5

CentOS7---Nginx安装并配置虚拟主机 - ChAnAn
source link: https://www.cnblogs.com/sre-chan/p/17324289.html
Go to the source link to view the article. You can view the picture content, updated content and better typesetting reading experience. If the link is broken, please click the button below to view the snapshot at that time.

1、源码安装nginx,并提供服务脚本
源码包的获取:官网下载
实验环境:和企业环境类似,关闭防火墙,禁用selinux,使用静态IP地址
安装步骤:
步骤一:安装Nginx所需的pcre库
[root@node01 ~]# yum install pcre-devel -y
步骤二:安装依赖包
[root@node01 ~]# yum -y install gc gcc gcc-c++ zlib-devel openssl-devel
步骤三:创建用户和用户组
[root@node01 ~]# groupadd nginx
[root@node01 ~]# useradd -s /sbin/nologin -g nginx -M nginx
步骤四:上传文件并解压到指定目录
[root@node01 ~]# wget http://tengine.taobao.org/download/tengine-2.2.0.tar.gz
[root@node01 ~]# tar xf tengine-2.2.0.tar.gz -C /usr/local/src/
[root@node01 ~]# cd /usr/local/src/tengine-2.2.0/
[root@node01 tengine-2.2.0]#
[root@node01 tengine-2.2.0]# ls
AUTHORS.te  CHANGES.cn  conf       docs     man       README           tests
auto        CHANGES.ru  configure  html     modules   README.markdown  THANKS.te
CHANGES     CHANGES.te  contrib    LICENSE  packages  src
步骤五:编译安装
./configure --user=nginx --group=nginx \
--prefix=/usr/local/src/nginx \
--with-http_stub_status_module \
--with-http_ssl_module \
--with-http_gzip_static_module
步骤六:make make install
[root@node01 tengine-2.2.0]# make && make install
步骤七:修改目录权限
[root@node01 tengine-2.2.0]# chown -R nginx.nginx /src/tengine-2.2.0/
服务脚本:
[root@node01 ~]# cat /usr/lib/systemd/system/nginx.service
t]
Description=nginx - high performance web server
Documentation=http://nginx.org/en/docs/
After=network.target remote-fs.target nss-lookup.target

[Service]
Type=forking
PIDFile=/usr/local/src/nginx/logs/nginx.pid
ExecStartPre=/usr/local/src/nginx/sbin/nginx -t -c /usr/local/src/nginx/conf/nginx.conf
ExecStart=/usr/local/src/nginx/sbin/nginx -c /usr/local/src/nginx/conf/nginx.conf
ExecReload=/bin/kill -s HUP $MAINPID
ExecStop=/bin/kill -s QUIT $MAINPID
PrivateTmp=true

[Install]
WantedBy=multi-user.target
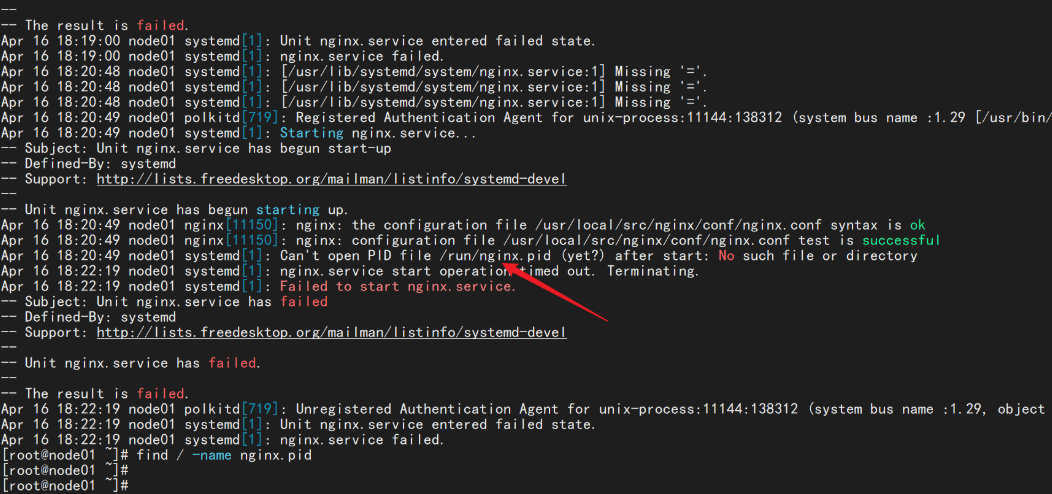
修改了PID文件
# 重新创建了一个PID文件
touch /usr/local/src/nginx/logs/nginx.pid

[root@node01 ~]# systemctl daemon-reload
[root@node01 ~]# systemctl restart nginx.service
[root@node01 ~]#
[root@node01 ~]#
[root@node01 ~]# ss -lntup | grep 80
tcp    LISTEN     0      128       *:80                    *:*                   users:(("nginx",pid=13454,fd=6),("nginx",pid=13452,fd=6))
tcp    LISTEN     0      80     [::]:3306               [::]:*                   users:(("mysqld",pid=1202,fd=28))
[root@node01 ~]#
[root@node01 ~]#
[root@node01 ~]# systemctl stop  nginx.service
[root@node01 ~]#
[root@node01 ~]#
[root@node01 ~]# ss -lntup | grep 80
tcp    LISTEN     0      80     [::]:3306               [::]:*                   users:(("mysqld",pid=1202,fd=28))
2、配置基于域名的虚拟主机
步骤一:进入默认主页路径
[root@node01 ~]# cd /usr/local/src/nginx/html/
[root@node01 html]# ll
total 8
-rw-r--r-- 1 root root 539 Apr 16 18:07 50x.html
-rw-r--r-- 1 root root 555 Apr 16 18:07 index.html
步骤二:备份原来默认主页并提供方一个测试页
[root@node01 html]# cp index.html{,.bak}
[root@node01 html]# vim index.html
<!DOCTYPE html>
<html>
	<head>
		<meta charset="utf-8">
		<title></title>
		<style>
			@keyframes myAnimation {
				from {
					width: 100px;
					height: 75px;
					background-color: yellow;
					border: 1px solid red;
				}

				to {
					width: 200px;
					height: 150px;
					background-color: green;
					border: 1px solid red;
				}
			}

			div {
				animation-name: myAnimation;
				transition-duration: 1s;
				transition-timing-function: ease;
				animation-iteration-count: infinite;
				animation-play-state: running;
				animation-direction: reverse;
				animation: myAnimation 10s infinite linear;
			}

			div:hover {
				display: none;
			}
		</style>
	</head>
	<body>
		<div>

		</div>
	</body>
</html>
步骤三:配置文件添加虚拟主机部分
[root@node01 conf]# pwd
/usr/local/src/nginx/conf
[root@node01 conf]# vim nginx.conf
server {
                listen 80;
                server_name bbs.openlab.edu;
                location / {
                root html/bbs;
                index index.html index.htm;
        }
}


        server {
                listen 80;
                server_name blog.openlab.edu;
                location / {
                root html/blog;
                index index.html index.htm;
        }
}
步骤四:没有做DNS服务,就配置一个hosts解析
[root@node01 conf]# cat /etc/hosts
127.0.0.1   localhost localhost.localdomain localhost4 localhost4.localdomain4
::1         localhost localhost.localdomain localhost6 localhost6.localdomain6
192.168.11.110 bbs.openlab.edu blog.openlab.ed
步骤五:准备默认主页
[root@node01 html]# for name in blog bbs;do mkdir $name;done
[root@node01 html]# for name in blog bbs ;do echo " $name test" > $name/index.html ;done
步骤六:重启服务测试
[root@node01 conf]# curl http://bbs.openlab.edu
 bbs test
[root@node01 conf]# curl http://blog.openlab.edu
 blog test
3、配置nginx基于用户和地址的访问控制
基于地址访问控制
server {
        listen 192.168.11.110:80;
        server_name bbs.openlab.edu;
        location / {
        autoindex on;
        root html/bbs;
        index index.html index.htm;
        deny 192.168.11.111;
        allow 192.168.11.0/24;
        deny all;
}
location /nginx_status {
        stub_status on;
        access_log off;
 }

 }
允许通过的地址:
[root@template ~]# ifconfig
ens32: flags=4163<UP,BROADCAST,RUNNING,MULTICAST>  mtu 1500
        inet 192.168.11.10  netmask 255.255.255.0  broadcast 192.168.11.255
        inet6 fe80::23ff:1697:647:7139  prefixlen 64  scopeid 0x20<link>
        ether 00:0c:29:bc:8b:08  txqueuelen 1000  (Ethernet)
        RX packets 589  bytes 49970 (48.7 KiB)
        RX errors 0  dropped 0  overruns 0  frame 0
        TX packets 968  bytes 115511 (112.8 KiB)
        TX errors 0  dropped 0 overruns 0  carrier 0  collisions 0

lo: flags=73<UP,LOOPBACK,RUNNING>  mtu 65536
        inet 127.0.0.1  netmask 255.0.0.0
        inet6 ::1  prefixlen 128  scopeid 0x10<host>
        loop  txqueuelen 1000  (Local Loopback)
        RX packets 0  bytes 0 (0.0 B)
        RX errors 0  dropped 0  overruns 0  frame 0
        TX packets 0  bytes 0 (0.0 B)
        TX errors 0  dropped 0 overruns 0  carrier 0  collisions 0

[root@template ~]# curl http://bbs.openlab.edu
 bbs test
拒绝的地址:
[root@node02 ~]# ifconfig
ens32: flags=4163<UP,BROADCAST,RUNNING,MULTICAST>  mtu 1500
        inet 192.168.11.111  netmask 255.255.255.0  broadcast 192.168.11.255
        inet6 fe80::de65:5eb0:ef21:bfad  prefixlen 64  scopeid 0x20<link>
        inet6 fe80::e8bb:875c:36dc:9aac  prefixlen 64  scopeid 0x20<link>
        ether 00:0c:29:b0:1e:37  txqueuelen 1000  (Ethernet)
        RX packets 705  bytes 60926 (59.4 KiB)
        RX errors 0  dropped 0  overruns 0  frame 0
        TX packets 1180  bytes 141313 (138.0 KiB)
        TX errors 0  dropped 0 overruns 0  carrier 0  collisions 0

lo: flags=73<UP,LOOPBACK,RUNNING>  mtu 65536
        inet 127.0.0.1  netmask 255.0.0.0
        inet6 ::1  prefixlen 128  scopeid 0x10<host>
        loop  txqueuelen 1000  (Local Loopback)
        RX packets 0  bytes 0 (0.0 B)
        RX errors 0  dropped 0  overruns 0  frame 0
        TX packets 0  bytes 0 (0.0 B)
        TX errors 0  dropped 0 overruns 0  carrier 0  collisions 0

[root@node02 ~]# curl -I  http://blog.openlab.edu
HTTP/1.1 403 Forbidden
Server: Tengine/2.2.0
Date: Sun, 16 Apr 2023 11:45:53 GMT
Content-Type: text/html
Content-Length: 589
Connection: keep-alive
基于用户控制
对于实现访问网站或目录密码认证保护,nginx的HTTP基本认证模块(HTTP Auth Basic)可以实现。这个模块提供基于用户名与密码的验证来保护你的站点或站点的一部分
# 在location中添加这俩行
auth_basic  "Restricted";
auth_basic_user_file /usr/local/nginx/webpass;


server {
                listen 80;
                server_name bbs.openlab.edu;
                location / {
                root html/bbs;
                index index.html index.htm;
                auth_basic  "Restricted";
                auth_basic_user_file /usr/local/src/nginx/webpass;

        }
}
创建账号密码, 此账号密码就是用户访问网站时需要输入的
[root@node01 conf]# yum install httpd-tools -y
使用方法:
[root@node01 conf]# htpasswd -cm /usr/local/src/nginx/webpass tom
New password:
Re-type new password:
Adding password for user tom

[root@node01 conf]# more /usr/local/src/nginx/webpass
tom:$apr1$mlWgXfOz$6j4C758K/wsTDDdQtFH990
重新加载 Nginx 使配置修改生效
浏览器测试:
[root@node01 conf]# yum install elinks.x86_64 -y
[root@node1 ~]# elinks http://bbs.openlab.edu/nginx_status
Recommend
About Joyk
Aggregate valuable and interesting links.
Joyk means Joy of geeK