Sound your yawp over the rooftops of the world!
“I sound my barbaric yawp over the rooftops of the world” , from Song of Myself by Walt Whitman.
Spring 2020:
Alphorns, also known as Alpine Horns or Alpenhorns, make a warm, rich, sonorous, mysterious sound; their history is old and married to the Alps. They are beautiful pieces of woodworking also. I wanted to play one, so I set out to build one. I built the Alphorns shown below in my workshop in Wisconsin, USA.
Page Contents:
1. Background information on Alphorns
2. Photos of my finished Alphorn
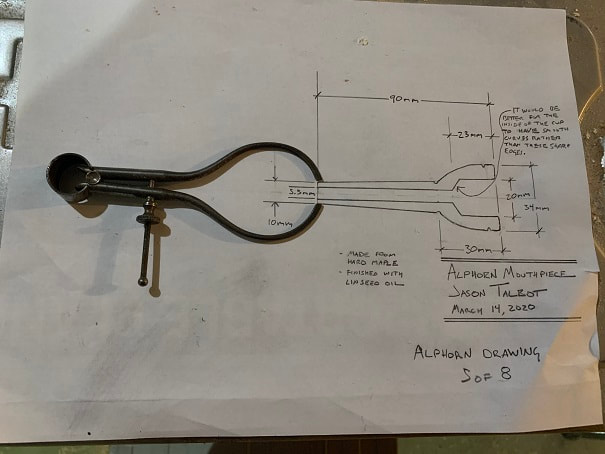
3. Alphorn and mouthpiece dimensional drawings
4. Build log of making alphorn mouthpieces
5. Complete build log of my first Alphorn. This Alphorn is made of Sitka Spruce, is a one-piece alphorn, and is fully wrapped with wooden reed wrapping.
6. Build log of my second alphorn. The intent of this 2nd alphorn was to build an alphorn from very inexpensive, readily available construction lumber, and also to build a lightweight horn that breaks down into 3 sections for easier transportation.
These are the two Alphorns that I built. Build-logs for both of these alphorns are on this page.
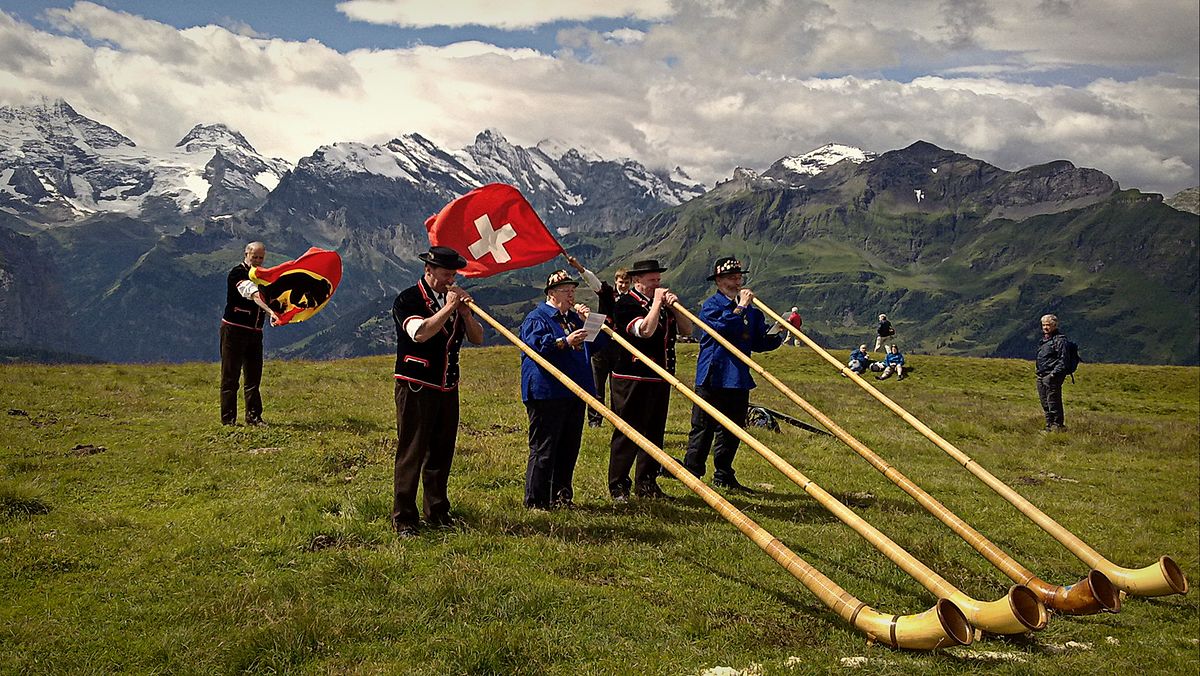
Alphorns being played in Switzerland; photo from Wikipedia.
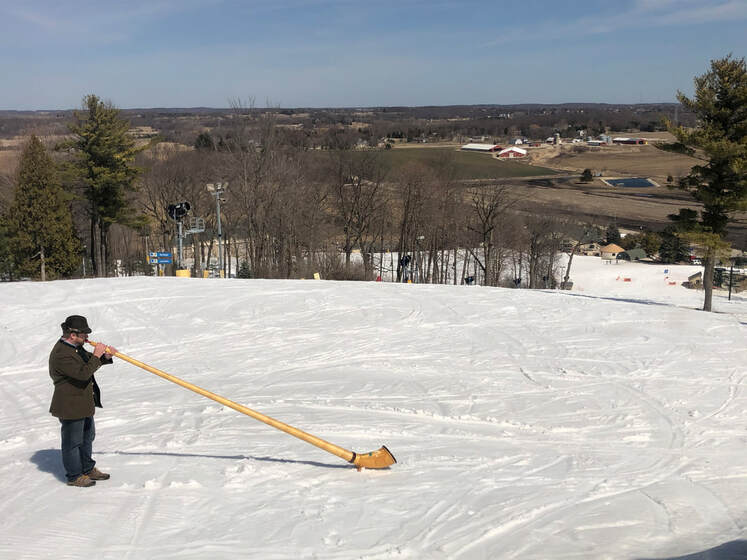
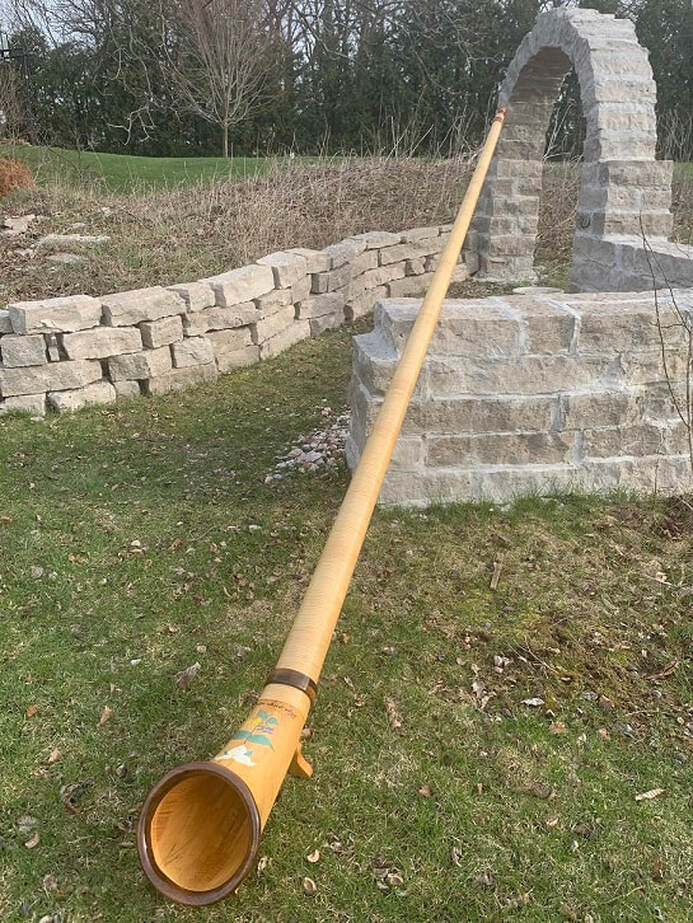
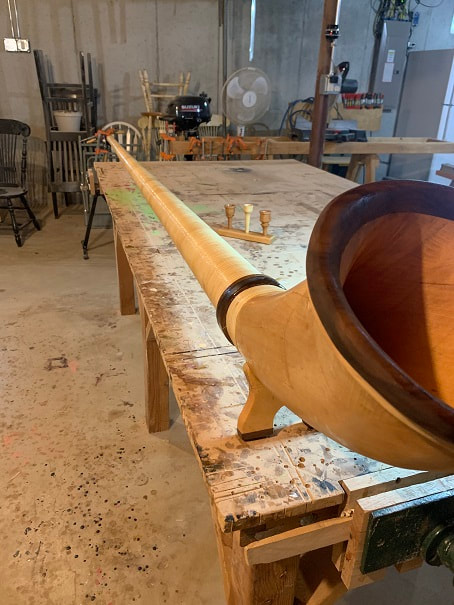
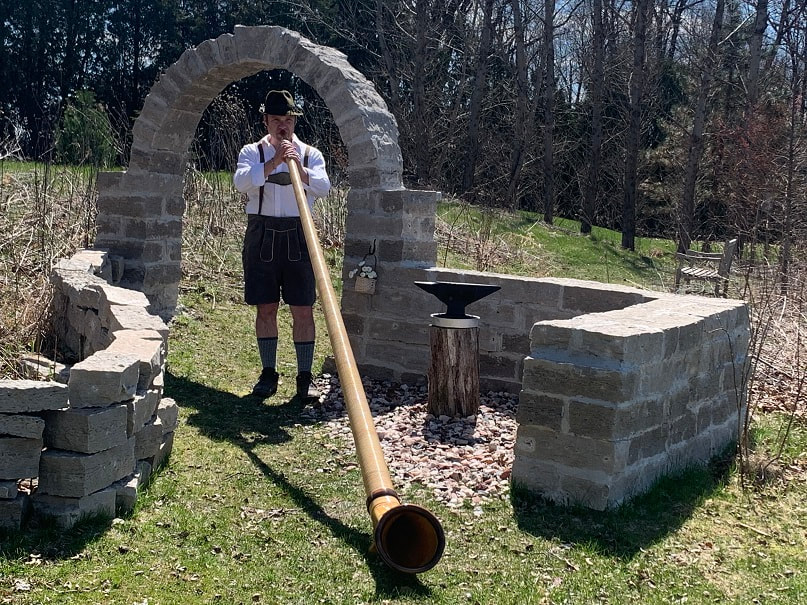
Here is the Alphorn that I built. The build log for this Alphorn is below. Photo taken March 21 at Ausblick Ski Hill in Wisconsin, USA.
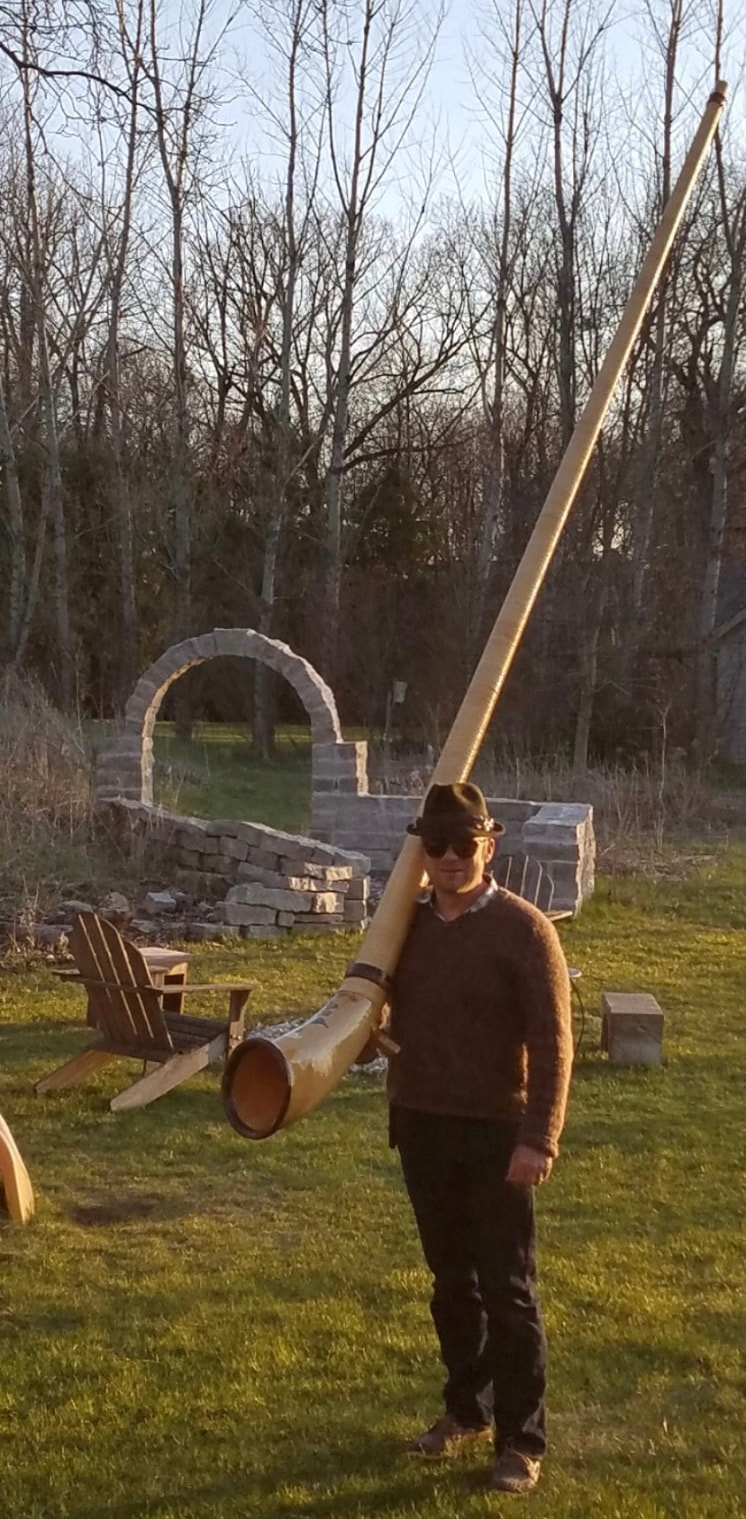
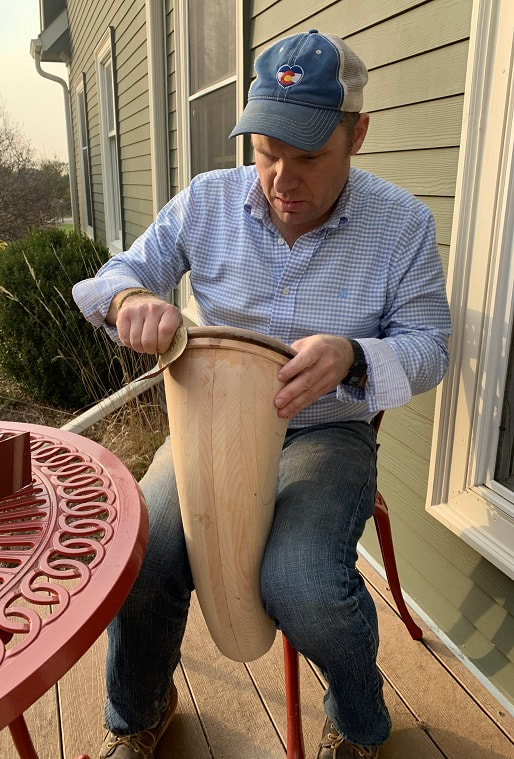
This is me and the homemade Alphorn I built; seeing a person in the photo helps show just how big these horns are.
I built my Alphorn to the tune of F. It is approximately 12' 3" long.
I built my alphorn of Sitka Spruce, with Black Walnut, Maple, and Cherry trim rings. On the bell, I painted local Spring wildflowers.
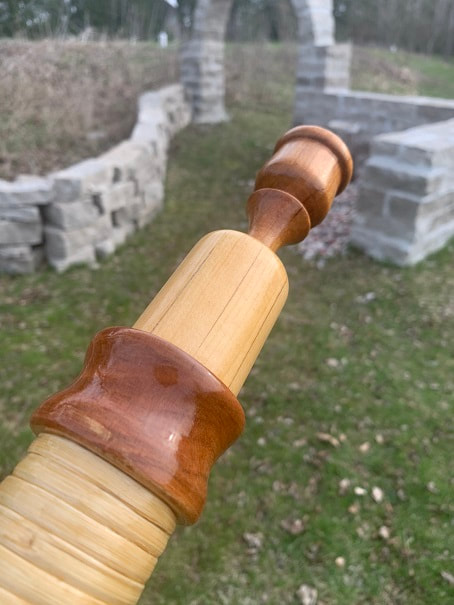
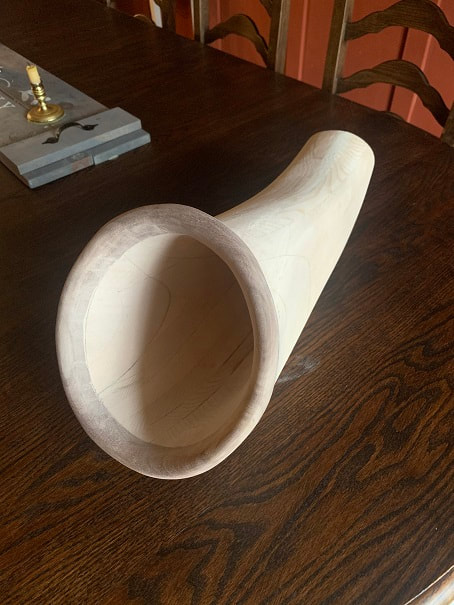
Mouthpiece end of my Alphorn
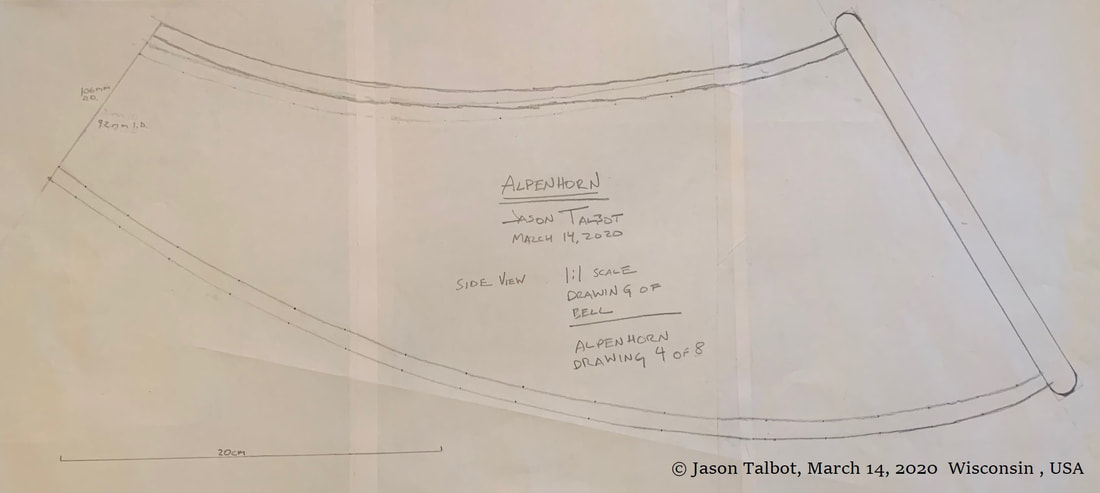
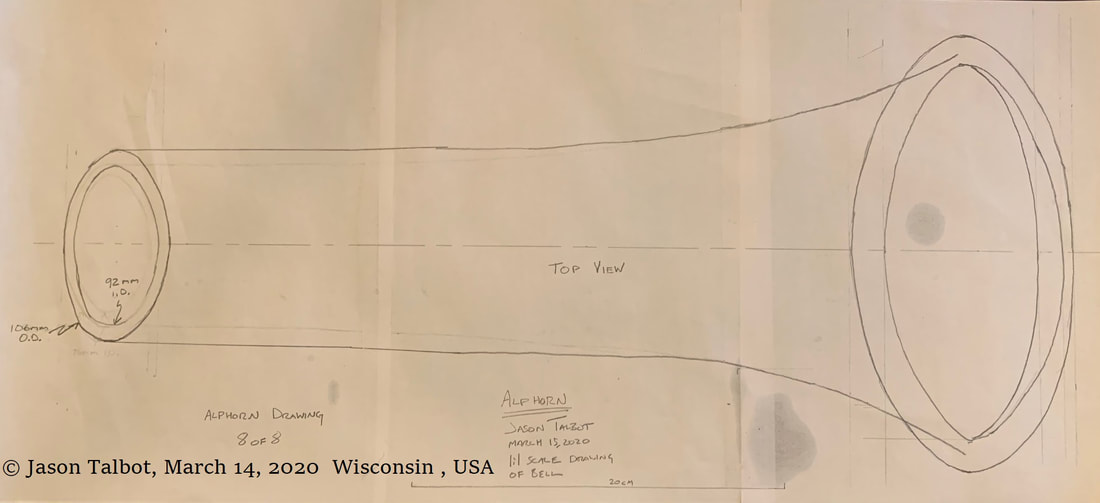
I decided to build an Alphorn tuned to F (approx. 373cm long or 12' - 3" long). The mouthpiece sizes seem to range from similar to a trombone mouthpiece on the large end, to similar to a French Horn mouthpiece on the smaller end. The smaller mouthpieces work better to play the melodies in the higher register. For reference the length of tubing in a trombone is about 9 feet. Regarding the shape of the Alphorn bell, I drew this from photos. I still had questions on the length of the main trunk of an alphorn, so I wrote an email to an Alphorn player, William Hopson, who gave me the great advice to build it a bit long and then trim it down to tune it. The drawings below are a result of my research.
Overview Video of the Construction of this Alphorn
Dimensional drawings and a detailed build log for this alphorn, may be found further down on this page.
A Brief History of Alphorns
These beautiful horns were built from spruce trees growing high in the Alps and were used by Alpine shepherds 2000 years ago to communicate with other people and to call grazing animals, and also to make music. Long ago, builders would choose a high mountain tree that grew out of a steep mountainside. After growing out from the mountainside, the tree would turn and grow vertically toward the sun, and the shape of the tree was used by the early builders of Alphorns to make the shape of the horn. The trees were split in half, carved out, the halves reattached, and the horn made. Alphorn playing declined in the late 1700's and early 1800's as they were needed less for communication. Efforts were made in Switzerland during the 1800's to promote the Alphorn due to its cultural significance, and the Alphorn has seen a resurgence in the last hundred and fifty years, and especially the last 40 years. They can be purchased online or at some stores, and there are Alphorn playing workshops and festivals in Europe and North America. It would seem that F is the most common pitch for alphorns in North America, while F# is common in Europe.
Alphorn Drawings by a Novice Alphorn Builder
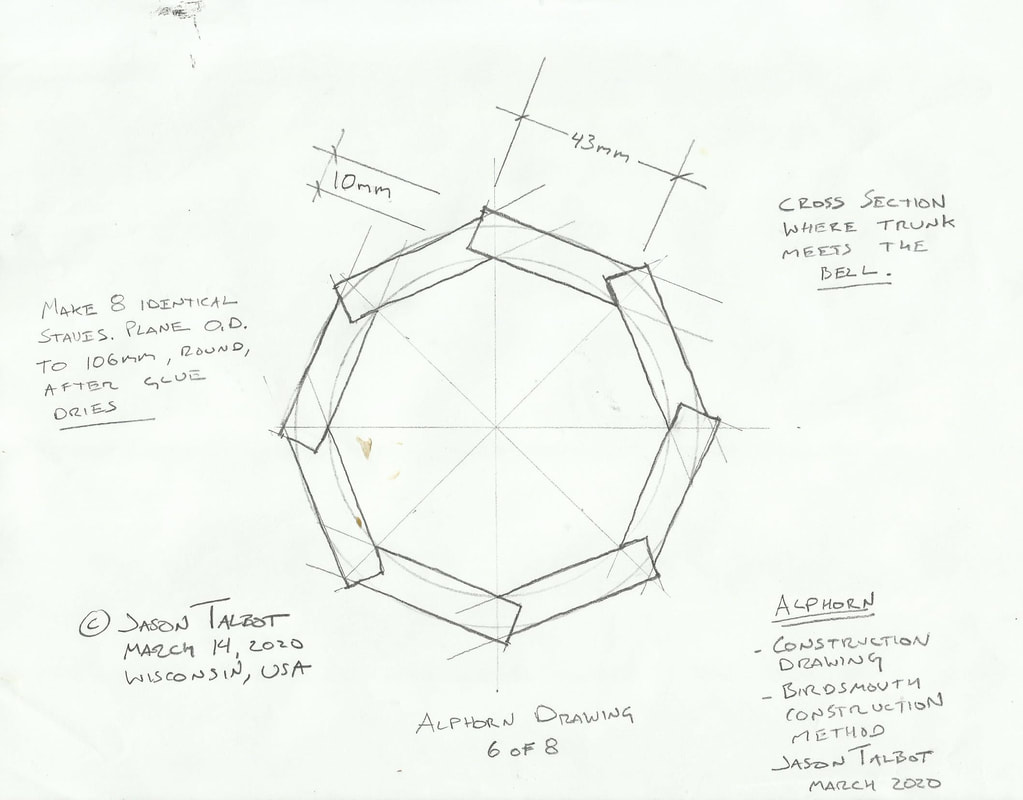
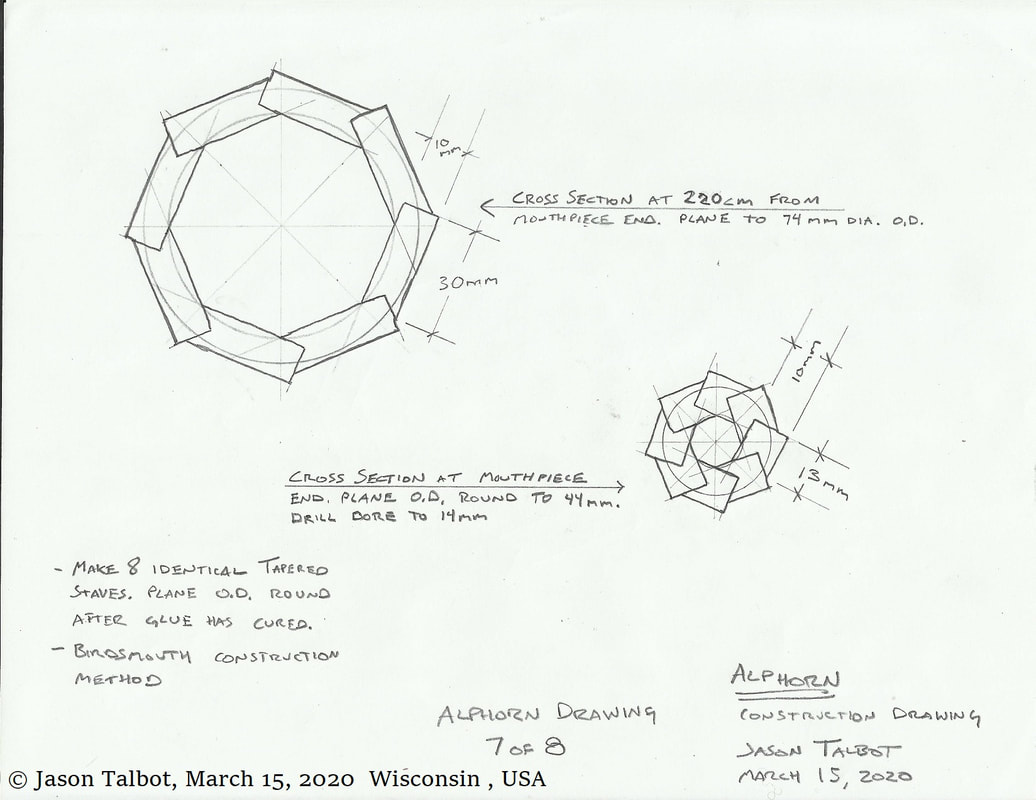
Now then, onto the alphorn I will build. After all my research, I hand-drew the drawings for building an Alphorn to best match what I had learned. I am not an experienced Alphorn maker, and this design is my design not a design from an Alphorn master. The dimensions are as traditional as I could make them but the construction method I will use is not traditional. I will make my Alphorn tube using the birdsmouth joinery
method used by shipbuilders to build ship masts. I used this method to build the Sitka Spruce mast on my sailboat. It is very strong joinery and I will use it to build my Alphorn. I believe that my method of building the bell and trunk of the alphorn, especially the birdsmouth construction technique will consume significantly less wood than gluing up solid blocks and hollowing them out, and will also allow me to make the trunk of the alphorn without specialty curved planes. You can make your own Alphorn!
Modern Alphorns available for purchase , come in three or four sections that one assembles into the Alphorn prior to playing it. This makes transporting the Alphorn much easier. Mine will be a one piece Alphorn!
These are decidedly European instruments, so I used the metric system in my drawings. I do not claim to be an authority on Alphorns, this is simply my documentation of the one that I built. In my notes below I use both metric and imperial notation, apologies for any confusion.
Feel free to use these drawings for building an Alphorn for your own use, contact
[email protected] for permission to reproduce these drawings for any purpose other than building an Alphorn for your own use.
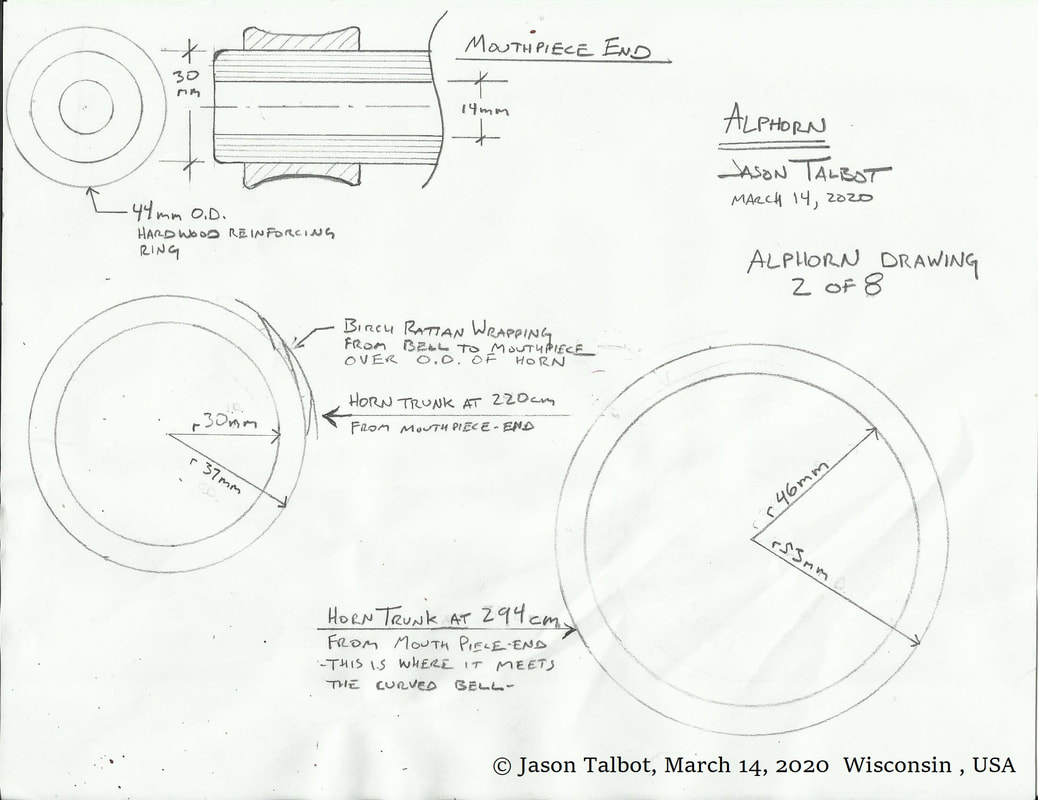
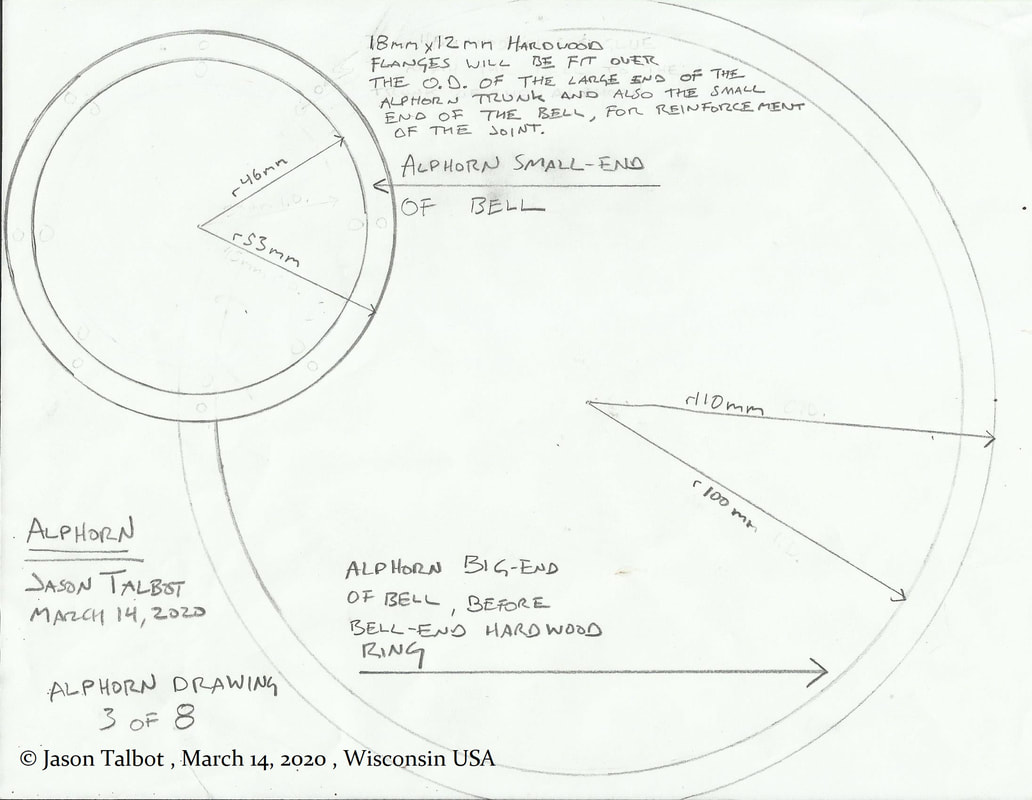
Alphorn, or Alpen Horn, or Alpine Horn, general arrangement drawing with Alphorn dimensions.
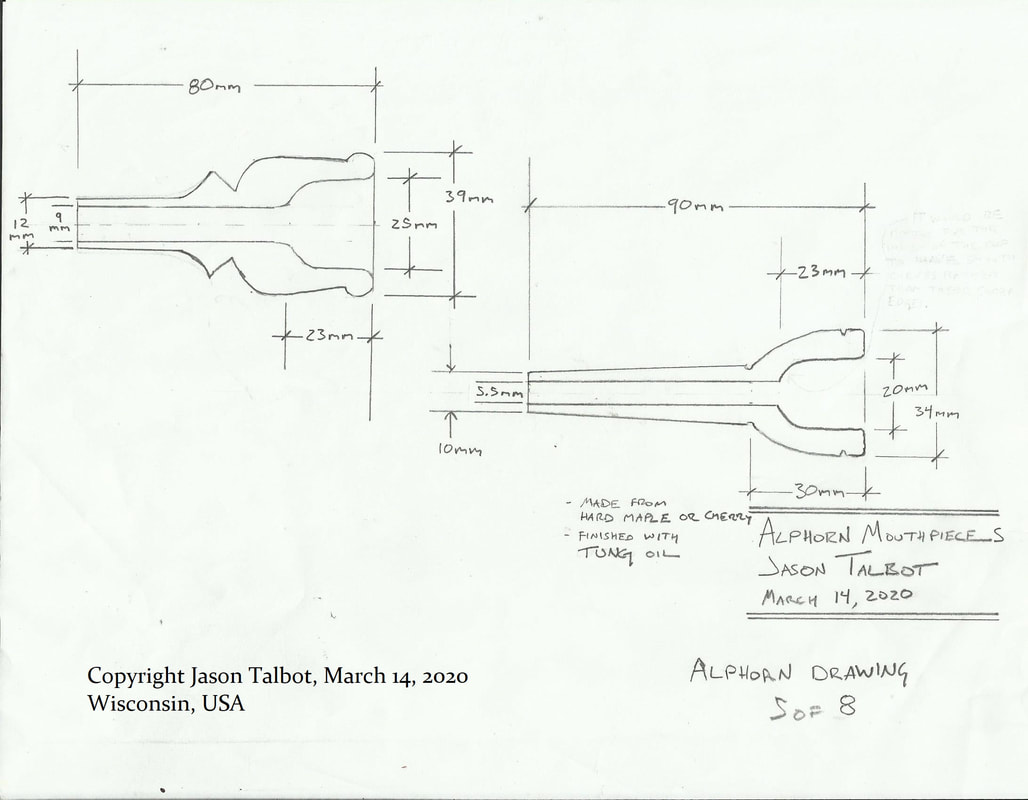
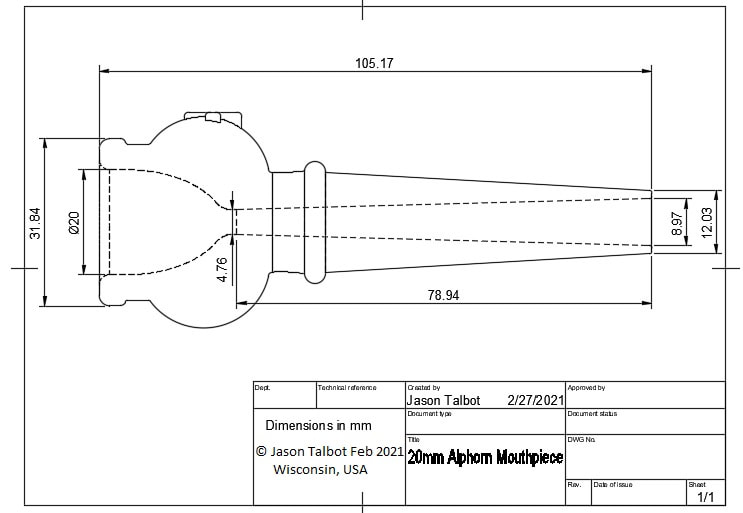
Alphorn mouthpiece dimensions. One can make an endless range of mouthpieces with varying cup diameters, cup depth, cup shape, rim width and shape, bore diameter and shape. The bore should reduce to around 3/16" at the base of the bowl, and then expand out to 5/16
or so at the discharge end of the mouthpiece, but with my tools, I am limited to straight bores when making the mouthpiece from wood. I have made three so far, all pictured further below on this page. Smaller diameter mouthpieces can help playing higher notes, and larger diameter mouthpieces can be better suited for lower notes.
See improved mouthpiece drawings below! Including tapered inner bore. I think the tapered inner bore plays better and sounds better.
Here is my latest 20mm alphorn mouthpiece design, including a tapered inner bore.
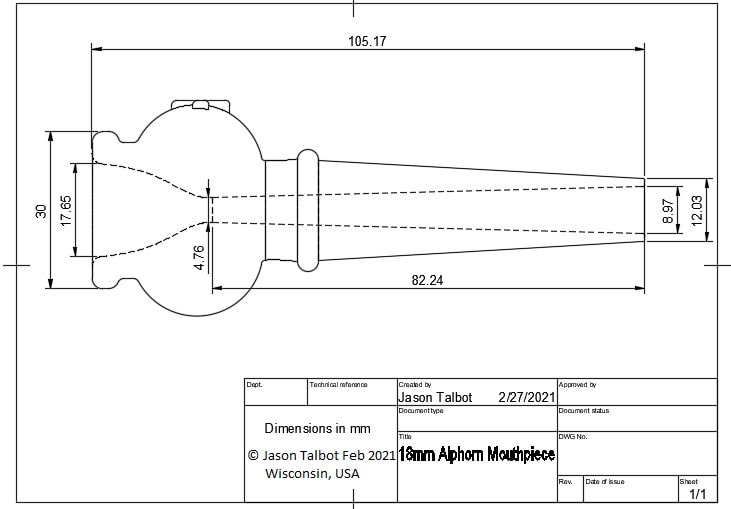
Here is my latest 18mm alphorn mouthpiece design, including a tapered inner bore.
MATERIALS: This Alphorn will be built from Sitka Spruce from the pacific northwest, hard maple from I tree I cut down years ago, and Black Walnut.
GLUE: I will use Titebond III glue for most of this project. In three places, I will use a 2-part epoxy: I will use two-part epoxy to glue the end rings to the bell, to glue the bell to the long trunk, and to glue the foot to the bell.
My guide to building an alphorn is below, but first, a section on making mouthpieces
Making an Alphorn Mouthpiece
I have been experimenting with making mouthpieces. I have made wooden ones from maple and cherry and have made 17mm, 18mm, 20mm, and 22mm 3D printed mouthpieces. 1st I will show some of the wooden ones I have made. These have straight internal bores, which I find do not play or sound as well as mouthpieces that have tapered internal bores as shown in the drawings above. I have purchased wooden mouthpieces that have tapered internal bores, and the 3D printed ones I make have tapered internal bores.
Here I will show examples of simple wooden mouthpieces and also plastic ones.
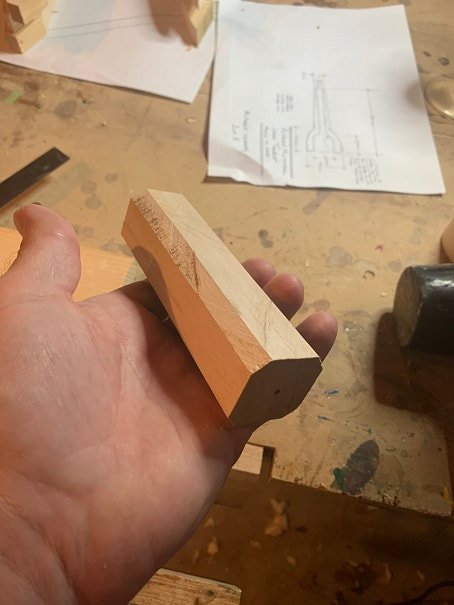
Maple is a traditional wood for the making of an Alpenhorn mouthpiece. I had cut down a hard maple that grew on my property in Thiensville, Wisconsin, about eighteen years ago, and I still had some sections of the trunk left. I made this mouthpiece from that tree.
Hard Maple blank , cut into a rough octagon before turning.
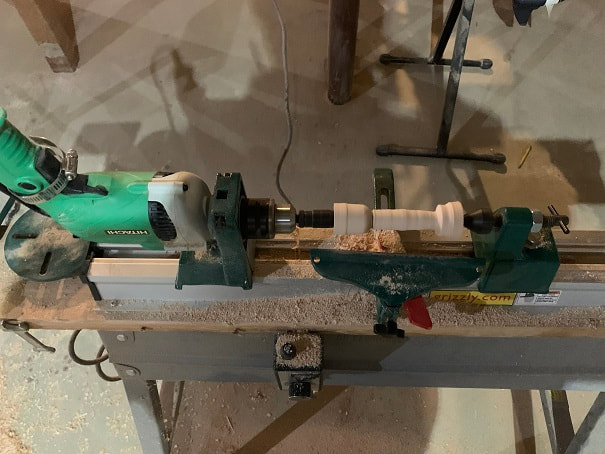
The start of turning the Alphorn mouthpiece.
Checking dimensions with a caliper, from drawing to the piece.
Checking dimensions from the drawing vs the work piece.
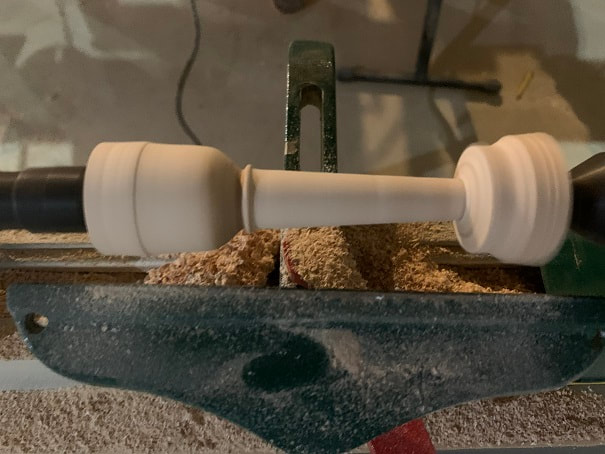
The Alphorn mouth piece is coming along.
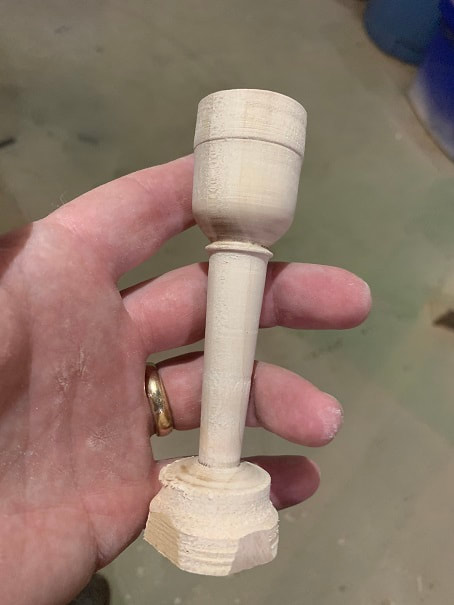
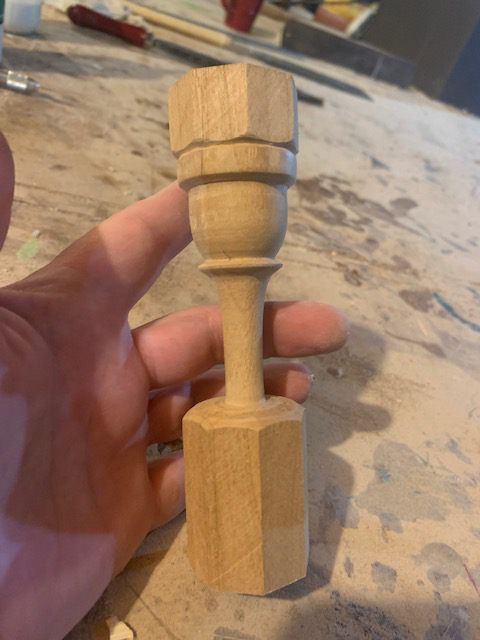
Here is the rough-turned and rough sanded Alphorn mouthpiece, removed from the lathe.
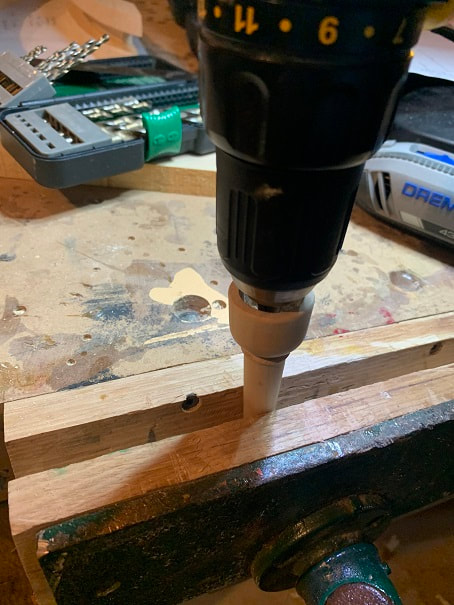
Drilling the bore through the stem of the mouthpiece
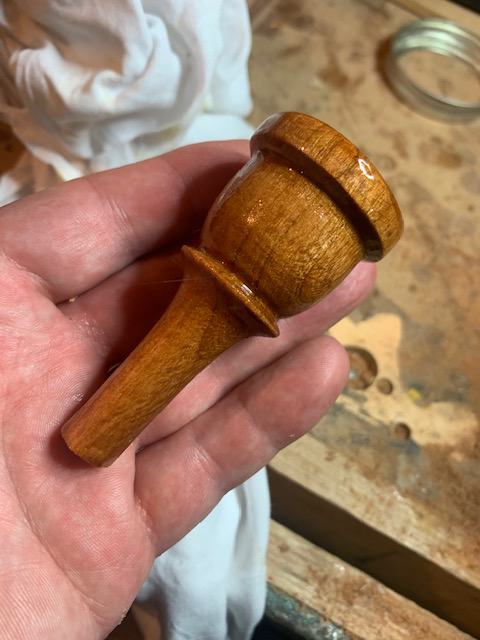
I played my Alphorn and the 1st mouthpiece worked well, but being used to a trombone mouthpiece I wanted one a bit bigger so I made one of cherry similar to a trombone mouthpiece. It is not a huge project to make these mouthpieces so I will make a few and try them.
Finished cherry Alphorn mouthpiece, a bit bigger than the maple one I made.
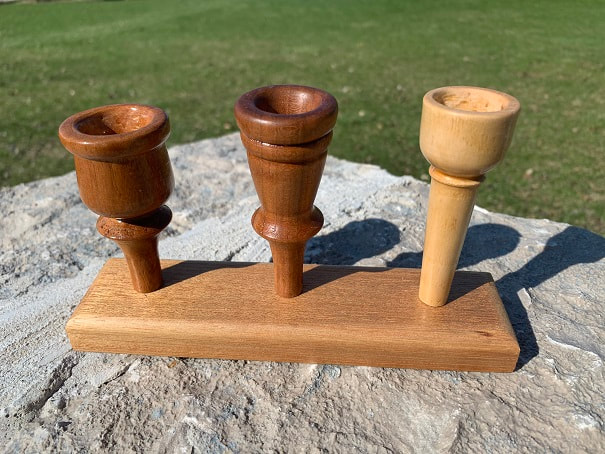
I have been experimenting with making and playing mouthpieces of different cup diameters, depth, internal shape, bore diameter, and rim width/shape. I have wound up so far with small, medium, and large versions of the mouth piece. Note that the outer shape of the cup does not reflect what the inner cup shape is....
Experimentation: 3D printed Alphorn Mouthpieces
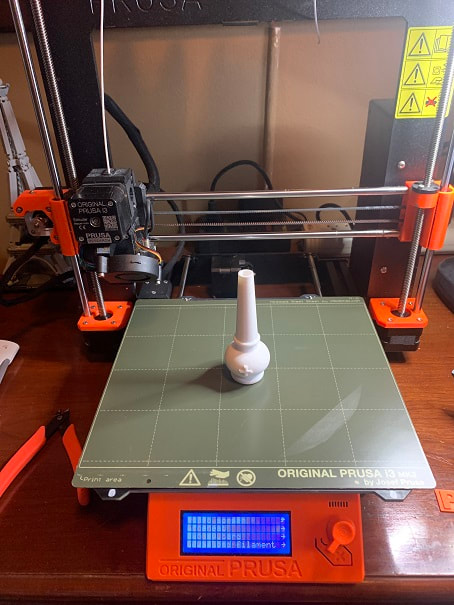
Designed on Fusion360 and printed in PETG on a Prusa MK3 i3 3D printer. These are 100% solid PETG and feature tapered inner bores as shown in the drawings above.
3D Printed Alphorn Mouthpiece. Printed in PETG material.
Here are some of my finished 3D printed PETG mouthpieces. The big opne is 25mm, followed by my favorite sizes: 18mm and 20mm.
Here are CAD .stl files for the 18mm and 20mm mouthpieces. When I open these in Fusion360, I find I need to scale them down by a factor of 0.1 in order for them to be the correct size (I am not sure why when I create an .stl file it changes the dimensions vs the original CAD file).
These are drawings are Copyright Jason Talbot Jan 2021. Please feel free to use them for making a mouthpiece for your own personal use, these drawings are not to be used for making mouthpieces for resale air any commercial purpose.
Below are two build logs of Alphorn projects.
1. The first is a Sitka Spruce Alphorn wrapped in wood reed. This is a one piece alphorn.
2. The second build log is for an Alphorn built out of low cost SPF (Spruce, Pine or Fir) construction lumber. This alphorn will not be wrapped in wood reed and will be cut into segments so that it can be disassembled.
Build Log 1 of 2: Making an Alphorn Out of Sitka Spruce and Wrapped with Wooden Reeds:
Sitka Spruce
Sitka Spruce is an amazingly clear and straight, vertical grained wood, with excellent strength-to-weight ratios. Due its high strength, low weight, straight grain, and minimal knots, Sitka Spruce is used for aircraft framework (including the Wright Flyer), sailboat masts, and it is also renowned for sound-quality in instruments.
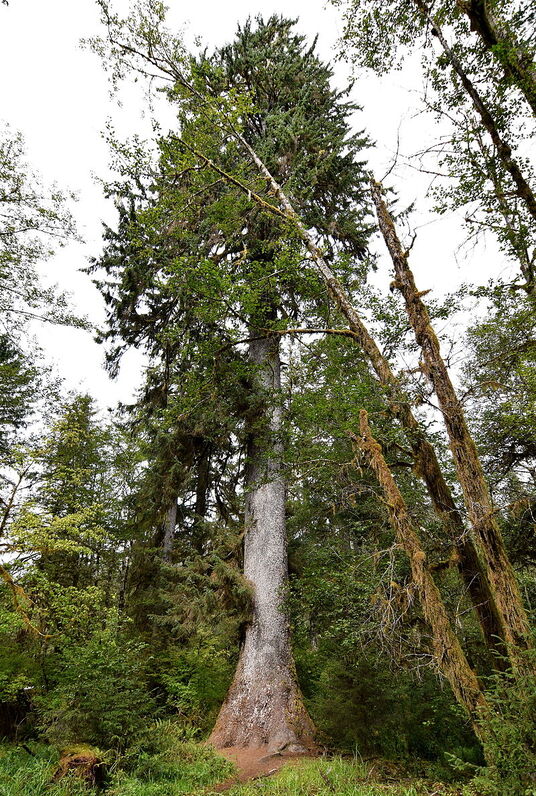
The tree itself is awe-inspiring. I plane and carve and cut this wood with the utmost respect, and have only used it for making such transcendental things as sailboat masts and spars, and musical instruments. The
Sitka Spruce grows in the Pacific Northwest of the USA and Canada. The Sitka Spruce is one of the few species on earth known to grow over 300 ft tall (over 90m). The forest of Sitka Spruce has been vastly diminished by logging, but on a positive note, it is considered a "species of least concern" regarding potential for extinction of the species. The largest of these trees were cut down in the past before the giants could be measured. The older trees do not even have branches on the lower 100 feet of the trunk. The Queets Spruce in Olympic National Park is 450 years old, and some Sitka Spruces are over 700 years old. All wood is special wood in its own way, and this also is very special wood.
Sitka Spruce, growing in Olympic National Park.
....and so, somberly, we reach the part where the tree (not necessary the tree in the picture) has been chopped down and milled into lumber for our use. I will turn this into an Alphorn, which is a noble end. I wish I could be of such a fine use after I bite the dust. I would be happy to return to the soil, and to do as Whitman suggests: from Leaves of Grass: "I bequeath myself to the dirt to grow from the grass I love, If you want me again look for me under your boot-soles." All trees are special, and these Spruce are special even amongst all trees; I will make the most of the wood.
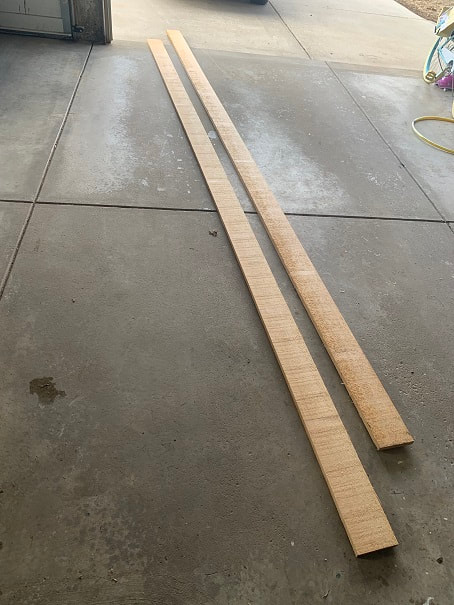
Two 4/4 x 6 x 17' rough sawn Sitka Spruce boards from McCormick Lumber in Madison Wisconsin. Dimensions are 1.0" x 6" x 17'. These are perfectly straight, straight and vertical grained board with no knots. I built the alphorn from these two boards, plus a 4/4 x 6" x 7foot board I had in the basement, at the end of the project I was left with a 4/4 x 4 x 8 foot piece of Sitka Spruce remaining from this raw material.
Here you can see why this is such a sought-after wood; tight, vertical, straight grain, with no knots over a 17' to 20' length.
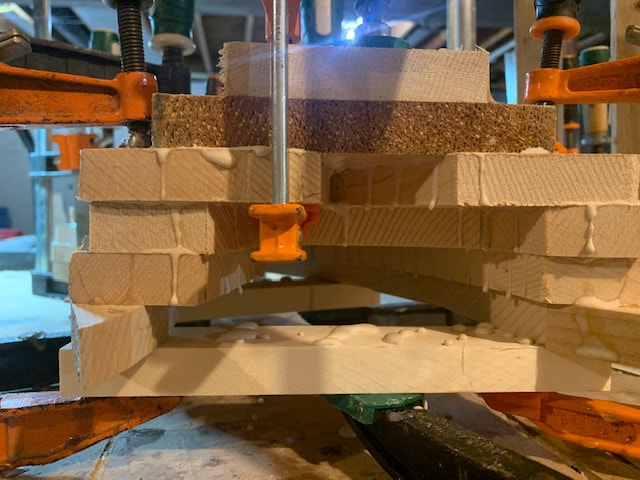
Making the Alpenhorn Bell
The bell will be built of Sitka spruce from laminated sections as shown below. After gluing the pieces together, I will carve them to round.
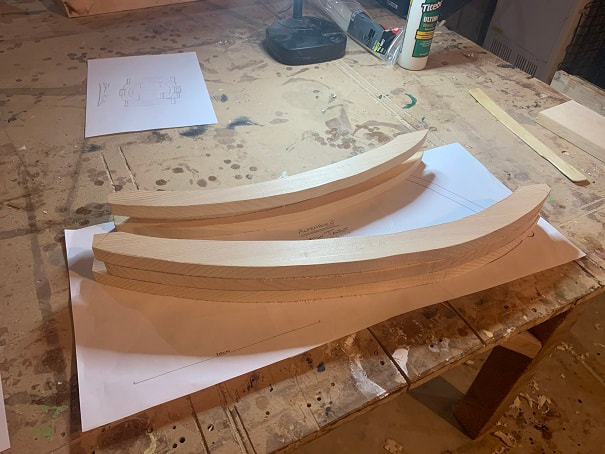
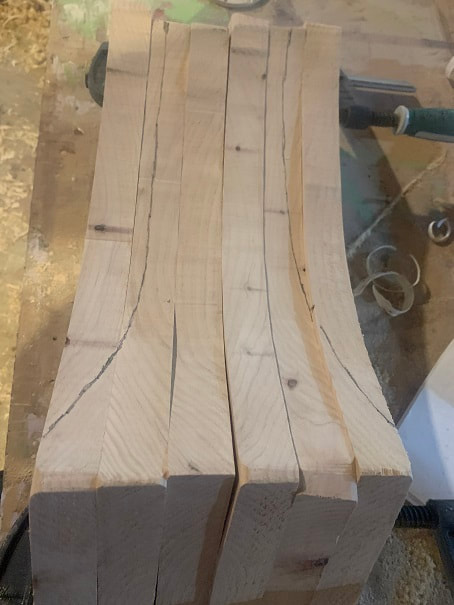
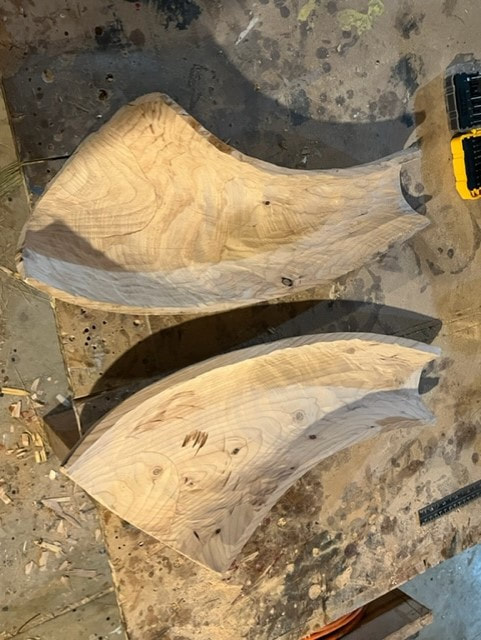
Sitka spruce pieces , cut to shape to build-up the laminations needed to make the Alpenhorn bell.
Here's what a little over one half of the bell laminations look like stacked up.
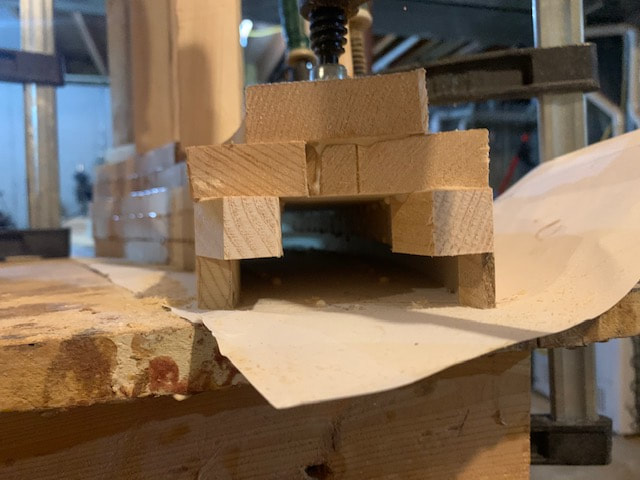
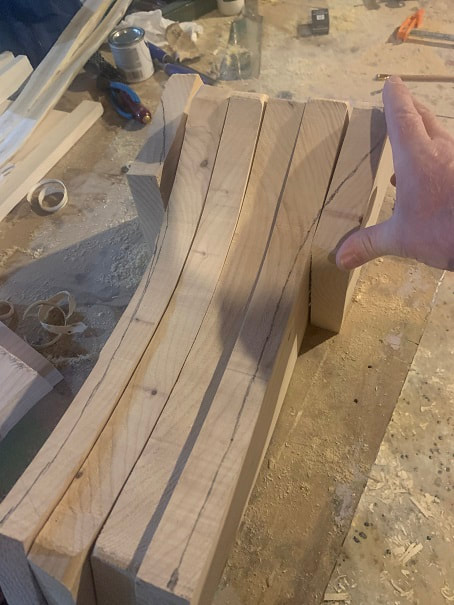
End-view of one half of the small end of the bell, rough at the initial glue-up stage.
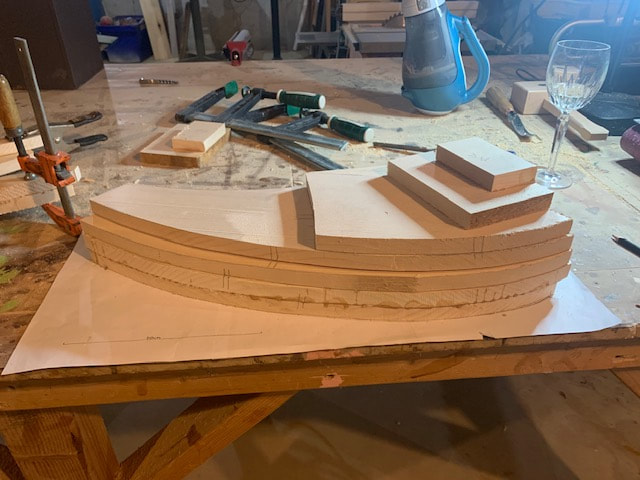
Here are both halves of the Alphorn bell at the stage of initial lamination glue-up.
End-view of one half of the large end of the bell, at the initial glue-up stage.
Large end of bell, not glued up yet, but showing that the halves match nicely.
I drew the line for the end of the bell and cut it using the Japanese pull saw. Do this carefully.
Trimming the small diameter end of the bell to length.
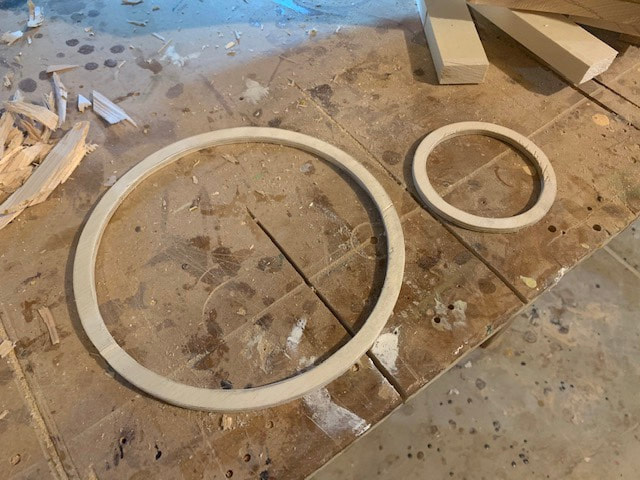
I made these templates out of 1/4” plywood. I will use them to trace the bell OD and ID onto the wood.
With the two halves clamped (but not glued!) together just right, I traced the final bell shape onto the ends using the templates I had made.
Then I used a mortise gage to mark the wall thickness along the length.
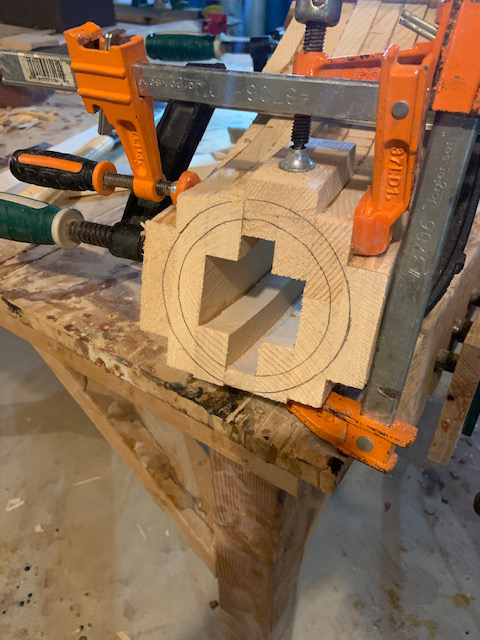
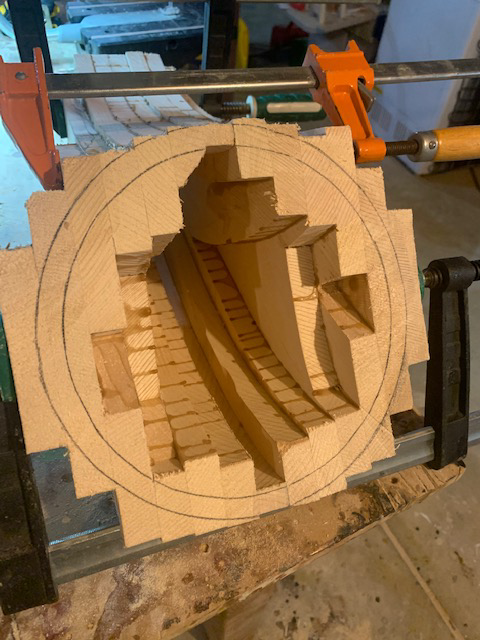
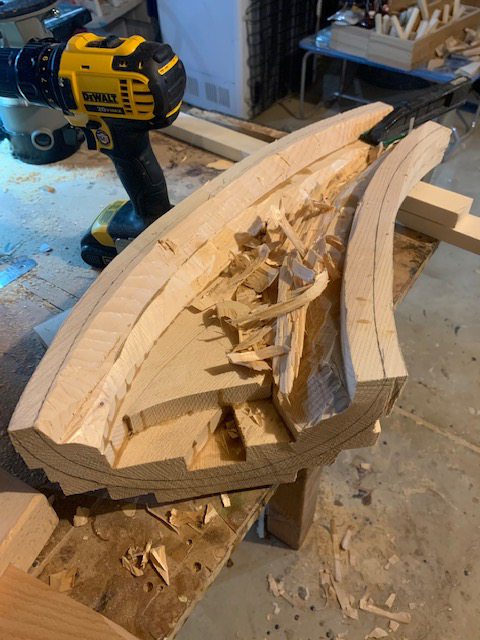
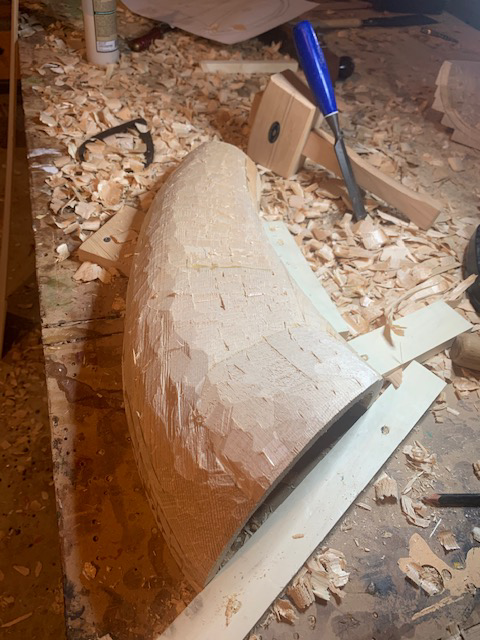
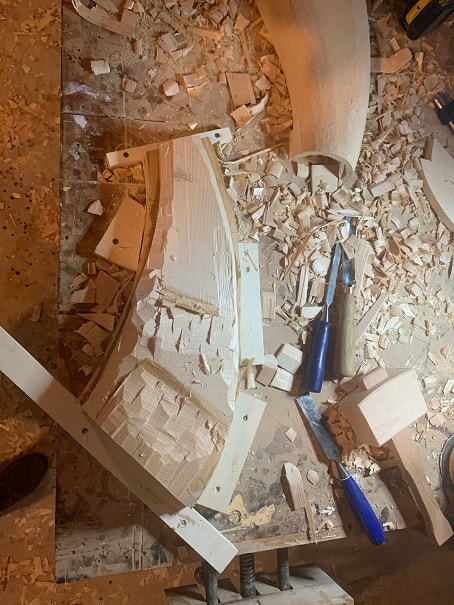
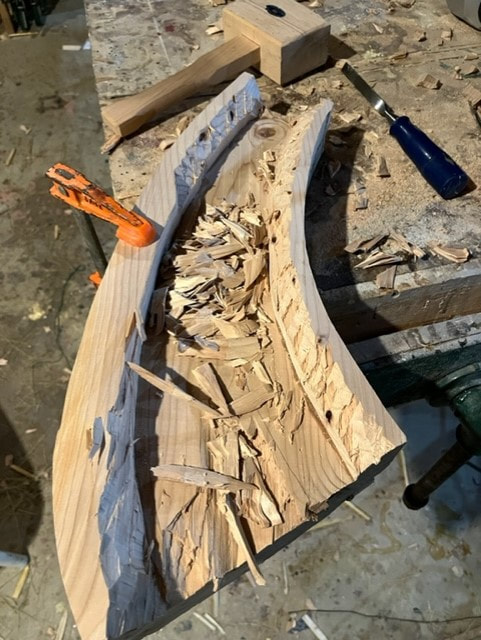
Carving out the inside of the Alphorn bell with chisel and mallet! I had an odd number of laminations, so this “half” of the bell is less than half of the bell.
I have left the OD uncarved as I carve out the ID, in attempt to maintain strength of the wood as I chisel away from the ID. The strength of the chisel blows will surprise a person, as this Sitka is strong. WATCH THE TREE GROWTH LINES and understand that that woods splits along the grain. After a short time carving, a person will understad this and use it to their benefit. I am using my straight chisels for almost all of this carving because straight chisels are soooo much easier to sharpen. As I get closer to the finished ID I will use my curved chisel.
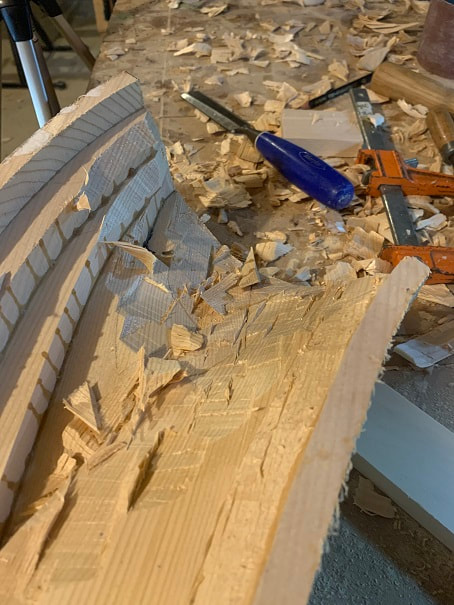
Still carving, carving, carving. Getting there. Soon I will start rough carving the outside of the bell.
Now I have to sand them smooth, but first I will carve the outer surface of the bell.
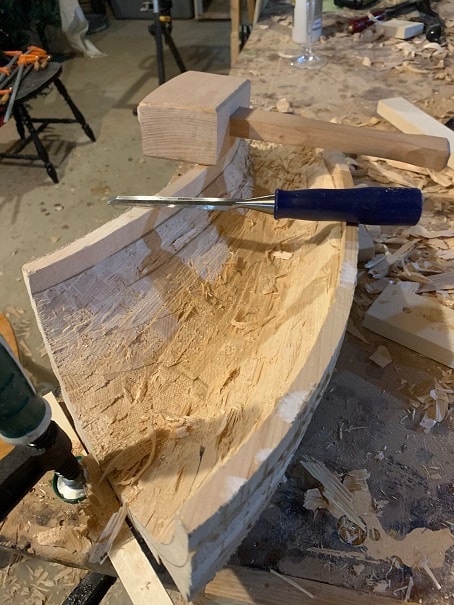
This half of the bell is flipped over and I will start rough carving the outside with a chisel.
Chipping away at the outer surface of the Alphorn bell.
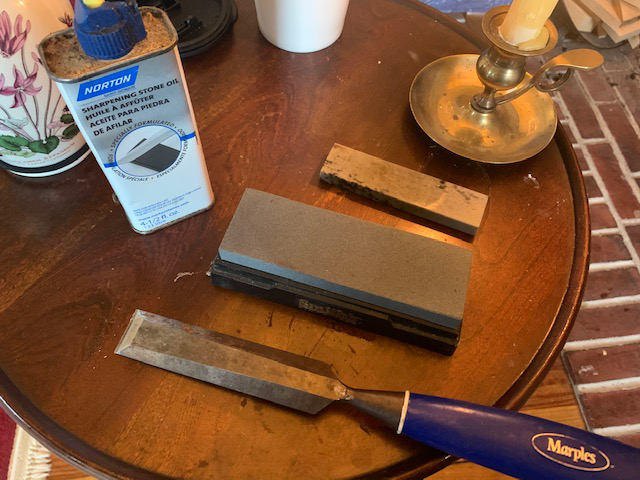
Sitka is pretty tough, especially for a softwood tree. Working with sharp tools is a necessity. Today I took a break to sharpen chisels.
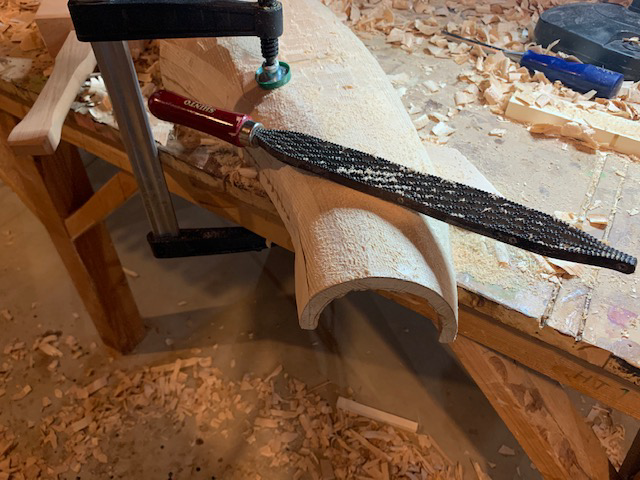
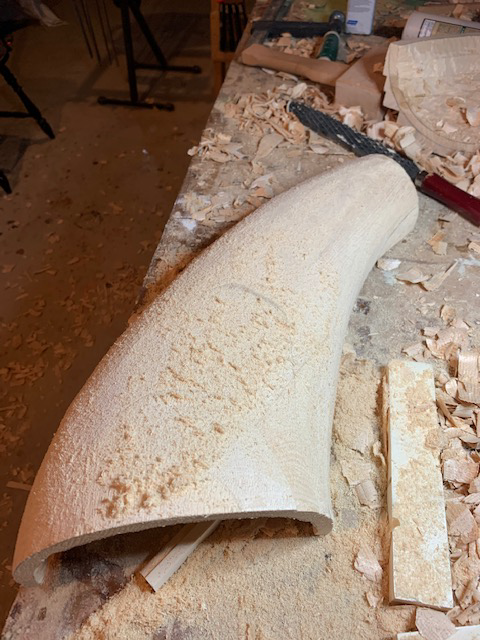
With chisel carving done, I will now smooth the exterior of the bell with a Shinto Rasp. The Shinto rasp is an amazing tool.
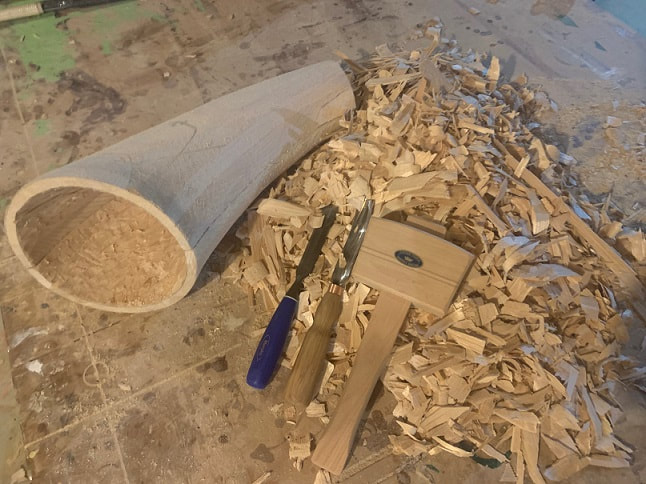
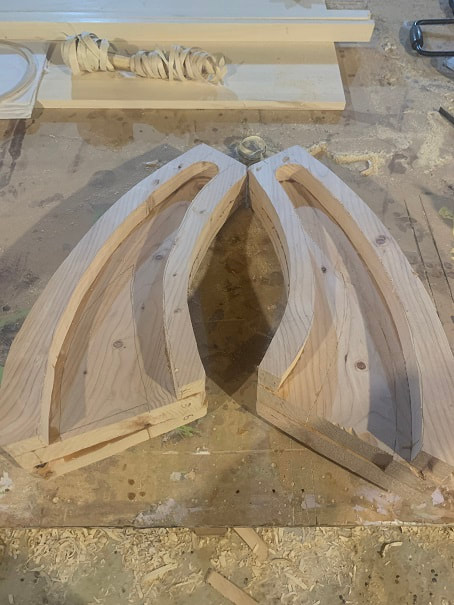
Here is one half of the Alpenhorn bell, with ID rough carved , and OD carved and rasped smooth.
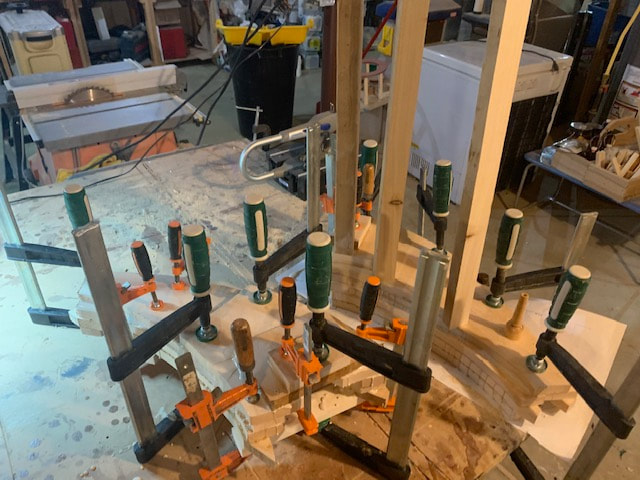
Now I will start carving the outside of the other half. One tricky aspect of carving this bell is holding it tight so that it doesn’t move as one carves it. Note the support blocks that I have screwed into the work table. After implementing this method of securing the workpiece, the carving became more efficient.
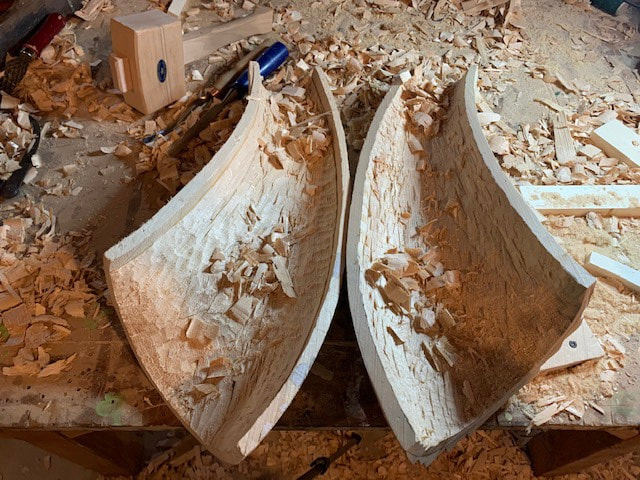
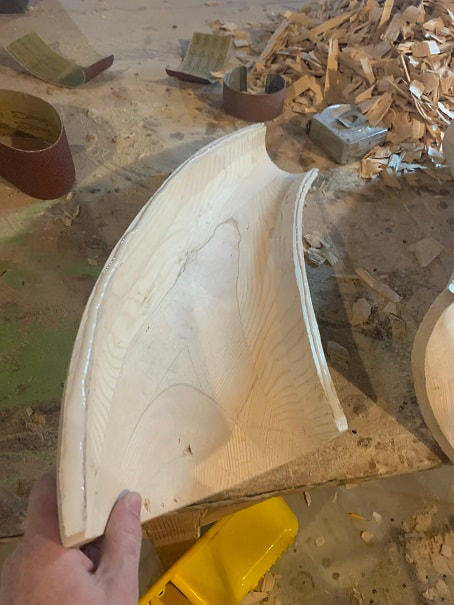
Here are the two Alphorn Bell halves, resting together. Next I will sand the insides, and then I will glue the halves together.
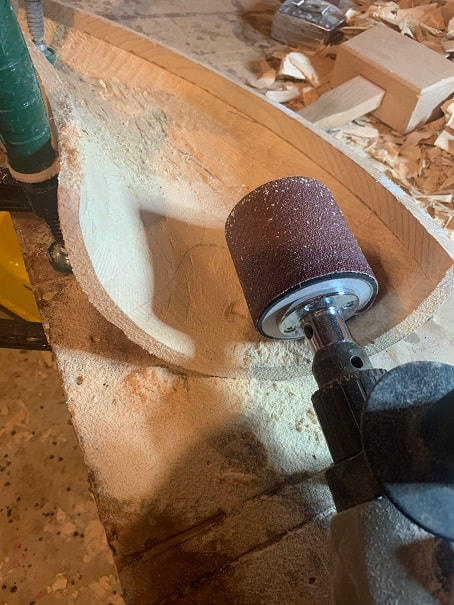
I used a 3" diameter x 3" long sanding drum, chucked in a 1/2" handheld electric drill to sand the ID of the bell.
Titebond III glue applied to both halves of the alphorn bell.
Moment of truth! It fit together nicely, this was a big moment in the project.
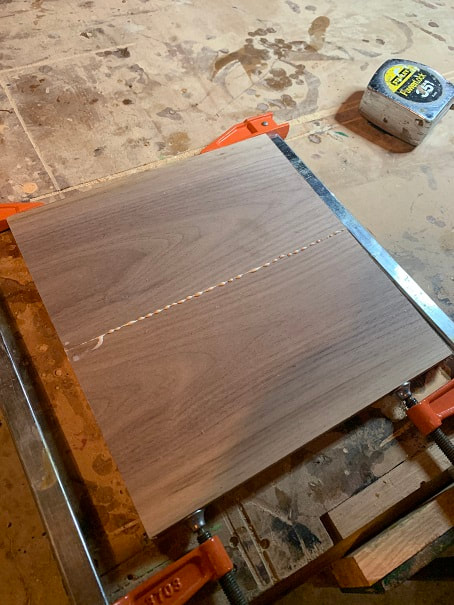
I selected a nice local wood, a dark hardwood, Black Walnut, for the ring at the end of the bell. This is a 10.5" x 10.5" x 3/4" glue-up.
The exterior of the bell has been rough sanded with a random orbit sander.
The ring assembly on the end of the bell will consist of two hardwood rings, a Black Walnut ring will fit up to the face of the endgrain of the bell, and the hard Maple ring will fit over the OD of the end of the bell.
Cut the OD of the ring, then I used a router to round over the edge, then used a sabre saw to cut out the ID.
Maple ring ready for installation
Black Walnut ring, ready for installation.
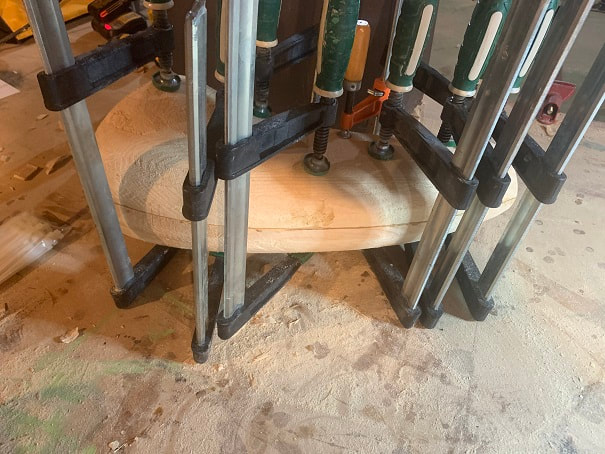
I used a two part epoxy to glue the rings to the bell and to each other. It's tough to see in the photo but the small end of the bell is resting up against a wooden brace to hold it in alignment so that the big face of the bell is laying flat on the ring. Be sure to wear latex gloves when working with epoxy.
Using a rasp to shape the flare of the ring at the end of the bell.
Sanding, sanding, sanding...
Rough sanding is all done.
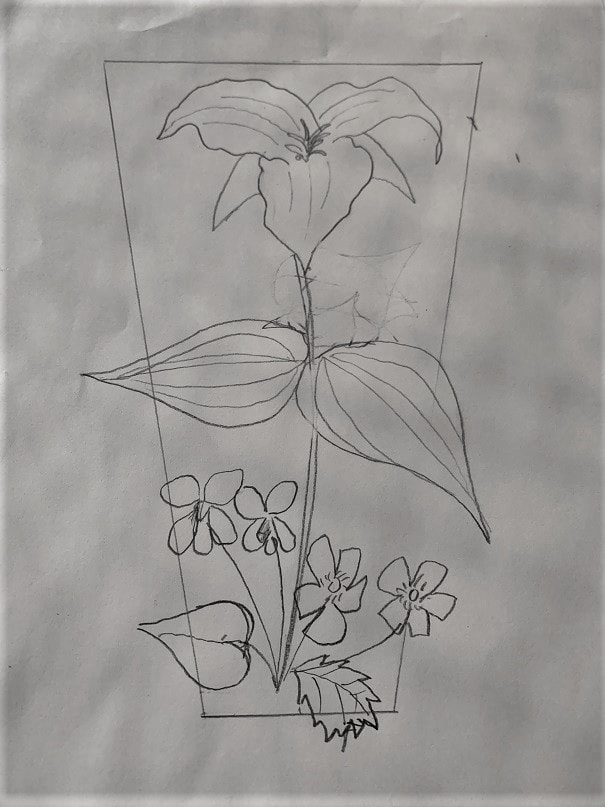
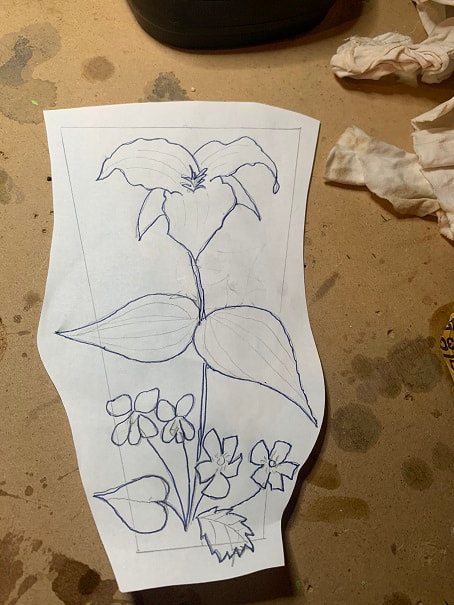
I measured out the approximate size of the space available for artowork on the top of the bell, and arrived at approx 8" Long x 2" at the narrow end x 5" at the wide end. I sketched out that area on a piece of paper and then sketched out the floral theme I will use. I drew springtime wildflowers that are native to my home here in Wisconsin; from left to right: Wood Violets, Trillium, and Buttercups.
At the large end of the trunk and the small end of the bell, I will epoxy Black Walnut ring flanges over the O.D. for reinforcement of that joint. Here are the rings in contruction.
Hardwood flange dry-fit on the end of the bell.
Making the long trunk of the Alpenhorn
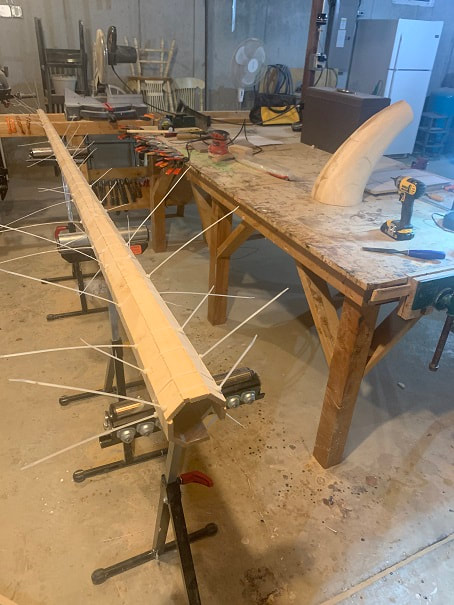
I built the long trunk (not sure the correct terminology for the long tube of the Alpenhorn, but I am calling it a trunk) of the Alphorn from Sitka Spruce, using the Birdsmouth construction technique, as shown in the drawings above. Here's how I did it.
IMPORTANT NOTE: I made the trunk of the Alphorn 6" (15.24cm) LONGER than shown on the drawing. The extra length was added to the mouthpiece end of the trunk. If I would have added the extra length to the bell-end of the trunk, the diameter would not have been correct where it meets the bell. I will trim the length of the mouthpiece end later when the horn is assembled in an attempt to tune the horn to F, hopefully this works.
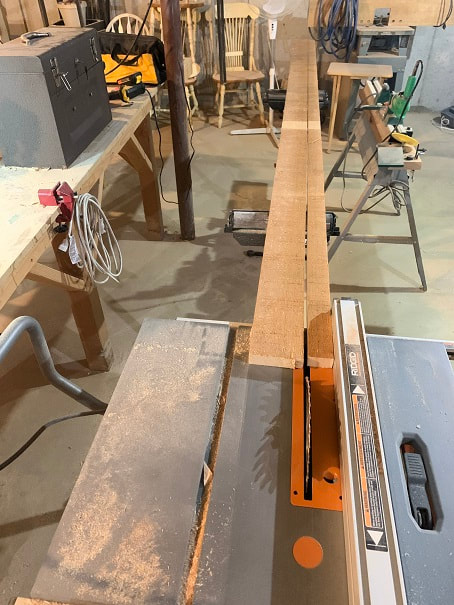
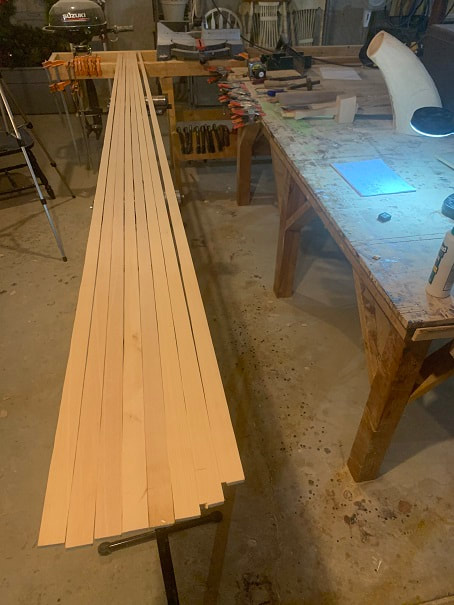
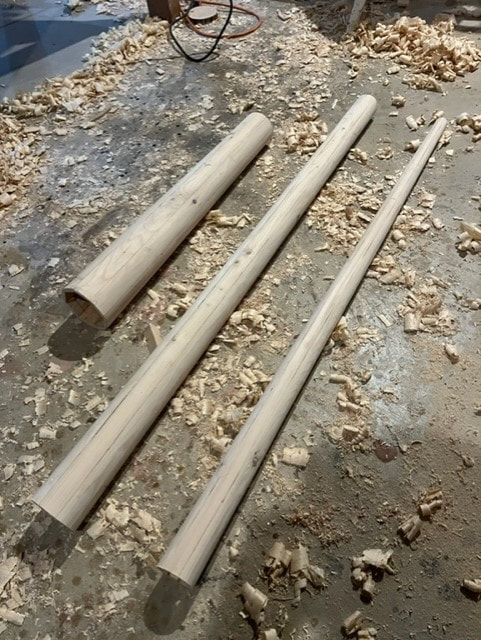
4/4 x 6" x 10.5 foot rough sawn Sitka spruce being ripped into three 2" wide pieces. I cut one more 2" wide strip from a second board of Sitka Spruce.
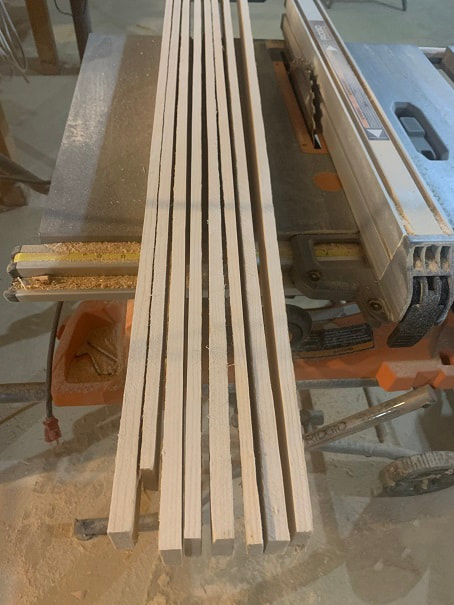
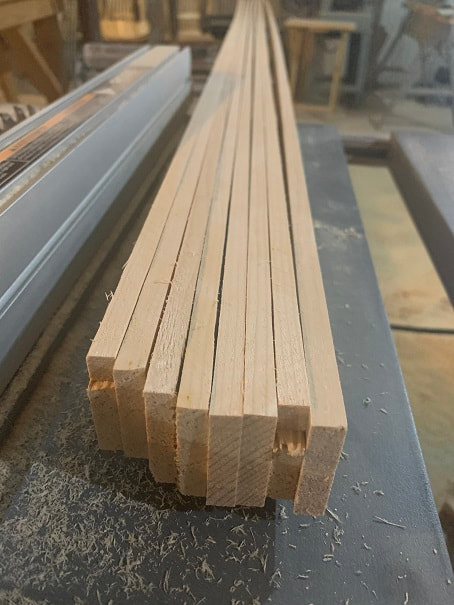
Then I carefully ripped each of those four pieces down the middle to wind up with eight 1/2" x 2" x 10.5' pieces.
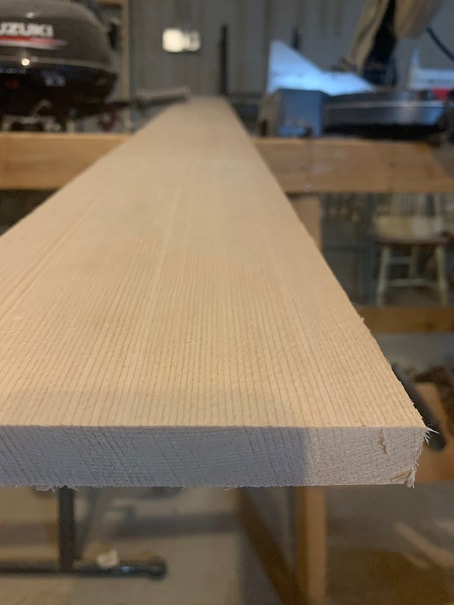
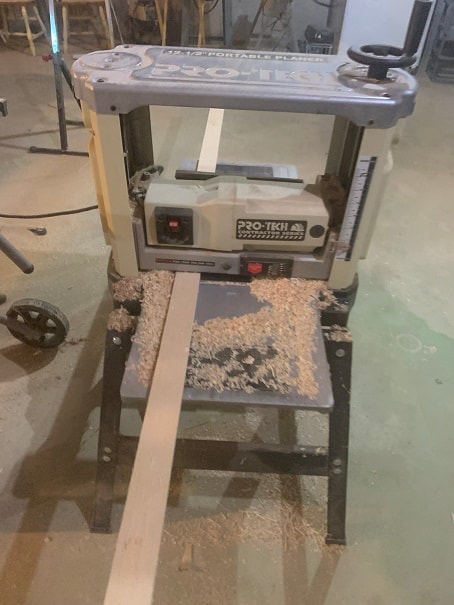
I will call these pieces that make up the trunk of the Alphorn, Staves. At this point I surface planed the staves to precisely 1cm thickness.
The staves are ripped to 43mm width. So now I have eight 10mm x 43mm full-length staves.
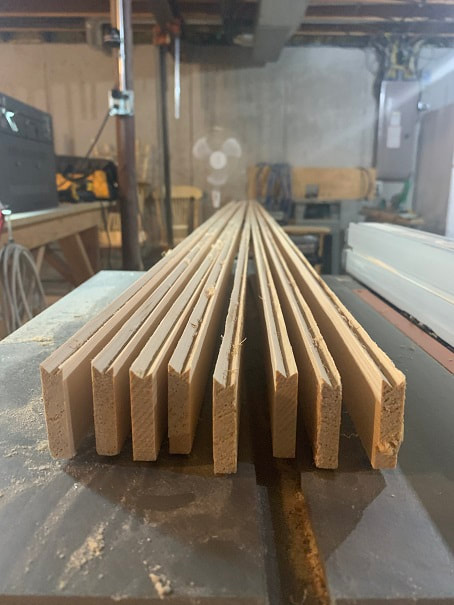
To cut the "birdsmouth" into the staves, carefully set the depth of the tablesaw, and carefully set the angle to 45deg and the fence in place. Test the cuts first on a piece of scrap wood cut to the exact same dimensions as the blank staves.
Here are the eight staves with the birdsmouths cut in.
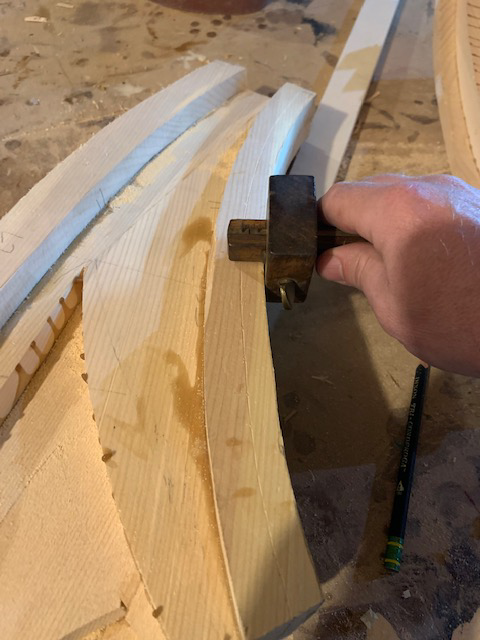
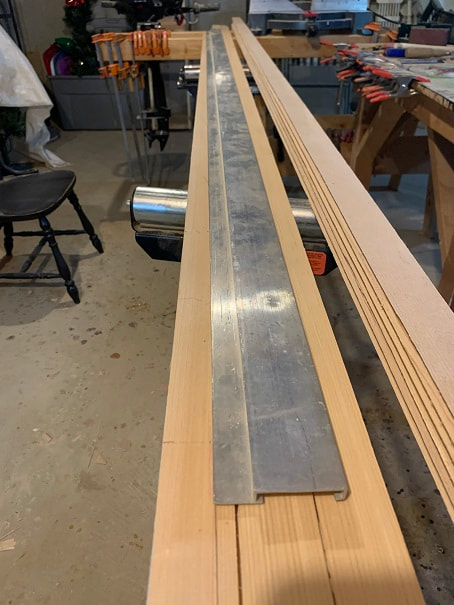
I used a long straight-edge to draw out the taper onto the first stave.
I cut the taper into the stave using a Sabre Saw and then traced out the taper on the remaining 7 staves.
Be attentive not to make the staves to big or too small. The dimensions in the drawing are exact; if your staves are a bit to big the inner bore of your alphorn will be to big. Double check and dry fit your staves and you can shave them a bit smaller if needed.
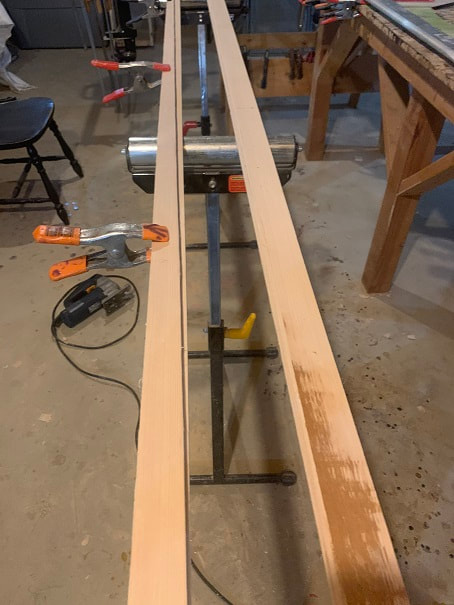
Here are all eight staves with the birdsmouths cut and the staves tapered to shape.
I cut three cradles from scrap plywood to assist in assembling the birdsmouth staves. I made sure they were perfectly level and straight.
NOW, dry fit the staves together and hold them together with zip ties. Check that the OD of the assembled staves is correct. You can still shave down the staves at this point to reduce the OD, but you cannot make it bigger.
First two staves of the birdsmouth Alphorn trunk glued together. Use ample glue and work fast!
The staves are vertical on either side. I made an inner support circle to help place the final staves on top, you can see this in the next photo, below.
I made the inner support circle from scrap wood including a little handle to make it easy to retrieve, and will remove it once all the pieces are locked in place.
Using zip ties to clamp the pieces together. Some jostling and pounding of the staves is necessary to make sure they are all seated in the birdsmouths. I am working down quickly with the zip ties from the large end to the small end.
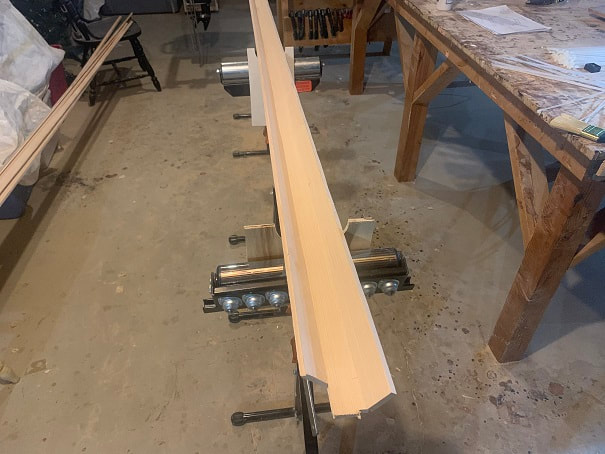
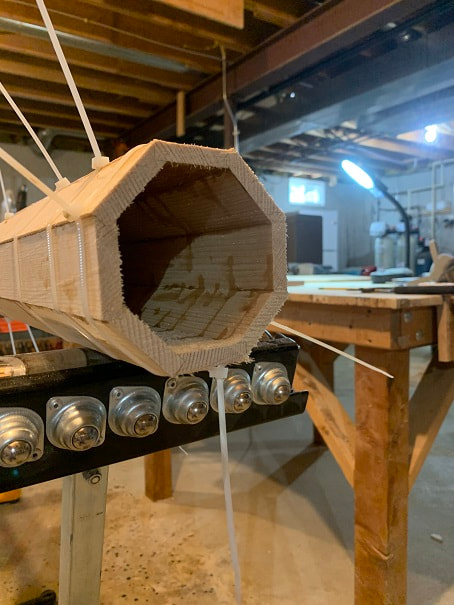
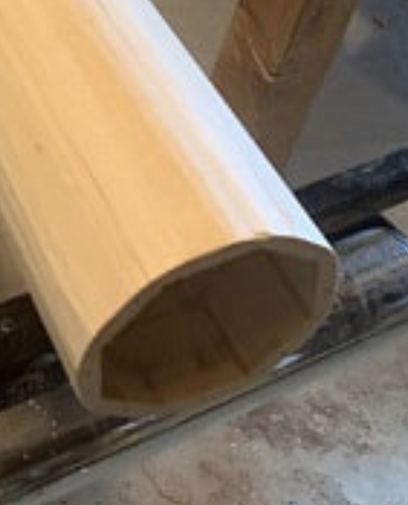
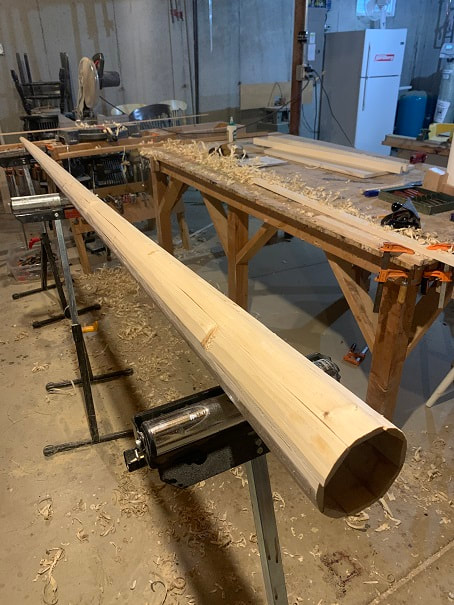
The trunk of the Alphorn is glued up using the birdsmouth technique. I pushed a damp rag through the bore to remove any glue blobs. I will let it dry a good and long time, and then will get to work planing the OD round.
I used the Japanese pull saw to trim the big end of the trunk to length.
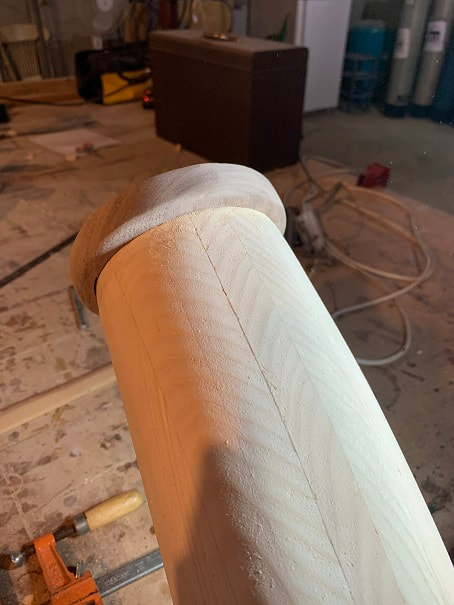
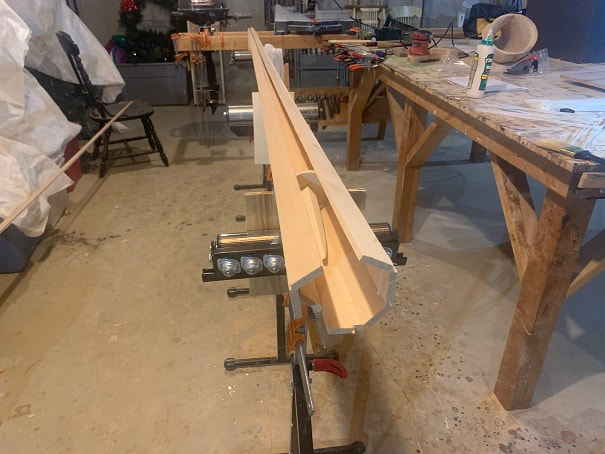
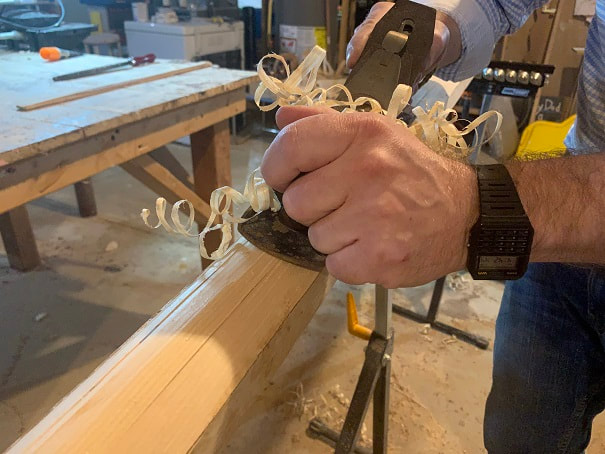
I let the glue dry a full 24hrs and then planed used a plane to round off the Alphorn trunk.
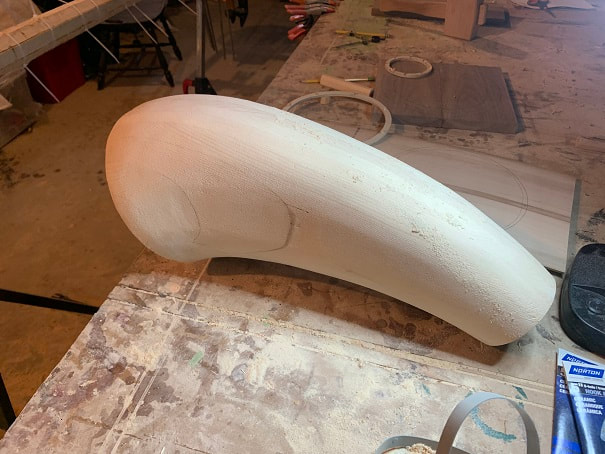
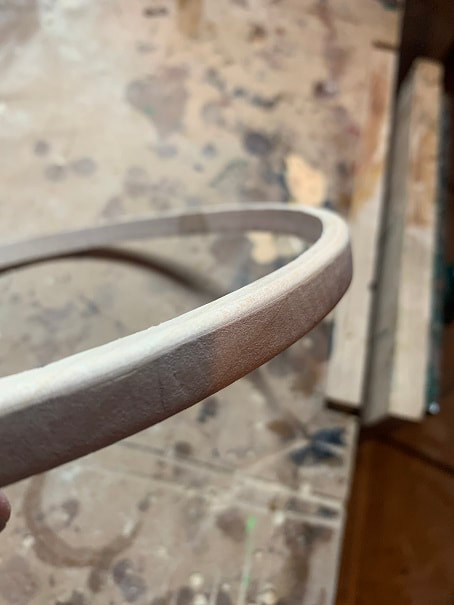
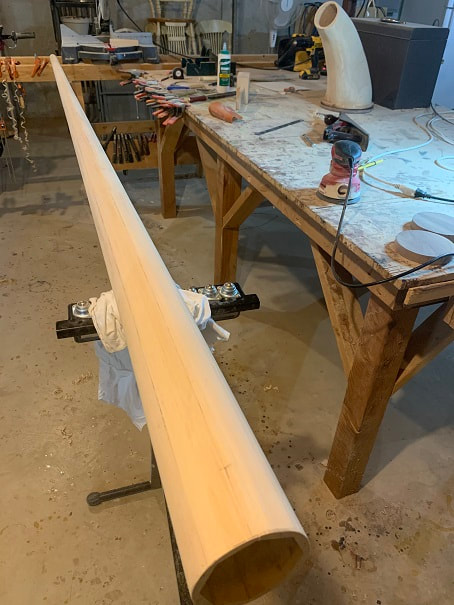
Birdsmouth Alphorn main trunk, planed to round, and sanded.
The finished walls of my alphorn are 5mm to 9mm thick.
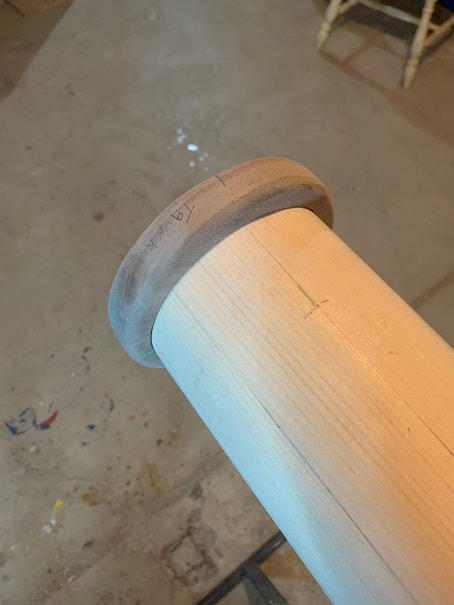
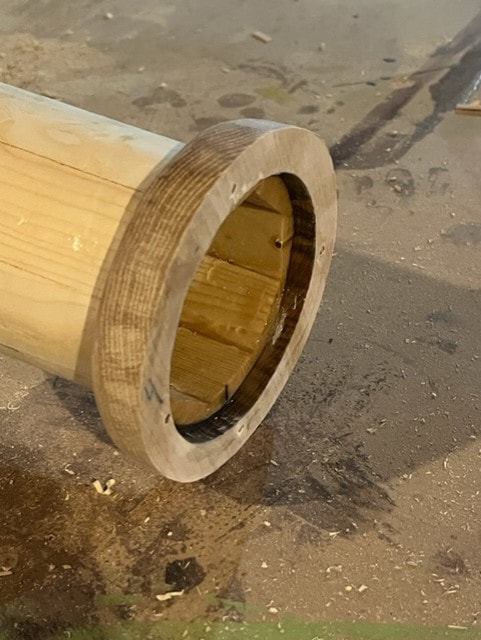
The large end of the trunk and the small end of the bell, will both be fitted with hardwood ring flanges on their outer diameters. These will be epoxied on, and will in turn be epoxied together to attach the trunk to the bell. Here are the Black walnut flanges being made.
Hardwood flange, dry-fit on the O.D. of the large end of the Alphorn trunk, where it will meet the bell.
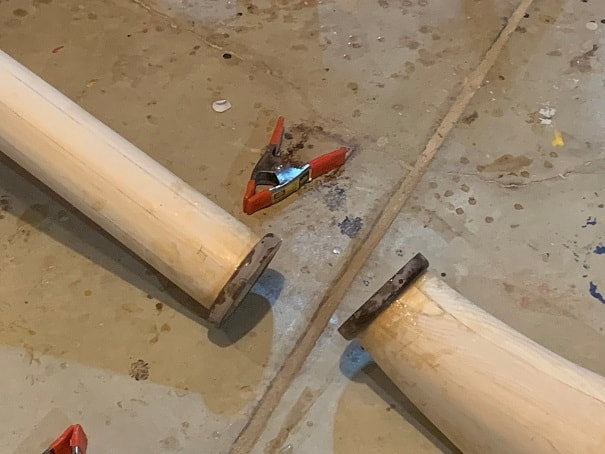
Attaching the Bell to the Trunk
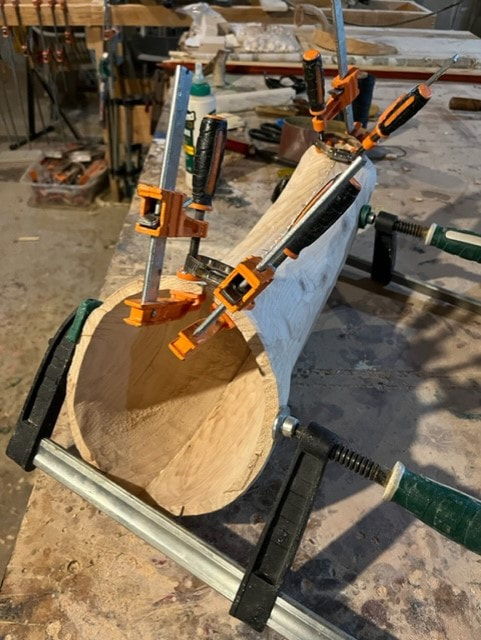
First I used two part epoxy glue to glue on the hardwood flanges to the trunk and bell. Be sure to wear latex gloves when working with epoxy.
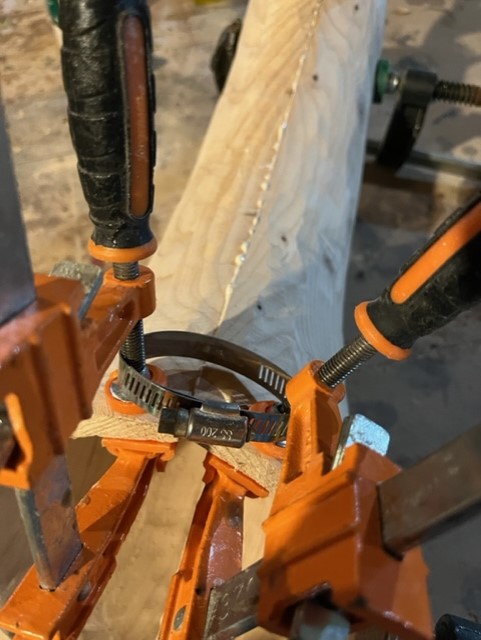
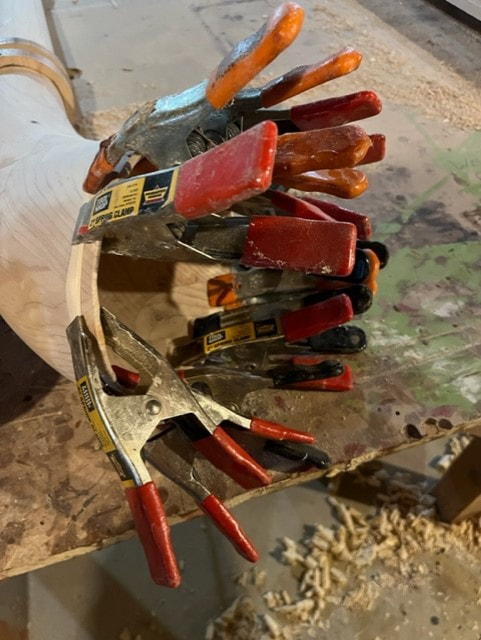
I let the epoxy on the flanges cure for about an hour. At that point it was well set but not at all fully cured. This was the point I wanted to glue the trunk to the bell, as I will get a good chemical epoxy bond on all faces of the epoxied joint. I gathered up a bunch of spring clamps. See the plastic covers on the jaws of the spring clamps? Take those off beforehand....they were too slippery and kept allowing the clamps to slip off, so I had to remove them in a hurry during the glue-up.
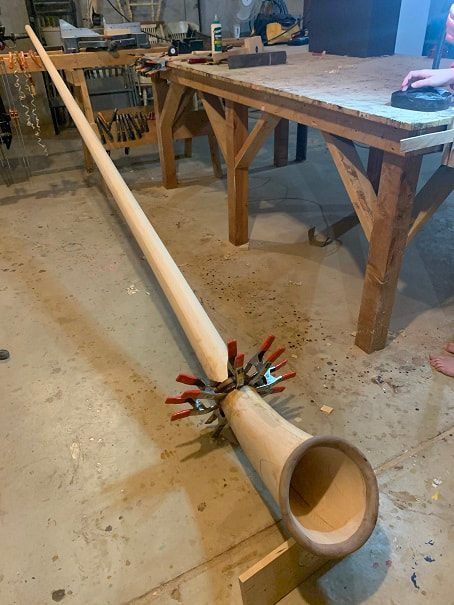
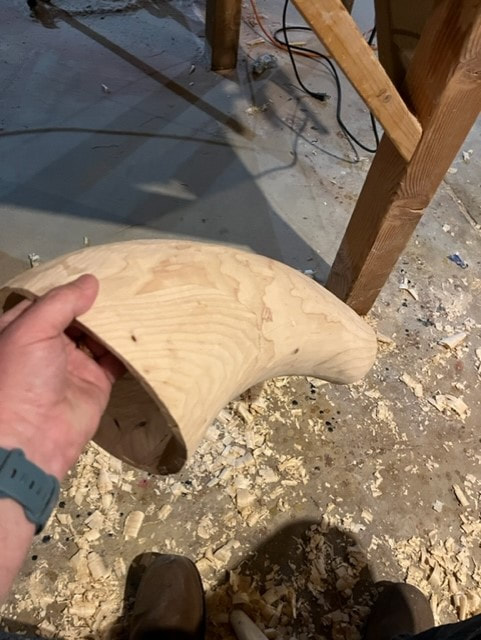
Alpenhorn bell epoxied to the trunk using a flanged joint.
So for the first time I got a view of the whole alphorn! Next I will tune it by cutting down the length at the mouthpiece end of the horn.
Tuning an Alphorn
I decided to make an Alphorn tuned to F. F# is also popular, but when listening to most Alphorn tunes on youtube, it seemed most were tuned to F. The only way to tune an Alphorn is to make it longer or shorter. One can lower to tuned-pitch of an alphorn by inserted an extender into the mouthpiece bore and then inserting your mouthpiece into the extender. To my knowledge there is not a way to make the tuned pitch of an alphorn higher, other than by cutting it down to a shorter length. When one plays an alphorn, the variation in pitch comes from the embouchure and frequency of vibration and airflow created by the players mouth and lungs, but the natural tuned pitch of the instrument is set by the maker during tuning, by cutting it to length. For this reason, the instrument is made a bit longer than needed so that it can be trimmed down in length to tune it.
I was curious if the pitch would be changed by attaching the bell (I assume the extra length of the bell will lower the pitch a bit), so after the trunk was glued up, I took it outside and played just the trunk. I used a digital tuner and found the trunk itself played a G! So as it stood the horn is only one step high with just the trunk. This made me nervous, as making the tune lower would require adding length which I cannot do. After I attach the bell, I will play it again and hope that the addition of the bell lowers the overall pitch by a at least a whole note.
Well, I attached the bell and it made the Alphorn one full note lower in pitch, I was very glad for this. I trimmed an inch (2.54cm) to get it to an F.
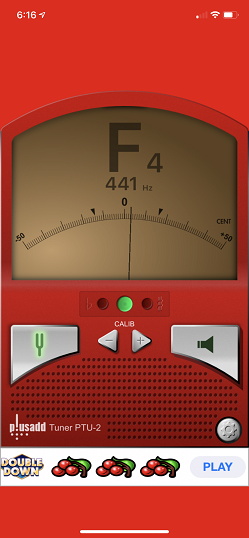
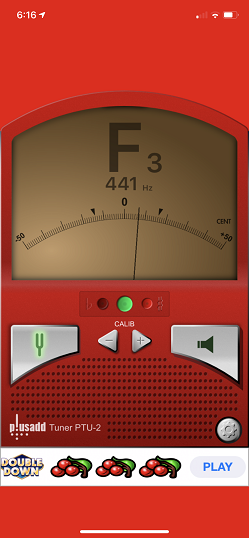
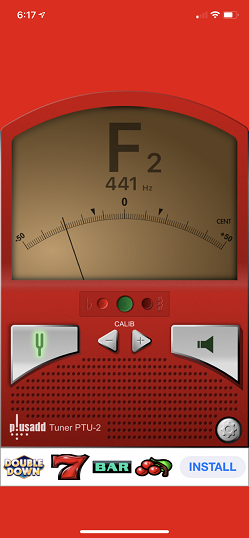
Digital tuner apps can be downloaded for free on your phone, or one can purchase a digital tuner from a music store, or one could use a pitch-pipe or a tuning fork to create the pitch of F. I used an app that I already had on my phone. Here are the screen captures from three octaves of F on my Alphorn (from high F to low F). The lowest F is a bit low.
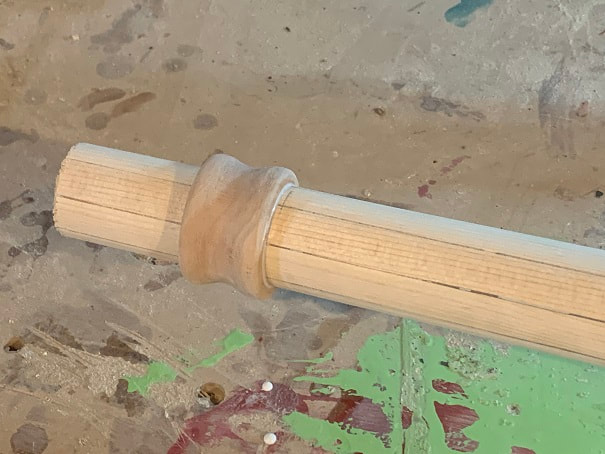
The Mouthpiece-End-Ring, the Foot, and Wrapping the Alphorn with Rattan
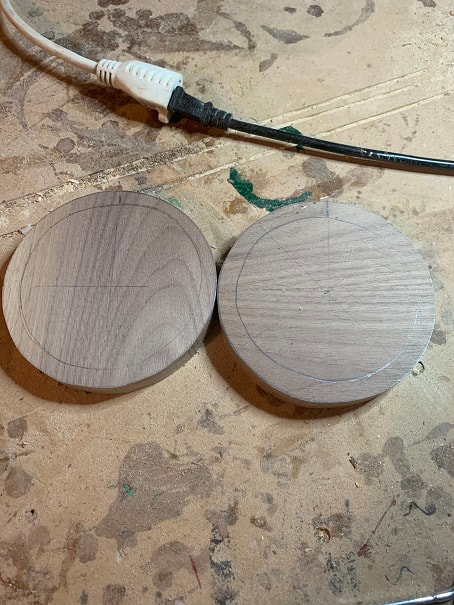
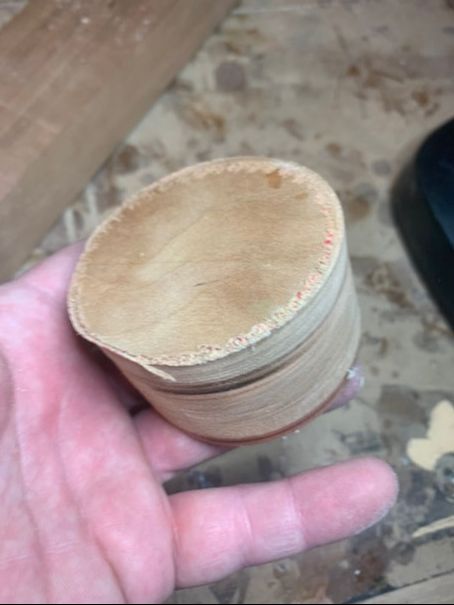
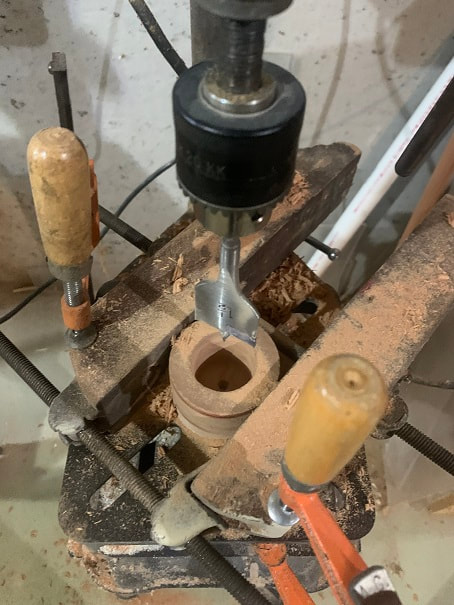
I found this nice thick solid piece of scrap Cherry in the shop, it is the center drop from a hole saw cut from a project a couple years ago. I will use it to make the little reinforcing ring near the mouthpiece.
Boring out the ring using the drill press, the only drill bit I had that was close in size to what I needed was a spade bit....not the best drill bit for this type of cut in a chunk of hardwood, but it's what I had. I was at least sharp, and it worked.
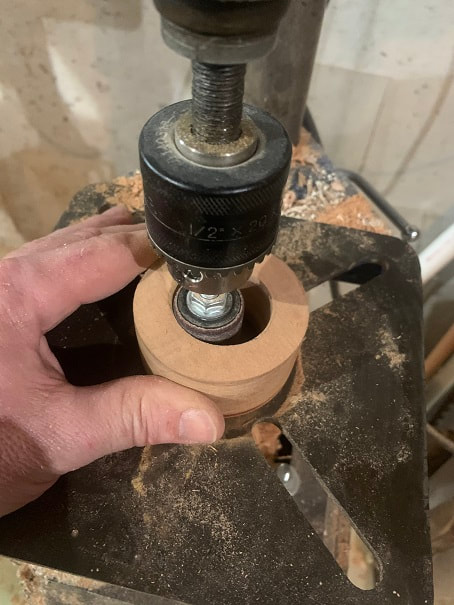
The hole from the drill-bit was too small, so I used a little drum sander chucked in the drill press to enlarge the ID to fit the Alpenhorn. I decided I wanted this ring to be about 75mm (3") down from the inlet end of the horn, which is a bit farther down that shown on my drawing.
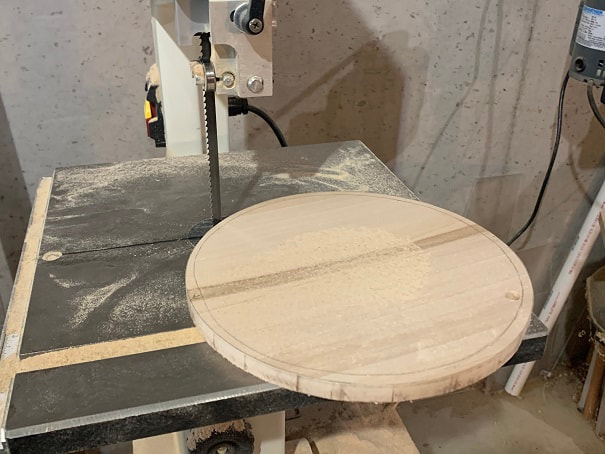
Next, I used a bandsaw to trim the OD of the ring to about 44mm. I forgot to get a photo of that step.
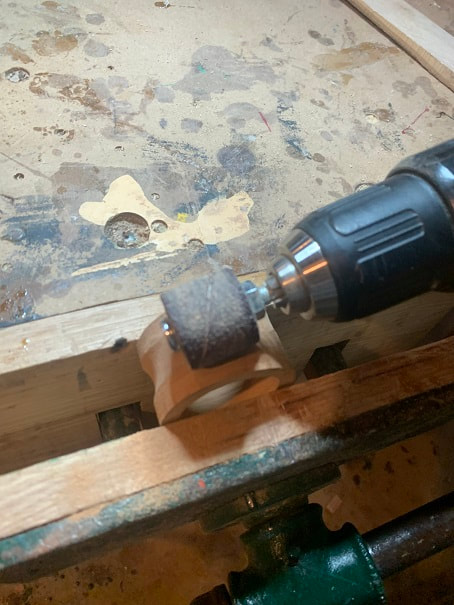
I used the drum-sander chucked in a hand drill to carve the concave curve into the ring, then I handsanded the piece down and rounded the edges.
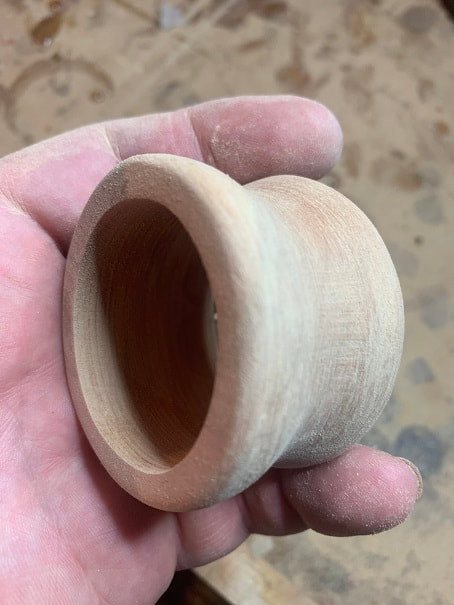
Finished ring, made of solid cherry, for the inlet end of the Alphorn.
Here is the ring glued in place with Tightbond III glue.
I rasped and sanded the flanges where the bell attaches to the trunk.
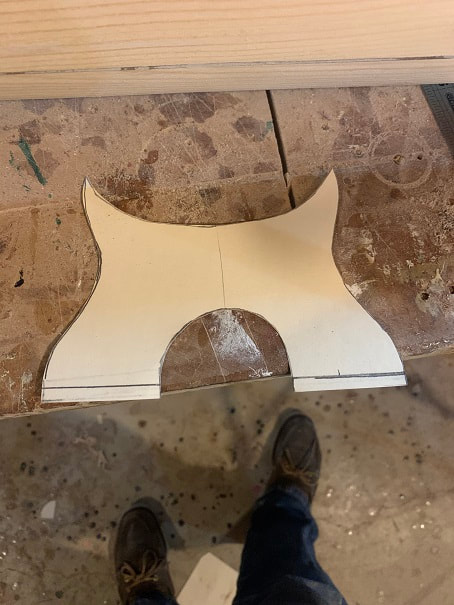
The foot of the Alphorn
The Alphorn is fitted with a small foot on the bottom of the bell, which lifts the horn out of the grass to protect the bell and make sure the sound can exit the horn unobstructed from low ground cover.
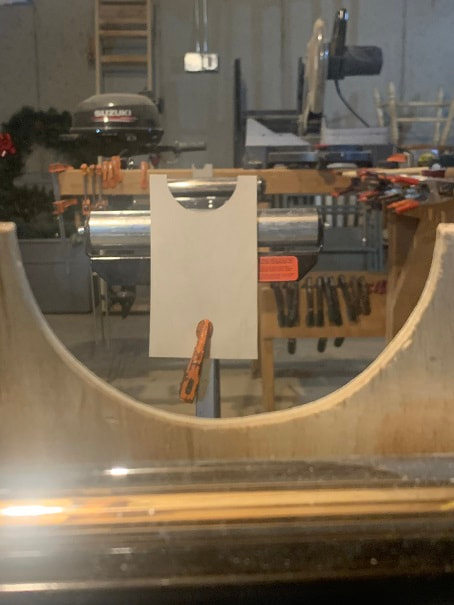
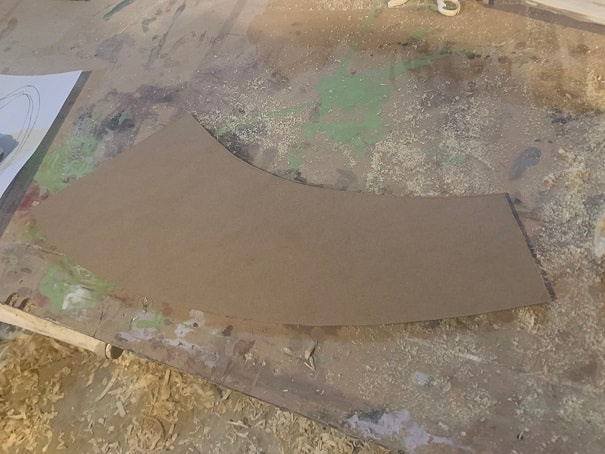
I carefully cut a template out of cardstock and made sure that the curve of the top of the foot matched the bell perfectly.
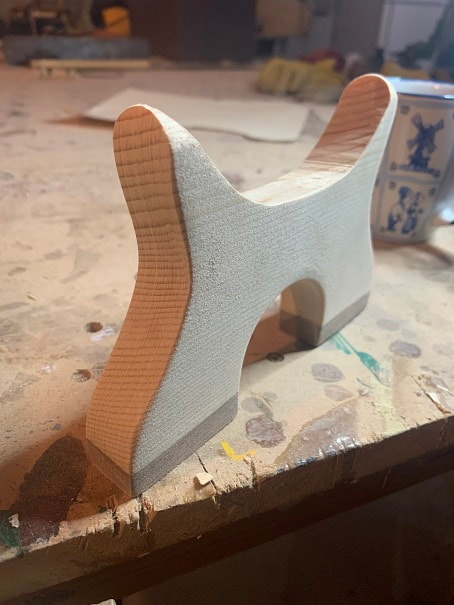
I made the foot from 4/4 Sitka Spruce, with Black Walnut pads on the bottom. The cradle of the foot is cut at an angle so that the feet will be level with the ground when the horn is played.
The foot is adhered to the bell with two-part epoxy glue.
I rounded off the sharp edges of the foot pads.
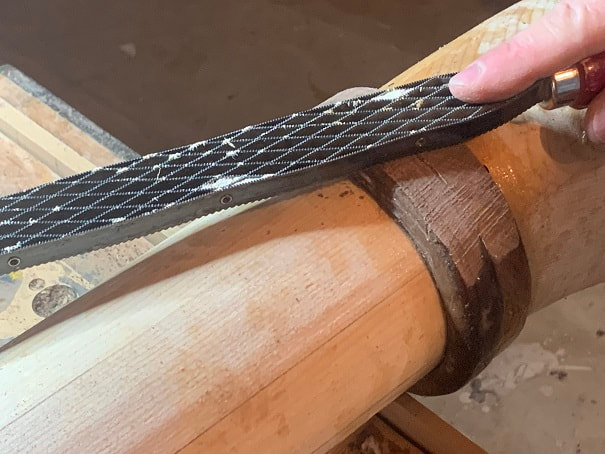
Wrapping the Alphorn with Wood Reed
I will wrap the trunk of my Alphorn with 1/4" half oval basket reed. This fibrous material is very strong in tension. Many aspects of building an alphorn were new for me, including this wrapping step. It took much longer that I expected; keeping the joints nice and tight prevented me from just spinning the trunk quickly, and many, many reeds and clamping was needed, as each reed only gets about 4-10" of coverage down the barrel of the Alphorn.
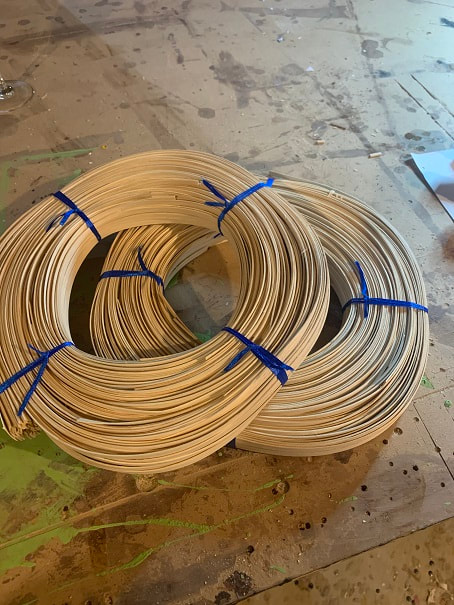
This is 1/4" Flat Oval Reed, which is used for basket making or chair-wicker, this is what I will use to wrap my Alphorn.
The reed arrives in coiled up bundles. Each piece is 8-14' long. (240-430cm)
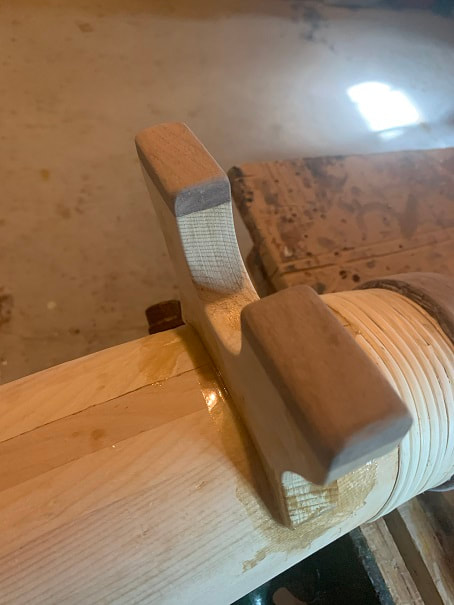
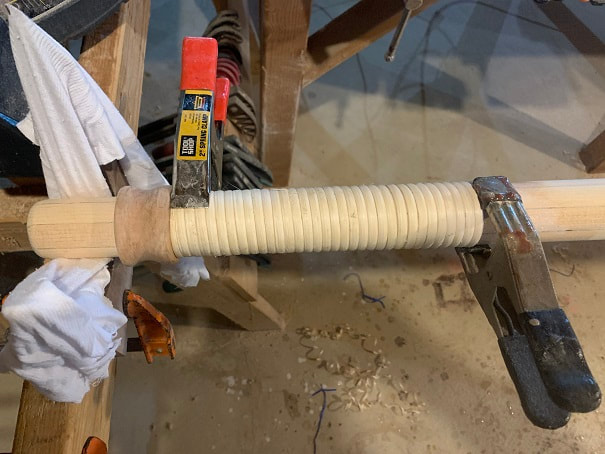
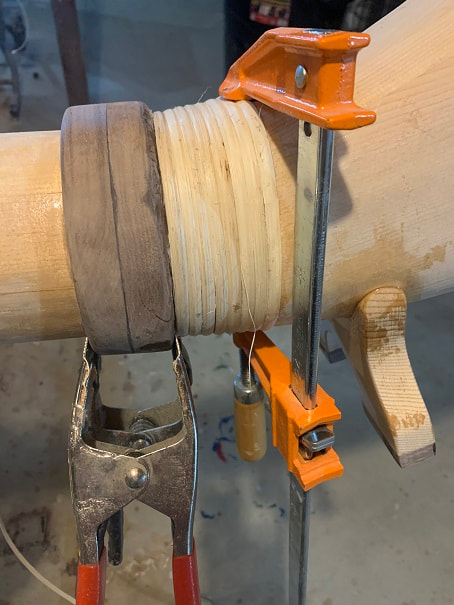
I started wrapping the Alphorn trunk at the mouthpiece end, just down from the hardwood ring. Notice where the wrapping just starts on the left that I carved a long taper into the reed to start the wrap. I glued and clamped this down with a spring clamp and started wrapping. I watered down Titebond III glue applied it to the OD with a toothbrush prior to wrapping on the rattan. I applied about 5” of glue at a time. I don't want messy blobs of glue squeezing out onto the OD of these wraps, It would be a nightmare to try an sand the outside of these wraps while maintaining their curved profile. The watered down glue has worked perfect.
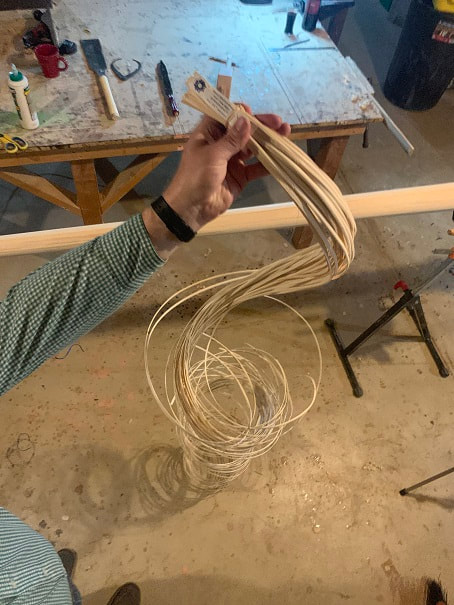
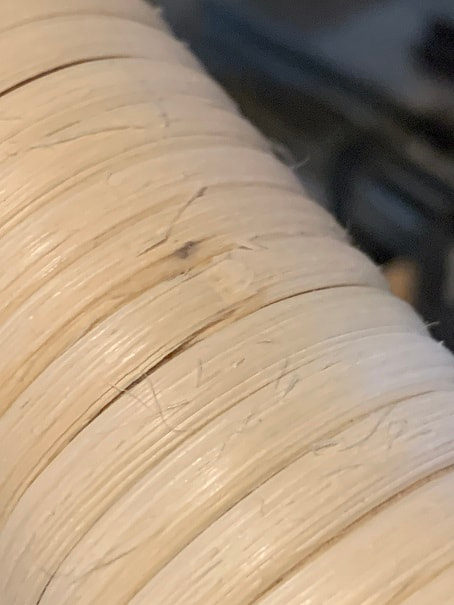
This is a photo of a 14 foot (430cm) length of reed wrapped around the narrow end of the Alpenhorn. As the diameter gets larger the horizontal coverage of each length of rattan will decrease. One learns many things building an Alphorn, and one of those things is just how many splices of reed wrapping it takes to wrap an Alphorn.
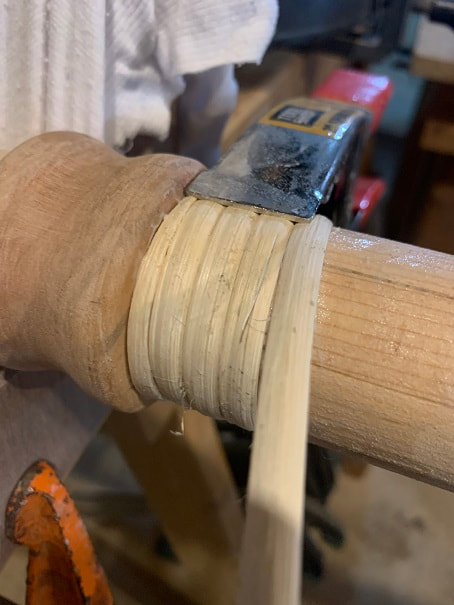
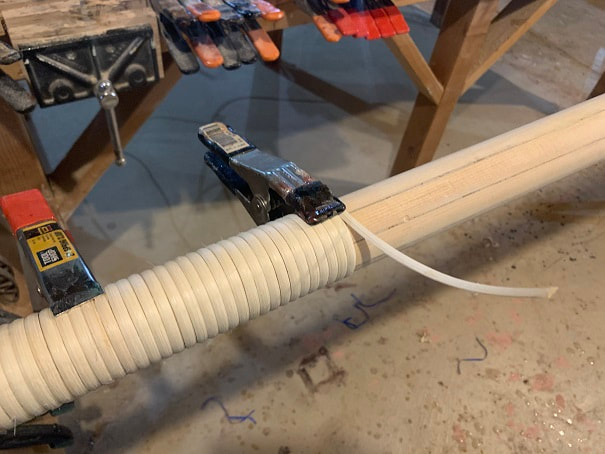
The spring clamp is holding the starting end of the rattan. Here I am applying watered down glue with the toothbrush on a section of the trunk prior to wrapping that section.
The clamp on the left is holding the starting end of the rattan wrap, the clamp on the right is the end of the length of the piece of rattan. I am using spring clamps which I leave in place for an hour, after which I splice on the next piece and move forward.
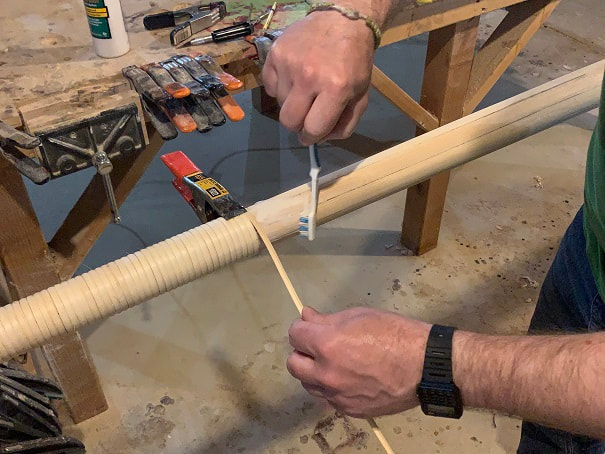
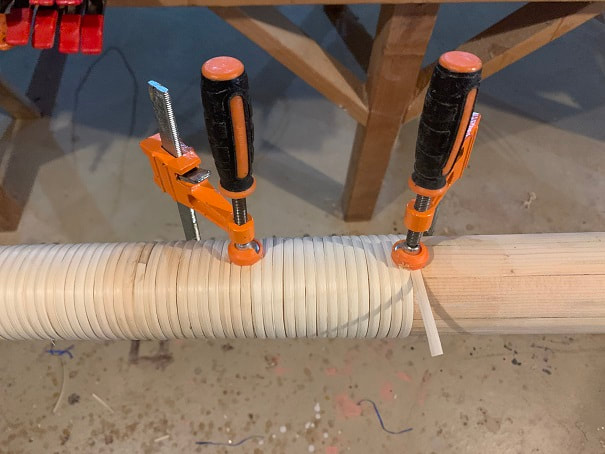
For the splice I taper down the reed from the top of the reed to the bottom on both pieces to be joined, then I use Titebond III (not watered down for the 1st inch of the wrap, and clamp the splice joint for an hour before unclamping. In the middle of this photo you can see a splice of the reeds. There will be more of these than I thought, as each reed only gets you 6-10" of distance along the horn length. I am locating all the splice joints on the bottom of the Alphorn trunk.
I saw some horns with a short section of wrapping on the small end of the bell, and I liked the look of that, so I did that. The spring clamps at the bottom of the picture are not being used to clamp the walnut flanges together, they are being used to press the narrow leading edge of tapered rattan wrapping against the trunk to keep it from moving. I located the end of the wrapping on the bottom of the bell where it will not be seen.
The diameter exceeded to jaw capacity of the spring-clamps, so at this point I am using adjustable c-clamps. You can see the typical coverage I am getting from each reed. The length-wise coverage is getting shorter and shorter as the diameter increases.
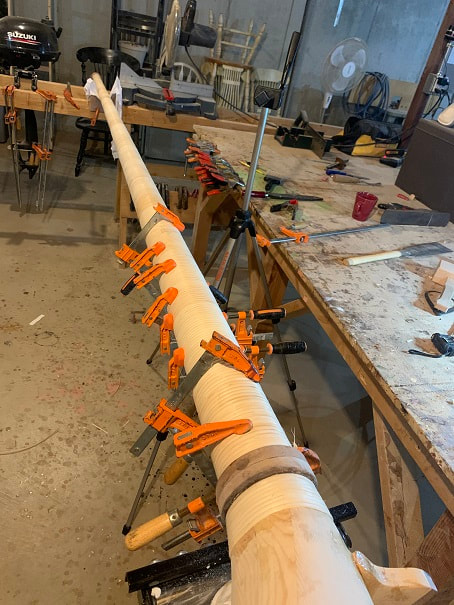
Whew, done wrapping the Alphorn tube. As the diameter got larger the horizontal coverage per strip of reed got smaller and smaller. I wound up using 32 individual strips of reed which were about 390 feet long combined (approx 12' long each).
Varnishing the Alphorn
The outside of the Alphorn will be varnished, along with the inside of the bell as far as I can reach. The ID of the bore will be soaked with Danish Oil later.
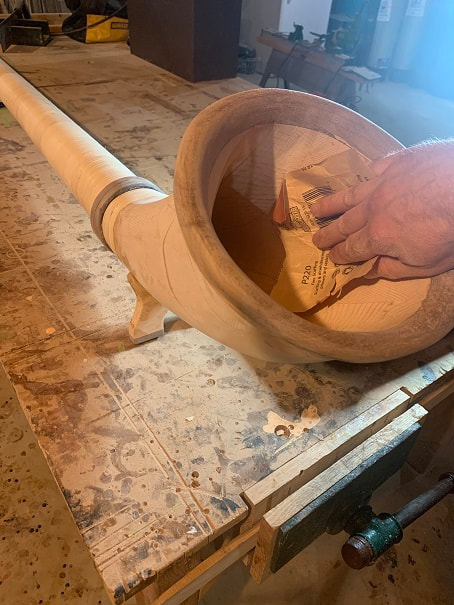
- I did I final sanding of the Alpenhorn prior to applying finishes.
- First , II cleared out the whole area and cleared off the table top. Then I blew out the bore of the alphorn with an air-compressor
- Then I brushed off the table and swept the floor.
- With all that dust kicked up into the air I waited half and hour for it to settle and came back and vacuumed off the table top and the alphorn itself, including as far into the bell as I could reach.
Final little bit of sanding.
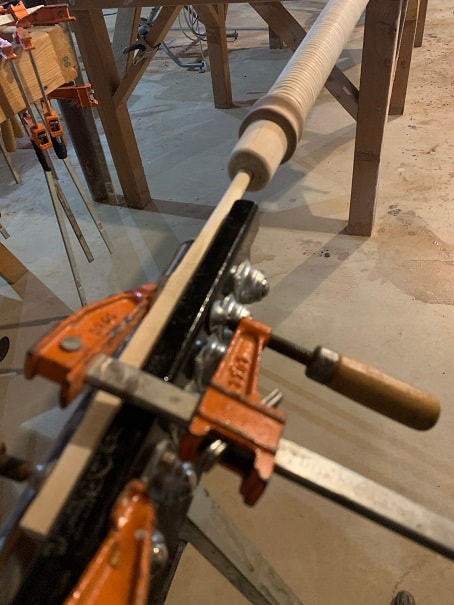
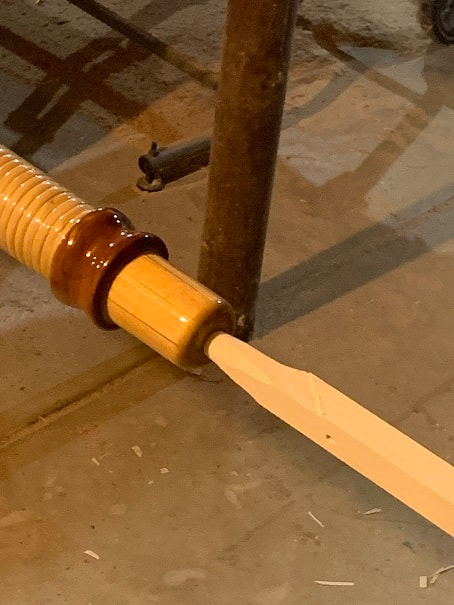
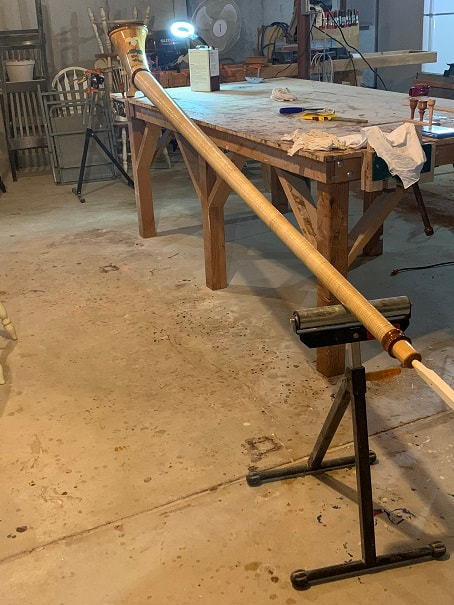
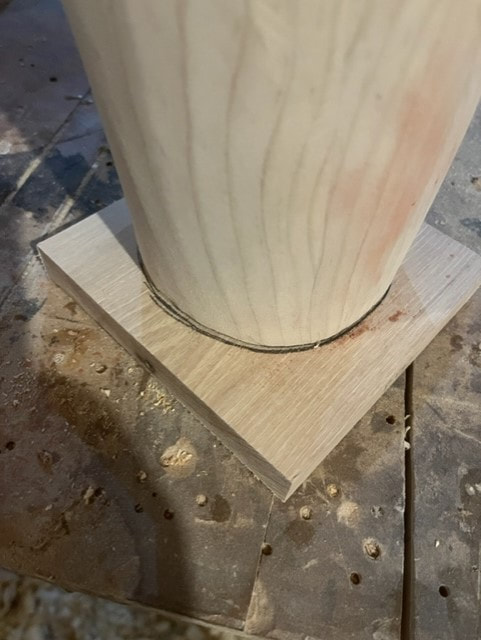
I planed down the end of the stick of wood and used it to hold the small end of the Alphorn during finishing.
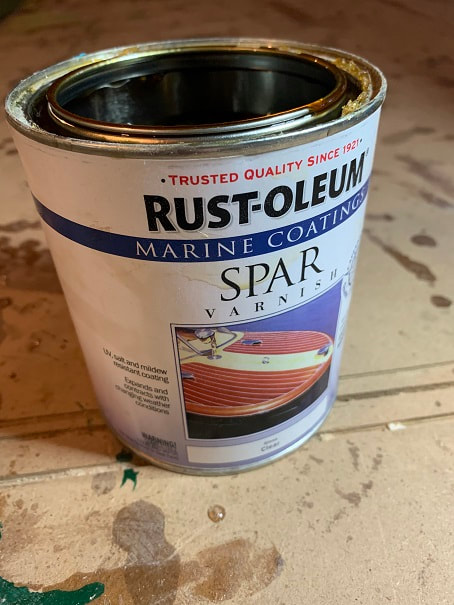
I will finish the outside of the horn with Spar Varnish. This is actual regular spar varnish, not one of the many types that has this or that polyurethane etc... Just actual spar varnish.
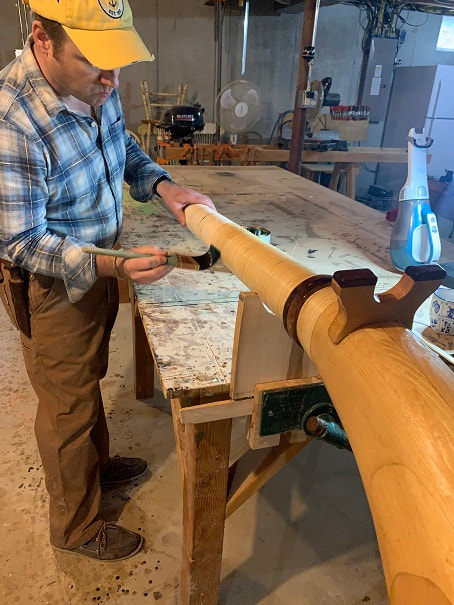
I varnished the bell first, inside and out, then I flipped the Alphorn over and rested the big end in the cradle shown in the photo. I varnished the bottom of the trunk first, then flipped it back over onto its foot and varnished the top.
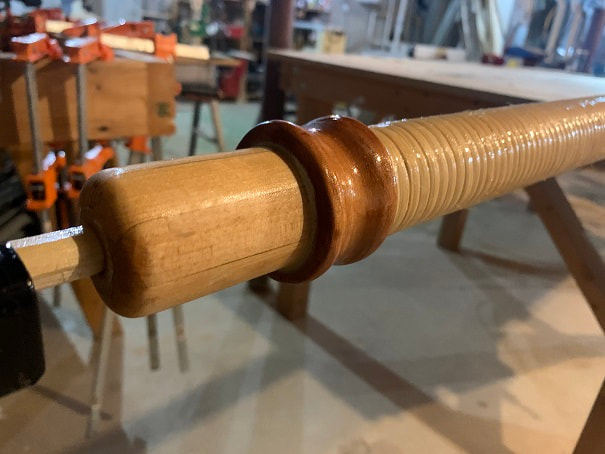
Even the first coat of varnish brings out nice color and depth of the wood and reed. After six coats, I wound up with a nice warm tone, and glossy surface. Pictures of the finished horn are at the bottom of the page below.
Looking down the Alpenhorn after the first coat of varnish.
I sanded the Alphorn lightly, and then vacuumed the dust away, between coats.
Here she is after 4 coats, two more to go, but the final two coats will be after I paint the bell.
Painting an Alphorn Bell
Painting onto bare wood can be messy, and the paint can wick into the wood beyond where the painter wishes the paint to go. I started painting the bell after four coats of varnish, and after painting I will apply further coats of varnish over the paint.
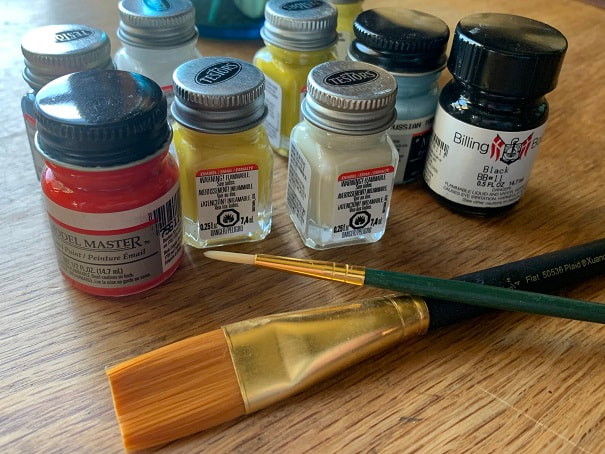
I will use modelers enamel paint for painting the bell.
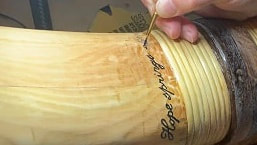
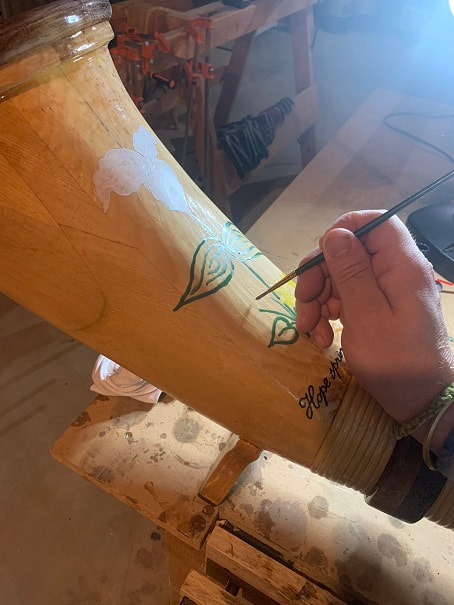
First, I sanded down down the varnish to provide a good surface for the enamel to adhere to. Here I am painting on a phrase in script.
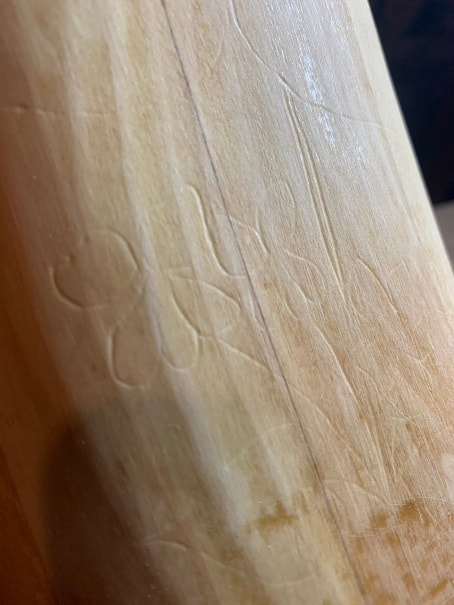
I sketched the outline of my painting on a piece of paper, then I laid the paper on the bell and traced the lines while pressing into the wood with a ballpoint pen. The pen did not mark the wood, but I pressed hard enough to leave an indent in the wood to help me with painting.
Here is my sketch, after tracing along it with a ballpoint pen to indent the outline into the wood below.
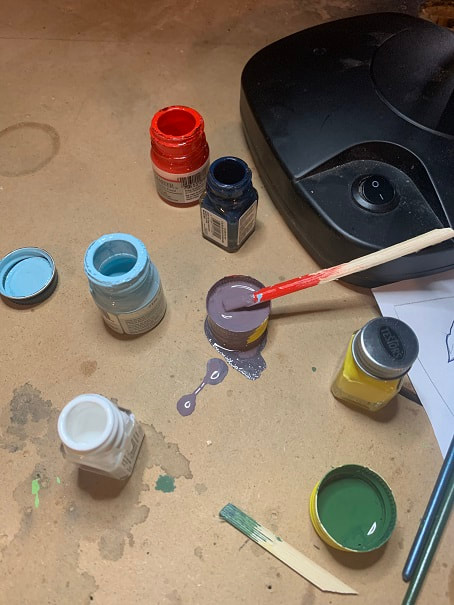
I had the primary colors and made my green and purple by mixing colors in bottle caps.
Here is a photo of the painting in progress. The white and yellow will need a couple coats. The varnish was sanded down to provide a good surface for adhesion of the paint.
When I am done painting the bell, I will apply two more coats of spar varnish.
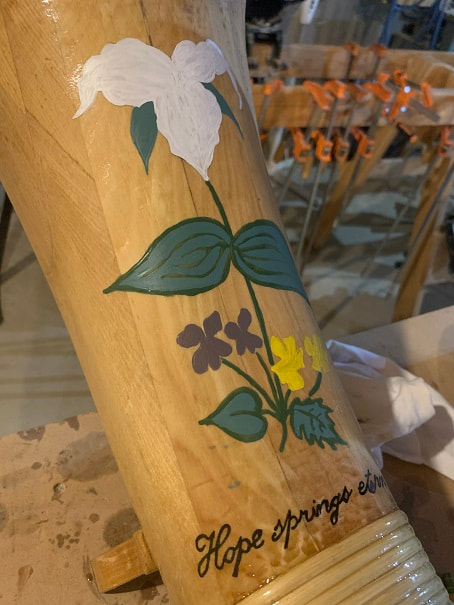
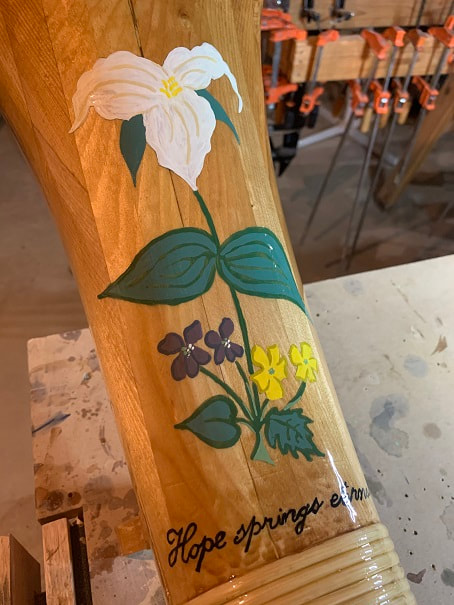
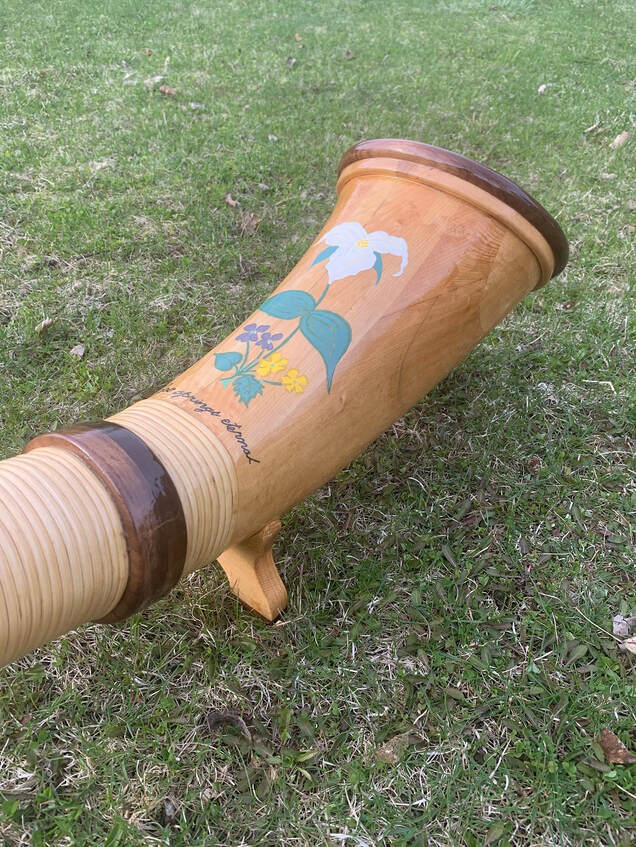
Completed Alphorn bell painting. The flowers are all local native wildflowers that bloom in Spring. The white one is a Trillium, the purple ones are the State flower of Wisconsin, Wood Violets, and the yellow ones are Buttercups.
Oiling the interior of the Alpenhorn
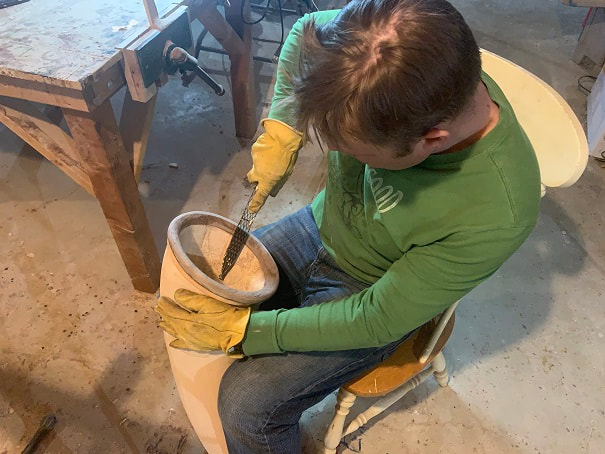
I flooded the interior of the Alphorn with penetrating wood oil. The goal is to protect the interior of the horn from moisture.
I carved a tapered bung to plug the mouthpiece end, prior to filling the horn with oil.
Here the Alphorn has been filled with 1 gallon penetrating wood oil. I turned the horn over and sloshed the oil all around inside. 1 gallon is not enough to actually fill the horn so one needs to rotate it around in order to get good internal coverage. I then removed the bung and poured the oil out the mouthpiece end.
Photos of the Finished Alphorn
Handmade Alphorn, built of Sitka Spruce, in Wisconsin in March and April of 2020.
I absolutely love the way the Alphorn sounds, and I love playing it!
The 2nd Alphorn Build Log is below, but first, check out this 3D printed Alphorn pin! The .STL file may be found on my
3D Printing Gallery.Build Log 2 of 2: Making an Alphorn from Common Spruce/Pine/Fir Construction Lumber
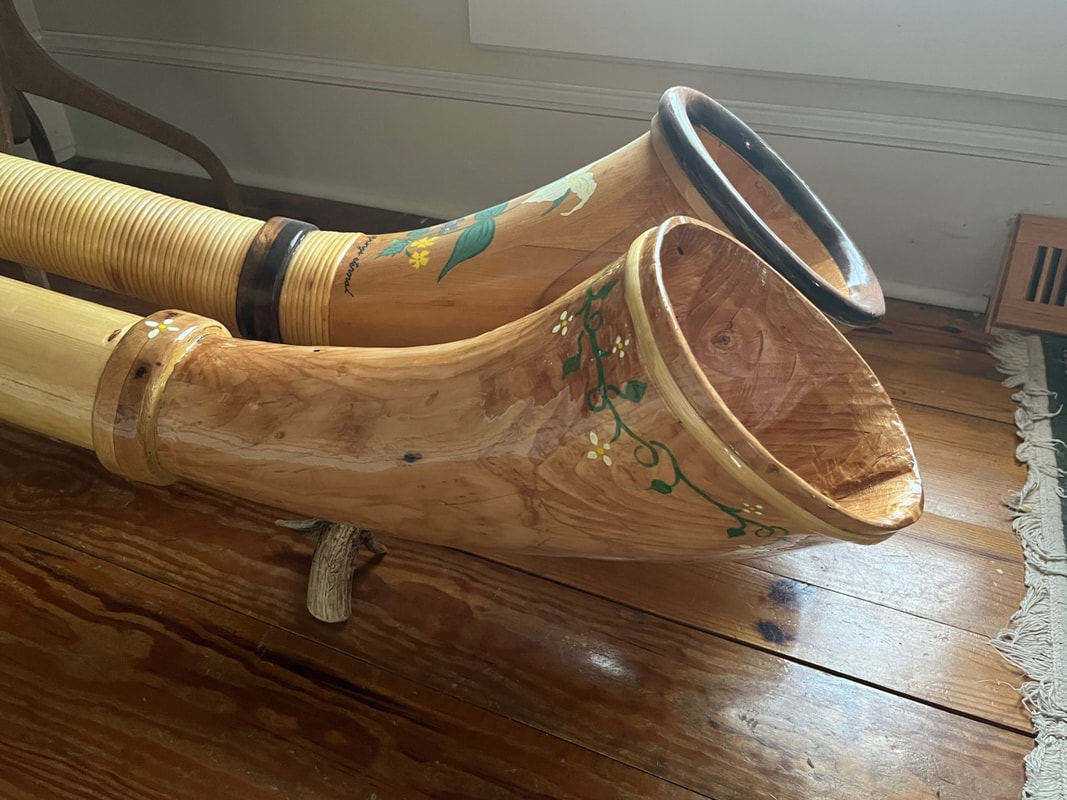
Here is a photo of the bell of my second alpenhorn, the build log for which , is below.
March 2021
Alphorns were originally instruments of working farmers. These were not the high-brow instruments played in royal chambers or national opera houses (though they are now!, which is great). In this spirit, I set out to make a lower-cost alphorn from humble construction lumber. My first alphorn is wrapped in wood reed and also cannot be disassembled. I am building this pine alphorn with the intent of creating a lightweight and portable Alphorn, so I will not wrap it and I will chop it into segments that can be disassembled for transportation.
This alphorn will be built using similar construction methods, and to the same dimensions, as the Alphorn above. In light of that, I will not duplicate all the detail in the build log above. This 2nd build log will be shorter and will only include detail on new construction details such as the segment joints.
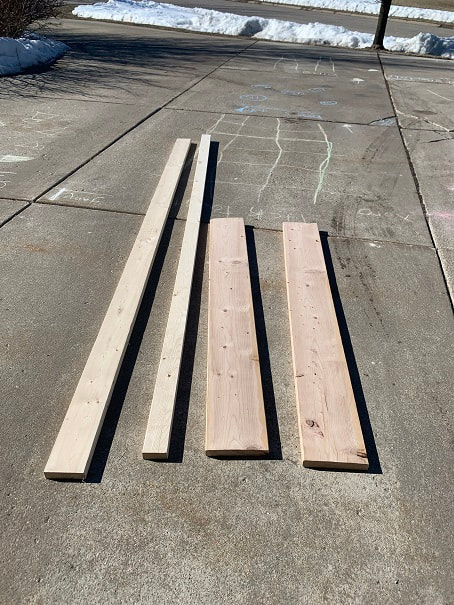
RAW MATERIALS FOR THIS ALPHORN: I will use "SPF" construction lumber for this build. This stands for "Spruce Pine or Fir" and can be any of those woods. These are construction lumber and have a knots. I took time and picked the very best boards I could find in the pile. The 2x4 and 2x6 at the store were pine and the 2x10s were fir. This lumber cost $59.00 including tax.
Raw materials for my 2nd alphorn: One 2x6x12 (38mm x 140mm x 3658mm), One 2x4x12 (38mm x 89mm x 3658mm), and Two 2x10x6 (38mm x 235mm x 1829mm).
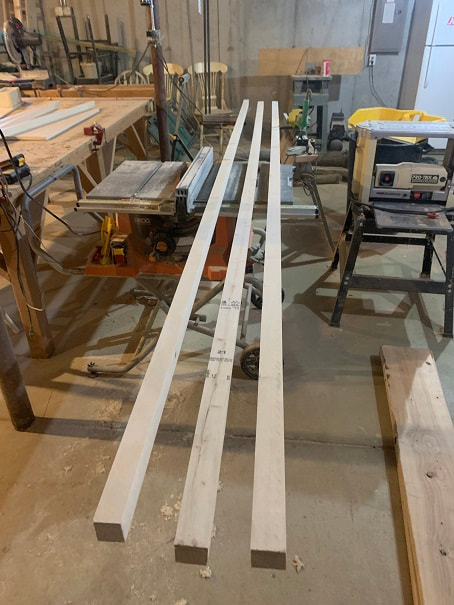
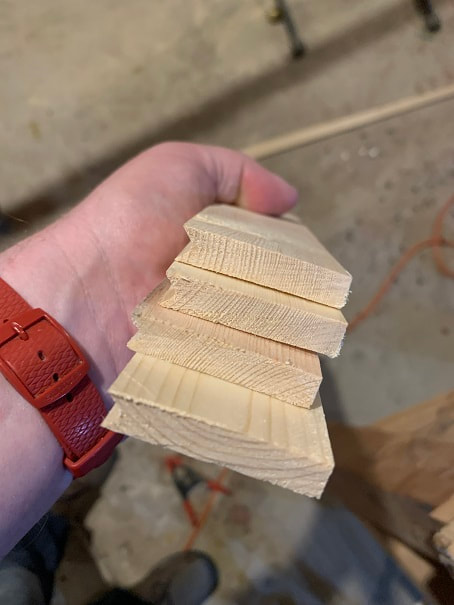
Cutting the pieces that will become the staves of the Alphorn trunk. These were cut from the 12' long 2x6 and 2x4 lumber. Carefully make your cuts to remove as many knots as possible.
I cut the staves blanks with the grain in mind, to wind up with staves with as vertical a grain as possible. Orient your cuts to achieve this. Here you can see that I got a decently vertical grain, though in the stave on the bottom the grain is not as good. I find that the last couple inches of the birdsmouth cut can waver a bit, and these imperfect birdsmouth ends can be seen in this photo. I cut of a bit of both ends off when cutting the stave to length to remove these imperfect ends.
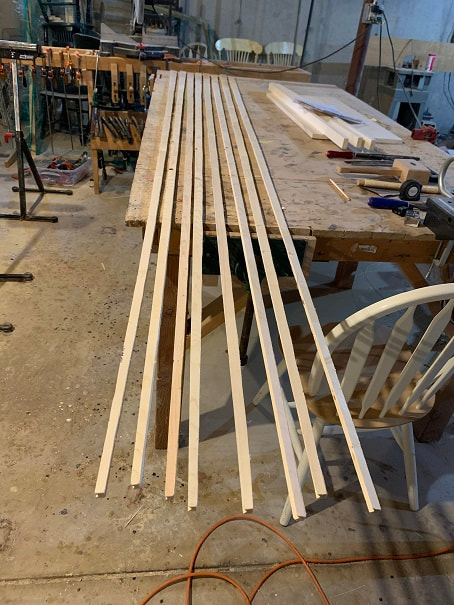
This picture shows the long tapers.
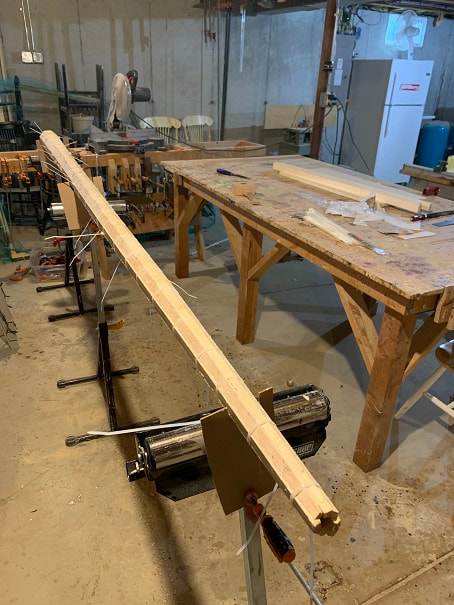
Glued up birdsmouth joinery Alphorn trunk. This photo is deceiving I as there is actually more taper to the trunk than what appears in the photo, this is due to the small end being so close to the camera making it look bigger, vs the big end which is far away making it look smaller. The pieces went together well. It is always a messy affair assembling these and it is tricky. Be determined and work deliberately and don't give up if the pieces flop and fall around. I did this solo, but if it is your first time assembling one, you might benefit from a second person helping. It is a bit hectic as the glue is drying. I started at the big end, got the joints in place, quickly threw on a zip tie, and then worked my way down to the skinny end with a zip tie every foot. Then I came back and added additional zip ties every 6 inches.
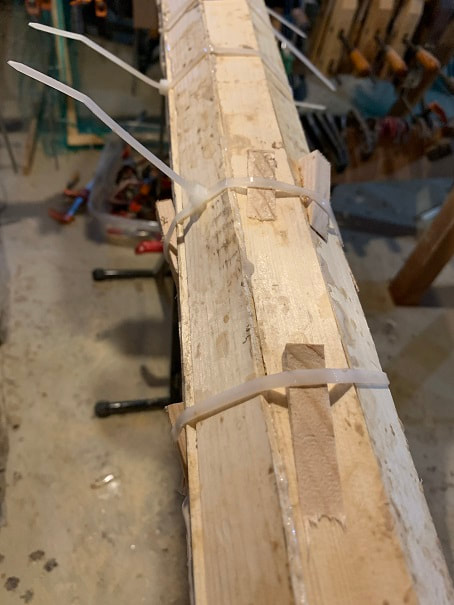
I cut little wedges and pounded them under the zip ties to close up any gaps.
Rough planed trunk of the Alphorn. Some gaps in the birdsmouth joints are visible, but I was glad to see them at least full of cured glue.
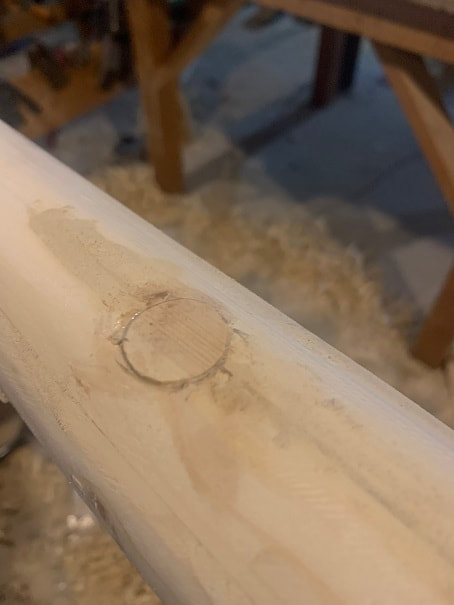
There were 4 loose/empty knot holes in the alphorn trunk. I drilled them out with a 3/4" forstner bit and plugged them with plugs that I had cut from the same exact material, with the grain going the same direction.
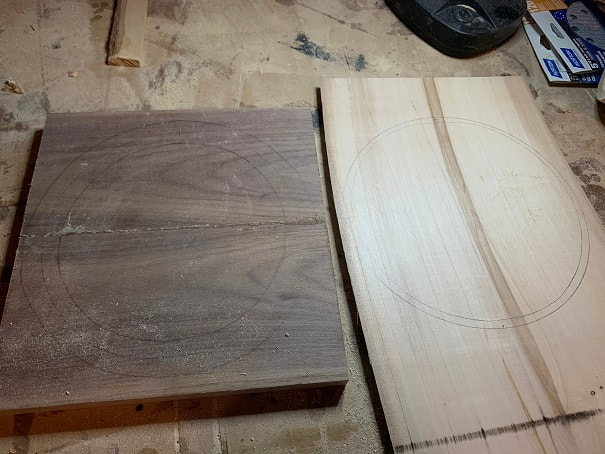
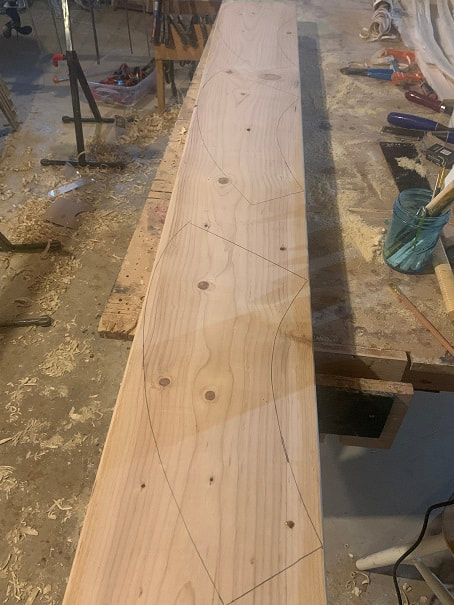
Decided to make a template of the side view of the bell. I drew the shape slightly different from my drawings above. On the upper curve , I kept the bell narrower until closer to the bell end, and then flared it up more.
I traced out 6 full-size bell pieces onto the 2x10
I planed down both sides of each 2x10 on my surface planer to flatten out the construction lumber. There's only a little that can be planed off before the pieces will get too thin to make the full OD of the bell, but planing them will help flatted them out for a good glue bond. This picture is after planing, and also after I sketched the plan-view shape of the bell onto the pieces.
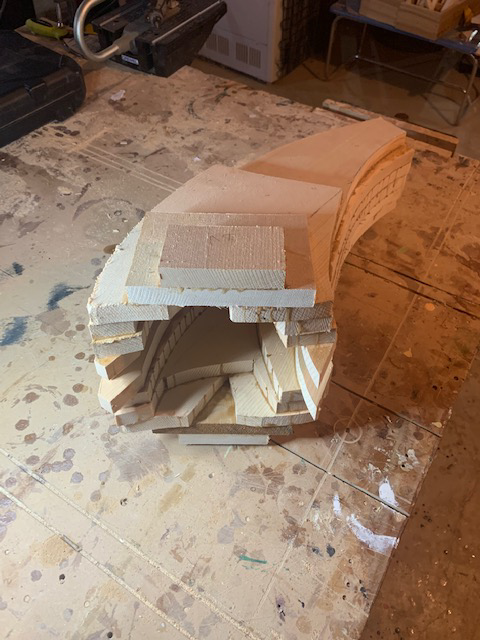
Carving away the wood of the bell is a huge amount of work, so removing any wood now is a benefit. When looking at the plan view of the shape of the bell, it was clear that I could chop the outer pieces short as shown.
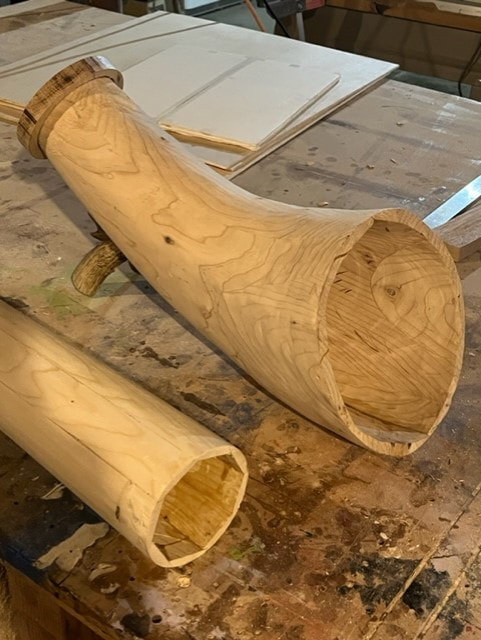
Here are the two halves, individually glued together into each half. Clamps removed. I cut out some material from the innermost slab, to make carving quicker. Now I will carve them, then glue them together to form the finished bell.
November 2022 update: I took a year and a half off of working on this project, but I am back at it!!! Started carving the bell last month and today got it glued up.
Rough carving the bell with a chisel and mallet.
I used a very coarse sanding wheel on my right angle grinder to rough sand the inside and outside of the bell halves to their finished shape.
Clamping the bell together. Glue up with Titebond III glue.
I needed a little localized clamping force at the top of the bell end, and this photo shows how I did that.
Sanding bell with 80 grit sandpaper on a random orbit sander
Tracing hardwood flange on a piece of 3/4" thick solid hickory.
Bell progress and also the end of the main trunk is shown in the photo.
This will be a more simple looking horn than the first one I built. The bell end will not have any hardwood rings, but will have a single wrap of wooden reed. Here is a photo of gluing on the reed.
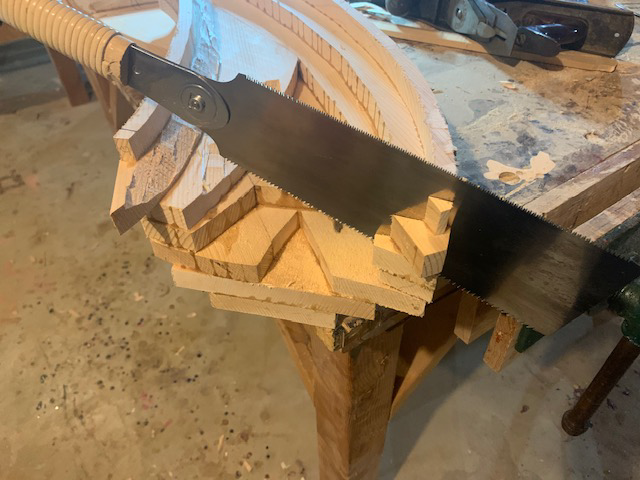
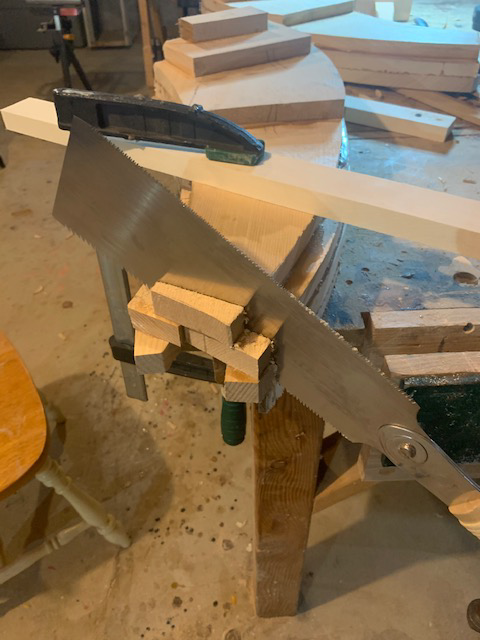
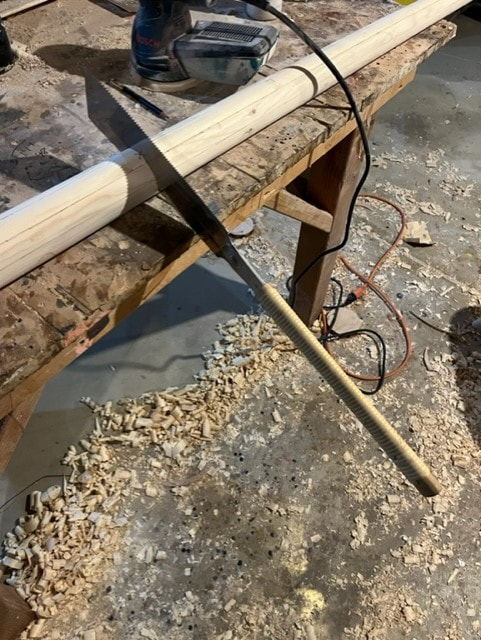
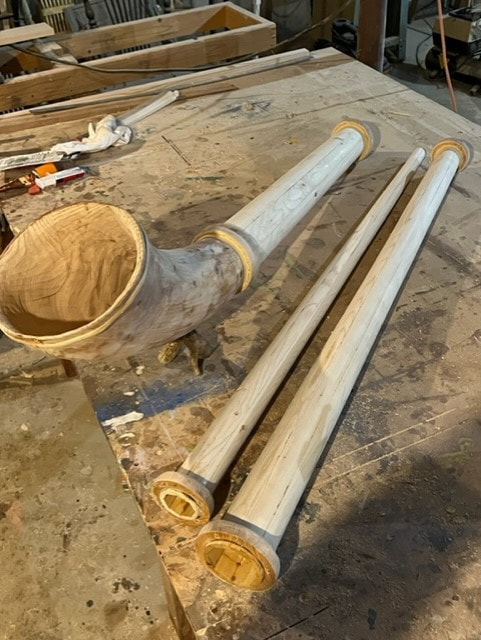
Measured the full length and divided by three and now cutting the sections with a thin-kerf pull-saw.
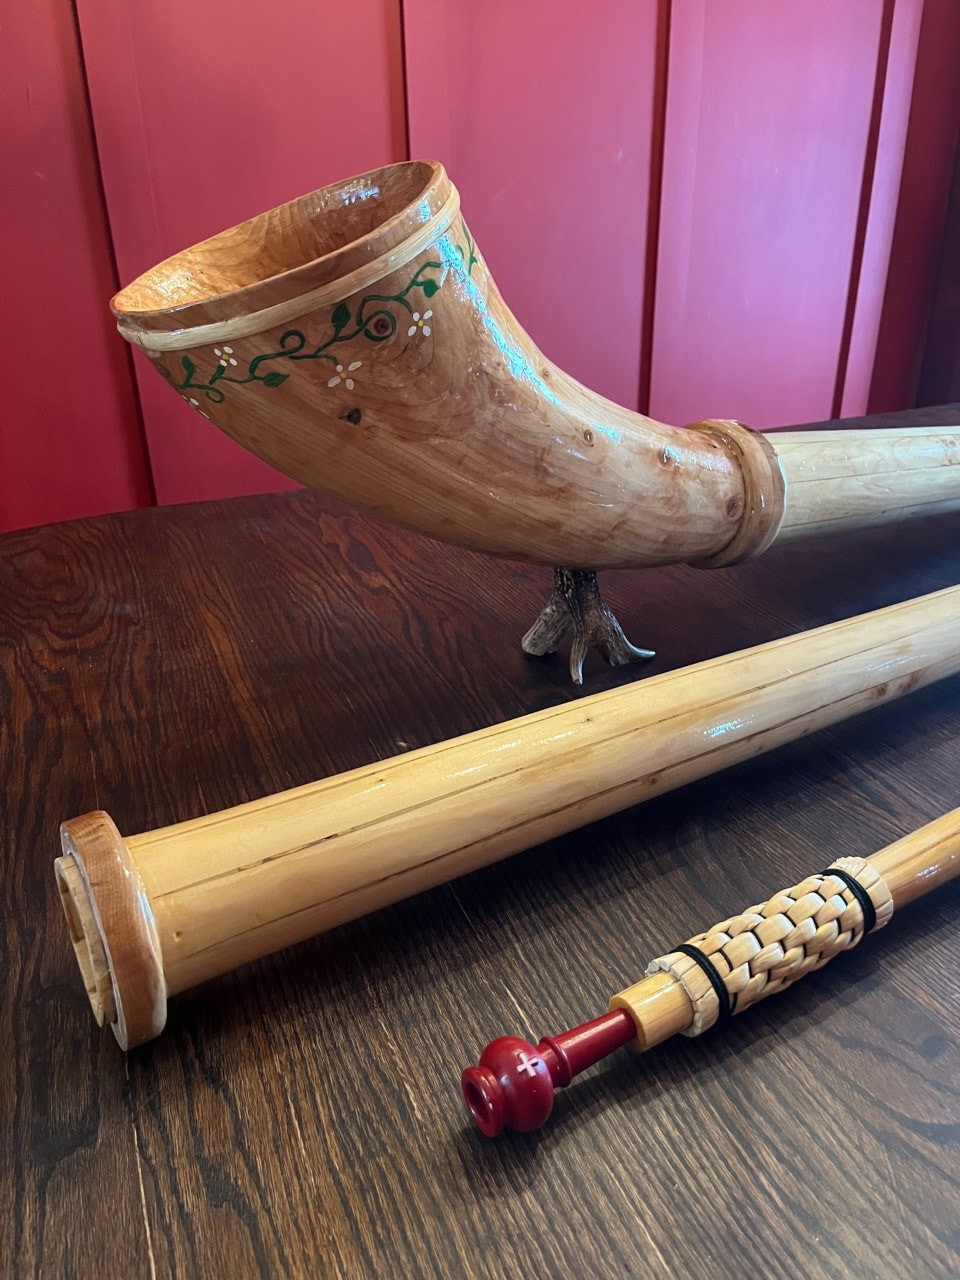
Here are the three sections of the alphorn. The larger diameter, shorter section, will have the bell attached to it, after which it will be the same length as the others.
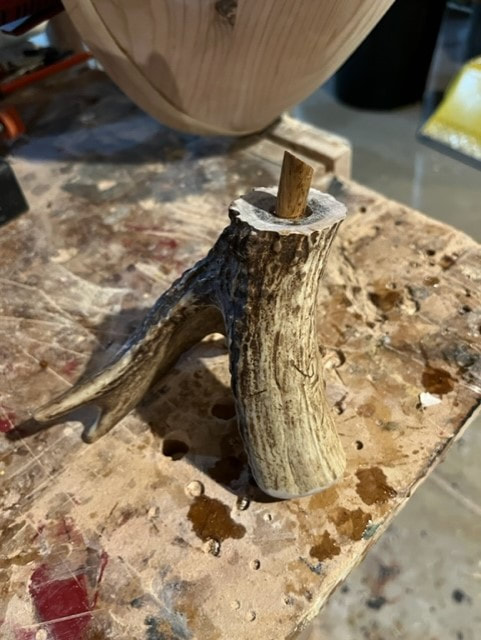
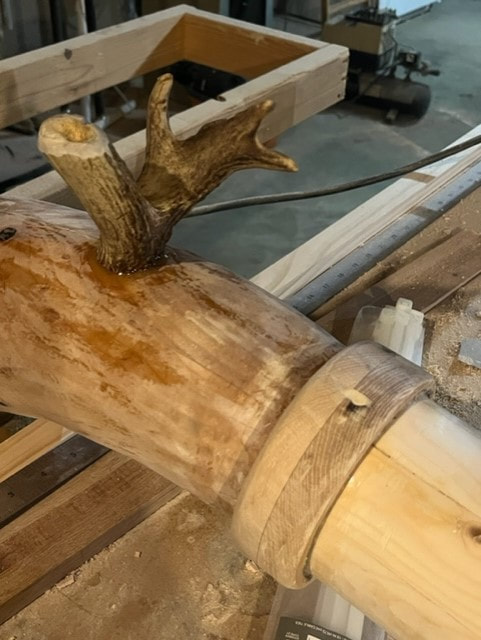
I fashioned an alphorn foot from a white-tailed deer antler that I found near our house. I epoxied a reinforcing oak pin into it, and I ground a radius into it to match the horn.
Next I used epoxy glue to glue solid Hickory flanges around the outer diameters of the bell and adjacent trunk piece. Once those cured, I then glued them together to attach the bell to the trunk.
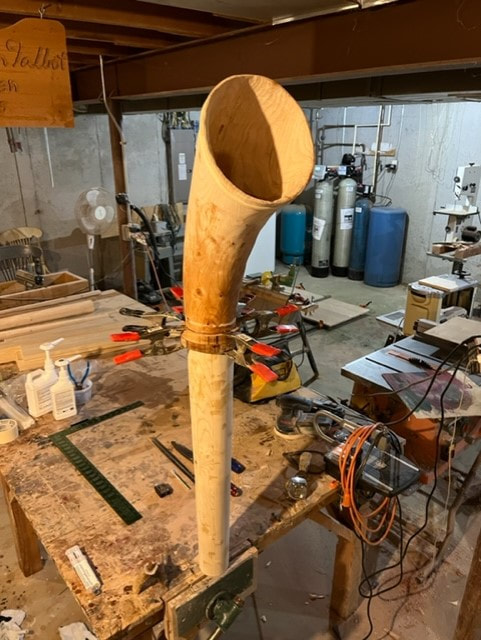
Epoxy glue was used to glue the Hickory flanges around the tube parts, and then also to glue the bell to the tube. I found it very useful to clamp a wooden stick in the bench clamp, and then to put the tube over the stick in order to keep it upright.
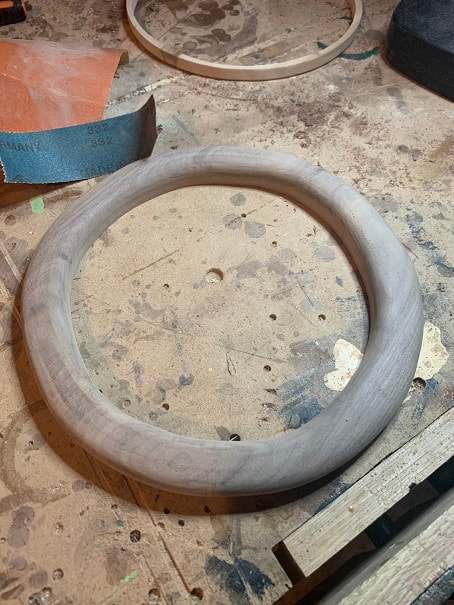
Hickory flange, epoxied on, and I sanded the edges round.
I clamped the sections in the correct orientation and drilled 4 holes for #10 wood screws.
Epoxied the foot onto the bell. There is a pin epoxied into the center of the foot and into the bell also.
Current status of the three sections. Now I will apply the gloss finish and paint the bell.
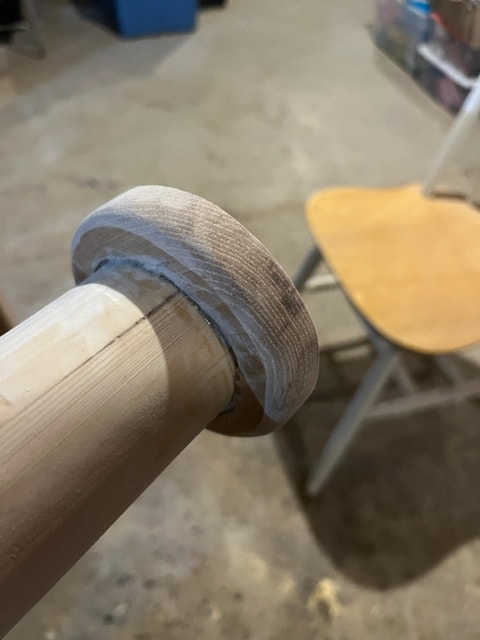
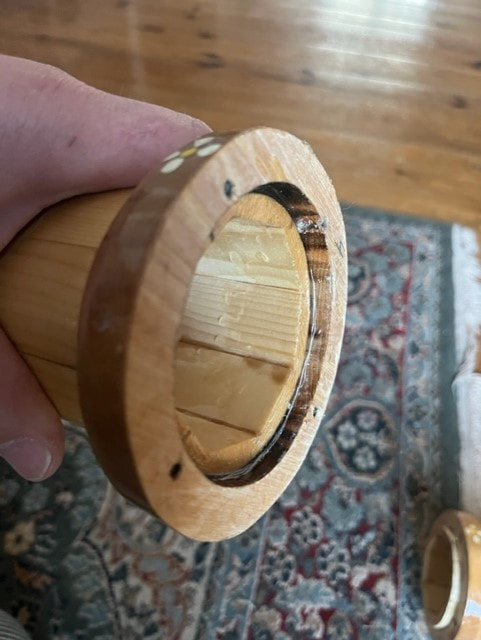
Finished flange joint. Note that I offset the flange joint a bit, which creates a "Socket" type joint for ease of assembly and added strength.
Here is the other section showing the socket end of the section joint.
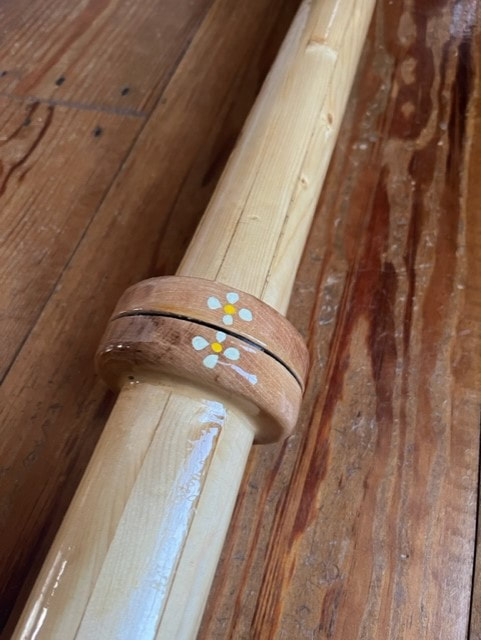
Here is the assembled joint, including a 1/16" rubber gasket. I painted little flowers to allow easy visual alignment when assembling the sections. The joint is quite tight even without the 1/16" circular gasket, so I will test the horn with and without this gasket.
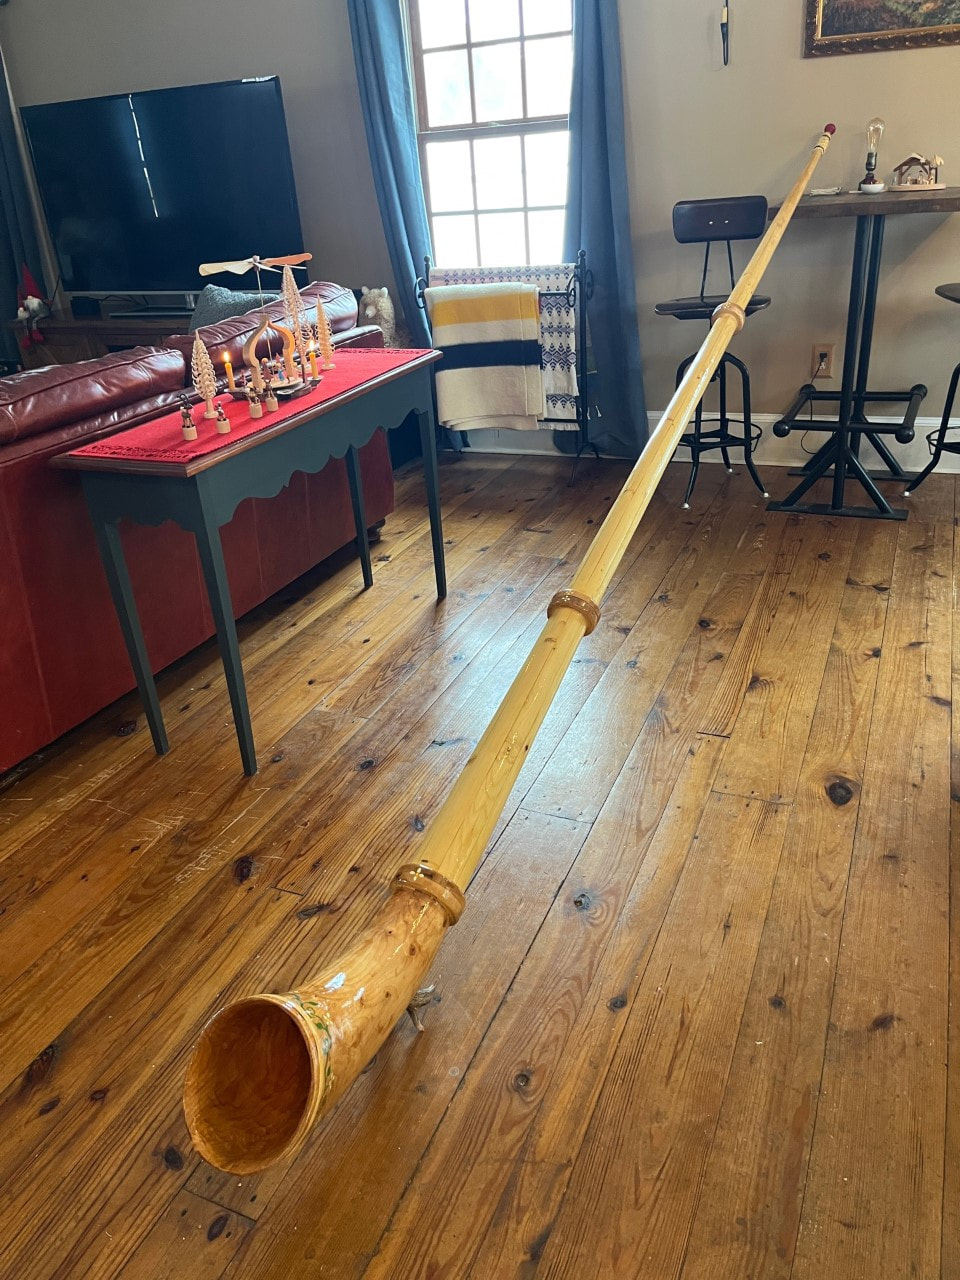
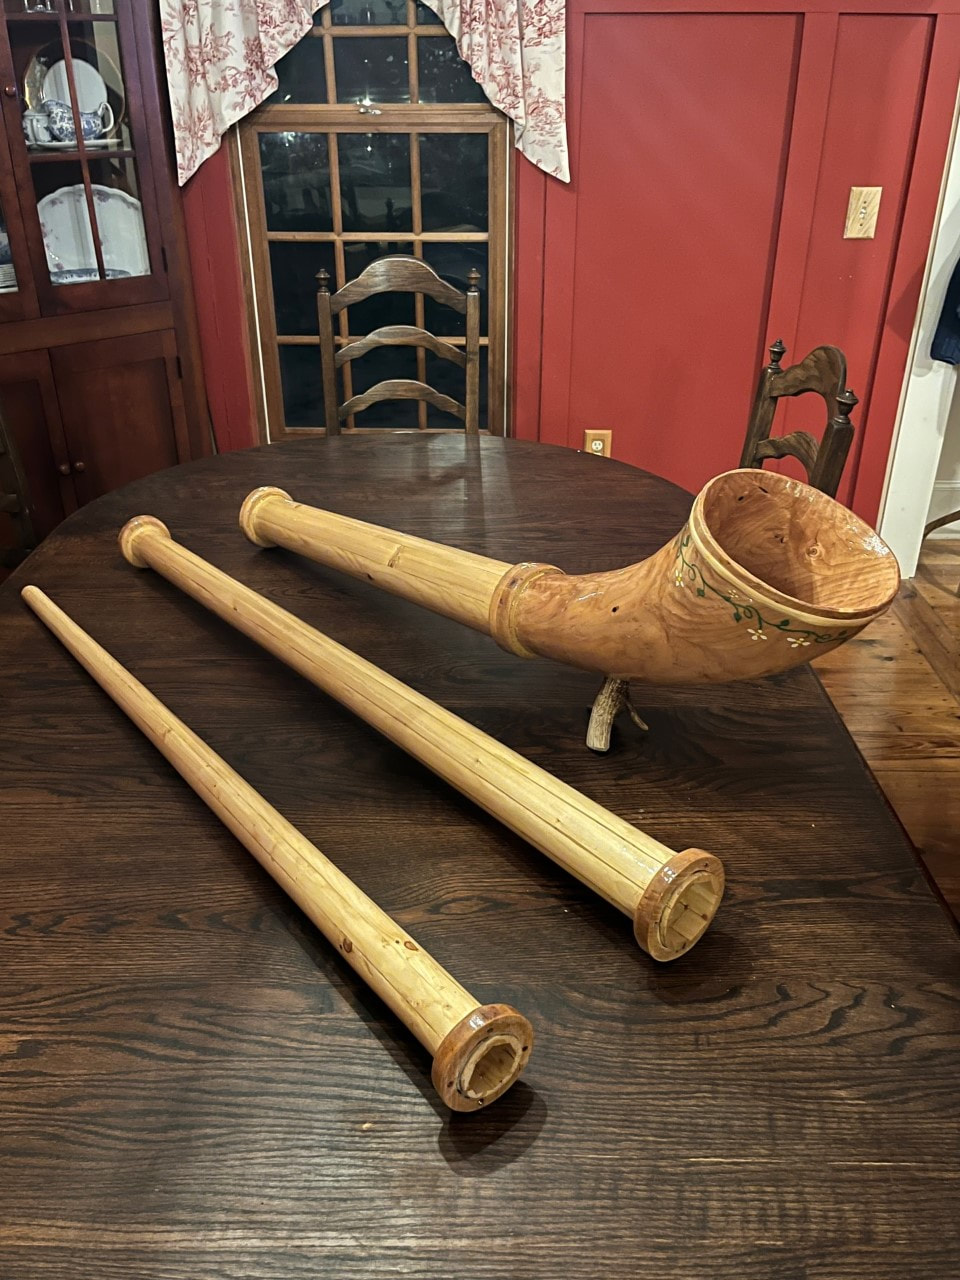
Homemade alphorn in 3 sections.
How to tune an Alphorn!
How to tune an Alphorn:
1. Build the Alphorn a bit too long
2. Get a tuner and tune it to F or F# depending on your preference, by carefully cutting the the mouthpiece end of the horn shorter and shorter till it is in tune. Shortening the horn brings the pitch higher. The only way to lower the pitch is to make the horn longer, which is hard to do, so be careful with this step.
Alphorn by cutting it shorter. I used a sharp, fine toothed Japanese pull-saw.
Final Finishes to My Second Alphorn:
I enjoy
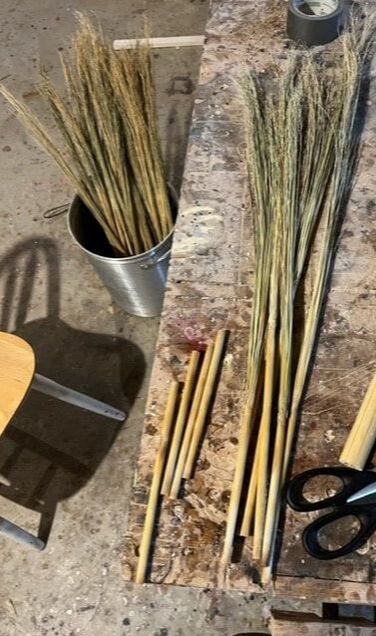
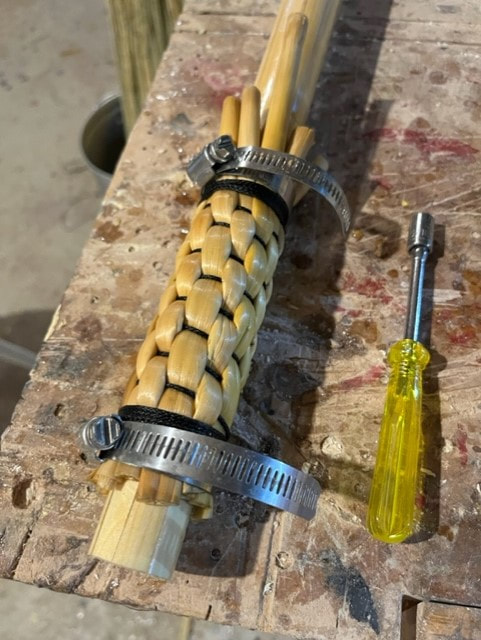
making brooms by hand, and in doing so, I learned how to plait broomcorn stalks, which are actually a sorghum stalks onto broom handles. I thought this would be a nice way to reinforce and finish the mouthpiece end of this rustic style Alphorn. The sorghum is woven on using high tensile strength tarred bank line, so this should provide good reinforcement also, considering there are no hardwood ends or wraps on my second Alphorn.
Here are broomcorn stalks. I have soaked the ends which I will plait, in hot water for an hour or so. I am cutting off the tassle-ends of the broom corn (the tassles would be the broom material , which I don't need).
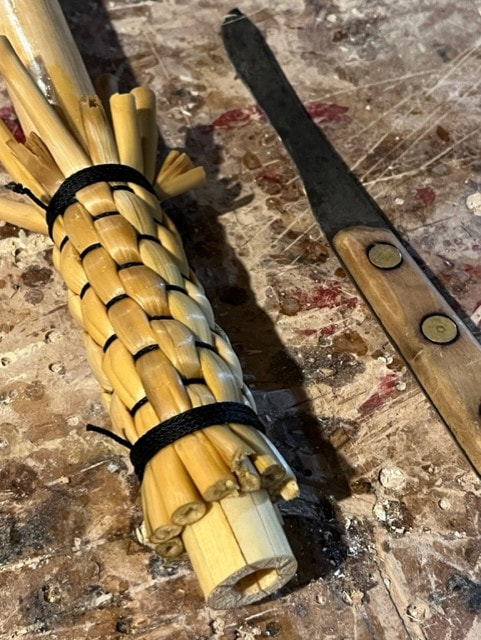
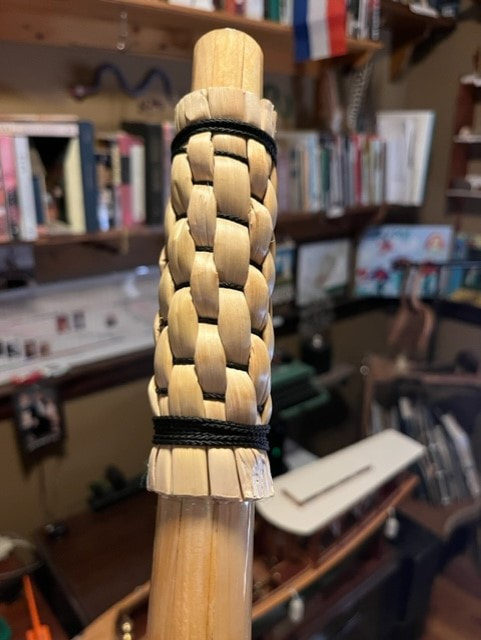
Here is the broom corn plaited (woven) on. Compressing the stalks at the ends makes them flare out as shown in the photo.
I use pipe clamps to compress the stalks tight against the horn. These will dry firmly in place, and then when dry, I will trim them off.
And here I have cut the broomcorn flush with a sharp knife and removed the clamps.