

How to use Migration Assistant with a Thunderbolt connection
source link: https://www.macworld.com/article/1663578/migration-assistant-thunderbolt.html
Go to the source link to view the article. You can view the picture content, updated content and better typesetting reading experience. If the link is broken, please click the button below to view the snapshot at that time.

How to use Migration Assistant with a Thunderbolt connection

Migration Assistant in macOS has matured over many years from a fragile tool that often failed in moving your identity—your apps, files, preferences, and other data—from one Mac to another. It’s now quite reliable, and I’ve used it several times in recent years without fail.
But one pain point relates to how fast files transfer. Ideally, you want to connect two Macs with a Thunderbolt 3 or 4 cable. A USB-C plug doesn’t ensure it’s Thunderbolt—some USB 3.1 and 3.2 cables sport USB-C plugs, but when connected between two Thunderbolt 3 ports on Macs only carry 480 Mbps (USB 2.0 speeds) instead of up to 40 Gbps. You can check the cable to make sure the lightning-bolt icon appears on both ends. If it doesn’t, it can be difficult without quite a lot of detail to verify that you have the right cable. Thunderbolt 4/USB4 cables are universal and don’t need to be a special type. (This column can help you tell USB-only and Thunderbolt cables apart.)
What if you’re sure, you plug the cable into both Macs, begin Migration Assistant’s transfer, and the speed is terrible? You can see in the Transferring Your Information screen which method is in use: at the bottom, it should show Current Connection and the method: Wi-Fi, Ethernet, or Thunderbolt. (Ethernet is next best, offering 1 Gbps; Wi-Fi relies on a peer-to-peer method that’s about 200 times slower than Thunderbolt in my testing.)
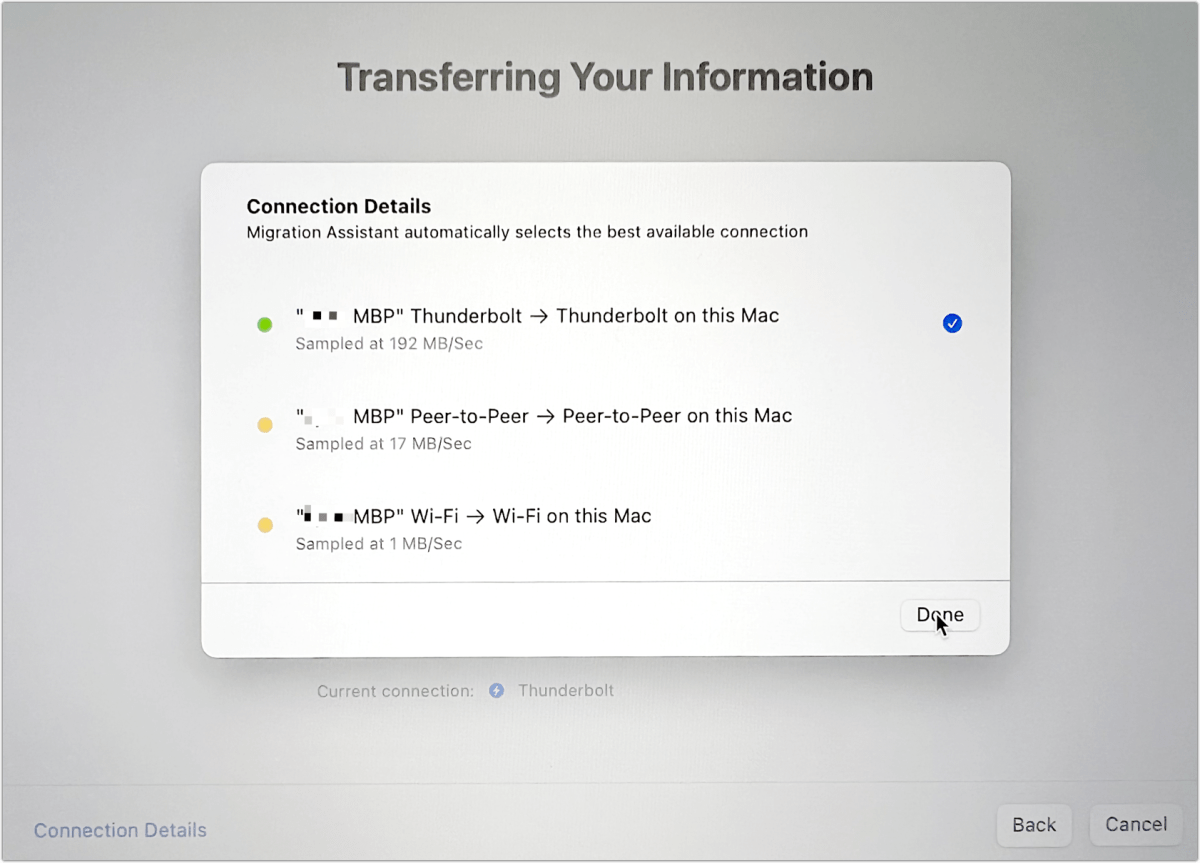
In some versions of Migration Assistant, you can click Connection Details and see the available methods and how they test for performance in Migration Assistant. If you don’t see Thunderbolt listed there, it’s simply not being used.
Some users have found the following can help you transfer at Thunderbolt speeds:
- Instead of using Migration Assistant on both Macs, boot into Target Disk Mode on the Mac you’re transferring from. The Mac you’re migrating to will recognize it as a source and let you select it. This can bypass some macOS issues. (This column tells you how to use Target Disk Mode with Intel or Apple silicon M-series Macs.)
- Make sure Thunderbolt Bridge mode is enabled and shows Connected with a green dot in > System Preferences/Settings > Network. If it’s active on both Macs and you see “Not connected,” it is plausible your cable isn’t working or isn’t the correct kind. If it’s not present, click the plus sign (Monterey and earlier) or … (Ventura) button, choose Add Service, and choose Thunderbolt Bridge from the Interface menu. Click Create.
This Mac 911 article is in response to a question submitted by Macworld reader Isidore.
Ask Mac 911
We’ve compiled a list of the questions we get asked most frequently, along with answers and links to columns: read our super FAQ to see if your question is covered. If not, we’re always looking for new problems to solve! Email yours to [email protected], including screen captures as appropriate and whether you want your full name used. Not every question will be answered, we don’t reply to email, and we cannot provide direct troubleshooting advice.
Recommend
About Joyk
Aggregate valuable and interesting links.
Joyk means Joy of geeK