

无线通信:WIFI、MQTT 开发例程
source link: https://www.51cto.com/article/751399.html
Go to the source link to view the article. You can view the picture content, updated content and better typesetting reading experience. If the link is broken, please click the button below to view the snapshot at that time.

无线通信:WIFI、MQTT 开发例程

一、无线通信
1、Wifi
(1)STA /AP 相关函数
主要学习Hi3861V100的STA和AP模式。常用接口函数如下:
// STA 模式
1.定义: int ConnectToHotspot(WifiDeviceConfig* apConfig);
功能: 连接WiFi
参数: WiFi相关参数比如SSID,passward
返回值: 1:成功
依赖: //foundation/communication/wifi_lite/interfaces/wifiservice
2.定义: void DisconnectWithHotspot(int netId);
**功能: 断开WiFi
参数: WiFi对应的netId
**返回值: 无
依赖: //foundation/communication/wifi_lite/interfaces/wifiservic

// AP模式
1.定义: int StartHotspot(const HotspotConfig* config);
功能: 开启AP
参数: AP参数包括:IP地址,默认网关,子网掩码
**返回值: 0:成功
依赖: //foundation/communication/wifi_lite/interfaces/wifiservice
2.定义: void StopHotspot(void);
功能: 断开AP
参数: 无
返回值: 无
依赖: //foundation/communication/wifi_lite/interfaces/wifiservice
(2)STA\AP demo运行
- 硬件准备: 一块开发板、可开启热点的手机。
第一步,将已有demo移动到app目录下:
- 将hi3861_hdu_iot_application/src/vendor/hisilicon/hispark_pegasus/demo/wifi_demo
文件夹复制到hi3861_hdu_iot_application/src/applications/sample/wifi-iot/app/目录下。 - 修改applications/sample/wifi-iot/app/ wifi_demo/目录下的BUILD.gn,如果使用STA模式,将"wifi_starter.c"和"wifi_hotspot_demo.c"使用#注释,如果使用。
AP模式,将"wifi_connecter.c"和"wifi_connect_demo.c"使用#注释(同时只能使用一种模式),如下示例使用AP模式:
static_library("wifi_control") {
sources = [
#"wifi_connecter.c",
"wifi_starter.c",
#"wifi_connect_demo.c",
"wifi_hotspot_demo.c",
]第二步,修改applications/sample/wifi-iot/app/目录下的BUILD.gn,,在features字段中添加wifi_demo: wifi_control。
import("//build/lite/config/component/lite_component.gni")
lite_component("app") {
features = [ "wifi_demo:wifi_control", ]
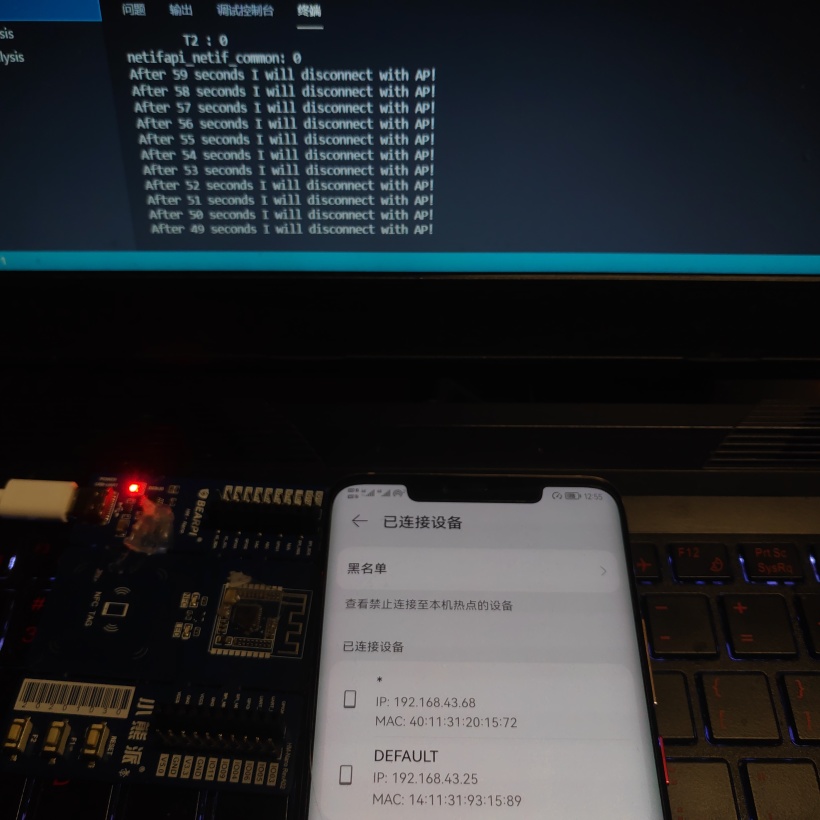
}第三步,步骤四:Hi3861V100作为STA模式(参考步骤2修改文件实现demo功能),使用开发板连接手机热点,可以在wifi_connect_demo.c修改热点名称和passward(注意:只支持4G网络),源码中的demo wifi名:“H”,passward:“12345678”,代码如下所示:
static void WifiConnectTask(void)
{
    osDelay(10); /* 10 = 100ms */
    // setup your AP params
    WifiDeviceConfig apConfig = { 0 };
    strcpy(apConfig.ssid, "H"); // 设置wifi ssid "h" Set wifi ssid
    strcpy(apConfig.preSharedKey, "12345678"); // 设置wifi passward "12345678" Set wifi password
    apConfig.securityType = WIFI_SEC_TYPE_PSK;

    int netId = ConnectToHotspot(&apConfig);
    int timeout = 60;
    while (timeout--) {
        printf("After %d seconds I will disconnect with AP!\r\n", timeout);
        /* 100相当于1s,60后WiFi断开 */
        /* 100 is equivalent to 1s, and the WiFi will be disconnected after 60 */
        osDelay(100);
    }
    DisconnectWithHotspot(netId);
}
编译运行之后,设置热点H,passward12345678,复位开发板,打开串口调试Monitor后,可以看到开发板已经连接到手机上。
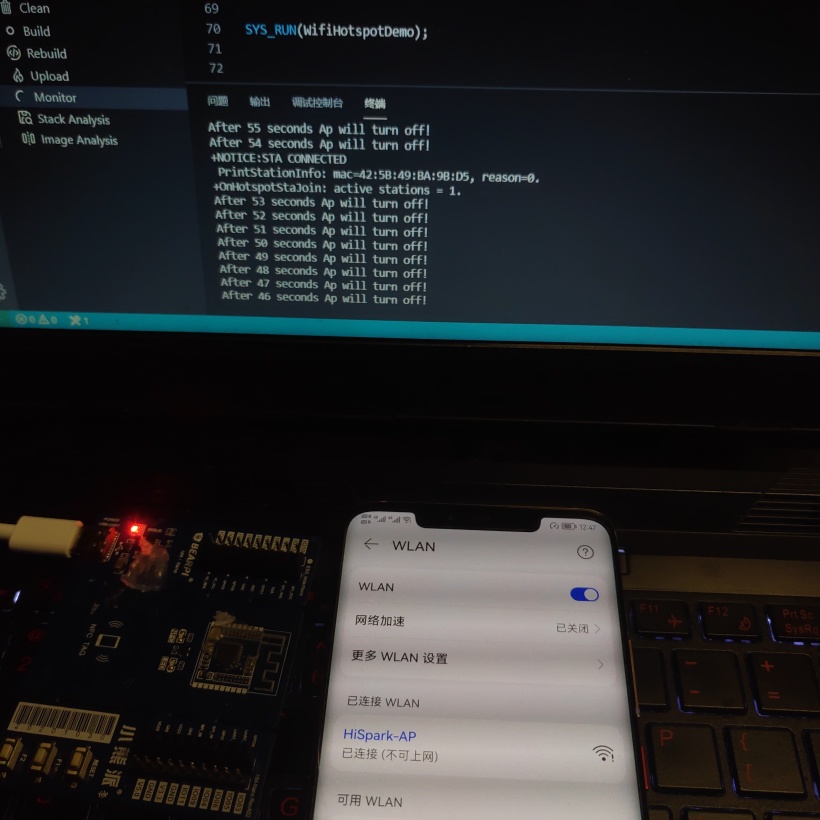
Hi3861作为AP模式(参考步骤一修改BUILD),可以使用手机连接开发板AP,可以在wifi_hotspot_demo.c文件中修改开发板AP的名称和passward。demo AP名称:“HiSpark-AP”,passward为:“12345678”,代码如下所示。
#include "wifi_starter.h"

static void WifiHotspotTask(void)
{
    WifiErrorCode errCode;
    HotspotConfig config = { 0 };

    // 设置AP的配置参数 set configuration parameters for AP
    strcpy(config.ssid, "HiSpark-AP"); // AP :HiSpark-AP
    strcpy(config.preSharedKey, "12345678"); // Password:12345678
    config.securityType = WIFI_SEC_TYPE_PSK;
    config.band = HOTSPOT_BAND_TYPE_2G;
    config.channelNum = 7; /* 通道7 Channel 7 */

    osDelay(10); /* 10 = 100ms */

    printf("starting AP ...\r\n");
    errCode = StartHotspot(&config);
    printf("StartHotspot: %d\r\n", errCode);

    int timeout = 60; /* 60 = 1 minute */
    while (timeout--) {
        printf("After %d seconds Ap will turn off!\r\n", timeout);
        osDelay(100); /* 100 = 1s */
    }

    printf("stop AP ...\r\n");
    StopHotspot();
    printf("stop AP ...\r\n");
    osDelay(10); /* 10 = 100ms */
}
编译运行之后,手机上可以看到HiSpark的无线网络,点击后输入passward即可连接,串口可以看到连接信息。
2、MQTT
(1)bearpi MQTT使用
mqtt目前已经移植到了OpenHarmony中,在源码vendor目录下bearpi、hihope等公司均有相应的应用demo。这里我先说如何使用bearpi的mqtt。
- 第一步,拷贝src\vendor\bearpi\bearpi_hm_nano\demo\D5_iot_mqtt文件夹到src\applications\sample\wifi-iot\app\下,该目录(D5_iot_mqtt).
- 第二步,修改app目录下的BUILD.gn,让该工程参与编译,如下:
import("//build/lite/config/component/lite_component.gni")
lite_component("app") {
features = [
# "startup",
# "iothardware:led_example",
# iothardware指的是工程目录
# :led_example指的是工程生成的静态库/文件
# "wifi_demo:wifi_control",
"D5_iot_mqtt:iot_mqtt",
]
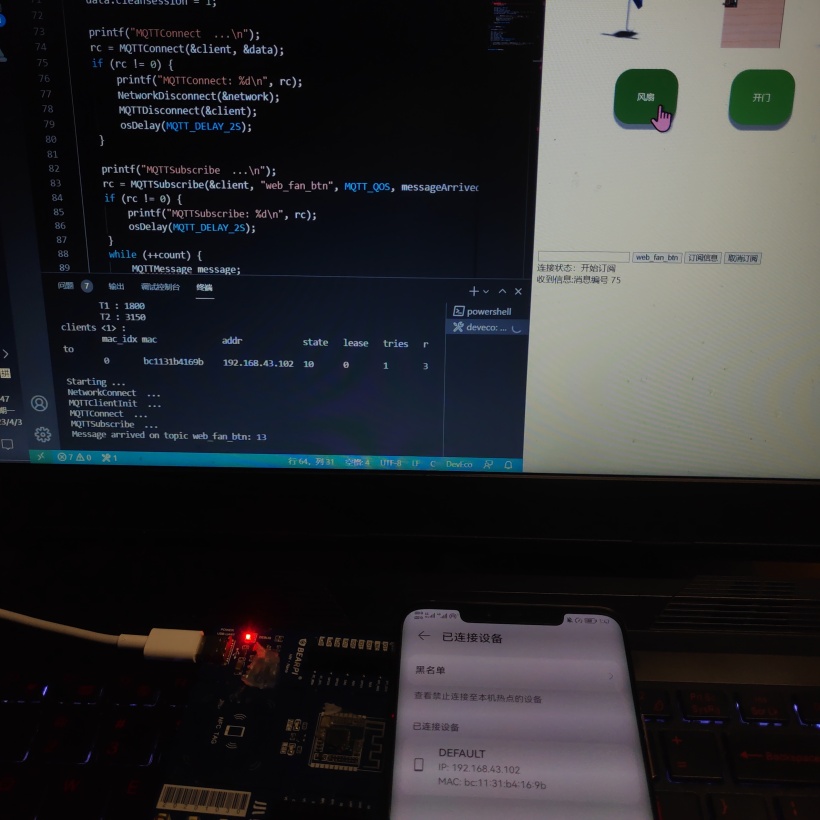
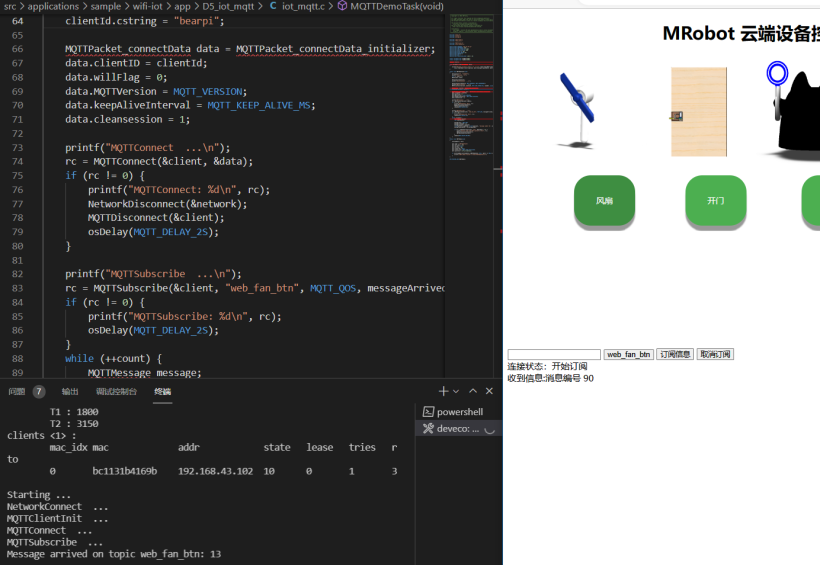
}- 第三步,打开src\applications\sample\wifi-iot\app\D5_iot_mqtt\iot_mqtt.c文件,修改我们要连接的mqtt服务器(这里可以使用我的服务器120.55.170.12)也可以使用mqtt调试工具EMQX调试。连接的热点我们改为H passward为12345678。
static void MQTTDemoTask(void)
{
    WifiConnect("H", "12345678");
    printf("Starting ...\n");
    int rc, count = 0;
MQTTClient client;- 第四步,如果使用我的服务器调试,那么对应的topic需要修改,如下:
printf("MQTTSubscribe  ...\n");
  // 下面这行 "substopic" 修改为 "web_fan_btn"
    rc = MQTTSubscribe(&client, "web_fan_btn", MQTT_QOS, messageArrived);
    if (rc != 0) {
        printf("MQTTSubscribe: %d\n", rc);
        osDelay(MQTT_DELAY_2S);
    }
   ····
   ·····
        message.payloadlen = strlen(payload);
   // 下面这行 "pubtopic" 修改为 "fan"
        if ((rc = MQTTPublish(&client, "fan", &message)) != 0) {
            printf("Return code from MQTT publish is %d\n", rc);
            NetworkDisconnect(&network);
            MQTTDisconnect(&client);
        }
        osDelay(MQTT_DELAY_500_MS);
    }
}
static void MQTTDemo(void)
如果自己设定的mqtt服务器,需要约定好topic。编译运行后,测试如下图所示,点击风扇按钮,开发板可以接收到发送过来的数据。
(2)hihope MQTT使用
这个已经有详细教程,可参考连老师文章,https://ost.51cto.com/posts/10201。
Recommend
About Joyk
Aggregate valuable and interesting links.
Joyk means Joy of geeK