
NUTUI-React电梯楼层组件的设计与实现
source link: https://jelly.jd.com/article/64128908decc790068347910
Go to the source link to view the article. You can view the picture content, updated content and better typesetting reading experience. If the link is broken, please click the button below to view the snapshot at that time.

官网GitHub:
点击进入
咚咚群号:1025679314
微信群:hanyuxinting(暗号:NutUI-React)
欢迎共建、使用!期待您早日成为我们共建大军中的一员!
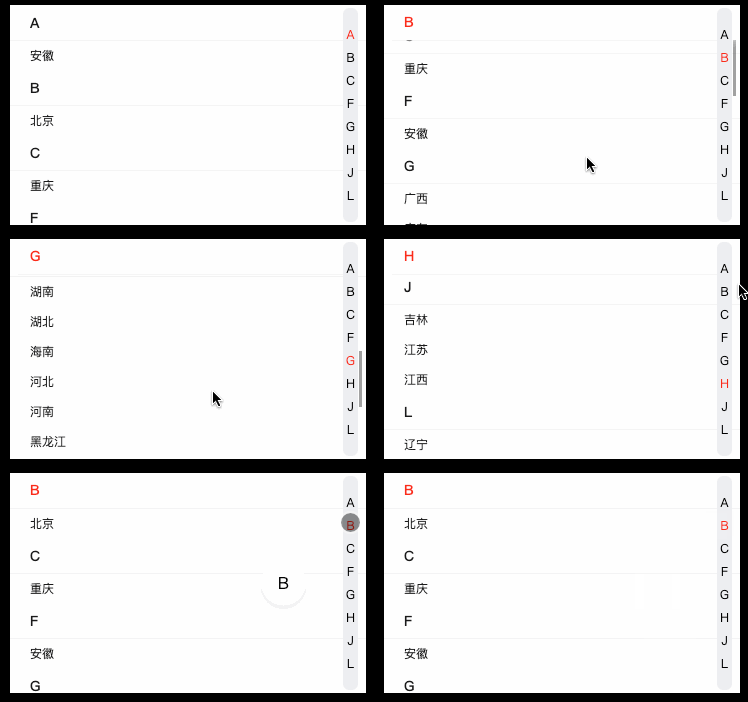
Elevator 组件是 NutUI-React 的一个电梯楼层组件,用于列表快速定位以及索引的显示,电梯与楼层结合是网站中比较常见的内容展示模式。我们通过一张效果图,来看看 Elevator 组件大概实现什么功能。

下面,本文会通过以下几方面,来介绍 Elevator 组件的具体实现:
- 为什么要封装该组件
- 组件的设计思路
- 组件的实现原理
为什么要封装该组件
日常工作中,会遇到很多相似功能,每次重新开发,不仅会影响开发效律,且这些相近的代码可能潜伏某些问题,一旦暴露,需要花费大量去处理业务里的相同代码。不管是为了业务考虑还是单纯的为了提高效率,我们会把一些经常用到的组件抽离封装,不同的地方使用这个组件,减少重复代码的编写。
组件的设计思路
我们先来看一下 Elevator 组件需要实现哪些功能:
- 页面滚动判断当前位于哪个楼层,高亮对应电梯标识
- 电梯容器描点点击,滚动至指定楼层位置
- 展示吸顶索引条
对功能进行拆解,我们大致需要实现以下几点:
- 为电梯和楼层添加匹配标识索引
- 获取楼层元素高度数组
- 监听楼层容器滚动事件,获取当前可视区楼层索引,高亮对应电梯元素
- 监听电梯容器的拖拽事件,确定点击的楼层索引,滚动到指定楼层位置
- 如果用户设置了索引吸顶参数且页面滚动距离顶部大于1,展示吸顶索引条
基于上面的设计思路和拆解方案,就可以着手实现组件了。
组件的实现原理
首先根据功能为组件设定参数,acceptKey 索引 key 值、indexList 索引列表、isSticky 索引是否吸顶、spaceHeight 电梯容器锚点的上下间距。
构建 DOM 结构,把 DOM 结构分为 3部分:
- 电梯容器:绑定拖拽事件
- 楼层容器:渲染楼层元素列表
- 吸顶索引条:渲染当前位置的索引 key 值

<div className="nutui-elevator">
    {/* 吸顶索引条 */}
    {isSticky && scrollY > 0 ? (
        <div className="nutui-list-fixed">
            {indexList[currentIndex][acceptKey]}
        </div>
    ) : null}
    {/* 楼层容器 */}
    <div className="nutui-list">
        <div className="nutui-list-inner" ref={listview}>
            {indexList.map((item: any, idx: number) => {
                return (
                    <div className="nutui-list-item" key={idx}>
                        <div className="nutui-list-item-title">{item[acceptKey]}</div>
                            <>
                                {item.list.map((subitem: ElevatorData) => {
                                    return (
                                        <div className="nutui-list-item-name" key={subitem.id}>
                                            {subitem.name}
                                        </div>
                                    )
                                })}
                            </>
                    </div>
                )
            })}
        </div>
    </div>
    {/* 电梯容器 */}
    <div className="nutui-bars">
        <animated.div
            className="nutui-bars-inner"
            {...bind()}
            style={{ touchAction: 'pan-y' }}
        >
            {indexList.map((item: any, index: number) => {
                return (
                    <div className="nutui-bars-item" key={index}  data-index={index}>
                        {item[acceptKey]}
                    </div>
                )
            })}
        </animated.div>
    </div>
</div>
接下来才是重头戏,也就是功能逻辑的实现。

获取楼层元素高度数组
采用 querySelectorAll 方法获取楼层容器中所有楼层元素,存储到数组中,循环遍历每个楼层元素,获取当前楼层元素距离外层元素的实际高度,存储到楼层高度数组中
const listview = useRef<HTMLDivElement>(null)
const state = useRef({
    listHeight: [],
    listGroup: []
})
const setListGroup = () => {
    if (listview.current) {
      const els = listview.current.querySelectorAll('.nut-elevator__list__item')

      els.forEach((el: Element) => {
        if (el != null && !state.current.listGroup.includes(el)) {
          state.current.listGroup.push(el)
        }
      })
    }
  }
const calculateHeight = () => {
    let height = 0
    state.current.listHeight.push(height)
    for (let i = 0; i < state.current.listGroup.length; i++) {
      const item = state.current.listGroup[i]
      height += item.clientHeight
      state.current.listHeight.push(height)
    }
}
监听楼层容器滚动事件
监听楼层容器外层元素的 scroll 事件,获取目标对象的滚动高度 e.target.scrollTop,循环遍历楼层高度数组,确认可视区楼层索引,存储索引值并中断后续循环
const [scrollY, setScrollY] = useState(0)
const [currentIndex, setCurrentIndex] = useState<number>(0)

const listViewScroll = (e: Event) => {
    const target = e.target as Element
    const { scrollTop } = target
    const { listHeight } = state.current
    setScrollY(scrollTop)
    for (let i = 0; i < listHeight.length - 1; i++) {
      const height1 = listHeight[i]
      const height2 = listHeight[i + 1]
      if (scrollTop >= height1 && scrollTop < height2) {
        setCurrentIndex(i)
      }
      break
    }
}
useEffect(() => {
    listview.current.addEventListener('scroll', listViewScroll)
}, [])
展示吸顶索引条
当用户设置 isSticky 参数为 true,且楼层容器的 scrollY 值大于 0时,展示吸顶索引条。
监听电梯容器拖拽事件
监听电梯容器外层元素的拖拽事件,我们借助 Use Gesture 库实现,它是一个支持丰富鼠标和触摸手势的 React 库。可以将丰富的鼠标和事件绑定到任何节点上。兼容 PC 和 M 端,它让我们设置手势变得更加简单,可以单独使用,官方推荐和react-spring动画库一起使用。
Use Gesture 库包含很多 hooks, 我们采用的 useGesture useGesture hooks 返回一个函数(存储在bind常量中),调用时返回一个带有事件处理程序的对象。当把{…bind()}放在节点上,就是给节点添加 onDragStart 和 onDragEnd 事件处理程序。
在 onDragStart 中获取事件目标元素 target 的 data-index 值,该值为电梯和楼层匹配的标识索引,在获取手势开始的偏移量记录到 touchState中,在 onDragEnd 中获取手势结束的偏移量,两个偏移量差值计算,计算手势拖动范围,结合电梯容器描点的间距获取最终的楼层索引值,滚动到对应楼层位置。
import { useGesture } from '@use-gesture/react'
import { animated } from '@react-spring/web'
...

const [scrollY, setScrollY] = useState(0)
const touchState = useRef({
    y1: 0,
    y2: 0,
})
const getData = (el: HTMLElement, name: string): string | void => {
    const prefix = 'data-'
    return el.getAttribute(prefix + name) as string
}
const scrollTo = (index: number) => {
    let cacheIndex = index
    if (index < 0) {
      cacheIndex = 0
    } else if (index > state.current.listHeight.length - 2) {
      cacheIndex = state.current.listHeight.length - 2
    }
    listview.current.scrollTo(0, state.current.listHeight[cacheIndex])
}
const bind = useGesture({
    onDragStart: ({ target, offset }) => {
      const index = Number(getData(target as HTMLElement, 'index'))
      touchState.current.y1 = offset[1]
      state.current.anchorIndex = +index
      scrollTo(index)
    },
    onDragEnd: ({ offset }) => {
      touchState.current.y2 = offset[1]
      // delta 是一个浮点数, 需要四舍五入一下, 否则页面会找不到最终计算后的index
      const delta =
        (touchState.current.y2 - touchState.current.y1) / spaceHeight || 0
      const cacheIndex = state.current.anchorIndex + Math.ceil(delta)
      scrollTo(cacheIndex)
    },
})
...
{/* 电梯容器 */}
<div className="nutui-bars">
    <animated.div
        className="nutui-bars-inner"
        {...bind()}
        style={{ touchAction: 'pan-y' }}
    >
        {indexList.map((item: any, index: number) => {
            return (
                <div className="nutui-bars-item" key={index}  data-index={index}>
                    {item[acceptKey]}
                </div>
            )
        })}
    </animated.div>
</div>
自定义楼层内容
楼层内容列表默认只展示列表标题,比较单一,考虑到用户可能需要展示其他内容,我们为用户提供自定义内容的功能,使用 React.createContext 来实现,React.createContext() 会创建两个组件(Provider、Consumer)分别用来提供数据和接收数据,在Elevator 组件列表的渲染中,我们通过 Provider 组件设置 value 属性,用户调用 Consumer 组件接收数据,然后渲染 DOM 通过 children 再传给 Elevator 组件。
// 用户使用
<Elevator
    indexList={[索引列表]}>
    <Elevator.Context.Consumer>
    {(value) => {
        return (<span>自定义...{value?.name}</span>
        )
    }}
    </Elevator.Context.Consumer>
</Elevator>
// 组件内处理
import React, {FunctionComponent, createContext} from 'react'
export const elevatorContext = createContext({} as ElevatorData)
export const Elevator: FunctionComponent<
Partial<ElevatorProps> & React.HTMLAttributes<HTMLDivElement>
> & { Context: typeof elevatorContext } = (props) => {
...
return (
<div className="nutui-elevator">
{/* 吸顶索引条 */}
...
{/* 楼层容器 */}
<div className="nutui-list">
<div className="nutui-list-inner" ref={listview}>
{indexList.map((item: any, idx: number) => {
return (
<div className="nutui-list-item" key={idx}>
<div className="nutui-list-item-title">{item[acceptKey]}</div>
<>
{item.list.map((subitem: ElevatorData) => {
return (
<div className="nutui-list-item-name" key={subitem.id}>
{children ? (
<elevatorContext.Provider value={subitem}>
{children}
</elevatorContext.Provider>
) : (
subitem.name
)}
</div>
)
})}
</>
</div>
)
})}
</div>
</div>
{/* 电梯容器 */}
...
</div>
)
}
Elevator.Context = elevatorContextElevator 组件的实现就基本完成了。
本篇文章介绍了 Elevator 组件的实现思路和实现原理,希望对大家有那么一丢丢的帮助或启发。后续我们也会对组件进行持续优化迭代,如果感兴趣,不妨查看和试用一下,使用上有任何问题,可在 issues 上进行提问,我们会尽快解答和修复。对该系列文章感兴趣的小伙伴,记得点个 Star ❤️支持我们一下~
再次期待您早日成为我们共建大军中的一员!
一起共建,一起使用!
做站内最优秀的开源组件库!
咚咚群号:1025679314
赶紧加入我们吧!
更多文章:
NutUI-React 京东移动端组件库新增 Demo 示例一览(2月上新,20+demo)
NutUI-React 适配 Taro 的实现
基于 Leo+NutUI 的移动端项目模板实践
NutUI-React Input输入框的使用指南
NUTUI-React 数字滚动组件的设计与实现
NutUI-React 组件库的动态主题探索
NutUI 4.0 正式发布!
2022 倒带-NutUI
京东 React 组件库支持小程序开发了
NutUI 京东小程序发布了!
Recommend
About Joyk
Aggregate valuable and interesting links.
Joyk means Joy of geeK