

WebSocket集群解决方案,不用MQ - 十月南城
source link: https://www.cnblogs.com/shiyuelp/p/17264482.html
Go to the source link to view the article. You can view the picture content, updated content and better typesetting reading experience. If the link is broken, please click the button below to view the snapshot at that time.

WebSocket集群解决方案,不用MQ
首先不了解WebSocket的可以先看看这篇文章,以及传统的WebSocket方案是怎么做的,https://www.cnblogs.com/jeremylai7/p/16875115.html 这是用MQ解决的版本,那么这种方案存在什么问题呢。
第一:增加MQ,可能造成消息挤压、消息顺序的问题
第二:增加MQ,则还需要保证MQ的可用性
第三:每个socket服务都需要去消费消息,增加每个服务的压力(做无用功)
那么,基于以上问题,还有没有解决方案呢?
当然有!!!
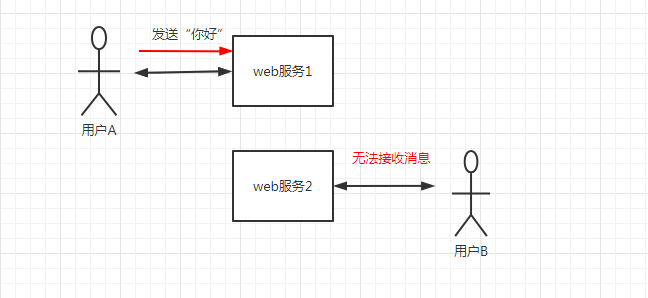
首先我们理解一个逻辑,为什么WebSocket不能直接做集群,socket是一个长链接,当我们要给socket用户发送消息的时候,我们不知道用户是连接到哪一个服务上面的,这样就无法直接发送消息了
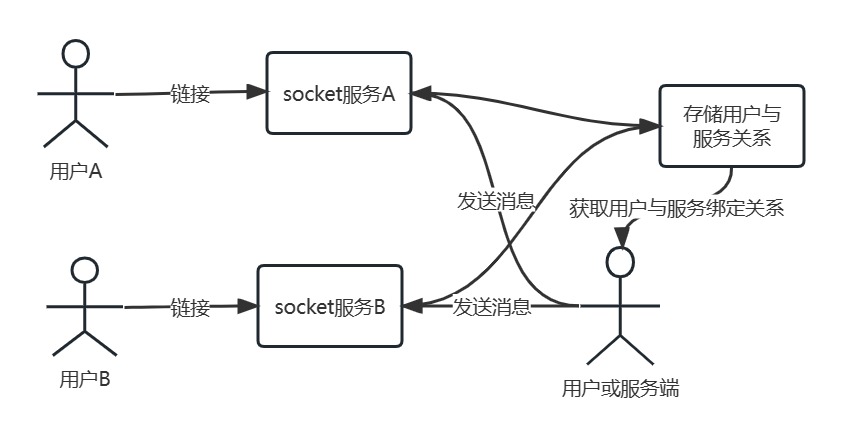
那么,我们能不能给每一个socket服务器增加一个标识,然后在用户连接的时候将用户与socket服务器的关系绑定起来,然后在使用的时候再去判断用户存在哪,再给指定的服务器发送消息不就解决问题了吗?
那么,我们来结合springcloud来完成这个工作,根据这个理论,其他方式也可以实现
首先,来看websocket服务,启动的时候主要注意的问题
@SpringBootApplication
public class WsApplication implements CommandLineRunner {

    public static void main(String[] args) {
        //动态服务名
        System.setProperty("SpringApplicationName", "WS-" + IdUtil.simpleUUID());
        SpringApplication.run(WsApplication.class, args);
    }

    @Override
    public void run(String... args) {
        System.out.println("项目启动完毕");
    }

}
需要注意的是动态服务名这里,每个服务的名字都是不一样的,这样就保证了每个服务的一个唯一性
spring:
  application:
    #随机名字,做ws集群使用
    name: ${SpringApplicationName}
  #    name: ws
  redis:
    host: 127.0.0.1
  cloud:
    nacos:
      server-addr: 127.0.0.1
      config:
        file-extension: yaml

server:
  port: 9090
这里用到了nacos与redis,使用的地方待会会有,其中SpringApplicationName是在启动的时候传入的
接下来看WebSocket链接时候需要注意的点
@Component
@ServerEndpoint("/ws/{userId}")
public class WebSocket {

    /**
     * 存放用户信息
     */
    private static final ConcurrentHashMap<Long, WebSocket> WEB_SOCKET_MAP = new ConcurrentHashMap<>(16);
    /**
     * session
     */
    private Session session;

    private Long userId;

    private String applicationName = System.getProperty("SpringApplicationName");

    private StringRedisTemplate stringRedisTemplate = SpringUtil.getBean(StringRedisTemplate.class);

    /**
     * 静态常量
     */
    private static final String SOCKET_USER_SPRING_APPLICATION_NAME = "ws:socket:user:spring:application:name";

    /**
     * 当有新的WebSocket连接完成时
     *
     * @param session
     * @param userId
     */
    @OnOpen
    public void onOpen(Session session, @PathParam("userId") Long userId) {
        System.out.println("new connection");
        System.out.println(userId);
        this.session = session;
        //根据token获取用户信息
        this.userId = userId;
        WEB_SOCKET_MAP.put(this.userId, this);
        this.stringRedisTemplate.opsForHash().put(SOCKET_USER_SPRING_APPLICATION_NAME, userId + "", applicationName);
    }
}
其中在链接的时候,将用户ID与socket服务的关系保存进了redis,这样我们在使用的时候就可以根据这个关系,找到对应的socket服务从而实现自己的业务逻辑
然后我们定义一个发送消息的接口
@RestController
@RequestMapping("push")
public class PushController {


    @PostMapping("{userId}")
    public void pushMessage(@PathVariable Long userId, @RequestBody JSONObject message) {
        WebSocket.sendMessage(userId, message);
    }
}
再单独封装一个接口,供使用方使用feign
@FeignClient(name = "pushFeign", configuration = DynamicRoutingConfig.class)
public interface PushFeign {

    /**
     * 推送消息
     *
     * @param serviceName 服务名
     * @param userId      用户
     * @param message     消息体
     */
    @PostMapping(value = "//{serviceName}/push/{userId}")
    void pushMessage(@PathVariable String serviceName, @PathVariable Long userId, @RequestBody JSONObject message);
}
再来个Service
@Service
public class PushService {

    @Resource
    private PushFeign pushFeign;

    @Resource
    private StringRedisTemplate stringRedisTemplate;

    /**
     * 静态常量
     */
    private static final String SOCKET_USER_SPRING_APPLICATION_NAME = "ws:socket:user:spring:application:name";

    /**
     * 发送消息
     *
     * @param userId
     * @param message
     */
    public void pushMessage(Long userId, JSONObject message) {
        Object serviceName = this.stringRedisTemplate.opsForHash().get(SOCKET_USER_SPRING_APPLICATION_NAME, userId + "");
        if (serviceName != null) {
            this.pushFeign.pushMessage(serviceName.toString(), userId, message);
        }
    }
}
还有个feign的配置文件,将链接重写DynamicRoutingConfig
public class DynamicRoutingConfig {
    @Bean
    public RequestInterceptor cloudContextInterceptor() {
        return template -> {
            String url = template.url();
            if (url.startsWith("//")) {
                url = "http:" + url;
                if (url.contains("?")) {
                    url = url.substring(0, url.indexOf("?"));
                }
                template.target(url);
                template.uri("");
            }
        };
    }
}
那么在使用的时候,我们可以直接调用PushService.pushMessage方法就可以直接给对应的用户发送消息了
那么可能又有人想问了,每个服务都不一样,那网关这些该怎么做,项目源码已经放在了码云上面, https://gitee.com/liupan1230/spring-cloud-websocket-cluster 大家可以参考,同时也有发送方调用示例
Recommend
About Joyk
Aggregate valuable and interesting links.
Joyk means Joy of geeK