

泰拉瑞亚EasyBuildMod便捷建造模组开发详细过程 - longxiaoming
source link: https://www.cnblogs.com/lxm-cnblog/p/17255401.html
Go to the source link to view the article. You can view the picture content, updated content and better typesetting reading experience. If the link is broken, please click the button below to view the snapshot at that time.

github地址:
https://github.com/lxmghct/Terraria-EasyBuildMod
如果觉得有帮助,记得在github上点个star哦~
创意工坊搜索EasyBuildMod即可找到模组
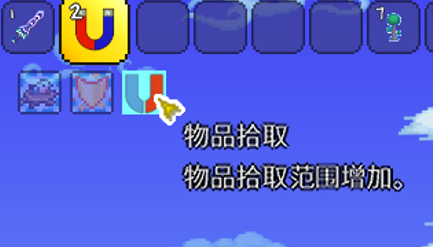
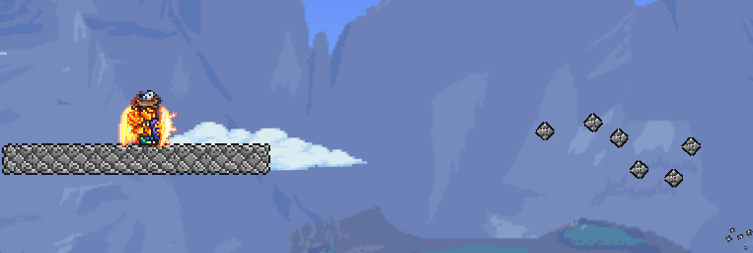
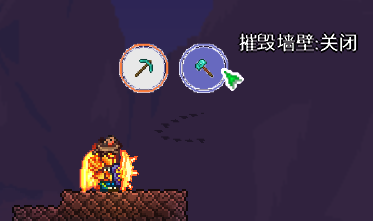
EasyBuildMod是一个便捷建造模组,它包含了三个物品:物块放置助手可以快速将物块或墙壁放置在一个矩形区域、物块摧毁助手可以快速摧毁矩形区域内的物块或墙壁、物品拾取磁铁则可用于快速拾取摧毁后掉落的物品。
制作这个模组主要是因为自己在游戏中想挖空或建造地形进行建造战斗场地时,直接手动挖空或放置非常耗时,而自己尝试过某些模组但都不太能满足自己需要,比如Fargo的“城市克星”,摧毁范围大但是墙壁无法破坏,还有“更好的体验”模组,放置和摧毁物块的效率并不算太高。暂时也没找到其他模组(如果有欢迎提出)。所以就自己动手写了一个。
2.模组物品制作
本模组包含三个物品,物品拾取磁铁、物块放置助手和物块摧毁助手。定义了一个全局的EasyBuildModPlayer类继承自ModPlayer,来控制使用某些物品或拥有某些效果时玩家的行为改变。
2.1物品拾取磁铁
ItemGrabMagnet,该物品借鉴了懒人模组中的战利品磁铁和ItemMagnetPlus模组。希望达到的效果是使用后玩家拥有“物品拾取”的Buff,可以扩大拾取范围,再次使用则可以关闭。
首先是ItemGrabMagnet的代码。这部分的代码比较简单,就是在玩家使用物品时判断是否已经拥有Buff,如果没有则添加Buff,如果有则移除Buff。
有几个细节的地方:由于想要的是使用磁铁后buff时间无限长,在Buff中设置剩余时间不可见,在给Buff时设置足够长的时间即可。
还有一个要注意的地方就是CombatText.NewText会默认对所有玩家触发,也就是玩家A在使用时,玩家B也能看到CombatText.NewText的讯息,所以CombatText.NewText的第一个参数不能用Main.LocalPlayer,否则其他人使用时也会显示在自己这里。
    public class ItemGrabBuff : ModBuff
    {
        public override void SetStaticDefaults()
        {
            Main.buffNoTimeDisplay[Type] = true;
            Main.debuff[Type] = false;
        }
        public override void Update(Player player, ref int buffIndex)
        {
            player.GetModPlayer<EasyBuildModPlayer>().ItemGrabBuff = true;
        }
    }
    public class ItemGrabMagnet : ModItem
    {
        internal static string GetText(string str, params object[] args)
        {
            return Language.GetTextValue($"Mods.EasyBuildMod.Content.Items.ItemGrabMagnet.{str}", args);
        }

        public override string Texture => "EasyBuildMod/Content/Items/ItemGrabMagnet";

        public bool IsMagnetOn;

        public override void SetStaticDefaults()
        {
            CreativeItemSacrificesCatalog.Instance.SacrificeCountNeededByItemId[Type] = 1;
        }

        public override void SetDefaults()
        {
            Item.width = 30;
            Item.height = 30;
            Item.maxStack = 1;
            Item.value = Item.sellPrice(gold: 1);
            Item.rare = ItemRarityID.Blue;
            Item.useAnimation = 15;
            Item.useTime = 20;
            Item.useStyle = ItemUseStyleID.HoldUp;
            Item.consumable = false;
            IsMagnetOn = false;
        }

        public override void AddRecipes()
        {
            // 20个铁锭/铅锭
            CreateRecipe()
                .AddRecipeGroup("IronBar", 20)
                .AddTile(TileID.Anvils)
                .Register();
        }

        public override bool? UseItem(Player player)
        {
            IsMagnetOn = !player.HasBuff(ModContent.BuffType<Buffs.ItemGrabBuff>());
            if (IsMagnetOn)
            {
                CombatText.NewText(player.Hitbox, Color.Green, GetText("OnTooltip"));
                player.AddBuff(ModContent.BuffType<Buffs.ItemGrabBuff>(), 2592000);
                SoundEngine.PlaySound(SoundID.MenuTick);
            }
            else
            {
                CombatText.NewText(player.Hitbox, Color.Red, GetText("OffTooltip"));
                player.ClearBuff(ModContent.BuffType<Buffs.ItemGrabBuff>());
                SoundEngine.PlaySound(SoundID.MenuClose);
            }
            return true;
        }

        public override void ModifyTooltips(List<TooltipLine> tooltips)
        {
            string color = IsMagnetOn ? "00FF00" : "FF0000";
            string tooltop = IsMagnetOn ? GetText("OnTooltip") : GetText("OffTooltip");
            var line = new TooltipLine(Mod, GetText("StatusName"), $"[c/{color}:{tooltop}]");
            tooltips.Add(line);
        }

    }
然后是物品拾取范围扩大的实现。新定义EasyBuildModGlobalItem继承自GlobalItem,重写其中的GrabRange方法。注意格子数与游戏实际距离的换算是乘除16。
    public class EasyBuildModGlobalItem : GlobalItem
    {
        public override void GrabRange(Item item, Player player, ref int grabRange)
        {
            if (player.GetModPlayer<EasyBuildModPlayer>().ItemGrabBuff)
            {
                grabRange = ModContent.GetInstance<EasyBuildModConfig>().MagnetRange * 16;
            }
        }
    }
至此便基本实现了ItemGrabMagnet的功能。效果如下:
2.2物块放置与摧毁助手基类
ItemPlaceHelper与ItemDestroyHelper二者都有共同的特点,一个是可以通过右键调出菜单进行选择,一个是左键可以框选区域进行放置或破坏。自己最开始是先写了ItemPlaceHelper,而后写另一个的时候才意识到有大量重复的逻辑。为了避免过多重复代码,这里就二者的共同特点提取出一个抽象基类。
这里分成了三部分,物品自身、菜单和区域选择。
2.2.1Item实现
主要就是定义了物品的基本行为,如右键调出菜单,左键进行框选。调出菜单在重写CanUseItem中进行实现,选择区域则是在UseItem,这样处理更为方便。这种情况下,ItemPlaceHelper与ItemDestroyHelper只需重写StartAction方法即可。
这部分核心代码如下:
    public abstract class AreaSelectItem : ModItem
    {
        // 选择区域的起点和终点
        protected Point _beginPoint;
        protected Point _endPoint;

        // 是否开始选择区域
        protected bool _startSelecting;

        // 菜单UI的静态实例
        protected MenuUI _menuUI;

        public override bool AltFunctionUse(Player player) => true;

        protected virtual bool useItemCondition(Player player) => true;

        public override bool CanUseItem(Player player)
        {
            UISystem.CurrentMenuUI = _menuUI;
            if (player.noBuilding)
            {
                return false;
            }
            if (player.altFunctionUse == 2)
            {
                if (_menuUI.Visible)
                {
                    SoundEngine.PlaySound(SoundID.MenuClose);
                    _menuUI.Close();
                }
                else
                {
                    SoundEngine.PlaySound(SoundID.MenuTick);
                    _menuUI.Open(this);
                }
                return false;
            }
            if (!useItemCondition(player))
            {
                return false;
            }
            if (!_startSelecting)
            {
                _beginPoint = Main.MouseWorld.ToTileCoordinates();
                _startSelecting = true;
            }
            return true;
        }

        public override bool? UseItem(Player player)
        {
            _endPoint = Main.MouseWorld.ToTileCoordinates();
            if (!Main.mouseLeft)
            {
                HandleMouseUp();
                return true;
            }
            if (Main.mouseRight && _startSelecting)
            {
                StopUse();
            }
            else
            {
                DrawingSystem.StartDraw(GetRectangle(_beginPoint, _endPoint));
            }
            return base.UseItem(player);
        }

        public virtual void StopUse()
        {
            DrawingSystem.StopDraw();
            _startSelecting = false;
        }

        public void HandleMouseUp()
        {
            if (_startSelecting)
            {
                StartAction(Main.LocalPlayer);
                SoundEngine.PlaySound(SoundID.Dig);
                StopUse();
            }
        }

        protected virtual void StartAction(Player player)
        {
        }

    }
2.2.2菜单实现
由于任意一个ItemPlaceHelper所调出的菜单都相同,所以就没必要给每一个ItemPlaceHelper配一个菜单,所有ItemPlaceHelper共用一个菜单即可。菜单继承自Terraria.UI.UIState,菜单的正确显示也花了不少时间,经过查看源码以及参考了"更好的体验"模组最后终于将UI显示出来。
显示菜单的基本层次结构是ModSystem -> UserInterface -> UIState -> UIElement。具体就是UI中由若干像按钮之类的UIElement构成,UI的显示需要通过用户接口去更新UI状态,UIState与UserInterface的静态变量都存储在一个ModSystem中,让其可以在模组加载时就被加载好,并通过重写ModSystem的UpdateUI和ModifyInterfaceLayers去实现UI的更新与绘制。UISystem的核心代码如下:
    public class UISystem : ModSystem
    {

        public static ItemPlaceHelperUI ItemPlaceHelperUI { get; set; }
        private static UserInterface _itemPlaceHelperInterface;

        public static ItemDestroyHelperUI ItemDestroyHelperUI { get; set; }
        private static UserInterface _itemDestroyHelperInterface;

        public override void Load()
        {
            ItemPlaceHelperUI = new ItemPlaceHelperUI();
            _itemPlaceHelperInterface = new UserInterface();
            _itemPlaceHelperInterface.SetState(ItemPlaceHelperUI);
            ItemDestroyHelperUI = new ItemDestroyHelperUI();
            _itemDestroyHelperInterface = new UserInterface();
            _itemDestroyHelperInterface.SetState(ItemDestroyHelperUI);
        }

        public override void Unload()
        {
            ItemPlaceHelperUI = null;
            _itemPlaceHelperInterface = null;
            ItemDestroyHelperUI = null;
            _itemDestroyHelperInterface = null;
        }

        public override void UpdateUI(GameTime gameTime)
        {
            if (ItemPlaceHelperUI.Visible)
            {
                _itemPlaceHelperInterface.Update(gameTime);
            }
            if (ItemDestroyHelperUI.Visible)
            {
                _itemDestroyHelperInterface.Update(gameTime);
            }
        }

        public override void ModifyInterfaceLayers(List<GameInterfaceLayer> layers)
        {
            int mouseTextIndex = layers.FindIndex(layer => layer.Name.Equals("Vanilla: Mouse Text")); // 表示在鼠标文本之上
            if (mouseTextIndex != -1)
            {
                layers.Insert(mouseTextIndex, new LegacyGameInterfaceLayer(
                    "EasyBuildMod: MyMenuUI",
                    delegate
                    {
                        if (ItemPlaceHelperUI.Visible)
                        {
                            _itemPlaceHelperInterface.Draw(Main.spriteBatch, new GameTime());
                        }
                        if (ItemDestroyHelperUI.Visible)
                        {
                            _itemDestroyHelperInterface.Draw(Main.spriteBatch, new GameTime());
                        }
                        return true;
                    },
                    InterfaceScaleType.UI)
                );
            }
        }

    }
可以看到存在这样的调用顺序ModSystem.UpdateUI -> UseInterface.Update用于实时更新, ModSystem.ModifyInterfaceLayers -> UseInterface.Draw用于绘制。而这里给UI添加了个变量Visible用于控制何时显示。只有当Visible为true时上述两个方法才对其进行更新。
接下来是UI,UI中的代码比较简单,由于所有物品共用一个UI,所以这里需要存储调出UI的物品是哪一个(AreaSelectItem)。在其派生类中只需定义包含的元素以及相应的点击事件等即可。
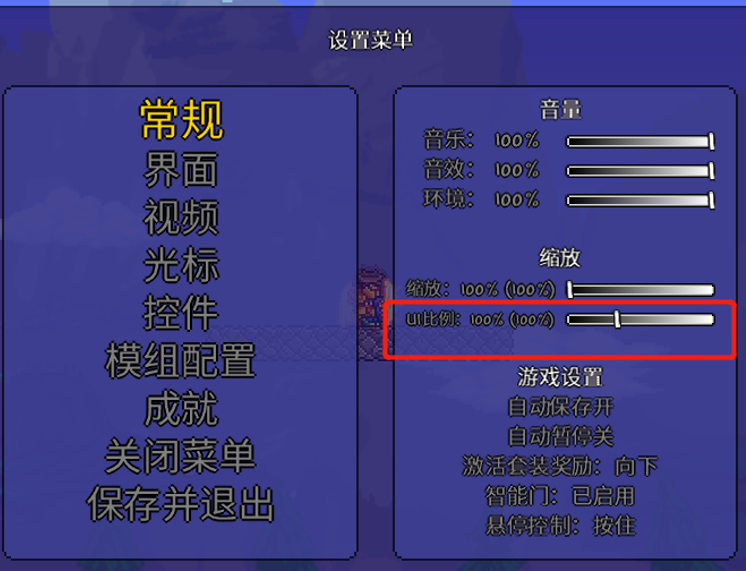
这里有一个需要注意的点就是UI的位置需要考虑用户的UI缩放。
这部分核心代码如下:
    public abstract class MenuUI : UIState
    {
        internal AreaSelectItem AreaSelectItem;

        protected UIElement MainContainer;

        public bool Visible;

        public override void OnInitialize()
        {
            base.OnInitialize();
            Append(MainContainer = new ());
            MainContainer.Width.Set(200, 0);
            MainContainer.Height.Set(200, 0);
        }

        public virtual void Open(AreaSelectItem item)
        {
            this.AreaSelectItem = item;
            Visible = true;
            // 注意要除以UIScale,否则如果缩放比例不是100%就会错位
            MainContainer.Left.Set(Main.mouseX / Main.UIScale - MainContainer.Width.Pixels / 2, 0);
            MainContainer.Top.Set(Main.mouseY / Main.UIScale - MainContainer.Height.Pixels / 2, 0);
        }

    }
当玩家手中物品切换时,也需要关闭UI,这里需要在ModPlayer中重写PostUpdate方法,当玩家手中物品不是AreaSelectItem时关闭UI。
    public override void PostUpdate()
    {
        if (UISystem.CurrentMenuUI is null || UISystem.CurrentMenuUI.AreaSelectItem is null)
        {
            return;
        }
        AreaSelectItem currentItem = UISystem.CurrentMenuUI.AreaSelectItem;
        Player player = Main.player[Main.myPlayer];
        Item item = player.inventory[player.selectedItem];
        if (item.type != currentItem.Type)
        {
            if (!Main.playerInventory)
            {
                UISystem.Hide();
            }
        }
        else
        {
            DrawingSystem.Init();
            if (!Main.mouseLeft)
            {
                UISystem.CurrentMenuUI.AreaSelectItem.
            }
        }
    }
2.2.3物块选择框实现
这里也一样需要通过在ModSystem的ModifyInterfaceLayers调用对应UserInterface的Draw进行绘制。新定义一个DrawingSystem继承自ModSystem,这部分代码就不多赘述了。
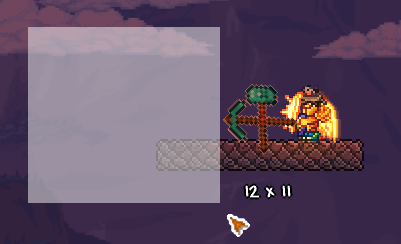
物品框选时希望显示的有(1)在鼠标末尾画物块预览 (2)矩形区域预览 (3) 矩形大小显示,其中(2)和(3)只有在使用物品时才进行绘制。这部分核心代码如下:
    public class SelectedAreaDrawing
    {
        public bool IsDrawing;

        /// <summary>
        /// 绘制物块预览
        /// </summary>
        private void drawItemPreview()
        {
            Vector2 position = Main.MouseScreen + new Vector2(32, 32);
            Texture2D texture = TextureAssets.Item[itemId].Value;
            Main.spriteBatch.Draw(texture, position, null, Color.White, 0f, texture.Size() / 2, 1f, SpriteEffects.None, 0f);
        }

        /// <summary>
        /// 绘制矩形区域预览
        /// </summary>
        private void drawRectanglePreview()
        {
            Vector2 leftTop = _rectangle.TopLeft() * 16 - Main.screenPosition;
            Vector2 size = _rectangle.Size() * 16;
            Color color = Color.White * 0.7f;
            _areaTexture.SetData(new Color[] { color });
            Main.spriteBatch.Draw(_areaTexture, leftTop, null, color, 0f, Vector2.Zero, size, SpriteEffects.None, 0f);
        }

        /// <summary>
        /// 标明矩形大小
        /// </summary>
        private void drawRectangleSize()
        {
            string sizeText = $"{_rectangle.Width} x {_rectangle.Height}";
            Vector2 size = FontAssets.MouseText.Value.MeasureString(sizeText);
            Vector2 position = Main.MouseScreen + new Vector2(16, -size.Y - 6);
            ChatManager.DrawColorCodedStringWithShadow(Main.spriteBatch, FontAssets.MouseText.Value, sizeText, position, Color.White, 0f, Vector2.Zero, Vector2.One);
        }

        public void Draw()
        {
            drawItemPreview();
            if (IsDrawing)
            {
                drawRectanglePreview();
                drawRectangleSize();
            }
        }
    }
2.3物块放置助手
ItemPlaceHelper,想要实现的效果是右键打开物品选择菜单,选择物品后,左键可以选择矩形区域放置。
选择菜单中只有一个用于放置选择物块的按钮,通过获取Main.mouseItem物品,根据其createTile和createWall判断是否为物块或墙壁,这部分代码如下:
    itemSelectButton.OnClick += (evt, element) =>
    {
        if (Main.mouseItem.type != 0)
        {
            // 如果物块可以放置,则添加进来
            if ((Main.mouseItem.createTile != -1 && Main.tileSolid[Main.mouseItem.createTile]) || Main.mouseItem.createWall != -1)
            {
                AreaSelectItem.ContentItemType = Main.mouseItem.type;
                itemSelectButton.SetContent(TextureAssets.Item[Main.mouseItem.type]);
            }
        }
        else
        {
            itemSelectButton.SetContent(null);
            AreaSelectItem.ContentItemType = 0;
        }
    };
其中itemSelectButton是自己定义的一个圆形按钮。
该物品的关键在于放置物品,即重写基类AreaSelectItem的StartAction方法。
    protected override void StartAction(Player player)
    {
        var rect = GetRectangle(_beginPoint, _endPoint);
        int consumeCount = 0;
        int total = GetItemCountOfInventory(player.inventory, ContentItemType);
        Item item = new Item();
        item.SetDefaults(ContentItemType);
        bool isWall = item.createWall > 0;
        bool hasHammer = getMaxHammerPower(player) > 0;
        // 从下到上,从左到右
        // 这种顺序可以保证某些具有自由落体性质的方块(如沙块)能够被正确的放置
        // 不过也会导致替换方块时, 像沙块这样的方块无法被从下往上替换
        for (int y = rect.Y + rect.Height - 1; y >= rect.Y; y--)
        {
            for (int x = rect.X; x < rect.X + rect.Width; x++)
            {
                if (consumeCount >= total)
                {
                    break;
                }
                Tile tile = Main.tile[x, y];
                if (isWall)
                {
                    if (tile.WallType > 0)
                    {
                        if (!player.TileReplacementEnabled)
                        {
                            continue;
                        }
                        if (hasHammer)
                        {
                            WorldGen.KillWall(x, y, false);
                            WorldGen.PlaceWall(x, y, (ushort)item.createWall, true);
                            consumeCount++;
                        }
                    }
                    else
                    {
                        WorldGen.PlaceWall(x, y, (ushort)item.createWall, true);
                        consumeCount++;
                    }
                }
                else
                {
                    if (tile.HasTile)
                    {
                        if (!player.TileReplacementEnabled || !player.HasEnoughPickPowerToHurtTile(x, y))
                        {
                            continue;
                        }
                        // 判断是否是同一种方块,是则跳过
                        WorldGen.KillTile_GetItemDrops(x, y, tile, out int tileType, out _, out _, out _);
                        if (tileType == item.type)
                        {
                            continue;
                        }
                        if (WorldGen.ReplaceTile(x, y, (ushort)item.createTile, item.placeStyle))
                        {
                            consumeCount++;
                        }
                    }
                    else
                    {
                        if (WorldGen.PlaceTile(x, y, (ushort)item.createTile, true, true, player.whoAmI, item.placeStyle))
                        {
                            consumeCount++;
                        }
                    }
                }
            }
        }
        if (consumeCount > 0)
        {
            for (int i = 0; i < player.inventory.Length; i++)
            {
                if (player.inventory[i].type == ContentItemType)
                {
                    if (player.inventory[i].stack > consumeCount)
                    {
                        player.inventory[i].stack -= consumeCount;
                        break;
                    }
                    else
                    {
                        consumeCount -= player.inventory[i].stack;
                        player.inventory[i].SetDefaults();
                    }
                }
            }
        }
    }
以上有几个需要注意的问题,
- 如果使用
player.PickTile进行破坏物块,则第三个参数镐力值需要尽可能的填大一些,如果镐力刚好大于物块所需的最大镐力,则完全有可能不能直接摧毁物块而仅仅是对其造成一定程度损坏 - 替换物块可以用
WorldGen.ReplaceTile但替换墙壁则没找到对应的ReplaceWall,需要先使用KillWall再进行放置。 - 获取位于x,y处的物块或墙壁的类型的问题放在了文章末尾 点这里跳转
2.4物块摧毁助手
ItemDestroyHelper,设计思路与ItemPlaceHelper几乎完全相同,只是将StartAction中的放置改为了摧毁,实际上摧毁的逻辑在替换物块时已经实现,这里就不多赘述。
3.多人模式下的相关修改
这部分主要集中在物块墙壁放置和摧毁时与游戏内其他玩家的同步问题上,于是我就在摧毁和放置的末尾加上:
    if (Main.netMode == NetmodeID.MultiplayerClient)
    {
        NetMessage.SendData(MessageID.TileSquare, Main.myPlayer, -1, null, rect.X, rect.Y, rect.Width, rect.Height);
    }
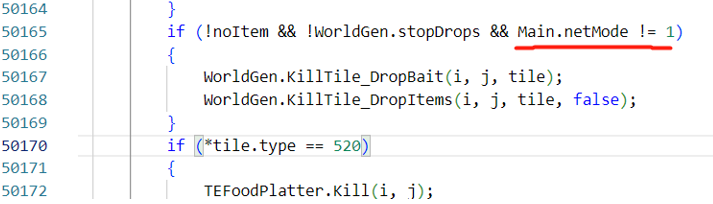
这样一次性同步范围内的所有方块。但这时也遇到了个问题,虽然方块同步了,但却没有掉落物。摧毁物块和墙壁调用的是WorldGen.KillTile和WorldGen.KillWall,仔细查看源码才发现当游戏处于多人模式时,这两个方法禁用了物块的正常掉落。
这时我注意到另一个函数player.PickTile(x, y, 10000)在进行破坏物块时可以在多人模式下掉落,于是我进入Player的PickTile方法中查看了一下,如下图所示:
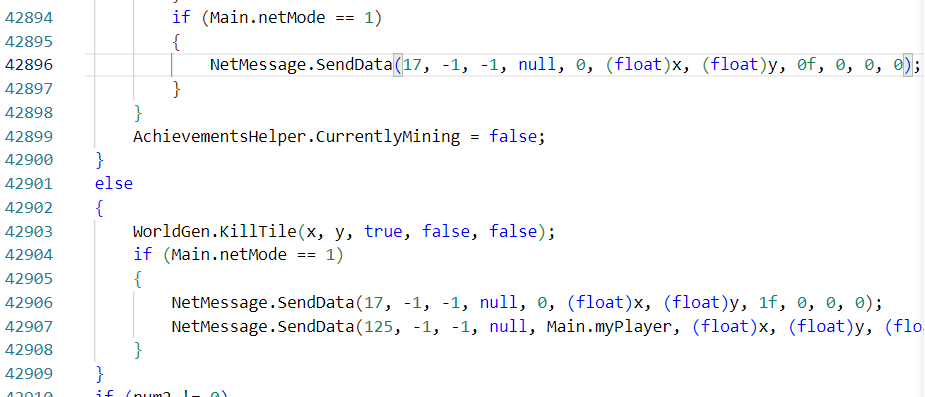
仿照这个方法,我重新写了一下破坏物块和墙壁的代码,注意墙壁和物块的SendData第五个参数不同:
    public static class WallUtils
    {
        public static void KillWall(int x, int y, bool fail = false)
        {
            WorldGen.KillWall(x, y, fail);
            if (!fail && Main.netMode == NetmodeID.MultiplayerClient)
            {
                // Wall对应的SendData第5个参数值为2
                NetMessage.SendData(MessageID.TileManipulation, -1, -1, null, 2, (float)x, (float)y, 0f, 0, 0, 0);
            }
        }

    }

    public static class TileUtils
    {
        public static void KillTile(int x, int y, bool fail = false, bool effectOnly = false, bool noItem = false)
        {
            WorldGen.KillTile(x, y, fail, effectOnly, noItem);
            if (!fail && Main.netMode == NetmodeID.MultiplayerClient)
            {
                // Tile对应的SendData第5个参数值为0
                NetMessage.SendData(MessageID.TileManipulation, -1, -1, null, 0, (float)x, (float)y, 0f, 0, 0, 0);
            }
        }

    }
4.开发过程中的其他问题
1.使用语言文件时遇到的问题
将模组中需要用到的文字信息的不同语言版本放在XXX.hjson如en-US.hjson中,再通过Language.GetTextValue("Mods.XXX.XXX")来获取对应语言的文字。但在我使用时遇到一个小问题,在设置物品的DisplayName和Tooltip的名称时,以下代码并不能正常获取到对应语言的文字信息:
    DisplayName.SetDefault(Language.GetTextValue("Mods.XXX.XXX"));
    Tooltip.SetDefault(Language.GetTextValue("Mods.XXX.XXX"));
在游戏运行时有时能正常显示,有时则直接显示了“Mods.XXXXXX”这个字符串。推测是语言文件与物品静态信息加载顺序关。后面参考了官方的ExampleMod,解决方法是在语言文件hjson中直接写明物品或Buff的DisplayName和Tooltip,会自动读取到游戏中。
    Mods.XXXMod.ItemName: {
        物品类名: 物品名称
    }
    Mods.XXXMod.ItemTooltip: {
        物品类名: 物品Tooltip
    }
    Mods.XXXMod.BuffName: {
        Buff类名: Buff名称
    }
    Mods.XXXMod.BuffDescription: {
        Buff类名: Buff描述
    }
2.获取物块或墙壁对应的类型
判断位于x,y处的物块对应的item的类型,也就是itemId。这个方法我找了很久,最后也是成功从掉落物块的相关源码中找到了直接想要的内容:Terraria.WorldGen.KillTile_DropItems是用于破坏物块后进行掉落用的,不过它是私有方法,而它调用的KillTile_GetItemDrops刚好是public方法,所以在判断物块时就使用了这种方法。但是奇怪的是KillWall_GetItemDrops却是私有方法,所以这里直接将源码中的代码复制过来,如下图所示:
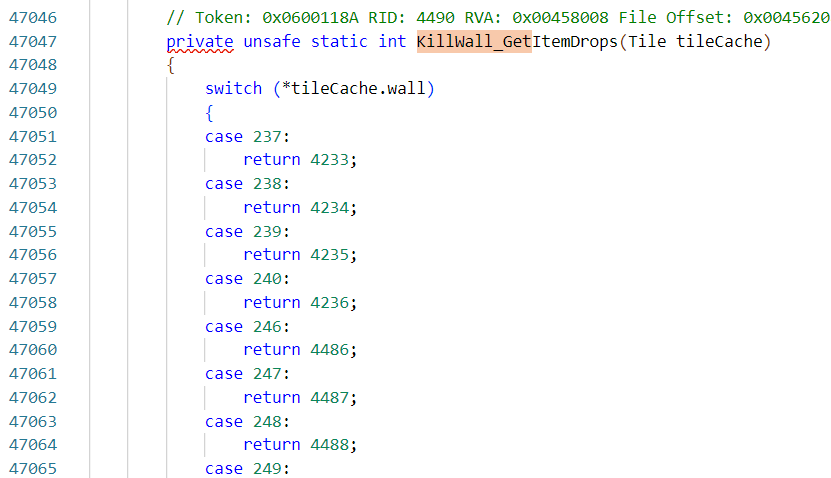
由于是反编译得到的源码,所以有大量的switch-case和if分支。唯一要注意的是图中*tileCache.wall是Tile的internal属性:
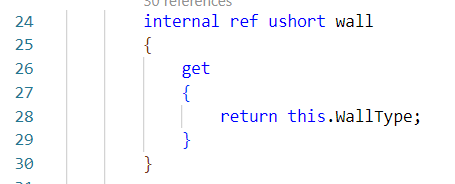
图中可以看到实际上wall对应的实际就是公有属性WallType,故将源码中的*tileCache.wall全改为tileCache.WallType即可。
3.按钮的点击问题
当鼠标上已经有物块时,点击按钮如果鼠标上的物块可以被正确放在按钮所在的原位置,则系统会优先将物块放置再触发按钮的点击事件。这个由于不是非常影响体验,将鼠标离玩家远一点即可,暂时没去研究解决方法。
Recommend
About Joyk
Aggregate valuable and interesting links.
Joyk means Joy of geeK