

GitHub - context-labs/autodoc: Toolkit for auto-generating codebase documentatio...
source link: https://github.com/context-labs/autodoc
Go to the source link to view the article. You can view the picture content, updated content and better typesetting reading experience. If the link is broken, please click the button below to view the snapshot at that time.


Autodoc
 Toolkit for auto-generating codebase documentation using LLMs
What is this? • Get Started • Community • Contribute
What is this?
Autodoc is a toolkit for for auto-generating codebase documention for git repositories using Large Language Models, like GPT-4 or Alpaca. Autodoc can be installed in your repo in about 5 minutes. It indexes your codebase through a depth-first traversal of all repository contents and calls an LLM to write documentation for each file and folder. These documents can be combined to describe the different components of your system and how they work together.
The generated documentation lives in your codebase, and travels where your code travels. Developers who download your code can use the doc command to ask questions about your codebase and get highly specific answers with reference links back to code files.
In the near future, documentation will be re-indexed as part your CI pipeline, so it is always up-to-date.
Examples
Below are a few examples of how Autodoc can be used.
- Autodoc - This repository contains documentation for itself, generated by Autodoc. It lives in the
.autodocfolder. Follow the instructions here to learn how to query it. - TolyGPT.com - TolyGPT is an Autodoc chatbot trained on the Solana validator codebase and deployed to the web for easy access. In the near future, Autodoc will support a web version in additon to the existing CLI tool.
Get Started
Install the Autodoc CLI tool as a global NPM module:
$ npm install -g @context-labs/autodocThis command installs the Autodoc CLI tool that will allow you to create and query Autodoc indexes.
Run doc to see the available commands.
Querying
We'll use the Autodoc repository as an example to demonstrate how querying in Autodoc works.
Clone Autodoc and change directory to get started:
$ git clone https://github.com/context-labs/autodoc.git
$ cd autodoc
Right now Autodoc only supports OpenAI. Make sure you have have your OpenAI API key exported in your current session:
$ export OPENAI_API_KEY=<YOUR_KEY_HERE>To start the Autodoc query CLI, run:
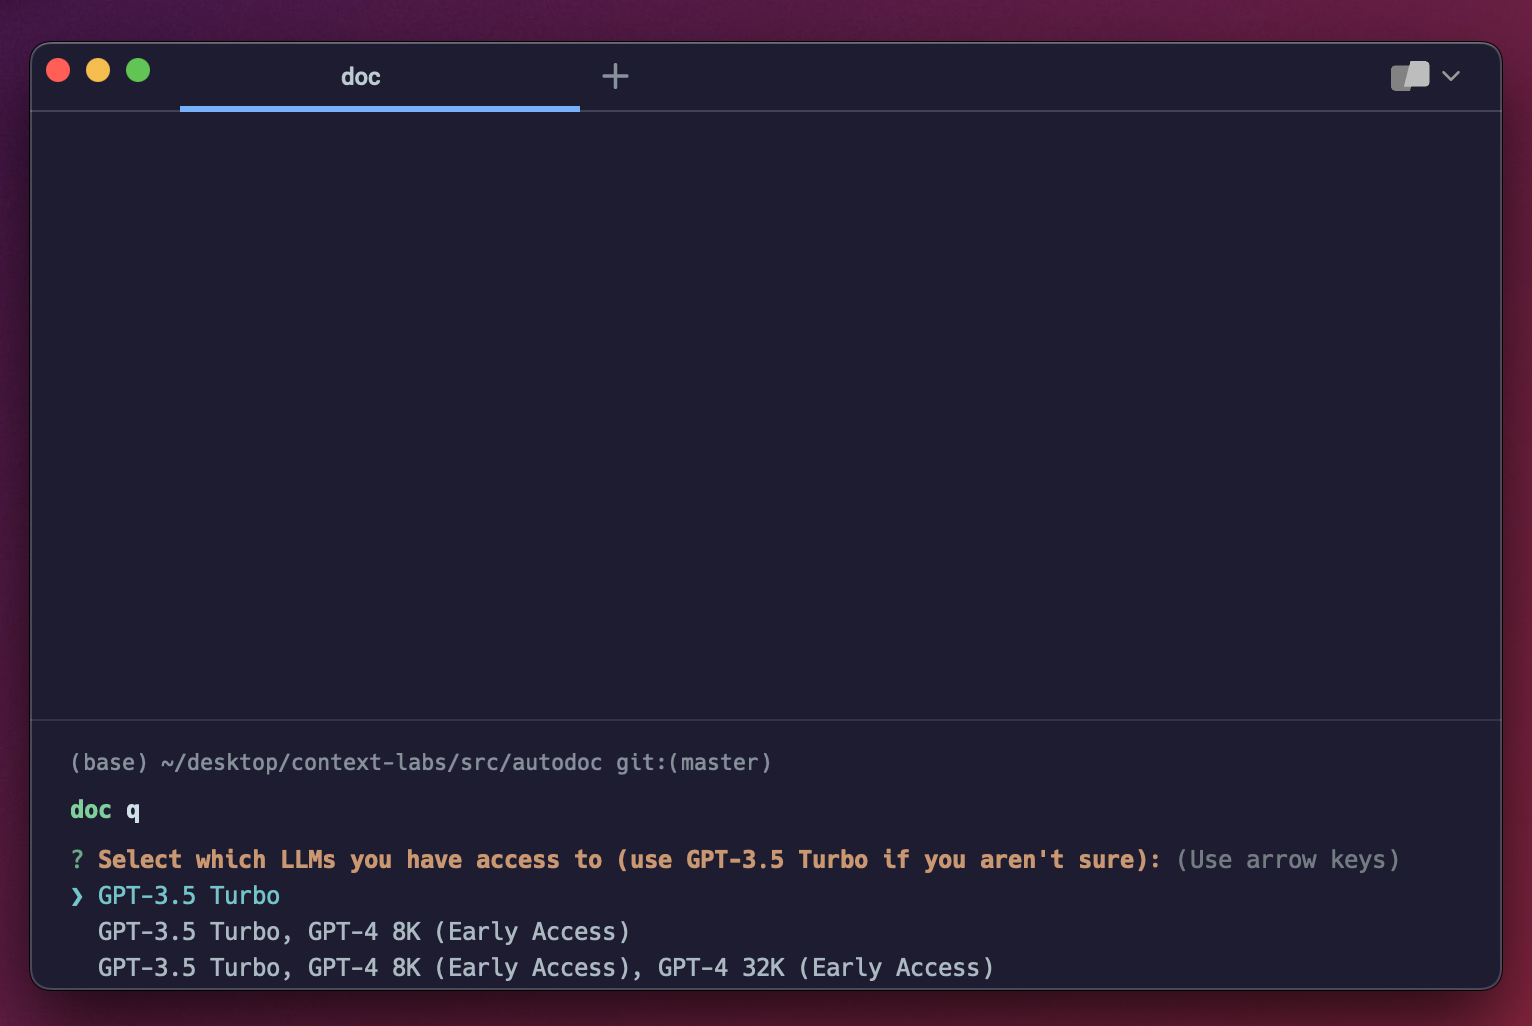
$ doc qIf this is your first time running doc q, you'll get a screen that prompts you to select which GPT models you have access to. Select whichever is appropriate for your level of access. If you aren't sure, select the first option:
You're now ready to query documentation for the Autodoc repository:
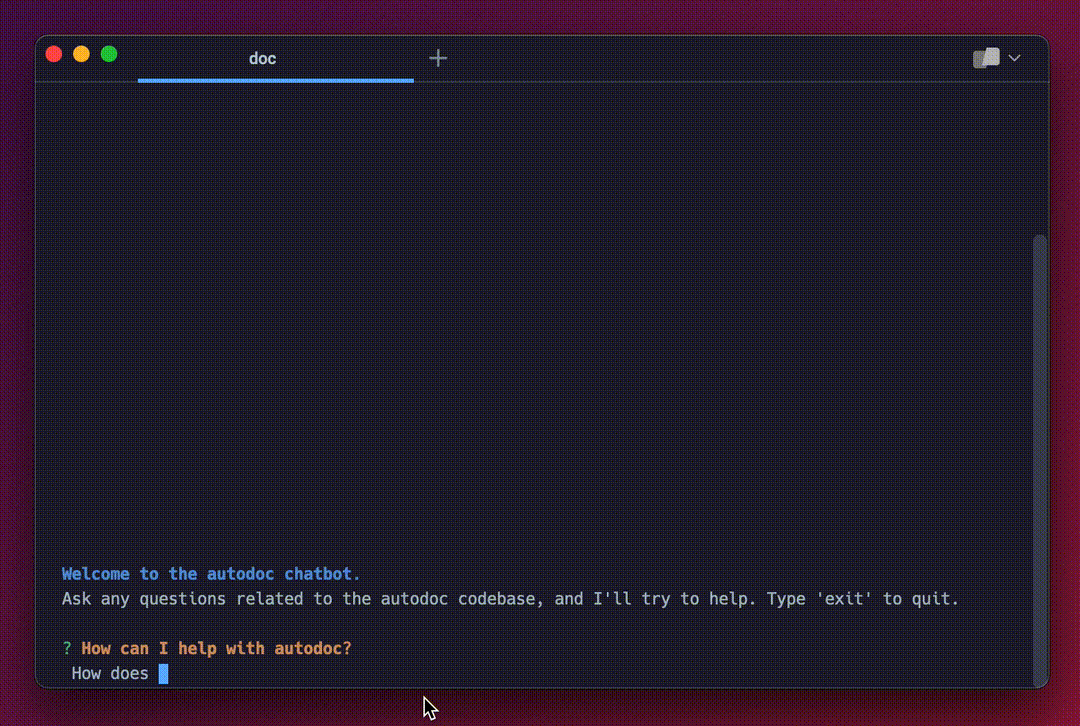
This is the core querying experience. It's very basic right now, with plenty of room of improvement. If you're interested in improving the Autodoc CLI querying experience, checkout this issue :)
Indexing
Follow the steps below to generate documentation for your own repository using Autodoc.
Change directory into the root of your project:
cd $PROJECT_ROOTMake sure your OpenAI API key is available in the current session:
$ export OPENAI_API_KEY=<YOUR_KEY_HERE>Run the init command:
doc init
You will be prompted to enter the name of your project, GitHub url, and select which GPT models you have access to. If you aren't sure which models you have access to, select the first option. This command will generate an autodoc.config.json file in the root of your project to store the values. This file should be checked in to git.
Note: Do not skip entering these values or indexing may not work.
Run the index command:
doc indexYou should see a screen like this:
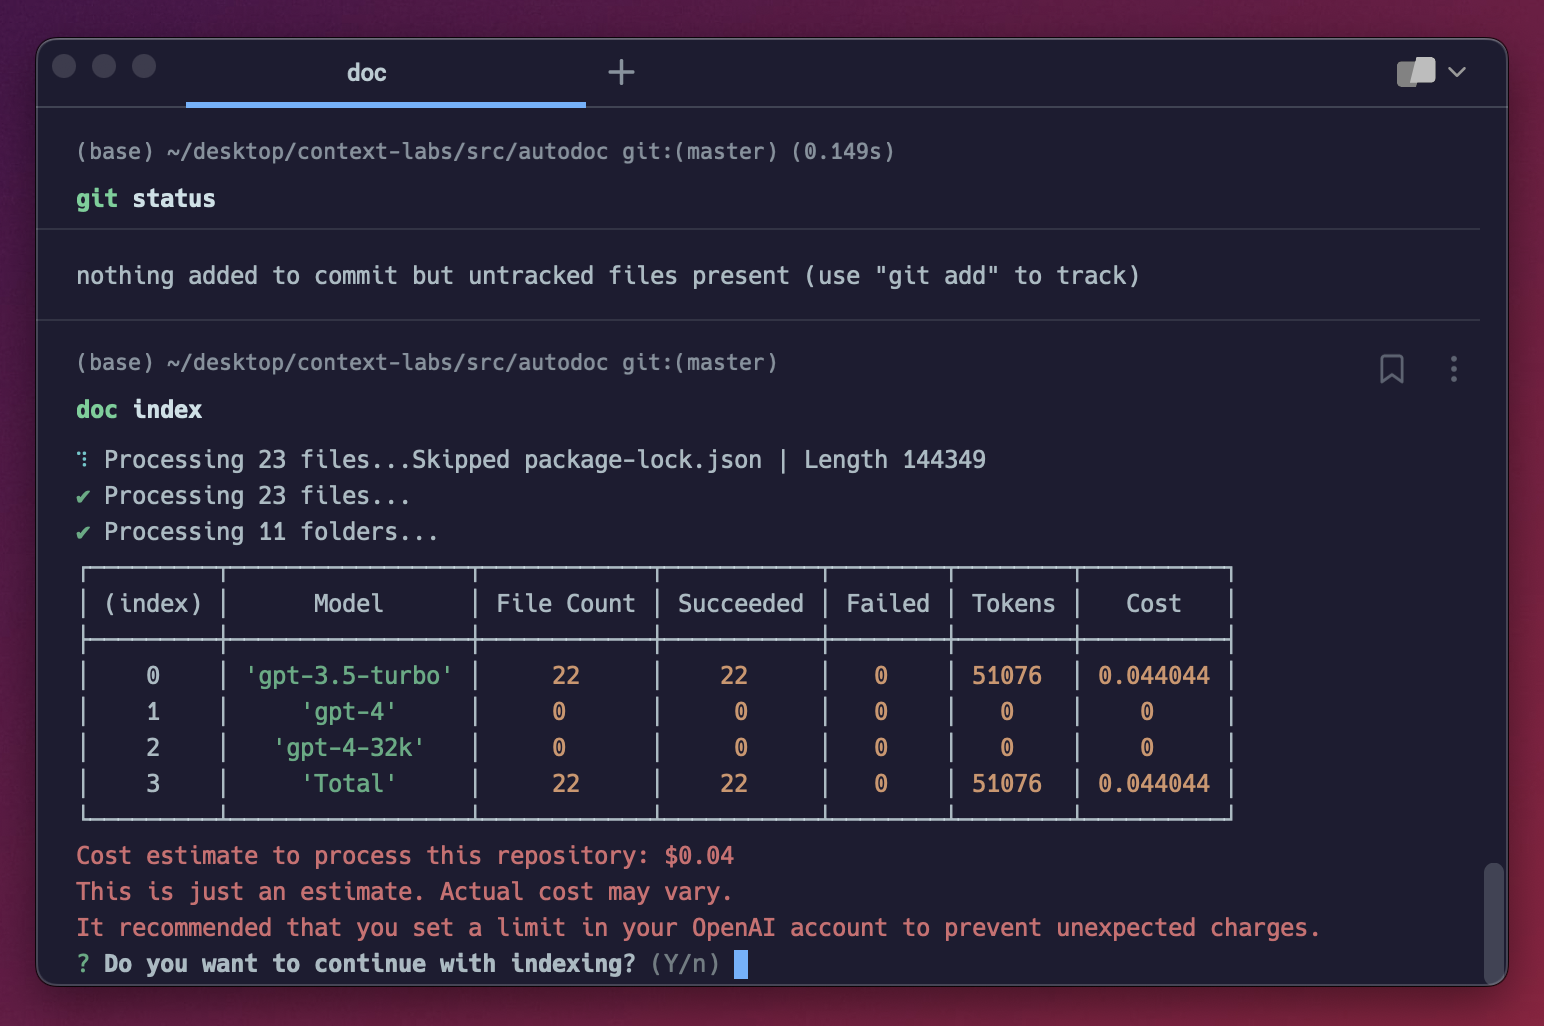
This screen estimates the cost of indexing your repository. You can also access this screen via the doc estimate command.
For every file in your project, Autodoc calculates the number of tokens in the file based on the file content. The more lines of code, the larger the number of tokens. Using this number, it determine which model it will use on per file basis, always choosing the cheapest model whose context length supports the number of tokens in the file.
Note: This naive model selection strategy means that files under ~4000 tokens will be documented using GPT-3.5, which will result in less accurate documenation. Checkout this issue if you're interested in helping make model selection configurable in Autodoc.
For large projects, the cost can be several hundred dollars. View OpenAI pricing here.
In the near future, we will support self-hosted models, such as Llama and Alpaca. Read this issue if you're interesting in contributing to this work.
When you're done repository is done being indexed, you should see a screen like this:
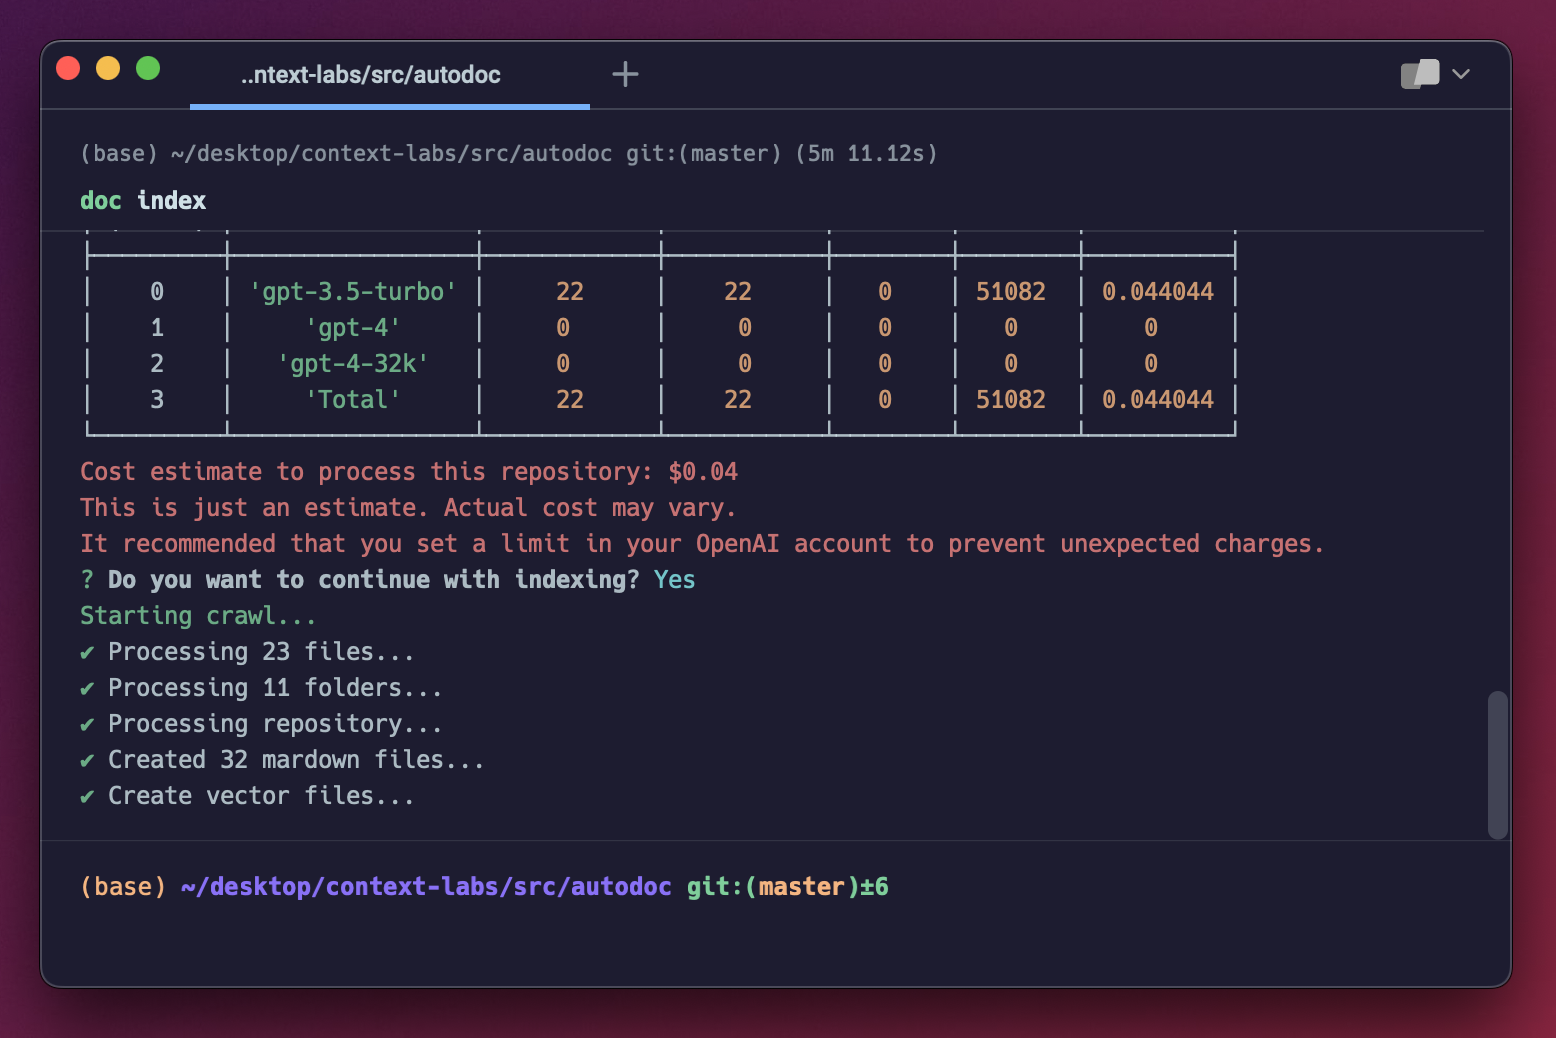
You can now query your application using the steps outlined in querying.
Community
There is a small group of us that are working full time on Autodoc. Join us on Discord, or follow us on Twitter for updates. We'll be posting reguarly and continuing to improve the Autodoc applicatioin. What to contribute? Read below.
Contributing
As an open source project in a rapidly developing field, we are extremely open to contributions, whether it be in the form of a new feature, improved infra, or better documentation.
For detailed information on how to contribute, see here.
Recommend
About Joyk
Aggregate valuable and interesting links.
Joyk means Joy of geeK