

Tars-Java网络编程源码分析 - vivo互联网技术
source link: https://www.cnblogs.com/vivotech/p/17226875.html
Go to the source link to view the article. You can view the picture content, updated content and better typesetting reading experience. If the link is broken, please click the button below to view the snapshot at that time.

作者:vivo 互联网服务器团队- Jin Kai
本文从Java NIO网络编程的基础知识讲到了Tars框架使用NIO进行网络编程的源码分析。
一、Tars框架基本介绍
Tars是腾讯开源的支持多语言的高性能RPC框架,起源于腾讯内部2008年至今一直使用的统一应用框架TAF(Total Application Framework),目前支持C++、Java、PHP、Nodejs、Go语言。
该框架为用户提供了涉及到开发、运维、以及测试的一整套解决方案,帮助一个产品或者服务快速开发、部署、测试、上线。它集可扩展协议编解码、高性能RPC通信框架、名字路由与发现、发布监控、日志统计、配置管理等于一体,通过它可以快速用微服务的方式构建自己的稳定可靠的分布式应用,并实现完整有效的服务治理。
官方仓库地址:
https://github.com/TarsCloud/Tars
vivo推送平台也深度使用了该框架,部署服务节点超过一千个,经过线上每日一百多亿消息推送量的考验。
此前已在vivo互联网技术公众号发布过《Tars Java 客户端源码分析》,此篇文章为续集。
Tars-java 最新稳定版1.7.2以及之前的版本都使用Java NIO进行网络编程;本文将分别详细介绍java NIO的原理和Tars 使用NIO进行网络编程的细节。
二、Java NIO原理介绍
从1.4版本开始,Java提供了一种新的IO处理方式:NIO (New IO 或 Non-blocking IO) 是一个可以替代标准Java IO 的API,它是面向缓冲区而不是字节流,它是非阻塞的,支持IO多路复用。
2.1 Channels (通道) and Buffers (缓冲区)
标准的IO基于字节流进行操作的,而NIO是基于通道(Channel)和缓冲区(Buffer)进行操作。数据总是从通道读取到缓冲区中,或者从缓冲区写入到通道中,下图是一个完整流程。

Channel类型:
-
支持文件读写数据的FileChannel
-
能通过UDP读写网络中的数据的DatagramChannel
-
能通过TCP读写网络数据的SocketChannel
-
可以监听新进来的TCP连接,对每一个新进来的连接都会创建一个SocketChannel的ServerSocketChannel 。
SocketChannel:
-
打开 SocketChannel:SocketChannel socketChannel = SocketChannel.open();
-
关闭 SocketChannel:socketChannel.close();
-
从Channel中读取的数据放到Buffer: int bytesRead = inChannel.read(buf);
-
将Buffer中的数据写到Channel: int bytesWritten = inChannel.write(buf);
ServerSocketChannel:
通过 ServerSocketChannel.accept() 方法监听新进来的连接,当accept()方法返回的时候,它返回一个包含新进来的连接的SocketChannel,因此accept()方法会一直阻塞到有新连接到达。
通常不会仅仅只监听一个连接,在while循环中调用 accept()方法. 如下面的例子:
while(true){
    SocketChannel socketChannel = serverSocketChannel.accept();
     //do something with socketChannel...
}
ServerSocketChannel可以设置成非阻塞模式。在非阻塞模式下,accept() 方法会立刻返回,如果还没有新进来的连接,返回的将是null。因此,需要检查返回的SocketChannel是否是null。
ServerSocketChannel serverSocketChannel = ServerSocketChannel.open();
serverSocketChannel.socket().bind(new InetSocketAddress(8888));
serverSocketChannel.configureBlocking(false);
while(true){
    SocketChannel socketChannel = serverSocketChannel.accept();
    if(socketChannel != null){
        //do something with socketChannel...
    }
}
Buffer类型:
-
ByteBuffer
-
CharBuffer
-
DoubleBuffer
-
FloatBuffer
-
IntBuffer
-
LongBuffer
-
ShortBuffer
Buffer的分配:
ByteBuffer buf = ByteBuffer.allocate(2048);
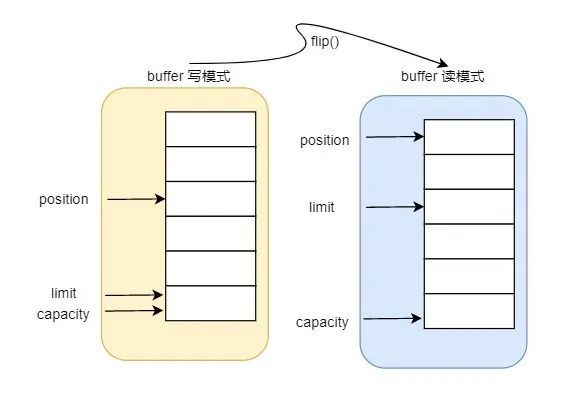
Buffer的读写:
一般是以下四个步骤:
-
写入数据到Buffer,最大写入量是capacity,写模式下limit值即为capacity值,position即为写到的位置。
-
调用flip()方法将Buffer从写模式切换到读模式,此时position移动到开始位置0,limit移动到position的位置。
-
从Buffer中读取数据,在读模式下可以读取之前写入到buffer的所有数据,即为limit位置。
-
调用clear()方法或者compact()方法。clear()方法将position设为0,limit被设置成capacity的值。compact()方法将所有未读的数据拷贝到Buffer起始处,然后将position设到最后一个未读元素后面。
mark() 与 reset()方法 通过调用Buffer.mark()方法,可以标记Buffer中的一个特定position,之后可以通过调用Buffer.reset()方法恢复到这个position。
duplicate() 此方法返回承载先前字节缓冲区内容的新字节缓冲区。
remaining()limit 减去 position的值
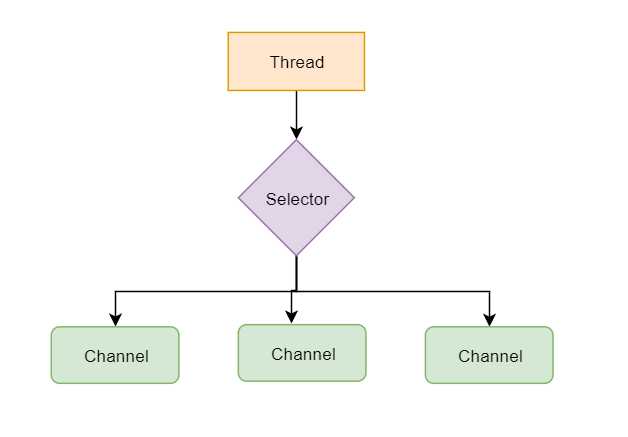
2.2 Selector(选择器)
Java NIO引入了选择器的概念,选择器用于监听多个通道的事件。单个的线程可以监听多个数据通道。要使用Selector,得向Selector注册Channel,然后调用它的select()方法。这个方法会一直阻塞到某个注册的通道有事件就绪。一旦这个方法返回,线程就可以处理这些事件。
channel.configureBlocking(false);
SelectionKey key = channel.register(selector,Selectionkey.OP_READ);
注意register()方法的第二个参数,这是一个监听的集合,即在通过Selector监听Channel时关注什么事件集合。
SelectionKey包含:
1) interest集合:selectionKey.interestOps() 可以监听四种不同类型的事件:OP_ACCEPT、OP_CONNECT、OP_WRITE、OP_READ
2) ready集合:selectionKey.readyOps(); ready 集合是通道已经准备就绪的操作的集合,提供4个方便的方法:
-
selectionKey.isAcceptable();
-
selectionKey.isConnectable();
-
selectionKey.isReadable();
-
selectionKey.isWritable();
3) Channel:selectionKey.channel();
4) Selector:selectionKey.selector();
5) 可选的附加对象:
selectionKey.attachment(); 可以将一个对象或者更多信息附着到SelectionKey上,这样就能方便的识别特定的通道。
提示:
OP_ACCEPT和OP_CONNECT的区别:简单来说,客户端建立连接是connect,服务器准备接收连接是accept。一个典型的客户端服务器网络交互流程如下图

selectedKeys()
一旦调用了select()方法,并且返回值表明有一个或更多个通道就绪了,然后可以通过调用selector的selectedKeys()方法,访问已选择键集(selected key set)中的就绪通道。
wakeUp()
某个线程调用select()方法后阻塞了,即使没有通道已经就绪,也有办法让其从select()方法返回。只要让其它线程在阻塞线程调用select()方法的对象上调用Selector.wakeup()方法即可。阻塞在select()方法上的线程会立马返回。如果有其它线程调用了wakeup()方法,但当前没有线程阻塞在select()方法上,下个调用select()方法的线程会立即wake up。
close()
用完Selector后调用其close()方法会关闭该Selector,且使注册到该Selector上的所有SelectionKey实例无效。通道本身并不会关闭。
通过Selector选择通道:
-
int select() 阻塞直到至少有一个通道在你注册的事件上就绪了
-
int select(long timeout) 增加最长阻塞毫秒数
-
int selectNow() 不会阻塞,不管什么通道就绪都立刻返回
三、 Tars NIO网络编程
了解完 Java NIO的原理,我们来看看Tars是如何使用NIO进行网络编程的。
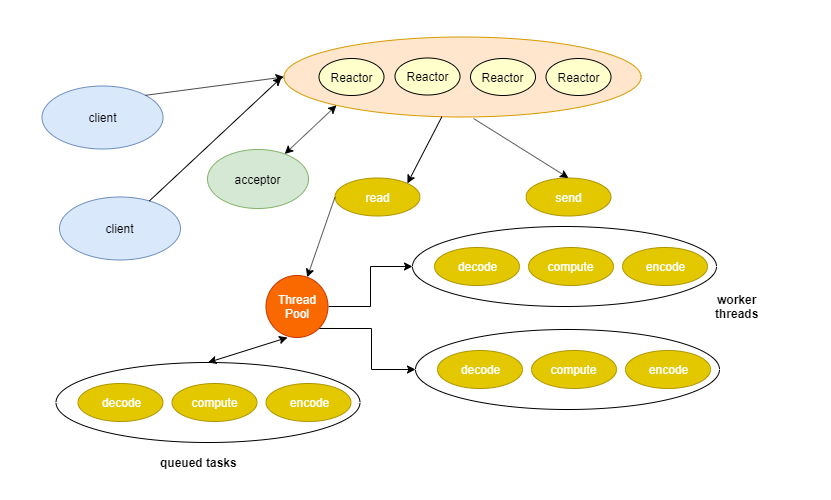
Tars的网络模型是多reactor多线程模型。有一点特殊的是tars的reactor线程组里随机选一个线程处理网络事件,并且该线程同时也能处理读写。
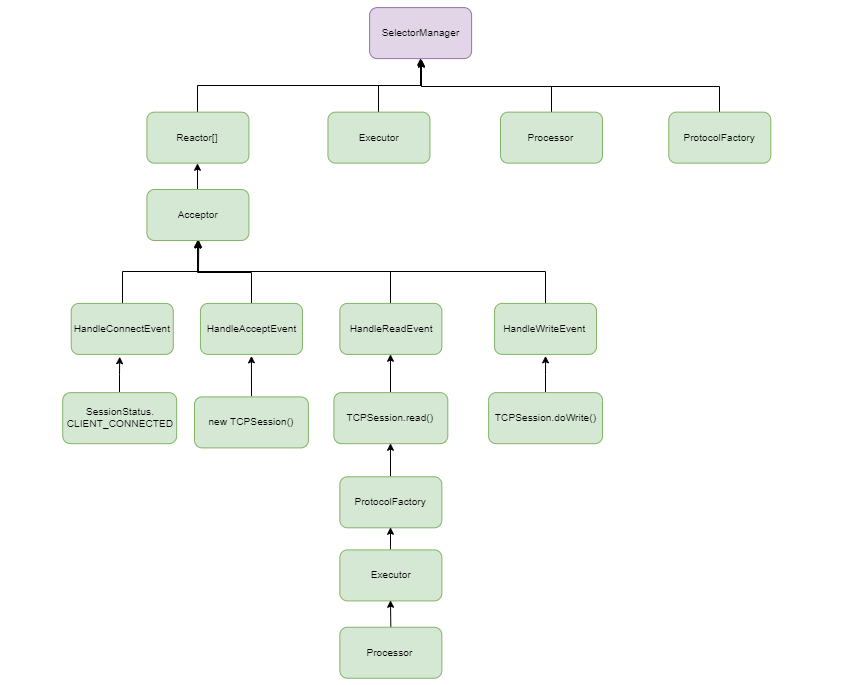
核心类之间的关系如下:
3.1 一个典型的Java NIO服务端开发流程
-
创建ServerSocketChannel,设置为非阻塞,并绑定端口
-
创建Selector对象
-
给ServerSocketChannel注册SelectionKey.OP_ACCEPT事件
-
启动一个线程循环,调用Selector的select方法来检查IO就绪事件,一旦有IO就绪事件,就通知用户线程去处理IO事件
-
如果有Accept事件,就创建一个SocketChannel,并注册SelectionKey.OP_READ
-
如果有读事件,判断一下是否全包,如果全包,就交给后端线程处理
-
写事件比较特殊。isWriteable表示的是本机的写缓冲区是否可写。这个在绝大多少情况下都是为真的。在Netty中只有写半包的时候才需要注册写事件,如果一次写就完全把数据写入了缓冲区就不需要注册写事件。
3.2 Tars客户端发起请求到服务器的流程
-
Communicator.stringToProxy() 根据servantName等配置信息创建通信器。
-
ServantProxyFactory.getServantProxy() 调用工厂方法创建servant代理。
-
ObjectProxyFactory.getObjectProxy() 调用工厂方法创建obj代理。
-
TarsProtocolInvoker.create() 创建协议调用者。
-
ServantProtocolInvoker.initClient(Url url) 根据servantProxyConfig中的配置信息找到servant的ip端口等进行初始化ServantClient。
-
ClientPoolManager.getSelectorManager() 如果第一次调用selectorManager是空的就会去初始化selectorManager。
-
reactorSet = new Reactor[selectorPoolSize]; SelectorManager初始化构造类中的会根据selectorPoolSize(默认是2)的配置创建Reactor线程数组。线程名称的前缀是servant-proxy-加上CommunicatorId,CommunicatorId生成规则是由locator的地址生成的UUID。
-
启动reactor线程。
3.3 Tars服务端启动步骤
-
tars支持TCP和UDP两种协议,RPC场景下是使用TCP协议。
-
new SelectorManager() 根据配置信息初始化selectorManager,线程池大小 processors > 8 ? 4 + (processors * 5 / 8) : processors + 1;线程名称前缀是server-tcp-reactor,然后启动reactor线程数组中的所有线程。
-
开启服务端监听的ServerSocketChannel,绑定服务端本地ip和监听的端口号,设置TCP连接请求队列的最大容量为1024;设置非阻塞模式。
-
选取reactor线程数组中第0个线程作为服务端监听连接OP_ACCEPT就绪事件的线程。
public void bind(AppService appService) throws IOException {

    // 此处略去非关键代码

    if (endpoint.type().equals("tcp")) {  // 1
        this.selectorManager = new SelectorManager(Utils.getSelectorPoolSize(), new ServantProtocolFactory(codec), threadPool, processor, keepAlive, "server-tcp-reactor", false);     // 2
        this.selectorManager.setTcpNoDelay(serverCfg.isTcpNoDelay());
        this.selectorManager.start();
        ServerSocketChannel serverChannel = ServerSocketChannel.open();
        serverChannel.socket().bind(new InetSocketAddress(endpoint.host(), endpoint.port()), 1024);   // 3
        serverChannel.configureBlocking(false);
              selectorManager.getReactor(0).registerChannel(serverChannel, SelectionKey.OP_ACCEPT);  // 4
    } else if (endpoint.type().equals("udp")) {
        this.selectorManager = new SelectorManager(1, new ServantProtocolFactory(codec), threadPool, processor, false, "server-udp-reactor", true);
        this.selectorManager.start();
        // UDP开启的是DatagramChannel
        DatagramChannel serverChannel = DatagramChannel.open();
        DatagramSocket socket = serverChannel.socket();
        socket.bind(new InetSocketAddress(endpoint.host(), endpoint.port()));
        serverChannel.configureBlocking(false);
        // UDP协议不需要建连,监听的是OP_READ就绪事件
        this.selectorManager.getReactor(0).registerChannel(serverChannel, SelectionKey.OP_READ);
    }
}
3.4 Reactor线程启动流程
-
多路复用器开始轮询检查 是否有就绪的事件。
-
处理register队列中剩余的channel注册到当前reactor线程的多路复用器selector中。
-
获取已选键集中所有就绪的channel。
-
更新Session中最近操作时间,Tars服务端启动时会调用 startSessionManager() , 单线程每30s扫描一次session会话列表,会检查每个session的 lastUpdateOperationTime 与当前时间的时间差,如果超过60秒会将过期session对应的channel踢除。
-
分发IO事件进行处理。
-
处理unregister队列中剩余的channel,从当前reactor线程的多路复用器selector中解除注册。
public void run() {
while (!Thread.interrupted()) {
selector.select(); // 1
processRegister(); // 2
Iterator<SelectionKey> iter = selector.selectedKeys().iterator(); // 3
while (iter.hasNext()) {
SelectionKey key = iter.next();
iter.remove();
if (!key.isValid()) continue;
try {
if (key.attachment() != null && key.attachment() instanceof Session) {
((Session) key.attachment()).updateLastOperationTime(); //4
}
dispatchEvent(key); // 5
} catch (Throwable ex) {
disConnectWithException(key, ex);
}
}
processUnRegister(); // 6
}
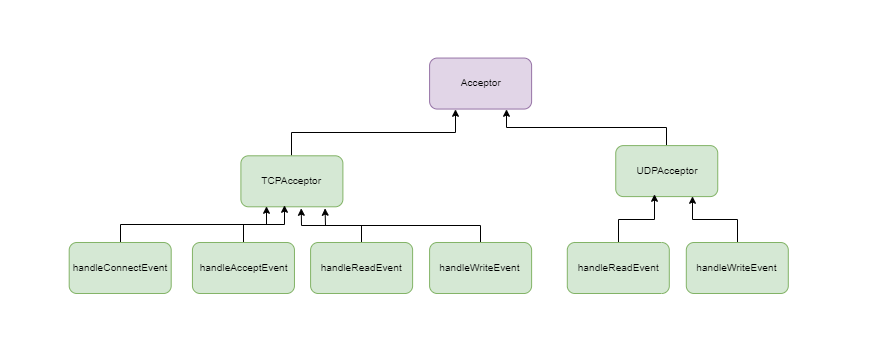
}3.5 IO事件分发处理
每个reactor线程都有一个专门的Accepter类去处理各种IO事件。TCPAccepter可以处理全部的四种事件(OP_ACCEPT、OP_CONNECT、OP_WRITE、OP_READ)、UDPAccepter由于不需要建立连接所以只需要处理读和写两种事件。
1. 处理OP_ACCEPT
-
获取channel,处理TCP请求。
-
为这个TCP请求创建TCPSession,会话的状态是服务器已连接
-
会话注册到sessionManager中,Tars服务可配置最大连接数maxconns,如果超过就会关闭当前会话。
-
寻找下一个reactor线程进行多路复用器与channel的绑定。
public void handleAcceptEvent(SelectionKey key) throws IOException {
    ServerSocketChannel server = (ServerSocketChannel) key.channel(); // 1
    SocketChannel channel = server.accept();
       channel.socket().setTcpNoDelay(selectorManager.isTcpNoDelay());
    channel.configureBlocking(false);
    Utils.setQosFlag(channel.socket());
    TCPSession session = new TCPSession(selectorManager);    // 2
    session.setChannel(channel);
    session.setStatus(SessionStatus.SERVER_CONNECTED);
    session.setKeepAlive(selectorManager.isKeepAlive());
    session.setTcpNoDelay(selectorManager.isTcpNoDelay());
    SessionManager.getSessionManager().registerSession(session);   // 3
      selectorManager.nextReactor().registerChannel(channel, SelectionKey.OP_READ, session); // 4
}
2. 处理OP_CONNECT
-
获取客户端连接过来的channel通道
-
获取Session
-
与服务器建立连接,将关注的兴趣OPS设置为ready就绪事件,session中的状态修改为客户端已连接
-
处理OP_CONNECT
public void handleConnectEvent(SelectionKey key) throws IOException {
    SocketChannel client = (SocketChannel) key.channel();  // 1
    TCPSession session = (TCPSession) key.attachment();   //2
    if (session == null) throw new RuntimeException("The session is null when connecting to ...");
    try {  // 3
        client.finishConnect();
        key.interestOps(SelectionKey.OP_READ);
        session.setStatus(SessionStatus.CLIENT_CONNECTED);
    } finally {
        session.finishConnect();
    }
}
3.处理OP_WRITE、 处理OP_READ
public void handleReadEvent(SelectionKey key) throws IOException {
    TCPSession session = (TCPSession) key.attachment();
    if (session == null) throw new RuntimeException("The session is null when reading data...");
    session.read();
}
public void handleWriteEvent(SelectionKey key) throws IOException {
    TCPSession session = (TCPSession) key.attachment();
    if (session == null) throw new RuntimeException("The session is null when writing data...");
    session.doWrite();
}
3.6 seesion中网络读写的事件详细处理过程
1. 读事件处理
申请2k的ByteBuffer空间,读取channel中的数据到readBuffer中。根据sessionStatus判断是客户端读响应还是服务器读请求,分别进行处理。
protected void read() throws IOException {
    int ret = readChannel();
    if (this.status == SessionStatus.CLIENT_CONNECTED) {
        readResponse();
    } else if (this.status == SessionStatus.SERVER_CONNECTED) {
        readRequest();
    } else {
        throw new IllegalStateException("The current session status is invalid. [status:" + this.status + "]");
    }
    if (ret < 0) {
        close();
        return;
    }
}
private int readChannel() throws IOException {
    int readBytes = 0, ret = 0;
    ByteBuffer data = ByteBuffer.allocate(1024 * 2);  // 1
    if (readBuffer == null) {
        readBuffer = IoBuffer.allocate(bufferSize);
    }
       // 2
    while ((ret = ((SocketChannel) channel).read(data)) > 0) {
        data.flip();  // 3
        readBytes += data.remaining();
        readBuffer.put(data.array(), data.position(), data.remaining());
        data.clear();
    }
    return ret < 0 ? ret : readBytes;
}
① 客户端读响应
从当前readBuffer中的内容复制到一个新的临时buffer中,并且切换到读模式,使用TarsCodec类解析出buffer内的协议字段到response,WorkThread线程通知Ticket处理response。如果response为空,则重置tempBuffer到mark的位置,重新解析协议。
代码10:
public void readResponse() {
    Response response = null;
    IoBuffer tempBuffer = null;
        tempBuffer = readBuffer.duplicate().flip();
        while (true) {
            tempBuffer.mark();
            if (tempBuffer.remaining() > 0) {
                response = selectorManager.getProtocolFactory().getDecoder().decodeResponse(tempBuffer, this);
            } else {
                response = null;
            }
            if (response != null) {
                if (response.getTicketNumber() == Ticket.DEFAULT_TICKET_NUMBER) response.setTicketNumber(response.getSession().hashCode());
                selectorManager.getThreadPool().execute(new WorkThread(response, selectorManager));
            } else {
                tempBuffer.reset();
                readBuffer = resetIoBuffer(tempBuffer);
                break;
            }
        }
}
② 服务器读请求
任务放入线程池交给 WorkThread线程,最终交给Processor类出构建请求的响应体,包括分布式上下文,然后经过FilterChain的处理,最终通过jdk提供的反射方法invoke服务端本地的方法然后返回response。如果线程池抛出拒绝异常,则返回SERVEROVERLOAD = -9,服务端过载保护。如果request为空,则重置tempBuffer到mark的位置,重新解析协议。
代码11:
public void readRequest() {
    Request request = null;
    IoBuffer tempBuffer = readBuffer.duplicate().flip();
        while (true) {
            tempBuffer.mark();
            if (tempBuffer.remaining() > 0) {
                request = selectorManager.getProtocolFactory().getDecoder().decodeRequest(tempBuffer, this);
            } else {
                request = null;
            }
            if (request != null) {
                try {
                    request.resetBornTime();
                    selectorManager.getThreadPool().execute(new WorkThread(request, selectorManager));
                } catch (RejectedExecutionException e) {
                  selectorManager.getProcessor().overload(request, request.getIoSession());
                } catch (Exception ex) {
                  ex.printStackTrace();
                }
            } else {
                tempBuffer.reset();
                readBuffer = resetIoBuffer(tempBuffer);
                break;
            }
        }
}
2. 写事件处理
同样也包括客户端写请求和服务端写响应两种,其实这两种都是往TCPSession中的LinkedBlockingQueue(有界队列最大8K)中插入ByteBuffer。LinkedBlockingQueue中的ByteBuffer最终会由TCPAcceptor中的handleWriteEvent监听写就绪事件并消费。
代码12:
protected void write(IoBuffer buffer) throws IOException {
    if (buffer == null) return;
    if (channel == null || key == null) throw new IOException("Connection is closed");
    if (!this.queue.offer(buffer.buf())) {
        throw new IOException("The session queue is full. [ queue size:" + queue.size() + " ]");
    }
    if (key != null) {
        key.interestOps(key.interestOps() | SelectionKey.OP_WRITE);
        key.selector().wakeup();
    }
}
本文主要介绍了Java NIO编程的基础知识 和 Tars-Java 1.7.2版本的网络编程模块的源码实现。
在最新的Tars-Java的master分支中我们可以发现网络编程已经由NIO改成了Netty,虽然Netty更加成熟稳定,但是作为学习者了解NIO的原理也是掌握网络编程的必经之路。
更多关于Tars框架的介绍可以访问:
本文分析源码地址(v1.7.x分支):
Recommend
About Joyk
Aggregate valuable and interesting links.
Joyk means Joy of geeK