
6

学习ASP.NET Core Blazor编程系列二十八——JWT登录(3) - DotNet菜园
source link: https://www.cnblogs.com/chillsrc/p/17207969.html
Go to the source link to view the article. You can view the picture content, updated content and better typesetting reading experience. If the link is broken, please click the button below to view the snapshot at that time.

十二、实现登入
在学习ASP.NET Core Blazor编程系列二十二——登录(1)至学习ASP.NET Core Blazor编程系列二十六——登录(5)
系列文章中学习了使用AuthenticationStateProvider实现模拟登录。今天的文章实现JWT登录,使用WebAPI接口来实现通过JWT令牌登录。
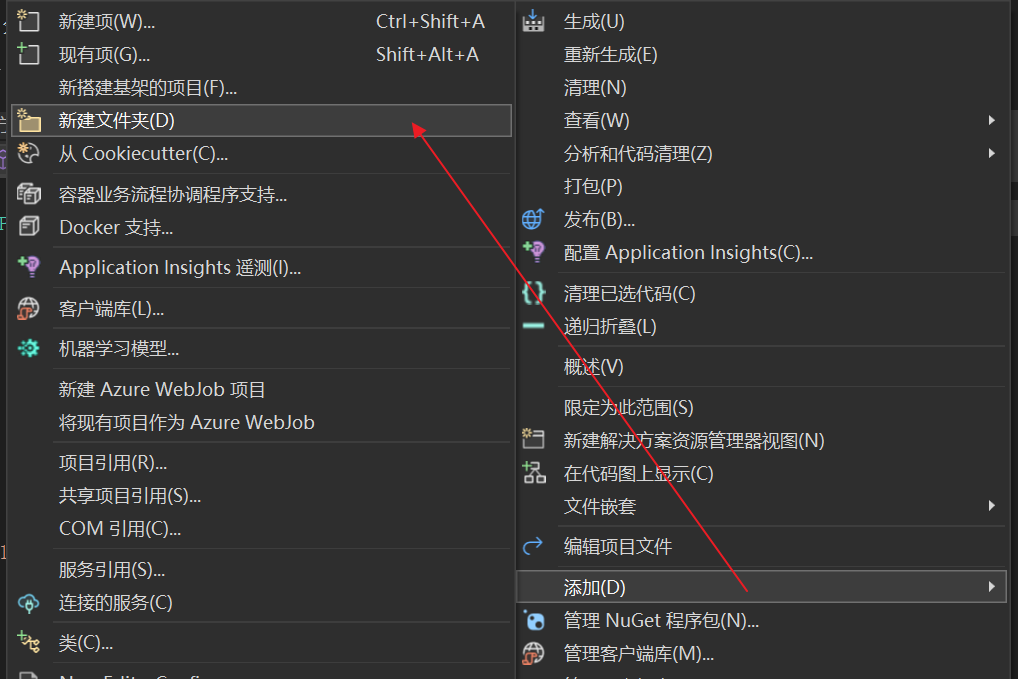
- 在Visual Studio 2022的解决方案资源管理器中,鼠标右键单击“BlazorAppDemo”项目名称,在弹出菜单中选择 “添加—>新建文件夹”,并将新建文件夹改为“Api”。如下图。
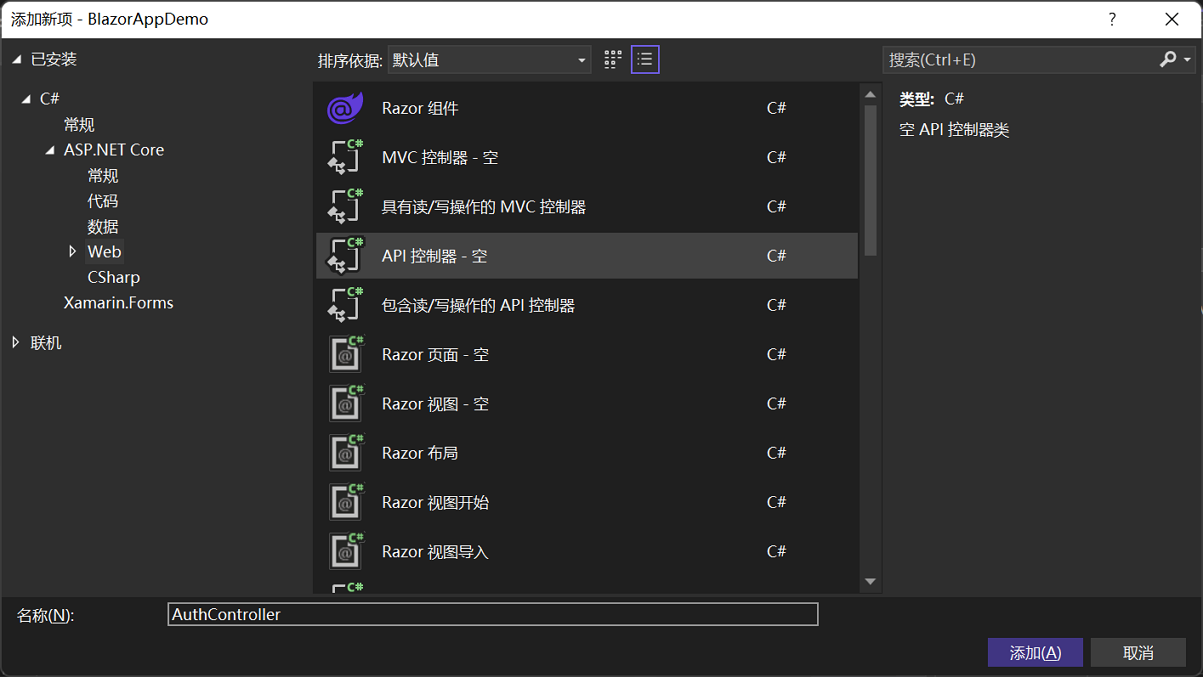
2.在Visual Studio 2022的解决方案资源管理器中,鼠标左键选中“Api”文件夹,右键单击,在弹出菜单中选择“添加—>新建项”,在弹出对话框中,选择“API控制器-空”,并将控制器命名为“AuthController”。如下图。并添加如下代码:
using BlazorAppDemo.Models;
using BlazorAppDemo.Utils;
using Microsoft.AspNetCore.Http;
using Microsoft.AspNetCore.Identity;
using Microsoft.AspNetCore.Mvc;
using Microsoft.Extensions.Configuration;
using Microsoft.IdentityModel.Tokens;
using Newtonsoft.Json.Linq;
using System.IdentityModel.Tokens.Jwt;
using System.Security.Claims;
using System.Text;

namespace BlazorAppDemo.Api
{
    [Route("api/[controller]")]
    [ApiController]
    public class AuthController : ControllerBase
    {
        private readonly IJWTHelper jwtHelper;


        public AuthController(IJWTHelper _IJWTHelper)
        {
            this.jwtHelper = _IJWTHelper;

            }

        [HttpPost("Login")]
            public async Task<ActionResult<UserToken>> Login(UserInfo userInfo)
        {
            //Demo用,更好的做法是查询用户表来实现
            if (userInfo.UserName == "admin" && userInfo.Password == "111111")
            {
                return BuildToken(userInfo);
            }
            else
            {
                UserToken userToken = new UserToken()
                {
                    StatusCode = System.Net.HttpStatusCode.Unauthorized,
                    IsSuccess = false

                };
                return userToken;
            }
        }


        /// <summary>
        /// 建立Token
        /// </summary>
        /// <param name="userInfo"></param>
        /// <returns></returns>
        private UserToken BuildToken(UserInfo userInfo)
        {

            string jwtToken = jwtHelper.CreateJwtToken<UserInfo>(userInfo);

            //建立UserToken,回传客户端
            UserToken userToken = new UserToken()
            {

                StatusCode = System.Net.HttpStatusCode.OK,
                Token = jwtToken,
                ExpireTime = DateTime.Now.AddMinutes(30),
                IsSuccess= true

            };

            return userToken;
        }
    }
}
3.在Visual Studio 2022的解决方案资源管理器中,鼠标左键选中“Models”文件夹,右键单击,在弹出菜单中选择“添加—>类”,在弹出对话框中,将类命名为“UserToken”。并添加如下代码:
using System.Net;
namespace BlazorAppDemo.Models
{
    public class UserToken
    {

        public bool IsSuccess { get ; set; }
        public HttpStatusCode StatusCode { get; set; }
        public string Token { get; set; }
        public DateTime ExpireTime { get; set; }
     }
}
using BlazorAppDemo.Models;
using System.Collections.Concurrent;

namespace BlazorAppDemo.Utils
{
    public class TokenManager
    {
        private const string TOKEN = "authToken";

        private static readonly ConcurrentDictionary<string, UserToken> tokenManager;

         static TokenManager()
        {

            tokenManager=new ConcurrentDictionary<string, UserToken>();
        }

        public static ConcurrentDictionary<string, UserToken> Instance { get { return tokenManager; } }

        public static string Token { get { return TOKEN; } }
    }
}
5.在Visual Studio 2022的解决方案资源管理器中,鼠标左键选中“Auth”文件夹,右键单击,在弹出菜单中选择“添加—>新建项”,在弹出对话框中,选择“接口”,并将接口命名为“IAuthService”。如下图。并添加如下代码:
using BlazorAppDemo.Models;

namespace BlazorAppDemo.Auth
{

    public interface IAuthService
    {

        Task<UserToken> LoginAsync(UserInfo userInfo);

        Task<UserToken> LogoutAsync();
    }
}
6.在Visual Studio 2022的解决方案资源管理器中,鼠标左键选中“Auth”文件夹,右键单击,在弹出菜单中选择“添加—>类”,在弹出对话框中,将类命名为“AuthService”。并添加如下代码:
using BlazorAppDemo.Models;
using BlazorAppDemo.Utils;
using Microsoft.AspNetCore.Components.Authorization;
using Microsoft.AspNetCore.Identity;
using Newtonsoft.Json;
using Newtonsoft.Json.Linq;
using System.Collections.Concurrent;
using System.Net.Http;
using System.Text;

namespace BlazorAppDemo.Auth
{

    public class AuthService : IAuthService
    {
        private readonly HttpClient httpClient;
        private readonly AuthenticationStateProvider authenticationStateProvider;
        private readonly IConfiguration configuration;
        private readonly Api.AuthController authController;
        private readonly string currentUserUrl, loginUrl, logoutUrl;


        public AuthService( HttpClient httpClient, AuthenticationStateProvider authenticationStateProvider, IConfiguration configuration,Api.AuthController authController)
        {
            this.authController = authController;
            this.httpClient = httpClient;
            this.authenticationStateProvider = authenticationStateProvider;
            this.configuration = configuration;
            currentUserUrl = configuration["AuthUrl:Current"] ?? "Auth/Current/";
            loginUrl = configuration["AuthUrl:Login"] ?? "api/Auth/Login";
            logoutUrl = configuration["AuthUrl:Logout"] ?? "/api/Auth/Logout/";
        }
        public async Task<UserToken> LoginAsync(UserInfo userInfo)
        {

            var result = authController.Login(userInfo);
            var loginResponse =  result.Result.Value;
            if (loginResponse != null && loginResponse.IsSuccess)
                {
                    TokenManager.Instance.TryAdd(TokenManager.Token, loginResponse);
                   ((ImitateAuthStateProvider)authenticationStateProvider).NotifyUserAuthentication(loginResponse.Token);

                    httpClient.DefaultRequestHeaders.Authorization = new System.Net.Http.Headers.AuthenticationHeaderValue("bearer", loginResponse.Token);
                     return loginResponse;
                }

            return new UserToken() { IsSuccess = false };
        }

        public Task<UserToken> LogoutAsync()
        {
            throw new NotImplementedException();
        }
    }
}
LoginAsync登录方法的实现功能:
- 將账号与密码,发送到AuthController做验证,验证成功生成UserToken实例
- 将token写到TokenManger实例中
- 通知前面页面更新登录状态
- 每次request的header将bearer token都带上。
7. 在Visual Studio 2022的解决方案管理器中,使用鼠标左键,双击ImitateAuthStateProvider.cs文件,对代码进行修改。具体代码如下:
using BlazorAppDemo.Models;
using BlazorAppDemo.Utils;
using Microsoft.AspNetCore.Components.Authorization;
using System.Net.Http;
using System.Security.Claims;

namespace BlazorAppDemo.Auth
{
    public class ImitateAuthStateProvider : AuthenticationStateProvider
    {
        private readonly IJWTHelper jwt;
        private AuthenticationState anonymous;
        private readonly HttpClient httpClient;

        public ImitateAuthStateProvider(IJWTHelper _jwt, HttpClient httpClient)
        {

            anonymous = new AuthenticationState(new ClaimsPrincipal(new ClaimsIdentity()));
            jwt = _jwt;
            this.httpClient = httpClient;
        }

        bool isLogin = false;
        string token = string.Empty;
        public override Task<AuthenticationState> GetAuthenticationStateAsync()
        {
            //确认是否已经登录
            UserToken userToken;
                TokenManager.Instance.TryGetValue(TokenManager.Token,out userToken);
            string tokenInLocalStorage=string.Empty;
            if (userToken != null)
            {
                tokenInLocalStorage = userToken.Token;
            }
            if (string.IsNullOrEmpty(tokenInLocalStorage))
            {
                //沒有登录,则返回匿名登录者
                return Task.FromResult(anonymous);
            }

            //將token取出转换为claim
            var claims = jwt.ParseToken(tokenInLocalStorage);

            //在每次request的header中都将加入bearer token
            httpClient.DefaultRequestHeaders.Authorization = new System.Net.Http.Headers.AuthenticationHeaderValue("bearer",
tokenInLocalStorage);

            //回传带有user claim的AuthenticationState
            return Task.FromResult(new AuthenticationState(new ClaimsPrincipal(new ClaimsIdentity(claims, "jwt"))));

        }
        public void Login(UserInfo request)
        {
            //1.验证用户账号密码是否正确
            if (request == null)
            {
                isLogin=false;
            }
            if (request.UserName == "user" && request.Password == "111111")
            {
                isLogin = true;
               token= jwt.CreateJwtToken<UserInfo>(request);
                Console.WriteLine($"JWT Token={token}");
            }
            NotifyAuthenticationStateChanged(GetAuthenticationStateAsync());
        }

        public void NotifyUserAuthentication(string token)
        {
            var claims = jwt.ParseToken(token);
            var authenticatedUser = new ClaimsPrincipal(new ClaimsIdentity(claims, "jwt"));

            var authState = Task.FromResult(new AuthenticationState(authenticatedUser));
            NotifyAuthenticationStateChanged(authState);
       }

    }
}
8. 在Visual Studio 2022的解决方案管理器中,使用鼠标左键,双击Program.cs文件,将之在文本编辑器中打开,将我们写的AuthController和框架中的HttpClient,使用DI方式注入,添加Controller服务。具体代码如下:
using BlazorAppDemo.Data;
using BlazorAppDemo.Models;
using Microsoft.AspNetCore.Components;
using Microsoft.AspNetCore.Components.Web;
using Microsoft.Extensions.Configuration;
using Microsoft.EntityFrameworkCore;
using Microsoft.Extensions.Hosting;
using Microsoft.AspNetCore.Components.Authorization;
using BlazorAppDemo.Auth;
using Microsoft.AspNetCore.Authentication.JwtBearer;
using Microsoft.IdentityModel.Tokens;
using System.Text;
using System.IdentityModel.Tokens.Jwt;
using BlazorAppDemo.Utils;
using BlazorAppDemo.Api;

var builder = WebApplication.CreateBuilder(args);


// Add services to the container.
builder.Services.AddRazorPages();
builder.Services.AddServerSideBlazor();
builder.Services.AddSingleton<WeatherForecastService>();
IConfiguration config = ConfigHelper.Configuration;
System.Console.WriteLine(config["ConnectionStrings:BookContext"]);
builder.Services.AddDbContextFactory<BookContext>(opt =>
   opt.UseSqlServer(ConfigHelper.Configuration["ConnectionStrings:BookContext"]));
builder.Services.AddScoped<ImitateAuthStateProvider>();
builder.Services.AddScoped<AuthenticationStateProvider>(implementationFactory =>
implementationFactory.GetRequiredService<ImitateAuthStateProvider>());
builder.Services.AddScoped<JwtSecurityTokenHandler>();
//此处的url地址改成自己实际的地址

builder.Services.AddScoped(sp => new HttpClient { BaseAddress = new Uri("http://localhost:7110") });

builder.Services.AddScoped<IAuthService, AuthService>();
builder.Services.AddScoped<AuthController>();
//JWT
//JWT认证

builder.Services.AddAuthentication(JwtBearerDefaults.AuthenticationScheme).AddJwtBearer(options =>
{
    //取出私钥
    var secretByte = Encoding.UTF8.GetBytes(builder.Configuration["Authentication:SecretKey"]);
    options.TokenValidationParameters = new TokenValidationParameters()
    {
        //验证发布者
        ValidateIssuer = true,
        ValidIssuer = builder.Configuration["Authentication:Issuer"],
        //验证接收者
        ValidateAudience = true,
        ValidAudience = builder.Configuration["Authentication:Audience"],
        //验证是否过期
        ValidateLifetime = true,
        //验证私钥
        IssuerSigningKey = new SymmetricSecurityKey(secretByte)
    };
});
;
builder.Services.AddScoped<IJWTHelper,JWTHelper>();

var app = builder.Build();

// Configure the HTTP request pipeline.
if (!app.Environment.IsDevelopment())
{
    app.UseExceptionHandler("/Error");
    // The default HSTS value is 30 days. You may want to change this for production scenarios, see https://aka.ms/aspnetcore-hsts.
    app.UseHsts();
}


using (var scope = app.Services.CreateScope())
{
    var services = scope.ServiceProvider;
    try
    {
        Console.WriteLine("数据库开始初始化。");
        var context = services.GetRequiredService<BookContext>();
        // requires using Microsoft.EntityFrameworkCore;
        context.Database.Migrate();
        // Requires using RazorPagesMovie.Models;
        SeedData.Initialize(services);
        Console.WriteLine("数据库初始化结束。");
    }

    catch (Exception ex)
    {
        var logger = services.GetRequiredService<ILogger<Program>>();
        logger.LogError(ex, "数据库数据初始化错误.");
    }
}


app.UseHttpsRedirection();

app.UseStaticFiles();


app.UseRouting();
app.MapControllers();


app.MapBlazorHub();
app.MapFallbackToPage("/_Host");
app.UseAuthentication();
app.UseAuthorization();


app.Run();
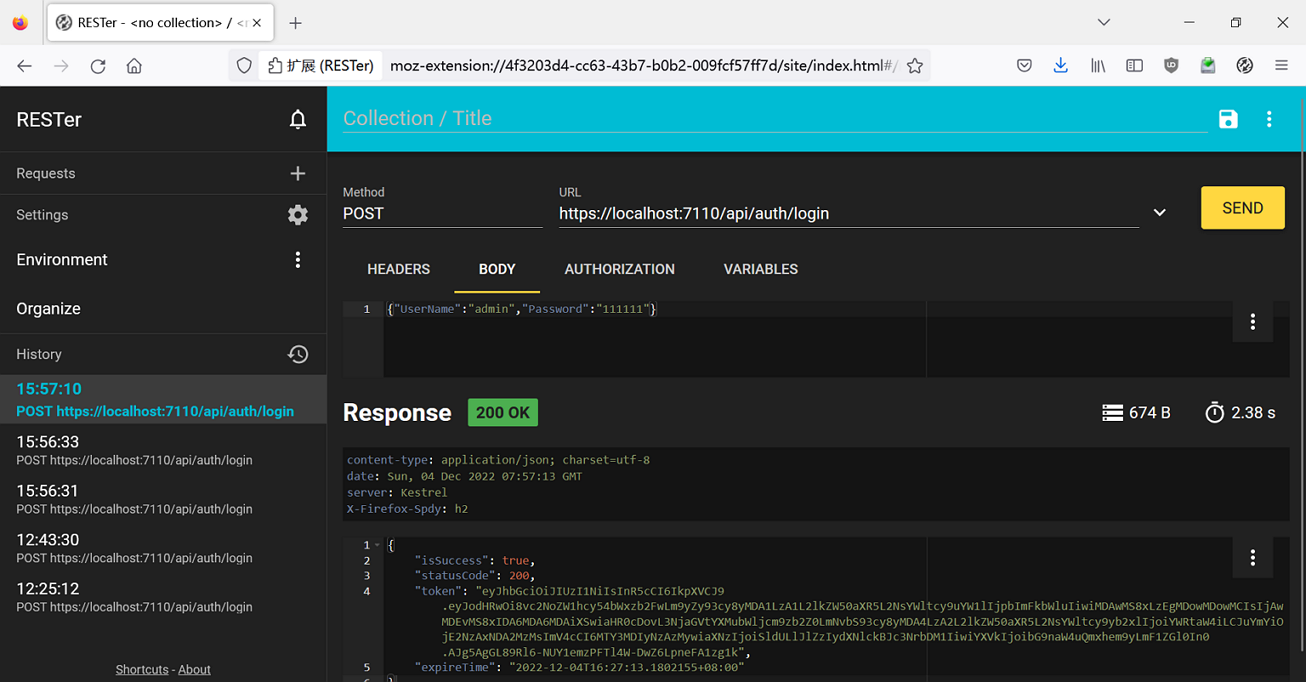
9. 在Visual Studio 2022的菜单栏上,找到“调试-->开始调试”或是按F5键,Visual Studio 2022会生成BlazorAppDemo应用程序,并在浏览器使用Rest调试插件,对api/auth/login接口进行调试,只要登入成功就可以取得token。如下图。
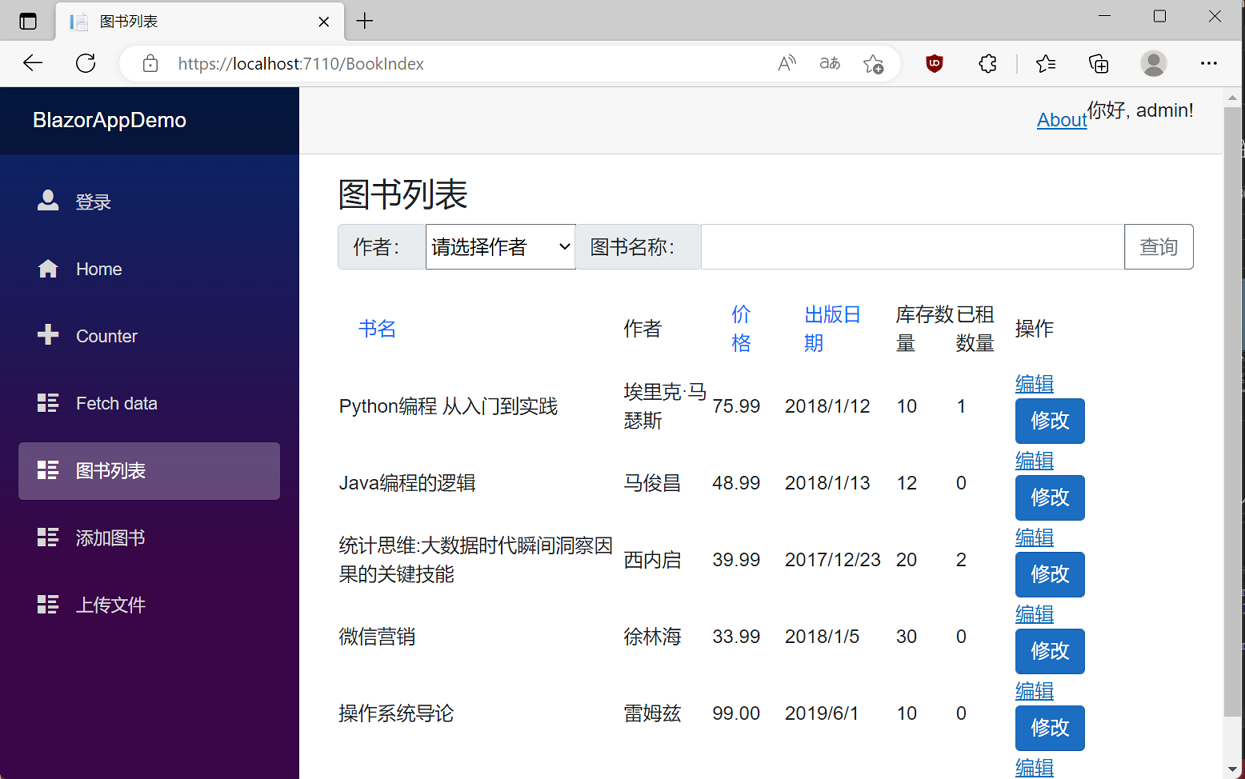
10.我们在用户名输入框中输入用户名"admin",在密码输入框中输入密码"111111",点击“登录”按钮,进行登录。我们进入了系统。如下图。
Recommend
About Joyk
Aggregate valuable and interesting links.
Joyk means Joy of geeK