
3

802.11ac, BT 4.0, Continuity, and Handoff Working on Mac Pro 2010 | MacRumors Fo...
source link: https://forums.macrumors.com/threads/802-11ac-bt-4-0-continuity-and-handoff-working-on-mac-pro-2010.1748061/
Go to the source link to view the article. You can view the picture content, updated content and better typesetting reading experience. If the link is broken, please click the button below to view the snapshot at that time.

802.11ac, BT 4.0, Continuity, and Handoff Working on Mac Pro 2010
--------------------------------------------------------------------------------------------------------------------------------------
--------------------------------------------------------------------------------------------------------------------------------------
News&Updates:
(I will continue updating and gathering some new information and plans. Just keep focusing!)
A. We just found another simpler, more convenient plan!
The plan is actually similar to mine. Using Apple's card to build a new card and plug it into the computer. Because the card is Apple-Genuine, the Continuity and Handoff features is enabled without any additional drivers.
However, I had confirmed from the seller that this USB dongle contain only BT but without Wi-Fi!
Here is the link: http://item.taobao.com/item.htm?spm=a230r.1.0.0.dTfITn&id=21898631216
(This seller could barely speak English (could read but hard talk). However, he do not accept Paypal. But the good news is that he could ship to US directly! Contact him if you guys want! His E-Mail address is [email protected])
This plan was discovered and shared by jdavidbarrera.
06/25/2014
--------------------------------------------------------------------------------------------------------------------------------------
B. If your computer is so old that contain no mPCIe slot. Try this plan:
This plan is nothing different from my plan but a PCIe card. So you could plug the card into you PCIe slot rather than mPCIe. Moreover, the PCIe slot has already contained the USB bus. So all you have to do is to plug in the card and use! However, the antenna could be external. But you could also prolong your internal antenna wire too (haha).
Here is the link: http://item.taobao.com/item.htm?spm...d4913621.aQQx6V&id=27356596474&_u=qb7bf0jb96e
(The seller is the same guy who sell the iMac Card and convert card. He speaks English, accepts Paypal and Ships directly to US. You guys could buy the card very easily! His E-Mail address is [email protected])
This plan was inspired by 128keaton.
06/26/2014
--------------------------------------------------------------------------------------------------------------------------------------
C. If you are seeking a more convenient plan about this upgrade, kennyman and cparr007 provided their plans in #122 and #123 floors which are more convenient than mine. They used some new kinds of conversion cards and approaches. However, The reason why I choose to make my plan like this (hide wires behind the backplane board which makes the plan more complex) is to protect wire because it could be dangerous if you leave those wires in free spaces. Anyway, thanks for sharing!
Those plans were provided by kennyman and cparr007 in #122 and #123 floors.
07/17/2014
--------------------------------------------------------------------------------------------------------------------------------------
--------------------------------------------------------------------------------------------------------------------------------------
Article:
Hello everyone! It is my first time to post on the MacRumors. It's been excited. I am a Chinese high school student, preparing to study in US next month. So please forgive my language using and mistakes. I took about 7 hours to write this article in order to help everybody upgrade their old Macs and use the latest features. So Please read the article carefully and patiently (some details are very important!). Thank you very much!
I also posted this article to Netkas: http://forum.netkas.org/index.php/topic,8497.0.html. Check it out if you want!
After the release of OS X 10.10, I found that my old Mac Pro Mid 2010 could not use the new features such as Continuity, Handoff and new AirDrop. As you know, the Continuity, Handoff and AirDrop is not available on the old Macs because the Airport and Bluetooth modules are out of date, using 802.11n and BT 2.1+EDR or even older. After reading articles and posts on the Internet, I found some solutions. The best plan is to replace the Airport Card and BT Card with the latest iMac Airport Card.
However, there are some problems with that plan:
First, the interface of the iMac Airport Card is not mPCIe but the special, unknown one. So it could not be directly used for the Mac Pro upgrade.
Second, some guys on Netkas have actually tried this plan. But the result look unsuccessful and strange. Some of them (http://forum.netkas.org/index.php/topic,8385.0.html) have even tried to convert the interface into mPCIe by soldering manually just because the convert card they bought on TaoBao is not working for BT part of the iMac Card.
Now, I had developed a feasible plan to let both the ac and BT 4.0 part of the iMac Card work on the Mac Pro 2010 simultaneously! Of course, with Continuity and handoff enabled!
Ok, here are the procedures you need to follow to finish the upgrade:
1. Preparing the materials and the plan.
A. Convert Card:
Go to TaoBao and buy this convert card in this link: http://item.taobao.com/item.htm?spm=a1z09.2.9.10.91QEa2&id=20953715880 (The seller of the cards didn't put out both the pictures of iMac Card and convert card but only the pictures of iMac Card because other sellers keep plagiarizing the pictures in order to captivate buyers. The link DO contain both the iMac Card and convert card! The seller speaks English, accepts Paypal and could ship to US directly. So it is pretty easy for you guys to buy the parts. Here is his E-Mail address so you guys could contact the seller directly: [email protected]. Thank jdavidbarrera for his suggestions!) The guy in Netkas said that he tried this card and discovered that the BT was not working by using this card. After having talks with the seller of the convert card, I find the problem: The original mPCIe slot of the Mac Pro Mid 2010 does not contain the USB bus!! So that is the reason why the BT part of the iMac Card is not working while being plugged into Mac Pro. I will show my solution later.
B. IPX antenna wire at the length of about half a meter:
You could search and buy it on ebay or TaoBao. The purpose of buying the wire is that the original BT antenna (see the pictures, the BT antenna of Mac Pro is independent, not merged with that of Wi-Fi, located at the back of the machine [see the pictures]) wire of Mac Pro is so short that could not reach the position of the mPCIe slot (the new iMac Card is a Wi-Fi and BT combo Airport Card). So we need an extra wire to prolong the origin one to the position of mPCIe slot.
C. A thin wire (around 1 mm thickness) at the length of about 1 meter:
The purpose of this wire is to connect the convert card and the iMac Card to the original BT USB slot of Mac Pro. In other words, a USB cable. I will show my solution later.
2. Implement the plan (Part I).
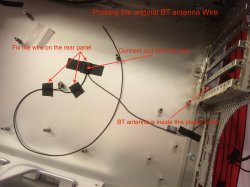
Take out your tools and IPX antenna Wire. We are going to disassemble the machine and prolong the BT antenna wire.
A. First, you need to get the vertical backplane board (not only the CPU tray) out of your machine because the BT antenna wire is behind that board. You need to be very careful moving out the board and find the BT antenna wire which is located at the lower right corner of the machine, labeled "BT". And then, disconnect the original Airport Card and BT Card from the backplane board.
--------------------------------------------------------------------------------------------------------------------------------------
ATTENTION: keep the USB connector of the BT Card (see the pictures)! We will use this part later.
--------------------------------------------------------------------------------------------------------------------------------------
B. Second, cut both the Head of the BT antenna wire in machine and the end of the IPX antenna wire you bought. And then connect them together (see the pictures). Soldering is not recommended because the wire is very thin and tiny. Using a electrical sticky tape to seal the wire could be a better approach. Checking shorts is the most important thing you need to do. After that, fix the wire on the rear panel of the machine. Finally, put ONLY the backplane board back to the machine.
Now, your prolonged BT antenna wire is supposed to be ready!
3. Implement the plan (Part II).
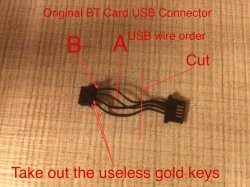
Take out the iMac Card (which is preinstalled on the convert card) bought on the TaoBao, the 1 meter thin wire and the origin BT card connector (see the picture).
A. First, cut that 1 meter long, 1 mm thin wire equally into two 50 cm wires, which are going to be used as Data+ & Date- USB wires.
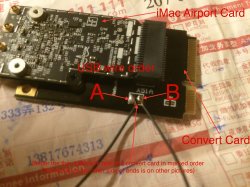
B. Solder one side of ends of the two wires onto the USB port of the convert card (see the pictures). and then put the other side of ends of the wires into the connector (see the pictures). Be careful about the orders of the wires' ends B] I have marked the orders on the pictures[/B].
--------------------------------------------------------------------------------------------------------------------------------------
REMEMBER: A to A, B to B! If you mistaken the order of the wires' ends, the BT part of the Card will not be functional!! IN ADDITION, You MUST carefully check for the shorts especially the parts you soldered!!
PS: we will only use two gold keys (A and B) of the connector. So I strongly recommend you guys to take out the other two gold keys by using screw drivers or knives in order to prevent shorting out.
--------------------------------------------------------------------------------------------------------------------------------------
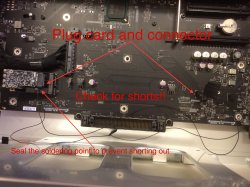
C. Use electrical sticky tapes to cover the soldering point on the convert card in order to prevent shorting out (see the pictures). And then plug in the convert card (iMac Card is on the convert card) onto the mPCIe slot of the backplane board.
D. Hide the USB wire (that thin wire) into the back of the backplane board in order to protect it (It is important!). And then, plug the connector in the original BT USB port (just see the pictures if you are confused). Finally, check the wire orders again for just in case.
--------------------------------------------------------------------------------------------------------------------------------------
PS: I put the original BT card back to the backplane board (which is useless now) JUST for decoration, with no wire connected. If you don't want to do this, just throw the old card away, haha! (But please keep the old Airport Card. You might need it later.)
--------------------------------------------------------------------------------------------------------------------------------------
E. Let's connect the antennas. I have marked the orders of the antennas on the pictures. There are number labels on the original antennas. Maybe you guys will ask: "Why are there 3 wires plus a BT wire? I only see 2 wires on the Airport card." The wire labeled "2" is unused so it has been hidden by Apple behind the Airport card. You will see the wire after removing Airport card from the backplane board. The orders could be "3, 1, BT, 2" from the top to the bottom. (Old rules, if you are confused, just see the pictures)
F. Reassemble the machine and boot it (The computer won't boot if you didn't reassemble the machine completely). And then check the status of the iMac Card.
--------------------------------------------------------------------------------------------------------------------------------------
--------------------------------------------------------------------------------------------------------------------------------------
ATTENTION:
If the machine do not EVEN recognize the Wi-Fi part, here is the solution: turn off the computer; unplug the new iMac Card (be careful about that thin, USB wire); replug the old Airport card (BT card and antennas are not necessary to replug); reboot the machine; you are supposed to see the Wi-Fi logo on the status bar after rebooting; if so, turn off the computer again; unplug the old Airport card and set it aside; replug the new card; check for the shorts; reboot the computer; the card is supposed to be functional now!
--------------------------------------------------------------------------------------------------------------------------------------
If the machine do not recognize the BT part, just check if you mistaken the order of that thin, USB wire. If so, revert them and try again!
--------------------------------------------------------------------------------------------------------------------------------------
--------------------------------------------------------------------------------------------------------------------------------------
G. If everything goes fine, congratulations! You just did it!
--------------------------------------------------------------------------------------------------------------------------------------
PS: All the paired BT devices on your Mac is invalid after replacing the card because the MAC address has changed. You have to repair all the devices. (Piece of cake, right?)
--------------------------------------------------------------------------------------------------------------------------------------
4. Any questions? Contact me via iMessage or E-Mail at [email protected]!.
5. I also did some great upgrades for my Mac Pro Mid 2010 such as two Sapphire HD 7950 CrossFire (pictures available), USB 3.0 PCI Card (Kexts free! Taboo purchase link: http://detail.tmall.com/item.htm?id=35125153100&spm=a1z09.2.9.31.tqniDl. This card do not need power supply!!), two 1 TB SSD with low price (Crucial M500, only 3000 RMB with great performance) and etc. I didn't post those upgrade on the Internet because I do not have enough time (Sorry!). If you are interested, contact me via iMessage or E-Mail at [email protected] if you are interested (better use QQ, my number is 920786872).
--------------------------------------------------------------------------------------------------------------------------------------
Thanks for reading!! And please keep focusing on my article and I will add some new information and plans in the "News&Updates" section on the top of the first post
06/24/2014
--------------------------------------------------------------------------------------------------------------------------------------
--------------------------------------------------------------------------------------------------------------------------------------
News&Updates:
(I will continue updating and gathering some new information and plans. Just keep focusing!)
A. We just found another simpler, more convenient plan!
The plan is actually similar to mine. Using Apple's card to build a new card and plug it into the computer. Because the card is Apple-Genuine, the Continuity and Handoff features is enabled without any additional drivers.
However, I had confirmed from the seller that this USB dongle contain only BT but without Wi-Fi!
Here is the link: http://item.taobao.com/item.htm?spm=a230r.1.0.0.dTfITn&id=21898631216
(This seller could barely speak English (could read but hard talk). However, he do not accept Paypal. But the good news is that he could ship to US directly! Contact him if you guys want! His E-Mail address is [email protected])
This plan was discovered and shared by jdavidbarrera.
06/25/2014
--------------------------------------------------------------------------------------------------------------------------------------
B. If your computer is so old that contain no mPCIe slot. Try this plan:
This plan is nothing different from my plan but a PCIe card. So you could plug the card into you PCIe slot rather than mPCIe. Moreover, the PCIe slot has already contained the USB bus. So all you have to do is to plug in the card and use! However, the antenna could be external. But you could also prolong your internal antenna wire too (haha).
Here is the link: http://item.taobao.com/item.htm?spm...d4913621.aQQx6V&id=27356596474&_u=qb7bf0jb96e
(The seller is the same guy who sell the iMac Card and convert card. He speaks English, accepts Paypal and Ships directly to US. You guys could buy the card very easily! His E-Mail address is [email protected])
This plan was inspired by 128keaton.
06/26/2014
--------------------------------------------------------------------------------------------------------------------------------------
C. If you are seeking a more convenient plan about this upgrade, kennyman and cparr007 provided their plans in #122 and #123 floors which are more convenient than mine. They used some new kinds of conversion cards and approaches. However, The reason why I choose to make my plan like this (hide wires behind the backplane board which makes the plan more complex) is to protect wire because it could be dangerous if you leave those wires in free spaces. Anyway, thanks for sharing!
Those plans were provided by kennyman and cparr007 in #122 and #123 floors.
07/17/2014
--------------------------------------------------------------------------------------------------------------------------------------
--------------------------------------------------------------------------------------------------------------------------------------
Article:
Hello everyone! It is my first time to post on the MacRumors. It's been excited. I am a Chinese high school student, preparing to study in US next month. So please forgive my language using and mistakes. I took about 7 hours to write this article in order to help everybody upgrade their old Macs and use the latest features. So Please read the article carefully and patiently (some details are very important!). Thank you very much!
I also posted this article to Netkas: http://forum.netkas.org/index.php/topic,8497.0.html. Check it out if you want!
After the release of OS X 10.10, I found that my old Mac Pro Mid 2010 could not use the new features such as Continuity, Handoff and new AirDrop. As you know, the Continuity, Handoff and AirDrop is not available on the old Macs because the Airport and Bluetooth modules are out of date, using 802.11n and BT 2.1+EDR or even older. After reading articles and posts on the Internet, I found some solutions. The best plan is to replace the Airport Card and BT Card with the latest iMac Airport Card.
However, there are some problems with that plan:
First, the interface of the iMac Airport Card is not mPCIe but the special, unknown one. So it could not be directly used for the Mac Pro upgrade.
Second, some guys on Netkas have actually tried this plan. But the result look unsuccessful and strange. Some of them (http://forum.netkas.org/index.php/topic,8385.0.html) have even tried to convert the interface into mPCIe by soldering manually just because the convert card they bought on TaoBao is not working for BT part of the iMac Card.
Now, I had developed a feasible plan to let both the ac and BT 4.0 part of the iMac Card work on the Mac Pro 2010 simultaneously! Of course, with Continuity and handoff enabled!
Ok, here are the procedures you need to follow to finish the upgrade:
1. Preparing the materials and the plan.
A. Convert Card:
Go to TaoBao and buy this convert card in this link: http://item.taobao.com/item.htm?spm=a1z09.2.9.10.91QEa2&id=20953715880 (The seller of the cards didn't put out both the pictures of iMac Card and convert card but only the pictures of iMac Card because other sellers keep plagiarizing the pictures in order to captivate buyers. The link DO contain both the iMac Card and convert card! The seller speaks English, accepts Paypal and could ship to US directly. So it is pretty easy for you guys to buy the parts. Here is his E-Mail address so you guys could contact the seller directly: [email protected]. Thank jdavidbarrera for his suggestions!) The guy in Netkas said that he tried this card and discovered that the BT was not working by using this card. After having talks with the seller of the convert card, I find the problem: The original mPCIe slot of the Mac Pro Mid 2010 does not contain the USB bus!! So that is the reason why the BT part of the iMac Card is not working while being plugged into Mac Pro. I will show my solution later.
B. IPX antenna wire at the length of about half a meter:
You could search and buy it on ebay or TaoBao. The purpose of buying the wire is that the original BT antenna (see the pictures, the BT antenna of Mac Pro is independent, not merged with that of Wi-Fi, located at the back of the machine [see the pictures]) wire of Mac Pro is so short that could not reach the position of the mPCIe slot (the new iMac Card is a Wi-Fi and BT combo Airport Card). So we need an extra wire to prolong the origin one to the position of mPCIe slot.
C. A thin wire (around 1 mm thickness) at the length of about 1 meter:
The purpose of this wire is to connect the convert card and the iMac Card to the original BT USB slot of Mac Pro. In other words, a USB cable. I will show my solution later.
2. Implement the plan (Part I).
Take out your tools and IPX antenna Wire. We are going to disassemble the machine and prolong the BT antenna wire.
A. First, you need to get the vertical backplane board (not only the CPU tray) out of your machine because the BT antenna wire is behind that board. You need to be very careful moving out the board and find the BT antenna wire which is located at the lower right corner of the machine, labeled "BT". And then, disconnect the original Airport Card and BT Card from the backplane board.
--------------------------------------------------------------------------------------------------------------------------------------
ATTENTION: keep the USB connector of the BT Card (see the pictures)! We will use this part later.
--------------------------------------------------------------------------------------------------------------------------------------
B. Second, cut both the Head of the BT antenna wire in machine and the end of the IPX antenna wire you bought. And then connect them together (see the pictures). Soldering is not recommended because the wire is very thin and tiny. Using a electrical sticky tape to seal the wire could be a better approach. Checking shorts is the most important thing you need to do. After that, fix the wire on the rear panel of the machine. Finally, put ONLY the backplane board back to the machine.
Now, your prolonged BT antenna wire is supposed to be ready!
3. Implement the plan (Part II).
Take out the iMac Card (which is preinstalled on the convert card) bought on the TaoBao, the 1 meter thin wire and the origin BT card connector (see the picture).
A. First, cut that 1 meter long, 1 mm thin wire equally into two 50 cm wires, which are going to be used as Data+ & Date- USB wires.
B. Solder one side of ends of the two wires onto the USB port of the convert card (see the pictures). and then put the other side of ends of the wires into the connector (see the pictures). Be careful about the orders of the wires' ends B] I have marked the orders on the pictures[/B].
--------------------------------------------------------------------------------------------------------------------------------------
REMEMBER: A to A, B to B! If you mistaken the order of the wires' ends, the BT part of the Card will not be functional!! IN ADDITION, You MUST carefully check for the shorts especially the parts you soldered!!
PS: we will only use two gold keys (A and B) of the connector. So I strongly recommend you guys to take out the other two gold keys by using screw drivers or knives in order to prevent shorting out.
--------------------------------------------------------------------------------------------------------------------------------------
C. Use electrical sticky tapes to cover the soldering point on the convert card in order to prevent shorting out (see the pictures). And then plug in the convert card (iMac Card is on the convert card) onto the mPCIe slot of the backplane board.
D. Hide the USB wire (that thin wire) into the back of the backplane board in order to protect it (It is important!). And then, plug the connector in the original BT USB port (just see the pictures if you are confused). Finally, check the wire orders again for just in case.
--------------------------------------------------------------------------------------------------------------------------------------
PS: I put the original BT card back to the backplane board (which is useless now) JUST for decoration, with no wire connected. If you don't want to do this, just throw the old card away, haha! (But please keep the old Airport Card. You might need it later.)
--------------------------------------------------------------------------------------------------------------------------------------
E. Let's connect the antennas. I have marked the orders of the antennas on the pictures. There are number labels on the original antennas. Maybe you guys will ask: "Why are there 3 wires plus a BT wire? I only see 2 wires on the Airport card." The wire labeled "2" is unused so it has been hidden by Apple behind the Airport card. You will see the wire after removing Airport card from the backplane board. The orders could be "3, 1, BT, 2" from the top to the bottom. (Old rules, if you are confused, just see the pictures)
F. Reassemble the machine and boot it (The computer won't boot if you didn't reassemble the machine completely). And then check the status of the iMac Card.
--------------------------------------------------------------------------------------------------------------------------------------
--------------------------------------------------------------------------------------------------------------------------------------
ATTENTION:
If the machine do not EVEN recognize the Wi-Fi part, here is the solution: turn off the computer; unplug the new iMac Card (be careful about that thin, USB wire); replug the old Airport card (BT card and antennas are not necessary to replug); reboot the machine; you are supposed to see the Wi-Fi logo on the status bar after rebooting; if so, turn off the computer again; unplug the old Airport card and set it aside; replug the new card; check for the shorts; reboot the computer; the card is supposed to be functional now!
--------------------------------------------------------------------------------------------------------------------------------------
If the machine do not recognize the BT part, just check if you mistaken the order of that thin, USB wire. If so, revert them and try again!
--------------------------------------------------------------------------------------------------------------------------------------
--------------------------------------------------------------------------------------------------------------------------------------
G. If everything goes fine, congratulations! You just did it!
--------------------------------------------------------------------------------------------------------------------------------------
PS: All the paired BT devices on your Mac is invalid after replacing the card because the MAC address has changed. You have to repair all the devices. (Piece of cake, right?)
--------------------------------------------------------------------------------------------------------------------------------------
4. Any questions? Contact me via iMessage or E-Mail at [email protected]!.
5. I also did some great upgrades for my Mac Pro Mid 2010 such as two Sapphire HD 7950 CrossFire (pictures available), USB 3.0 PCI Card (Kexts free! Taboo purchase link: http://detail.tmall.com/item.htm?id=35125153100&spm=a1z09.2.9.31.tqniDl. This card do not need power supply!!), two 1 TB SSD with low price (Crucial M500, only 3000 RMB with great performance) and etc. I didn't post those upgrade on the Internet because I do not have enough time (Sorry!). If you are interested, contact me via iMessage or E-Mail at [email protected] if you are interested (better use QQ, my number is 920786872).
--------------------------------------------------------------------------------------------------------------------------------------
Thanks for reading!! And please keep focusing on my article and I will add some new information and plans in the "News&Updates" section on the top of the first post
06/24/2014
--------------------------------------------------------------------------------------------------------------------------------------
Attachments
-
 IMG_4160.JPG1.4 MB · Views: 41,044
 -
 FullSizeRender 4.jpg1.7 MB · Views: 39,003
 -
 FullSizeRender.jpg1.8 MB · Views: 37,879
 -
 FullSizeRender copy.jpg2 MB · Views: 38,625
 -
 IMG_4192.JPG2.2 MB · Views: 35,386
Recommend
About Joyk
Aggregate valuable and interesting links.
Joyk means Joy of geeK