

maven 多模块项目的测试覆盖率分析 - jacoco 聚合分析 - 小二十七
source link: https://www.cnblogs.com/xiao2shiqi/p/17201756.html
Go to the source link to view the article. You can view the picture content, updated content and better typesetting reading experience. If the link is broken, please click the button below to view the snapshot at that time.

maven 多模块项目的测试覆盖率分析 - jacoco 聚合分析
对于大多数 maven 多模块化工程,可以使用 Jacoco 这款工具,关于 Jacoco 这款工具,ChatGPT 对它的描述是这样的:
JaCoCo(Java Code Coverage)是一个开源的测试覆盖率工具,它可以用于帮助开发人员衡量其软件测试的有效性。它支持多种语言,包括 Java 和 Kotlin 等,并且可以与多个构建工具和集成开发环境(IDE)一起使用。
JaCoCo 可以收集测试覆盖率数据,并生成可视化的测试覆盖率报告,帮助开发人员更好地理解其代码的测试覆盖率情况。它提供了多种测试覆盖率指标,例如行覆盖率、分支覆盖率、方法覆盖率、类覆盖率等,可以帮助开发人员了解其测试覆盖率情况的具体细节。
JaCoCo 还可以与多种构建工具集成,例如 Maven、Gradle 等。它可以通过 Maven 或 Gradle 的插件来收集测试覆盖率数据,并在构建过程中生成测试覆盖率报告
Jacoco 可以很好的支持对 Maven 多模块进行聚合分析测试覆盖率,可以从项目整体输出覆盖率报告非常方便。
下面展示一下具体的使用方法
一:创建根项目
先创建一个多模块的 Maven 项目,大致的结构如下:
├── parent-project
├── pom.xml
├── business-module1
│   ├── pom.xml
│   └── src
│       ├── main
│       └── test
├── business-module2
│   ├── pom.xml
│   └── src
│       ├── main
│       └── test
└── test-module
    ├── pom.xml
    └── src
        ├── main
        └── test
在一个空白的目录,一个的 Maven 的根项目:
mvn archetype:generate \
-DgroupId=org.example \
-DartifactId=jacoco-multi-module-example \
-DarchetypeArtifactId=maven-archetype-quickstart \
-DinteractiveMode=false
然后进入目录:
cd jacoco-multi-module-example
把根目录 pom.xml 的 packaging 属性改为 pom,从而将根目录设置为一个聚合模块,用来管理多个子模块的依赖关系
<packaging>pom</packaging>
二:创建子模块
根据上面的结构,在根目录下,分别创建:
- business-module1
- business-module2
- test-module
在根目录的路径下,输入以下命令,创建 business-module1 模块:
mvn archetype:generate \
-DgroupId=org.example \
-DartifactId=business-module1 \
-DarchetypeArtifactId=maven-archetype-quickstart  \
-DinteractiveMode=false
创建 business-module2 模块:
mvn archetype:generate \
-DgroupId=org.example \
-DartifactId=business-module2 \
-DarchetypeArtifactId=maven-archetype-quickstart \
-DinteractiveMode=false
创建 test-module 单元测试模块:
mvn archetype:generate \
-DgroupId=org.example \
-DartifactId=test-module \
-DarchetypeArtifactId=maven-archetype-quickstart \
-DinteractiveMode=false
然后模拟实际的开发,分别在模块1,模块2中添加一些业务代码,
在 business-module1 中我添加一个简单的数学运算 IntegerSimpleCompute 类:
// business-module1\src\main\java\org\example\IntegerSimpleCompute.java
package org.example;

public class IntegerSimpleCompute {

    public int add(int i, int j) {
        return i + j;
    }

    public int subtract(int i, int j) {
        return i - j;
    }

    public int multiply(int i, int j) {
        return i * j;
    }

    public int divide(int i, int j) {
        return i / j;
    }
}
在 business-module2 中我添加一个简单的逻辑运算 IntegerLogicCompute 类:
// business-module2\src\main\java\org\example\IntegerLogicCompute.java
package org.example;

public class IntegerLogicCompute {

    public int increment(Integer i) {
        return i + 1;
    }

    public int decrement(Integer i) {
        return i- 1;
    }

    // 存在条件分支的语句,需要满足所有条件分支判断才能达到 100% 的覆盖率
    public boolean equals(Integer i, Integer j) {
        if (i < 127 && j < 127) {
            return i == j;
        }
        return i.equals(j);
    }
}
三:创建测试模块
我们将 test-module 作为测试模块,在该模块的 pom.xml 文件中,我们引入上面的测试模块,方便对他们进行集成测试
<dependencies>
    <dependency>
        <groupId>org.example</groupId>
        <artifactId>business-module1</artifactId>
        <version>1.0-SNAPSHOT</version>
    </dependency>

    <dependency>
        <groupId>org.example</groupId>
        <artifactId>business-module2</artifactId>
        <version>1.0-SNAPSHOT</version>
    </dependency>

    <dependency>
        <groupId>junit</groupId>
        <artifactId>junit</artifactId>
        <version>4.12</version>
        <scope>test</scope>
    </dependency>
</dependencies>
然后在 src/test/java 目录下创建测试类:
// test-module\src\test\java\org\example\IntegrationTest.java
package org.example;

import org.junit.Before;
import org.junit.Test;

import static org.junit.Assert.assertEquals;

public class IntegrationTest {

    private IntegerSimpleCompute simpleCompute;
    private IntegerLogicCompute logicCompute;

    @Before
    public void init() {
        simpleCompute = new IntegerSimpleCompute();
        logicCompute = new IntegerLogicCompute();
    }

    @Test
    public void simpleComputeTest() throws Throwable {
        assertEquals(7, simpleCompute.add(3, 4));
        assertEquals(4, simpleCompute.subtract(7, 3));
        assertEquals(12, simpleCompute.multiply(3, 4));
        assertEquals(3, simpleCompute.divide(12, 4));
    }

    @Test
    public void logicComputeTest() throws Throwable {
        assertEquals(8, logicCompute.increment(7));
        assertEquals(6, logicCompute.decrement(7));
        assertEquals(true, logicCompute.equals(125, 125));
        assertEquals(false, logicCompute.equals(123, 125));
        assertEquals(false, logicCompute.equals(123, 130));
        assertEquals(false, logicCompute.equals(133, 125));
        assertEquals(true, logicCompute.equals(140, 140));
        assertEquals(false, logicCompute.equals(140, 141));
    }
}
到可以,你可以通过:
mvn test
执行单元测试,maven 的 maven-surefire-plugin 插件也会简单的输出如下测试报告:
Tests run: 2, Failures: 0, Errors: 0, Skipped: 0
四:生成覆盖率报告
首先在根目录的 pom.xml 引入 jacoco 插件并且启动代理:
<build>
    <plugins>
        <!-- 指定 Java 编译版本 -->
        <plugin>
            <groupId>org.apache.maven.plugins</groupId>
            <artifactId>maven-compiler-plugin</artifactId>
            <version>3.8.1</version>
            <configuration>
                <source>11</source>
                <target>11</target>
            </configuration>
        </plugin>

        <!-- jacoco 插件 -->
        <plugin>
            <groupId>org.jacoco</groupId>
            <artifactId>jacoco-maven-plugin</artifactId>
            <version>0.8.8</version>
            <executions>
                <!--  执行 prepare-agent 目标,它会启动 JaCoCo 代理 -->
                <execution>
                    <id>default-prepare-agent</id>
                    <goals>
                        <goal>prepare-agent</goal>
                    </goals>
                </execution>

                <!-- 执行 mvn verify 时,生成测试覆盖率报告 -->
                <execution>
                    <id>report</id>
                    <phase>verify</phase>
                    <goals>
                        <goal>report</goal>
                    </goals>
                </execution>
            </executions>
        </plugin>
    </plugins>
</build>
然后在 test-module 模块中引入 jacoco 插件,声明一个聚合分析任务:
<build>
    <plugins>
        <plugin>
            <groupId>org.jacoco</groupId>
            <artifactId>jacoco-maven-plugin</artifactId>
            <version>0.8.8</version>
            <executions>
                <!--  在执行 mvn verify 时,生成聚合测试覆盖率报告,所有 Maven 子模块的测试覆盖率数据 -->
                <execution>
                    <id>report-aggregate</id>
                    <phase>verify</phase>
                    <goals>
                        <goal>report-aggregate</goal>
                    </goals>
                </execution>
            </executions>
        </plugin>
    </plugins>
</build>
最后在根目录执行指令,运行所有测试:
$ mvn clean verify
构建成功后可以在 test-module 模块下的 target/site/jacoco-aggregate/index.html 查看覆盖率报告:
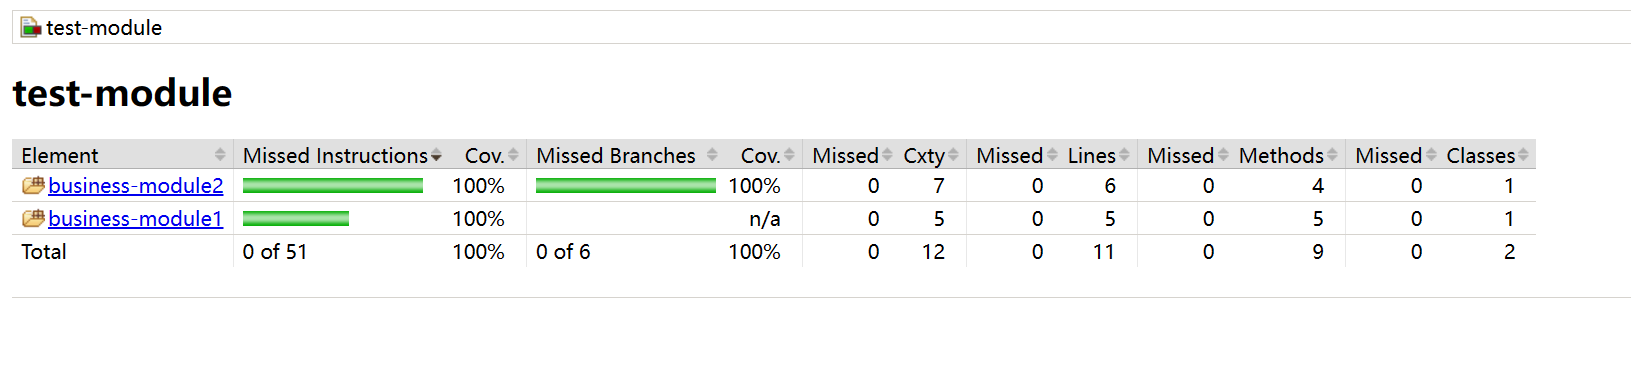
点击对应模块可以看到包内部所有类,方法还有每一行的测试覆盖率情况,这里具体不再展开,自己可以尝试以下
示例代码:jacoco-module-sample
参考资料:
Recommend
About Joyk
Aggregate valuable and interesting links.
Joyk means Joy of geeK