

redis(14)主从复制
source link: https://www.cnblogs.com/jiakecong/p/17172337.html
Go to the source link to view the article. You can view the picture content, updated content and better typesetting reading experience. If the link is broken, please click the button below to view the snapshot at that time.

Redis主从复制
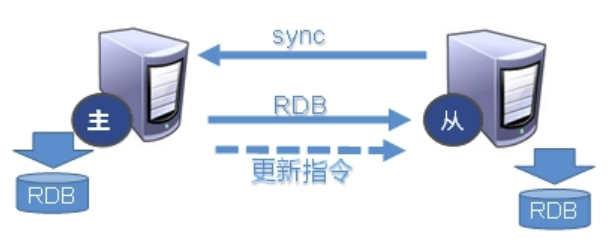
主机数据更新后根据配置和策略, 自动同步到备机的 master/slaver 机制,Master 以写为主,Slave 以读为主,主从复制节点间数据是全量的。
-
读写分离,性能扩展
-
容灾快速恢复

上图将主服务器复制了3份从服务器,主服务器进行写操作,从服务器进行读操作,读写分离,减少压力
-
Slave 启动成功连接到 master 后会发送一个 sync 命令;
-
Master 接到命令启动后台的存盘进程,同时收集所有接收到的用于修改数据集命令,在后台进程执行完毕之后,master 将传送整个数据文件到 slave,以完成一次完全同步。
-
全量复制:slave 服务器在接收到数据库文件数据后,将其存盘并加载到内存中。
-
增量复制:Master 继续将新的所有收集到的修改命令依次传给 slave,完成同步。
-
但是只要是重新连接 master,一次完全同步(全量复制) 将被自动执行。
模拟复制操作
①首先我们创建1个文件夹叫myredis
mkdir myredis
②复制redis.conf到myredis中
cp /opt/redis-6.2.10/redis.conf myredis/redis.conf

③由于我们是一台服务器,所以模拟的话,需要配置3份redis.conf,启动3个端口,分别配置redis6379.conf,redis6380.conf,redis6381.conf。
redis6379.conf
使用命令vi redis6379.conf写入以下内容
include /myredis/redis.conf
pidfile /var/run/redis6379.pid
port 6379
dbfilename dump6379.rdb
masterauth 你的redis密码(如果你有设置的话,没有设置密码这行不用加)
然后redis6380.conf和redis6381.conf跟上面一样操作,只是端口号改成对应的即可。
④启动3台redis服务
redis-server redis6379.conf
redis-server redis6380.conf
redis-server redis6381.conf
使用ps -ef | grep redis查看结果
但目前3个没有主从区分,可以使用info replication查看是否是主从关系
我们先连接6379这台服务
redis-cli -p 6379
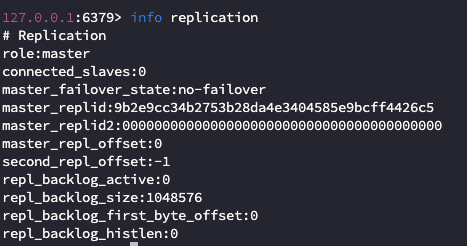
role:master就代表这台服务是主机,connected_salves:0代表主机下面的从机数量为0台
⑤将6380和6381这两台服务改成6379的从机
我们连接6380服务器,执行以下命令
slaveof 127.0.0.1 6379
这句话代表将此服务器变成6379的从服务器,当然ip地址填写你实际的,这里因为是本机所以填写127.0.0.1。6381服务器也做这个操作,这里就不重复写了
然后来到6379这台主机,执行info replication查看信息

可以看到从服务器的数量变成了2,具体的从服务器的ip和端口也显示出来了。
⑥测试主服务器写,从服务器读
我们在6379主服务器写入1个key
在6380和6381中查看
此时我们就完成了主从复制
__EOF__
Recommend
About Joyk
Aggregate valuable and interesting links.
Joyk means Joy of geeK