

OpenMP task construct 实现原理以及源码分析 - 一无是处的研究僧
source link: https://www.cnblogs.com/Chang-LeHung/p/17181561.html
Go to the source link to view the article. You can view the picture content, updated content and better typesetting reading experience. If the link is broken, please click the button below to view the snapshot at that time.

OpenMP task construct 实现原理以及源码分析
在本篇文章当中主要给大家介绍在 OpenMP 当中 task 的实现原理,以及他调用的相关的库函数的具体实现。在本篇文章当中最重要的就是理解整个 OpenMP 的运行机制。
从编译器角度看 task construct
在本小节当中主要给大家分析一下编译器将 openmp 的 task construct 编译成什么样子,下面是一个 OpenMP 的 task 程序例子:
#include <stdio.h>#include <omp.h> int main(){ #pragma omp parallel num_threads(4) default(none) {#pragma omp task default(none) { printf("Hello World from tid = %d\n", omp_get_thread_num()); } } return 0;}
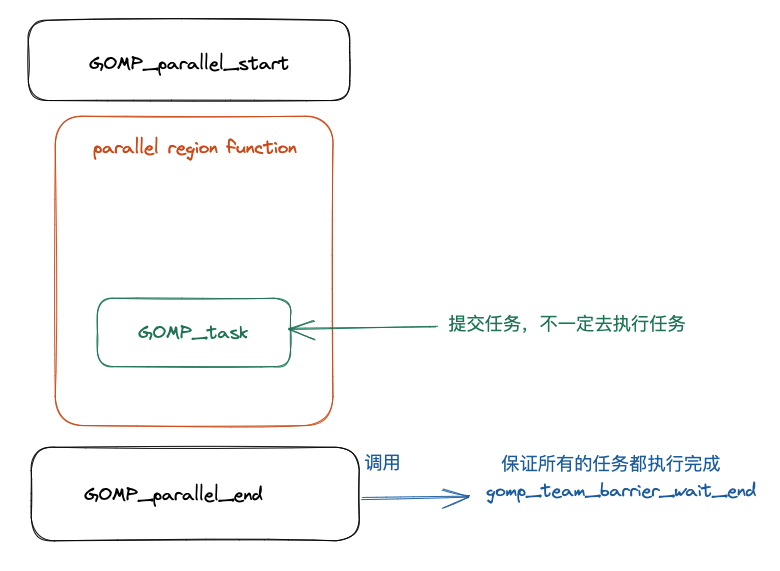
首先先捋一下整个程序被编译之后的执行流程,经过前面的文章的学习,我们已经知道了并行域当中的代码会被编译器编译成一个函数,关于这一点我们已经在前面的很多文章当中已经讨论过了,就不再进行复述。事实上 task construct 和 parallel construct 一样,task construct 也会被编译成一个函数,同样的这个函数也会被作为一个参数传递给 OpenMP 内部,被传递的这个函数可能被立即执行,也可能在函数 GOMP_parallel_end 被调用后,在到达同步点之前执行被执行(线程在到达并行域的同步点之前需要保证所有的任务都被执行完成)。整个过程大致如下图所示:
上面的 OpenMP task 程序对应的反汇编程序如下所示:
00000000004008ad <main>: 4008ad: 55 push %rbp 4008ae: 48 89 e5 mov %rsp,%rbp 4008b1: ba 04 00 00 00 mov $0x4,%edx 4008b6: be 00 00 00 00 mov $0x0,%esi 4008bb: bf db 08 40 00 mov $0x4008db,%edi 4008c0: e8 8b fe ff ff callq 400750 <GOMP_parallel_start@plt> 4008c5: bf 00 00 00 00 mov $0x0,%edi 4008ca: e8 0c 00 00 00 callq 4008db <main._omp_fn.0> 4008cf: e8 8c fe ff ff callq 400760 <GOMP_parallel_end@plt> 4008d4: b8 00 00 00 00 mov $0x0,%eax 4008d9: 5d pop %rbp 4008da: c3 retq 00000000004008db <main._omp_fn.0>: 4008db: 55 push %rbp 4008dc: 48 89 e5 mov %rsp,%rbp 4008df: 48 83 ec 10 sub $0x10,%rsp 4008e3: 48 89 7d f8 mov %rdi,-0x8(%rbp) 4008e7: c7 04 24 00 00 00 00 movl $0x0,(%rsp) # 参数 flags 4008ee: 41 b9 01 00 00 00 mov $0x1,%r9d # 参数 if_clause 4008f4: 41 b8 01 00 00 00 mov $0x1,%r8d # 参数 arg_align 4008fa: b9 00 00 00 00 mov $0x0,%ecx # 参数 arg_size 4008ff: ba 00 00 00 00 mov $0x0,%edx # 参数 cpyfn 400904: be 00 00 00 00 mov $0x0,%esi # 参数 data 400909: bf 15 09 40 00 mov $0x400915,%edi # 这里就是调用函数 main._omp_fn.1 40090e: e8 9d fe ff ff callq 4007b0 <GOMP_task@plt> 400913: c9 leaveq 400914: c3 retq 0000000000400915 <main._omp_fn.1>: 400915: 55 push %rbp 400916: 48 89 e5 mov %rsp,%rbp 400919: 48 83 ec 10 sub $0x10,%rsp 40091d: 48 89 7d f8 mov %rdi,-0x8(%rbp) 400921: e8 4a fe ff ff callq 400770 <omp_get_thread_num@plt> 400926: 89 c6 mov %eax,%esi 400928: bf d0 09 40 00 mov $0x4009d0,%edi 40092d: b8 00 00 00 00 mov $0x0,%eax 400932: e8 49 fe ff ff callq 400780 <printf@plt> 400937: c9 leaveq 400938: c3 retq 400939: 0f 1f 80 00 00 00 00 nopl 0x0(%rax)
从上面程序反汇编的结果我们可以知道,在主函数当中仍然和之前一样在并行域前后分别调用了 GOMP_parallel_start 和 GOMP_parallel_end,然后在两个函数之间调用并行域的代码 main._omp_fn.0 ,并行域当中的代码被编译成函数 main._omp_fn.0 ,从上面的汇编代码我们可以看到在函数 main._omp_fn.0 调用了函数 GOMP_task ,这个函数的函数声明如下所示:
voidGOMP_task (void (*fn) (void *), void *data, void (*cpyfn) (void *, void *), long arg_size, long arg_align, bool if_clause, unsigned flags);
在这里我们重要解释一下部分参数,首先我们需要了解的是在 x86 当中的函数调用规约,这一点我们在前面的文章当中已经讨论过了,这里只是说明一下:
| 寄存器 | 含义 |
|---|---|
| rdi | 第一个参数 |
| rsi | 第二个参数 |
| rdx | 第三个参数 |
| rcx | 第四个参数 |
| r8 | 第五个参数 |
| r9 | 第六个参数 |
根据上面的寄存器和参数的对应关系,在上面的汇编代码当中已经标注了对应的参数。在这些参数当中最重要的一个参数就是第一个函数指针,对应的汇编语句为 mov $0x400915,%edi,可以看到的是传入的函数的地址为 0x400915,根据上面的汇编程序可以知道这个地址对应的函数就是 main._omp_fn.1,这其实就是 task 区域之间被编译之后的对应的函数,从上面的 main._omp_fn.1 汇编程序当中也可以看出来调用了函数 omp_get_thread_num,这和前面的 task 区域当中代码是相对应的。
现在我们来解释一下其他的几个参数:
- fn,task 区域被编译之后的函数地址。
- data,函数 fn 的参数。
- cpyfn,参数拷贝函数,一般是 NULL,有时候需要 task 当中的数据不能是共享的,需要时私有的,这个时候可能就需要数据拷贝函数,如果有数据需要及进行拷贝而且这个参数还为 NULL 的话,那么在 OpenMP 内部就会使用 memcpy 进行内存拷贝。
- arg_size,参数的大小。
- arg_align,参数多少字节对齐。
- if_clause,if 子句当中的比较结果,如果没有 if 字句的话就是 true 。
- flags,用于表示 task construct 的特征或者属性,比如是否是最终任务。
我们现在使用另外一个例子,来看看参数传递的变化。
#include <stdio.h>#include <omp.h> int main(){ #pragma omp parallel num_threads(4) default(none) { int data = omp_get_thread_num();#pragma omp task default(none) firstprivate(data) if(data > 100) { data = omp_get_thread_num(); printf("data = %d Hello World from tid = %d\n", data, omp_get_thread_num()); } } return 0;}
上面的程序被编译之后对应的汇编程序如下所示:
00000000004008ad <main>: 4008ad: 55 push %rbp 4008ae: 48 89 e5 mov %rsp,%rbp 4008b1: 48 83 ec 10 sub $0x10,%rsp 4008b5: ba 04 00 00 00 mov $0x4,%edx 4008ba: be 00 00 00 00 mov $0x0,%esi 4008bf: bf df 08 40 00 mov $0x4008df,%edi 4008c4: e8 87 fe ff ff callq 400750 <GOMP_parallel_start@plt> 4008c9: bf 00 00 00 00 mov $0x0,%edi 4008ce: e8 0c 00 00 00 callq 4008df <main._omp_fn.0> 4008d3: e8 88 fe ff ff callq 400760 <GOMP_parallel_end@plt> 4008d8: b8 00 00 00 00 mov $0x0,%eax 4008dd: c9 leaveq 4008de: c3 retq00000000004008df <main._omp_fn.0>: 4008df: 55 push %rbp 4008e0: 48 89 e5 mov %rsp,%rbp 4008e3: 48 83 ec 20 sub $0x20,%rsp 4008e7: 48 89 7d e8 mov %rdi,-0x18(%rbp) 4008eb: e8 80 fe ff ff callq 400770 <omp_get_thread_num@plt> 4008f0: 89 45 fc mov %eax,-0x4(%rbp) 4008f3: 83 7d fc 64 cmpl $0x64,-0x4(%rbp) 4008f7: 0f 9f c2 setg %dl 4008fa: 8b 45 fc mov -0x4(%rbp),%eax 4008fd: 89 45 f0 mov %eax,-0x10(%rbp) 400900: 48 8d 45 f0 lea -0x10(%rbp),%rax 400904: c7 04 24 00 00 00 00 movl $0x0,(%rsp) # 参数 flags 40090b: 41 89 d1 mov %edx,%r9d # 参数 if_clause 40090e: 41 b8 04 00 00 00 mov $0x4,%r8d # 参数 arg_align 400914: b9 04 00 00 00 mov $0x4,%ecx # 参数 arg_size 400919: ba 00 00 00 00 mov $0x0,%edx # 参数 cpyfn 40091e: 48 89 c6 mov %rax,%rsi # 参数 data 400921: bf 2d 09 40 00 mov $0x40092d,%edi # 这里就是调用函数 main._omp_fn.1 400926: e8 85 fe ff ff callq 4007b0 <GOMP_task@plt> 40092b: c9 leaveq 40092c: c3 retq000000000040092d <main._omp_fn.1>: 40092d: 55 push %rbp 40092e: 48 89 e5 mov %rsp,%rbp 400931: 48 83 ec 20 sub $0x20,%rsp 400935: 48 89 7d e8 mov %rdi,-0x18(%rbp) 400939: 48 8b 45 e8 mov -0x18(%rbp),%rax 40093d: 8b 00 mov (%rax),%eax 40093f: 89 45 fc mov %eax,-0x4(%rbp) 400942: e8 29 fe ff ff callq 400770 <omp_get_thread_num@plt> 400947: 89 c2 mov %eax,%edx 400949: 8b 45 fc mov -0x4(%rbp),%eax 40094c: 89 c6 mov %eax,%esi 40094e: bf f0 09 40 00 mov $0x4009f0,%edi 400953: b8 00 00 00 00 mov $0x0,%eax 400958: e8 23 fe ff ff callq 400780 <printf@plt> 40095d: c9 leaveq 40095e: c3 retq 40095f: 90 nop
在上面的函数当中我们将 data 一个 4 字节的数据作为线程私有数据,可以看到给函数 GOMP_task 传递的参数参数的大小以及参数的内存对齐大小都发生来变化,从原来的 0 变成了 4,这因为 int 类型数据占 4 个字节。
Task Construct 源码分析
在本小节当中主要谈论在 OpenMP 内部是如何实现 task 的,关于这一部分内容设计的内容还是比较庞杂,首先需要了解的是在 OpenMP 当中使用 task construct 的被称作显示任务(explicit task),这种任务在 OpenMP 当中会有两个任务队列(双向循环队列),将所有的任务都保存在这样一张列表当中,整体结构如下图所示:

在上图当中由同一个线程创建的任务为 child_task,他们之间使用 next_child 和 prev_child 两个指针进行连接,不同线程创建的任务之间可以使用 next_queue 和 prev_queue 两个指针进行连接。
任务的结构体描述如下所示:
struct gomp_task{ struct gomp_task *parent; // 任务的父亲任务 struct gomp_task *children; // 子任务 struct gomp_task *next_child; // 下一个子任务 struct gomp_task *prev_child; // 上一个子任务 struct gomp_task *next_queue; // 下一个任务 (不一定是同一个线程创建的子任务) struct gomp_task *prev_queue; // 上一个任务 (不一定是同一个线程创建的子任务) struct gomp_task_icv icv; // openmp 当中内部全局设置使用变量的值(internal control variable) void (*fn) (void *); // task construct 被编译之后的函数 void *fn_data; // 函数参数 enum gomp_task_kind kind; // 任务类型 具体类型如下面的枚举类型 bool in_taskwait; // 是否处于 taskwait 状态 bool in_tied_task; // 是不是在绑定任务当中 bool final_task; // 是不是最终任务 gomp_sem_t taskwait_sem; // 对象锁 用于保证线程操作这个数据的时候的线程安全}; // openmp 当中的任务的状态enum gomp_task_kind{ GOMP_TASK_IMPLICIT, GOMP_TASK_IFFALSE, GOMP_TASK_WAITING, GOMP_TASK_TIED};
在了解完上面的数据结构之后我们来看一下前面的给 OpenMP 内部提交任务的函数 GOMP_task,其源代码如下所示:
/* Called when encountering an explicit task directive. If IF_CLAUSE is false, then we must not delay in executing the task. If UNTIED is true, then the task may be executed by any member of the team. */ voidGOMP_task (void (*fn) (void *), void *data, void (*cpyfn) (void *, void *), long arg_size, long arg_align, bool if_clause, unsigned flags){ struct gomp_thread *thr = gomp_thread (); // team 是 OpenMP 一个线程组当中共享的数据 struct gomp_team *team = thr->ts.team; #ifdef HAVE_BROKEN_POSIX_SEMAPHORES /* If pthread_mutex_* is used for omp_*lock*, then each task must be tied to one thread all the time. This means UNTIED tasks must be tied and if CPYFN is non-NULL IF(0) must be forced, as CPYFN might be running on different thread than FN. */ if (cpyfn) if_clause = false; if (flags & 1) flags &= ~1;#endif // 这里表示如果是 if 子句的条件为真的时候或者是孤立任务(team == NULL )或者是最终任务的时候或者任务队列当中的任务已经很多的时候 // 提交的任务需要立即执行而不能够放入任务队列当中然后在 GOMP_parallel_end 函数当中进行任务的取出 // 再执行 if (!if_clause || team == NULL || (thr->task && thr->task->final_task) || team->task_count > 64 * team->nthreads) { struct gomp_task task; gomp_init_task (&task, thr->task, gomp_icv (false)); task.kind = GOMP_TASK_IFFALSE; task.final_task = (thr->task && thr->task->final_task) || (flags & 2); if (thr->task) task.in_tied_task = thr->task->in_tied_task; thr->task = &task; if (__builtin_expect (cpyfn != NULL, 0)) { // 这里是进行数据的拷贝 char buf[arg_size + arg_align - 1]; char *arg = (char *) (((uintptr_t) buf + arg_align - 1) & ~(uintptr_t) (arg_align - 1)); cpyfn (arg, data); fn (arg); } else // 如果不需要进行数据拷贝则直接执行这个函数 fn (data); /* Access to "children" is normally done inside a task_lock mutex region, but the only way this particular task.children can be set is if this thread's task work function (fn) creates children. So since the setter is *this* thread, we need no barriers here when testing for non-NULL. We can have task.children set by the current thread then changed by a child thread, but seeing a stale non-NULL value is not a problem. Once past the task_lock acquisition, this thread will see the real value of task.children. */ if (task.children != NULL) { gomp_mutex_lock (&team->task_lock); gomp_clear_parent (task.children); gomp_mutex_unlock (&team->task_lock); } gomp_end_task (); } else { // 下面就是将任务先提交到任务队列当中然后再取出执行 struct gomp_task *task; struct gomp_task *parent = thr->task; char *arg; bool do_wake; task = gomp_malloc (sizeof (*task) + arg_size + arg_align - 1); arg = (char *) (((uintptr_t) (task + 1) + arg_align - 1) & ~(uintptr_t) (arg_align - 1)); gomp_init_task (task, parent, gomp_icv (false)); task->kind = GOMP_TASK_IFFALSE; task->in_tied_task = parent->in_tied_task; thr->task = task; // 这里就是参数拷贝逻辑 如果存在拷贝函数就通过拷贝函数进行参数赋值 否则使用 memcpy 进行 // 参数的拷贝 if (cpyfn) cpyfn (arg, data); else memcpy (arg, data, arg_size); thr->task = parent; task->kind = GOMP_TASK_WAITING; task->fn = fn; task->fn_data = arg; task->in_tied_task = true; task->final_task = (flags & 2) >> 1; // 在这里获取全局队列锁 保证下面的代码在多线程条件下的线程安全 // 因为在下面的代码当中会对全局的队列进行修改操作 下面的操作就是队列的一些基本操作啦 gomp_mutex_lock (&team->task_lock); if (parent->children) { task->next_child = parent->children; task->prev_child = parent->children->prev_child; task->next_child->prev_child = task; task->prev_child->next_child = task; } else { task->next_child = task; task->prev_child = task; } parent->children = task; if (team->task_queue) { task->next_queue = team->task_queue; task->prev_queue = team->task_queue->prev_queue; task->next_queue->prev_queue = task; task->prev_queue->next_queue = task; } else { task->next_queue = task; task->prev_queue = task; team->task_queue = task; } ++team->task_count; gomp_team_barrier_set_task_pending (&team->barrier); do_wake = team->task_running_count + !parent->in_tied_task < team->nthreads; gomp_mutex_unlock (&team->task_lock); if (do_wake) gomp_team_barrier_wake (&team->barrier, 1); }}
对于上述所讨论的内容大家只需要了解相关的整体流程即可,细节除非你是 openmp 的开发人员,否则事实上没有多大用,大家只需要了解大致过程即可,帮助你进一步深入理解 OpenMP 内部的运行机制。
但是需要了解的是上面的整个过程还只是将任务提交到 OpenMP 内部的任务队列当中,还没有执行,我们在前面谈到过在线程执行完并行域的代码会执行函数 GOMP_parallel_end 在这个函数内部还会调用其他函数,最终会调用函数 gomp_barrier_handle_tasks 将内部的所有的任务执行完成。
voidgomp_barrier_handle_tasks (gomp_barrier_state_t state){ struct gomp_thread *thr = gomp_thread (); struct gomp_team *team = thr->ts.team; struct gomp_task *task = thr->task; struct gomp_task *child_task = NULL; struct gomp_task *to_free = NULL; // 首先对全局的队列结构进行加锁操作 gomp_mutex_lock (&team->task_lock); if (gomp_barrier_last_thread (state)) { if (team->task_count == 0) { gomp_team_barrier_done (&team->barrier, state); gomp_mutex_unlock (&team->task_lock); gomp_team_barrier_wake (&team->barrier, 0); return; } gomp_team_barrier_set_waiting_for_tasks (&team->barrier); } while (1) { if (team->task_queue != NULL) { struct gomp_task *parent; // 从任务队列当中拿出一个任务 child_task = team->task_queue; parent = child_task->parent; if (parent && parent->children == child_task) parent->children = child_task->next_child; child_task->prev_queue->next_queue = child_task->next_queue; child_task->next_queue->prev_queue = child_task->prev_queue; if (child_task->next_queue != child_task) team->task_queue = child_task->next_queue; else team->task_queue = NULL; child_task->kind = GOMP_TASK_TIED; team->task_running_count++; if (team->task_count == team->task_running_count) gomp_team_barrier_clear_task_pending (&team->barrier); } gomp_mutex_unlock (&team->task_lock); if (to_free) // 释放任务的内存空间 to_free 在后面会被赋值成 child_task { gomp_finish_task (to_free); free (to_free); to_free = NULL; } if (child_task) // 调用任务对应的函数 { thr->task = child_task; child_task->fn (child_task->fn_data); thr->task = task; } else return; // 退出 while 循环 gomp_mutex_lock (&team->task_lock); if (child_task) { struct gomp_task *parent = child_task->parent; if (parent) { child_task->prev_child->next_child = child_task->next_child; child_task->next_child->prev_child = child_task->prev_child; if (parent->children == child_task) { if (child_task->next_child != child_task) parent->children = child_task->next_child; else { /* We access task->children in GOMP_taskwait outside of the task lock mutex region, so need a release barrier here to ensure memory written by child_task->fn above is flushed before the NULL is written. */ __atomic_store_n (&parent->children, NULL, MEMMODEL_RELEASE); if (parent->in_taskwait) gomp_sem_post (&parent->taskwait_sem); } } } gomp_clear_parent (child_task->children); to_free = child_task; child_task = NULL; team->task_running_count--; if (--team->task_count == 0 && gomp_team_barrier_waiting_for_tasks (&team->barrier)) { gomp_team_barrier_done (&team->barrier, state); gomp_mutex_unlock (&team->task_lock); gomp_team_barrier_wake (&team->barrier, 0); gomp_mutex_lock (&team->task_lock); } } }}
在本篇文章当中主要给大家介绍了,OpenMP 内部对于任务的处理流程,这其中的细节非常复杂,大家只需要了解它的整个工作流程即可,这已经能够帮助大家理清楚整个 OpenMP 内部是如何对任务进行处理的,如果大家感兴趣可以自行研读源程序。
更多精彩内容合集可访问项目:https://github.com/Chang-LeHung/CSCore
关注公众号:一无是处的研究僧,了解更多计算机(Java、Python、计算机系统基础、算法与数据结构)知识。
Recommend
About Joyk
Aggregate valuable and interesting links.
Joyk means Joy of geeK