

ViT简述【Transformer】 - iSherryZhang
source link: https://www.cnblogs.com/shuezhang/p/17159565.html
Go to the source link to view the article. You can view the picture content, updated content and better typesetting reading experience. If the link is broken, please click the button below to view the snapshot at that time.

ViT简述【Transformer】
Transformer在NLP任务中表现很好,但是在CV任务中应用还很有限,基本都是作为CNN的一个辅助,Vit尝试使用纯Transformer结构解决CV的任务,并成功将其应用到了CV的基本任务--图像分类中。
因此,简单而言,这篇论文的主旨就是,用Transformer结构完成图像分类任务。
基本结构如下:
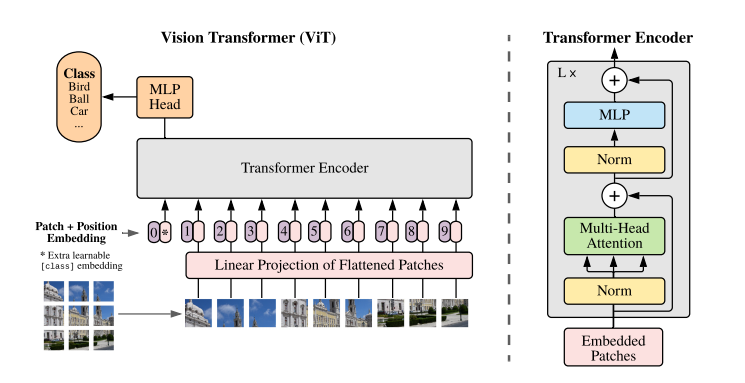
核心要点:
- 图像切patch
- Patch0
- Position Embedding
- Multi-Head Attention
图像切patch
在NLP任务中,将自然语言使用Word2Vec转为向量(Embedding)送入模型进行处理,在CV中没有对应的序列化token,因此作者采用将原始图像切分为多个小块,然后将每个小块儿内的信息展平的方式。
假设输入的shape为:(1, 3, 288, 288)
切分为9个小块,则每个小块的shape为:(1, 3, 32, 32)
然后将每个小块展平,则每个小块为(1, 3072),有9个小块,所以Linear Projection of Flattened Patched的shape为:(1, 9, 3072)输出shape为(1, 9, 1024),再加上Position Embedding,Transformer Encoder的输入shape为(1, 10, 1024),也就是图中Embedded Patches的shape。
Patch0
为什么需要有Patch0?
这是因为需要对1-9个patches信息的整合,最后送入MLP Head的只有Patch0。
Position Embedding
图像被切分和展开后,丢失了位置信息,对于图像处理任务来说,这是很怪异的,因此,作者这里采用在每个Patch上增加一个位置信息的方式,将位置信息纳入考虑。
Multi-Head Attention
参考Attention的基本结构。[Todo, Link]
代码[Pytorch]
import torch
from vit_pytorch import ViT

v = ViT(
    image_size = 256,
    patch_size = 32,
    num_classes = 1000,
    dim = 1024,
    depth = 6,
    heads = 16,
    mlp_dim = 2048,
    dropout = 0.1,
    emb_dropout = 0.1
)

img = torch.randn(1, 3, 256, 256)

preds = v(img)
print(preds.shape) # 1000,与ViT定义的num_classes一致
ViT类参数解析:
- dim:Linear Projection的输出维度:1024
- depth:有多少个Transformer Blocks
- heads:Multi-Head的Head数
- mlp_dim:Transformer Encoder内部的MLP的维度
- dropout
- ......
ViT的forward函数:
def forward(self, img):
    x = self.to_patch_embedding(img)
    b, n, _ = x.shape

    cls_tokens = repeat(self.cls_token, '1 1 d -> b 1 d', b = b)
    x = torch.cat((cls_tokens, x), dim=1)
    x += self.pos_embedding[:, :(n + 1)]
    x = self.dropout(x)

    x = self.transformer(x)

    x = x.mean(dim = 1) if self.pool == 'mean' else x[:, 0]

    x = self.to_latent(x)
    return self.mlp_head(x)
输入端的切分主要由下面这句话完成:
x = self.to_patch_embedding(img)

==>

self.to_patch_embedding = nn.Sequential(
    Rearrange('b c (h p1) (w p2) -> b (h w) (p1 p2 c)', p1 = patch_height, p2 = patch_width),
	nn.LayerNorm(patch_dim),
    nn.Linear(patch_dim, dim),
    nn.LayerNorm(dim),
)
#由传入参数: image_size = 256, patch_size = 32
# Rearrange完成的shape变换为(b, c, 256, 256) -> (b, 64, 1024*c)
# nn.LayerNorm
# nn.Linear: (b, 64, 1024*c) --> (b, 64, 1024)
Rearrange用更加可理解的方式实现transpose的功能:
We don't write:
y = x.transpose(0, 2, 3, 1)We write comprehensible code:
y = rearrange(x, 'b c h w -> b h w c')
Recommend
About Joyk
Aggregate valuable and interesting links.
Joyk means Joy of geeK