

Use Cloudflare Load Balancer with Cloudflare Tunnel
source link: https://nyan.im/p/cloudflare-load-balancer-tunnel
Go to the source link to view the article. You can view the picture content, updated content and better typesetting reading experience. If the link is broken, please click the button below to view the snapshot at that time.

Use Cloudflare Load Balancer with Cloudflare Tunnel
中文版:配合Cloudflare Tunnel使用Cloudflare Load Balancer – Frank’s Weblog
Cloudflare Load Balancer is a global load balancing product provided by Cloudflare. It can connect to origin servers in traditional ways by DNS name or IP addresses, it also can be integrated with Cloudflare Tunnel to create a seamless and secure network infrastructure.
Using Cloudflare Tunnel with Cloudflare Load Balancer is more complicated as we need to configure the DNS name and host header to make sure the routing and monitoring work correctly.
In this post, we will use an example to demonstrate how to use Cloudflare Load Balancer with Cloudflare Tunnel.
Before getting started, make sure you understand how Host header in HTTP protocol works, here’s some references:
What is HTTP “Host” header? – Stack Overflow
Host names – IBM Documentation
一个谜之CORS Bug的调试过程 – Frank’s Weblog
Steps
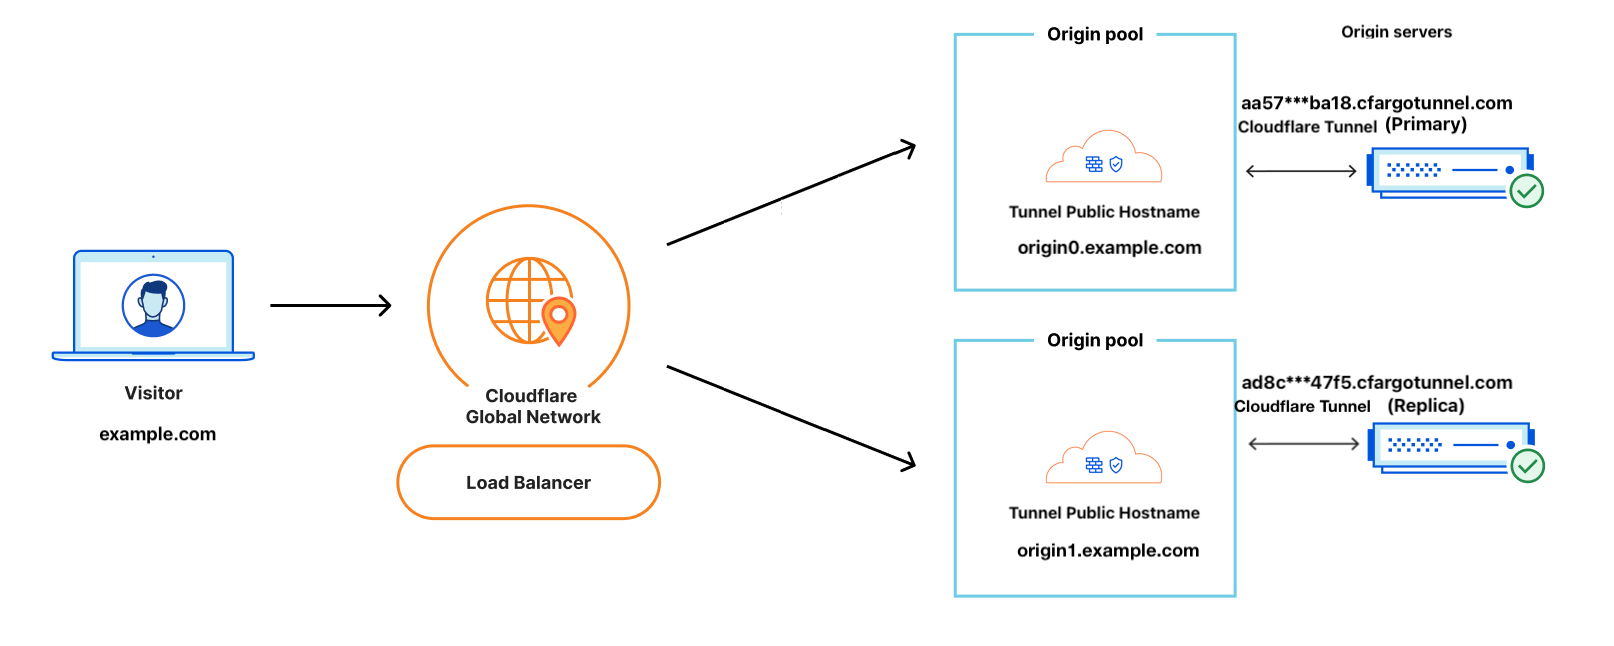
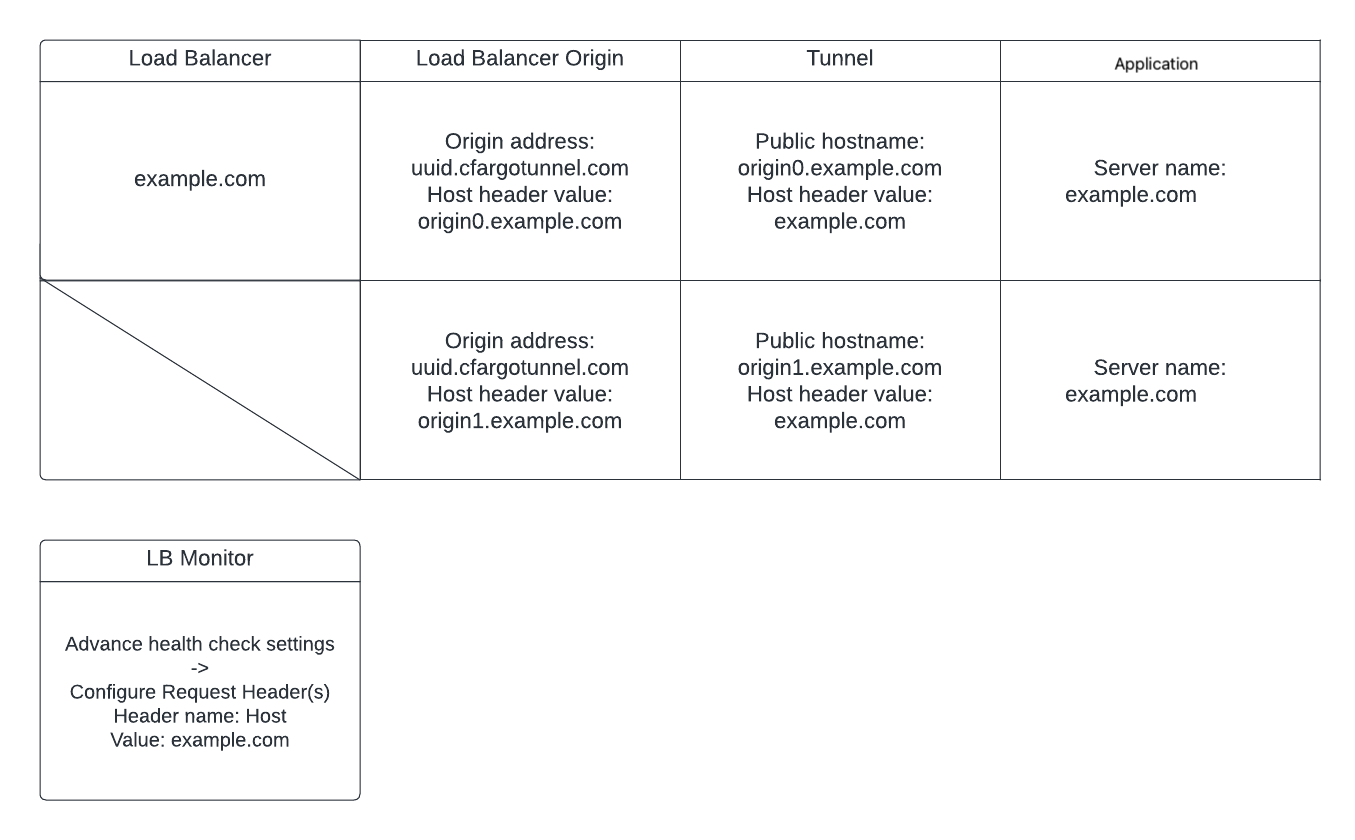
We’ll use following configuration: The website domain of the site and the hostname configured in the application are both example.com[*], there are two origins connected via Cloudflare Tunnel: origin0.example.com and origin1.example.com.
[*]: Assume the application is served by nginx, the server_name of this nginx is example.com.
Install Cloudflare Tunnel
See official document for installation guide: Via the dashboard · Cloudflare Zero Trust docs
If you are running Cloudflare Tunnel from Kubernetes, see Deploy Cloudflare Tunnel on Kubernetes – Frank’s Weblog.
Configure Cloudflare Tunnel
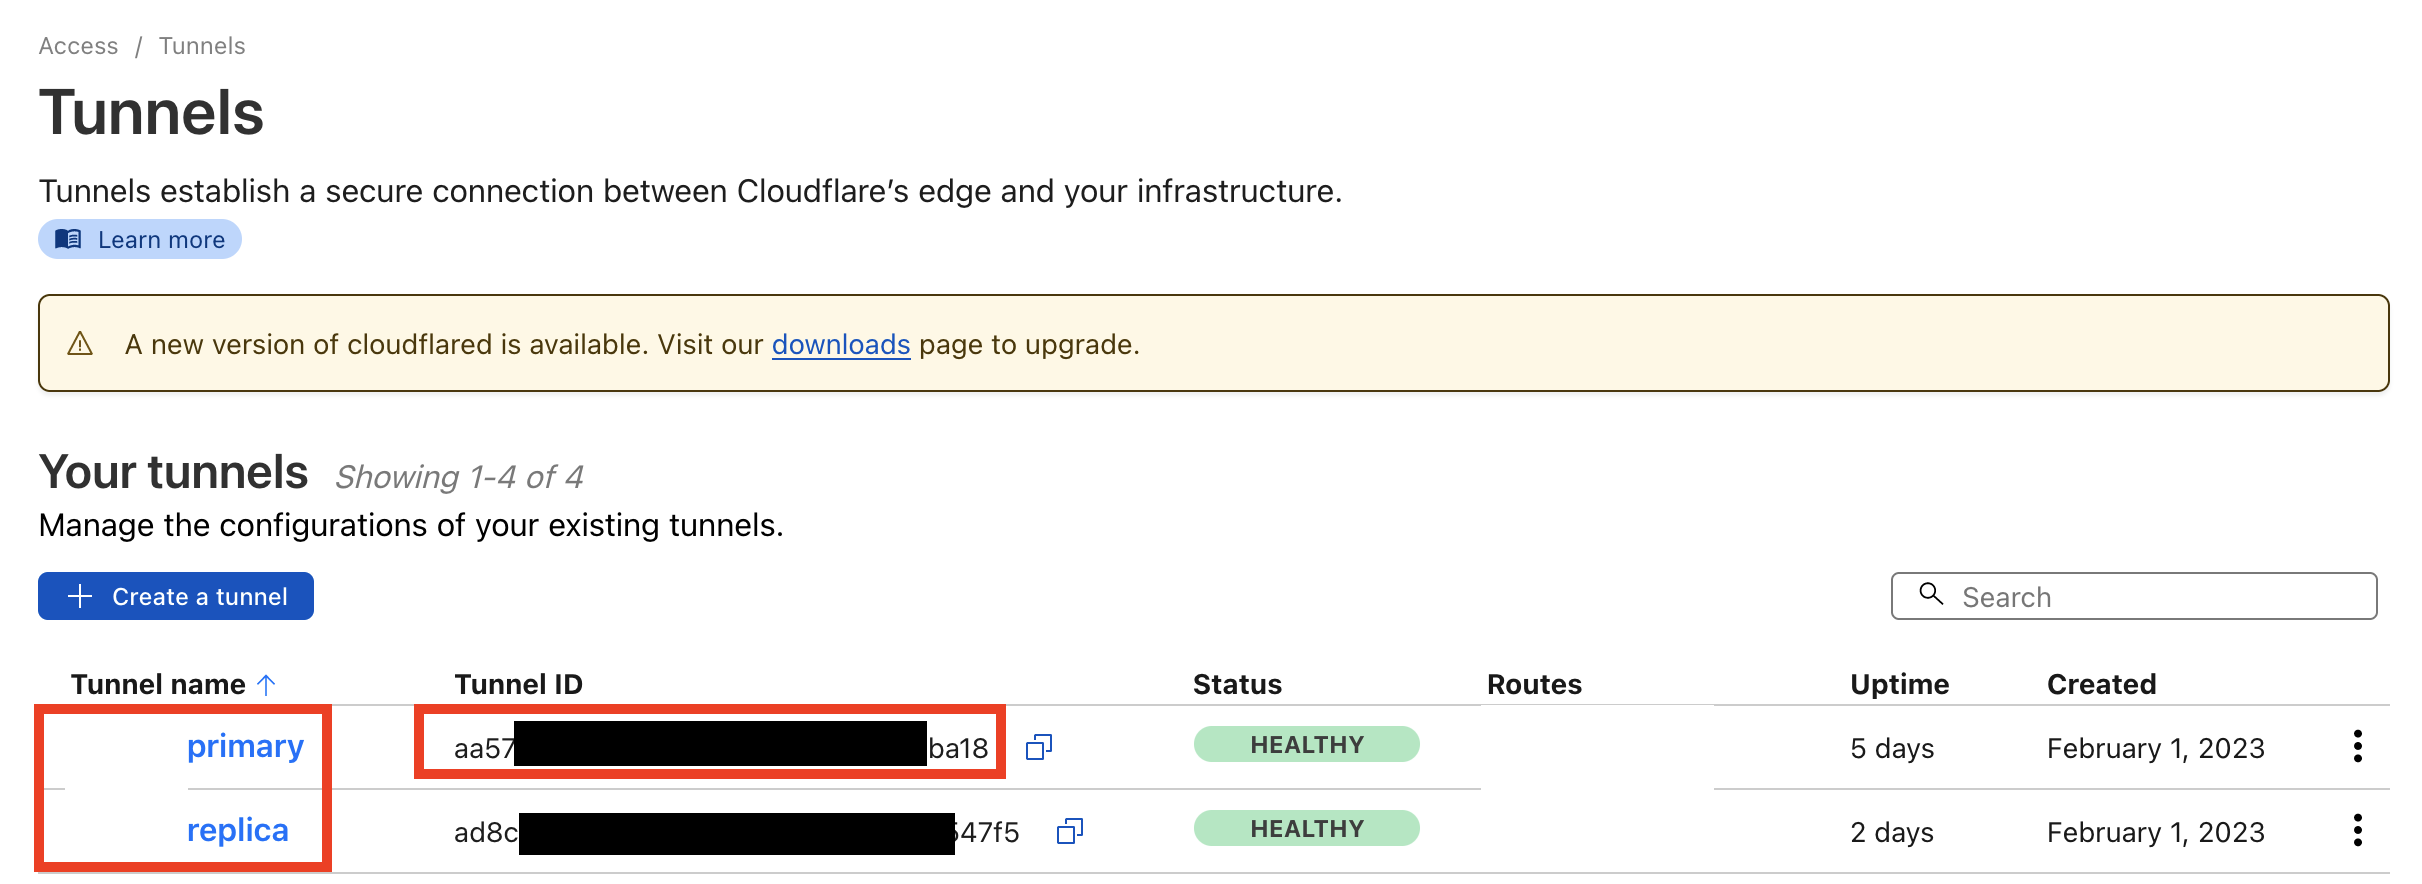
After a cloudflared client is connected, a tunnel will be created automatically. An UUID will be assigned to the tunnel as the tunnel ID. In this example, I created two tunnels, one named primary, tunnel ID aa57***ba18; the other one named replica, tunnel ID ad8c***47f5.
The content below only demonstrates the configuration for primary tunnel, the configuration for the other tunnel is similar.
Create “Public hostname” for the tunnel.
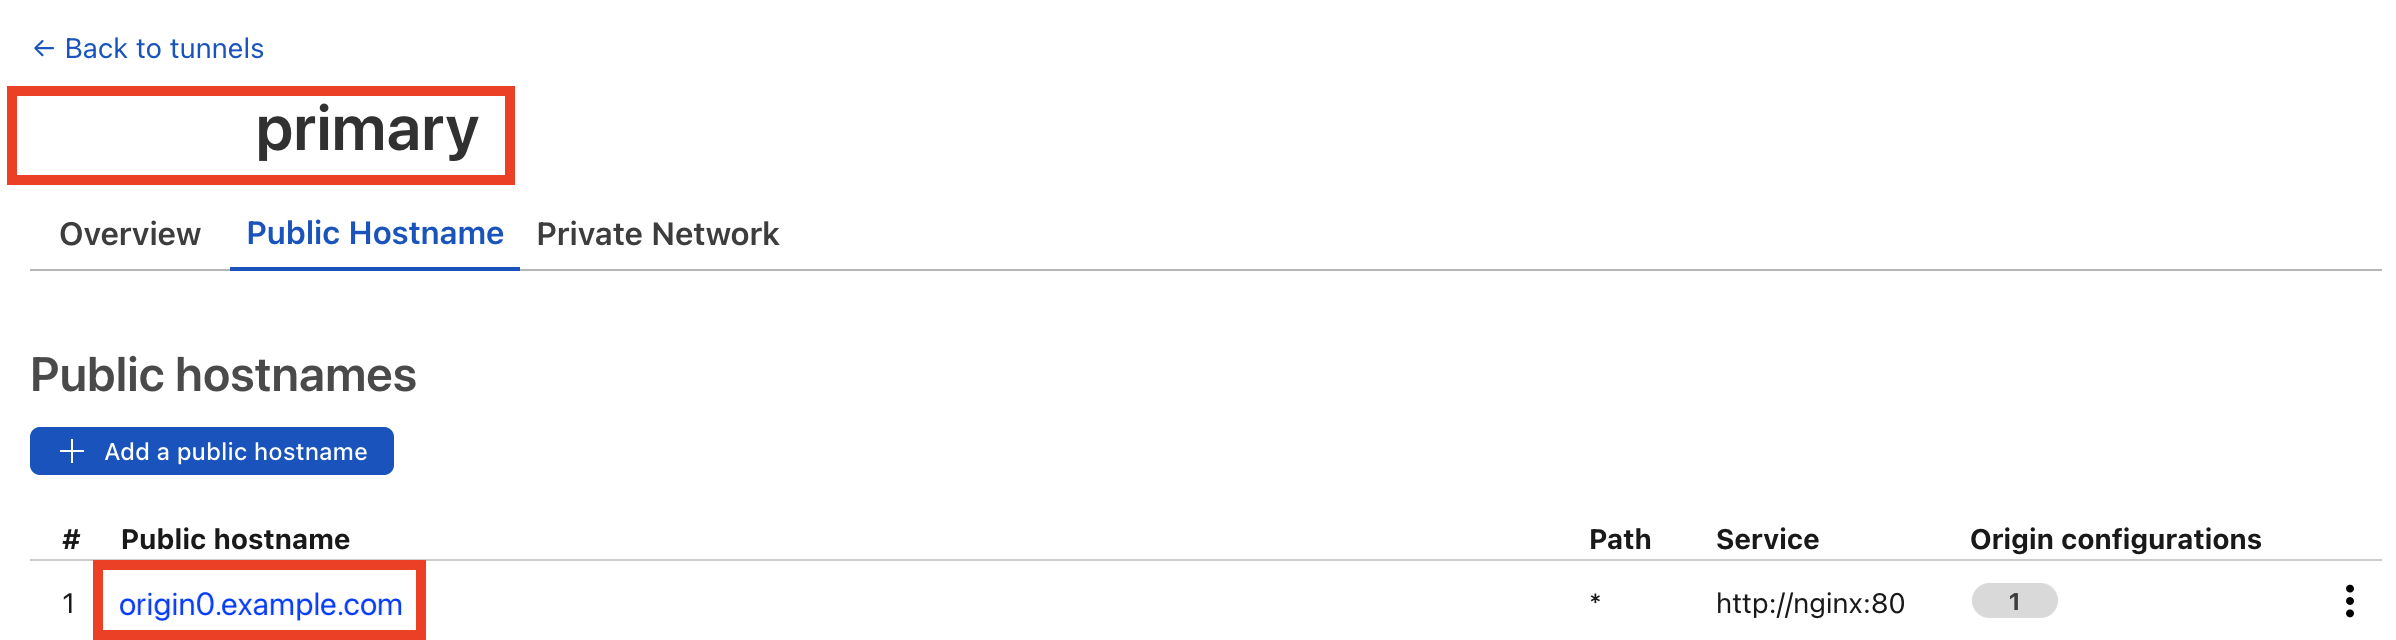
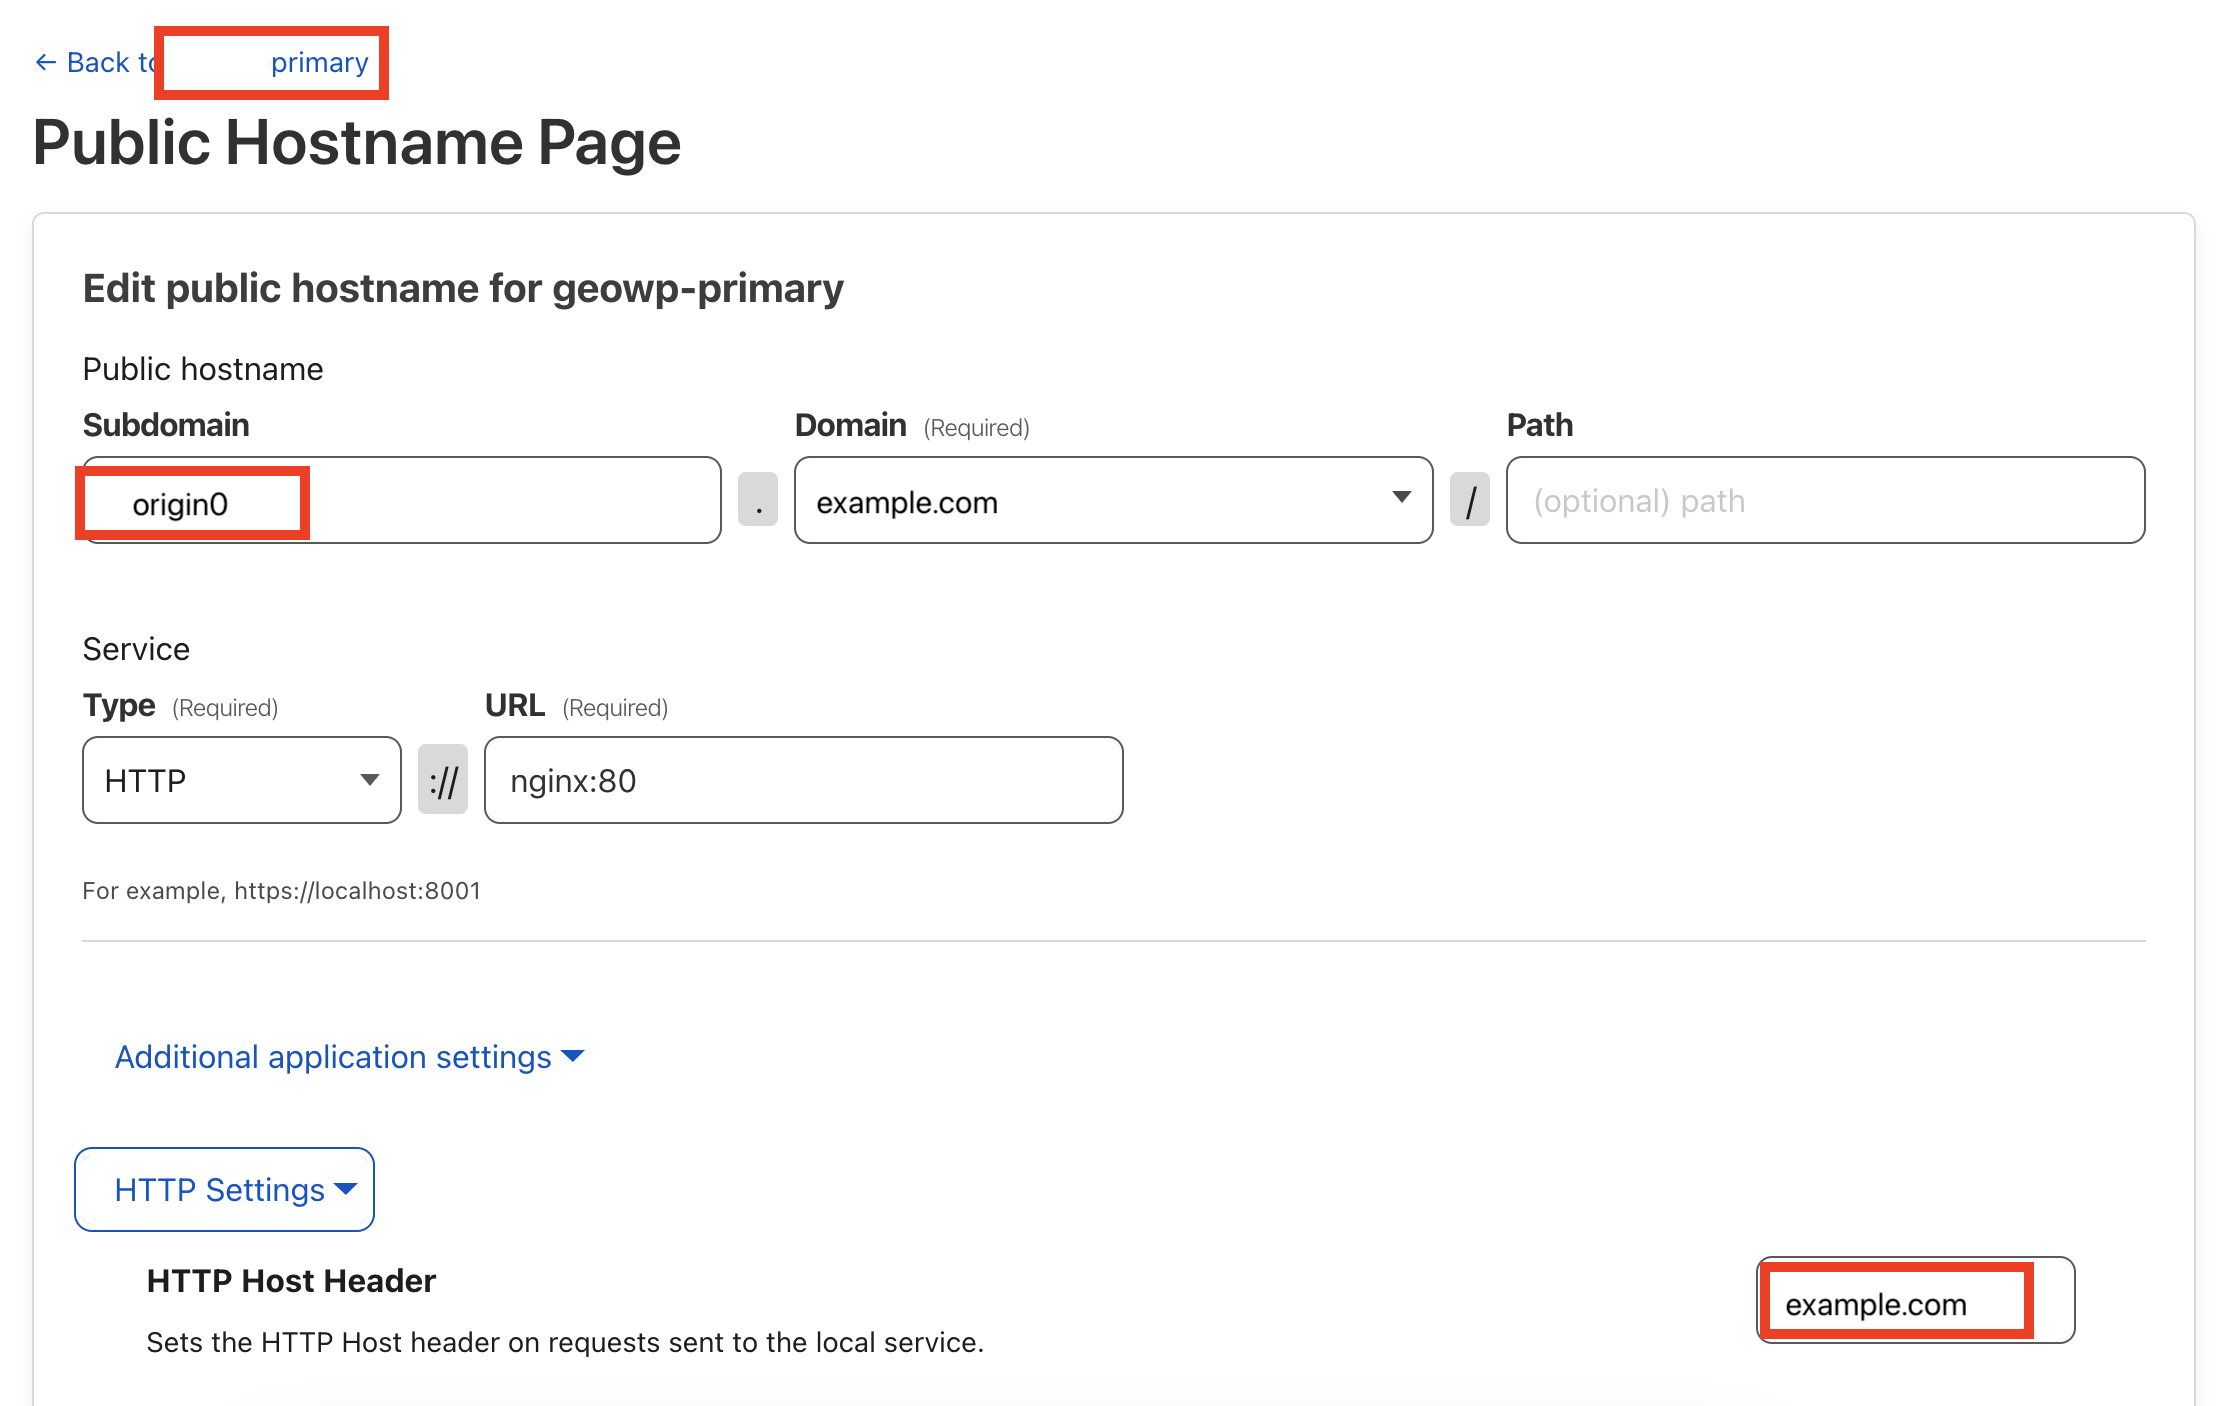
Configure its hostname to origin0.example.com, set HTTP Host Header to example.com.
Repeat the steps above to the same to the tunnel that hosts origin1.example.com.
When creating the public hostname, a DNS record points to (UUID).cfargotunnel.com will be automatically created for the subdomain origin0.example.com. Since the origins will be behind the load balancers, we won’t need these public records. To ensure security, you can remove them from DNS records.
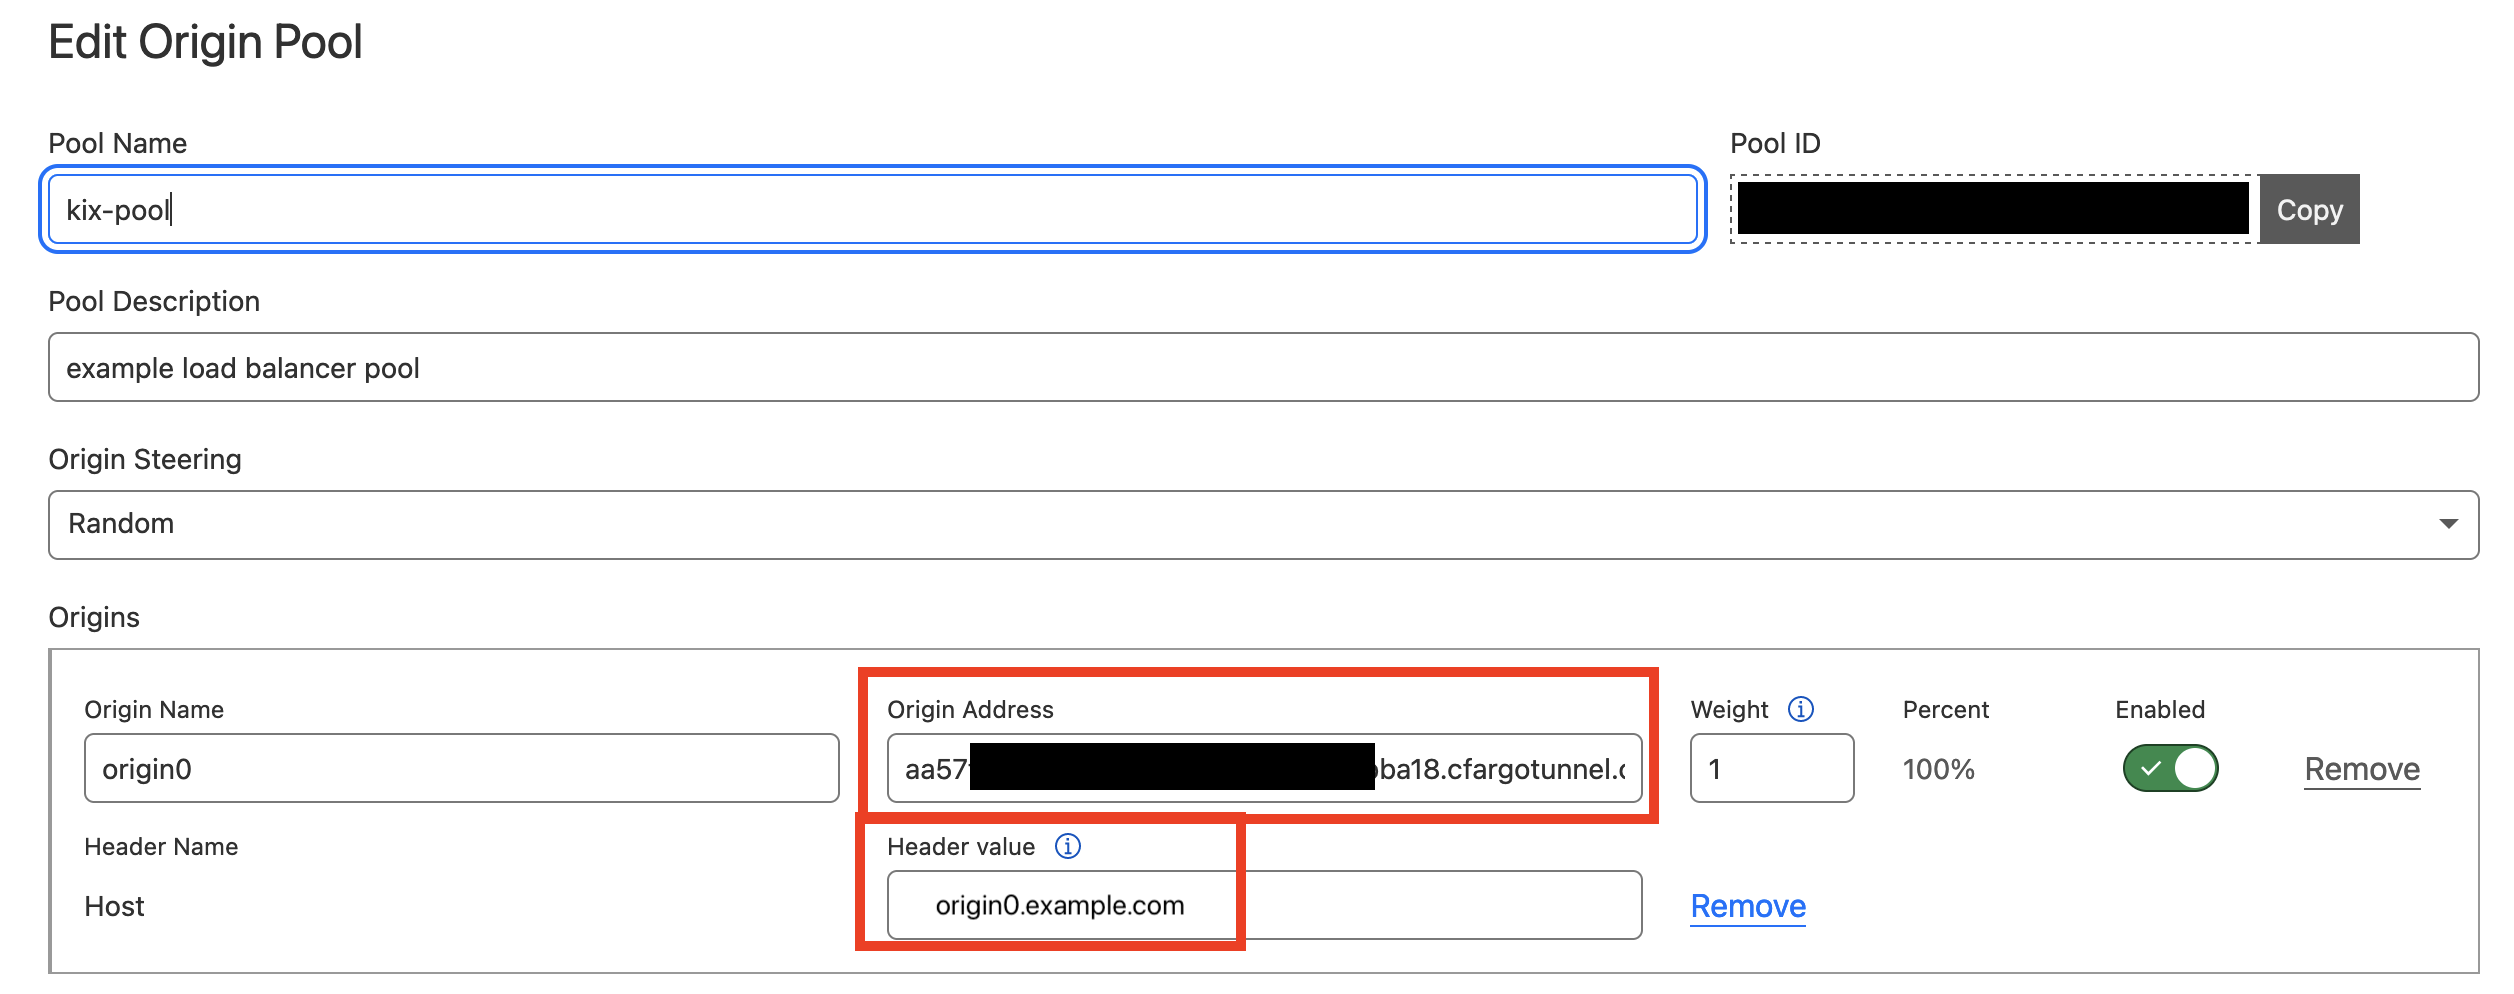
Load Balancer and Origin Pool
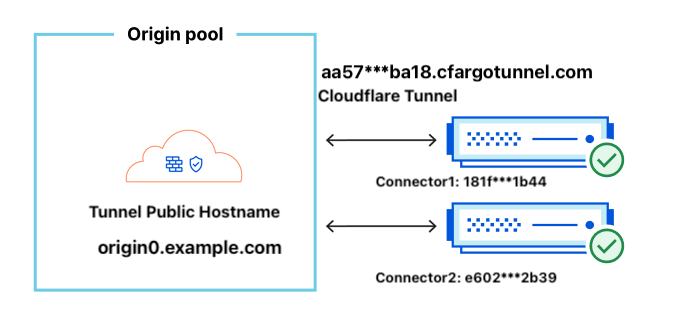
After finished configurations above, create an Load Balancer and an origin pool. Configure the origin address as (UUID).cfargotunnel.com and configure the “Header value” as the hostname configured in Public hostname, in this case origin0.example.com.
This setting is somehow against the intuition. (UUID).cfargotunnel.com is the network address of this Tunnel, it allows Cloudflare Load Balancer to find the right host in the internet. In the previous step, we configured the Public Hostname to origin0.example.com, this is the virtual address[1] of this Public Hostname. Here we need to configure the Host to the same value to ensure Tunnel can forward the request to the corresponding “Public Hostname”. When request reaches the Public Hostname, since we set the HTTP Host Header to example.com in the HTTP Settings, the Tunnel will use example.com as the HTTP Host header to forward the request to upstream, in this case, it’s http://nginx:80.
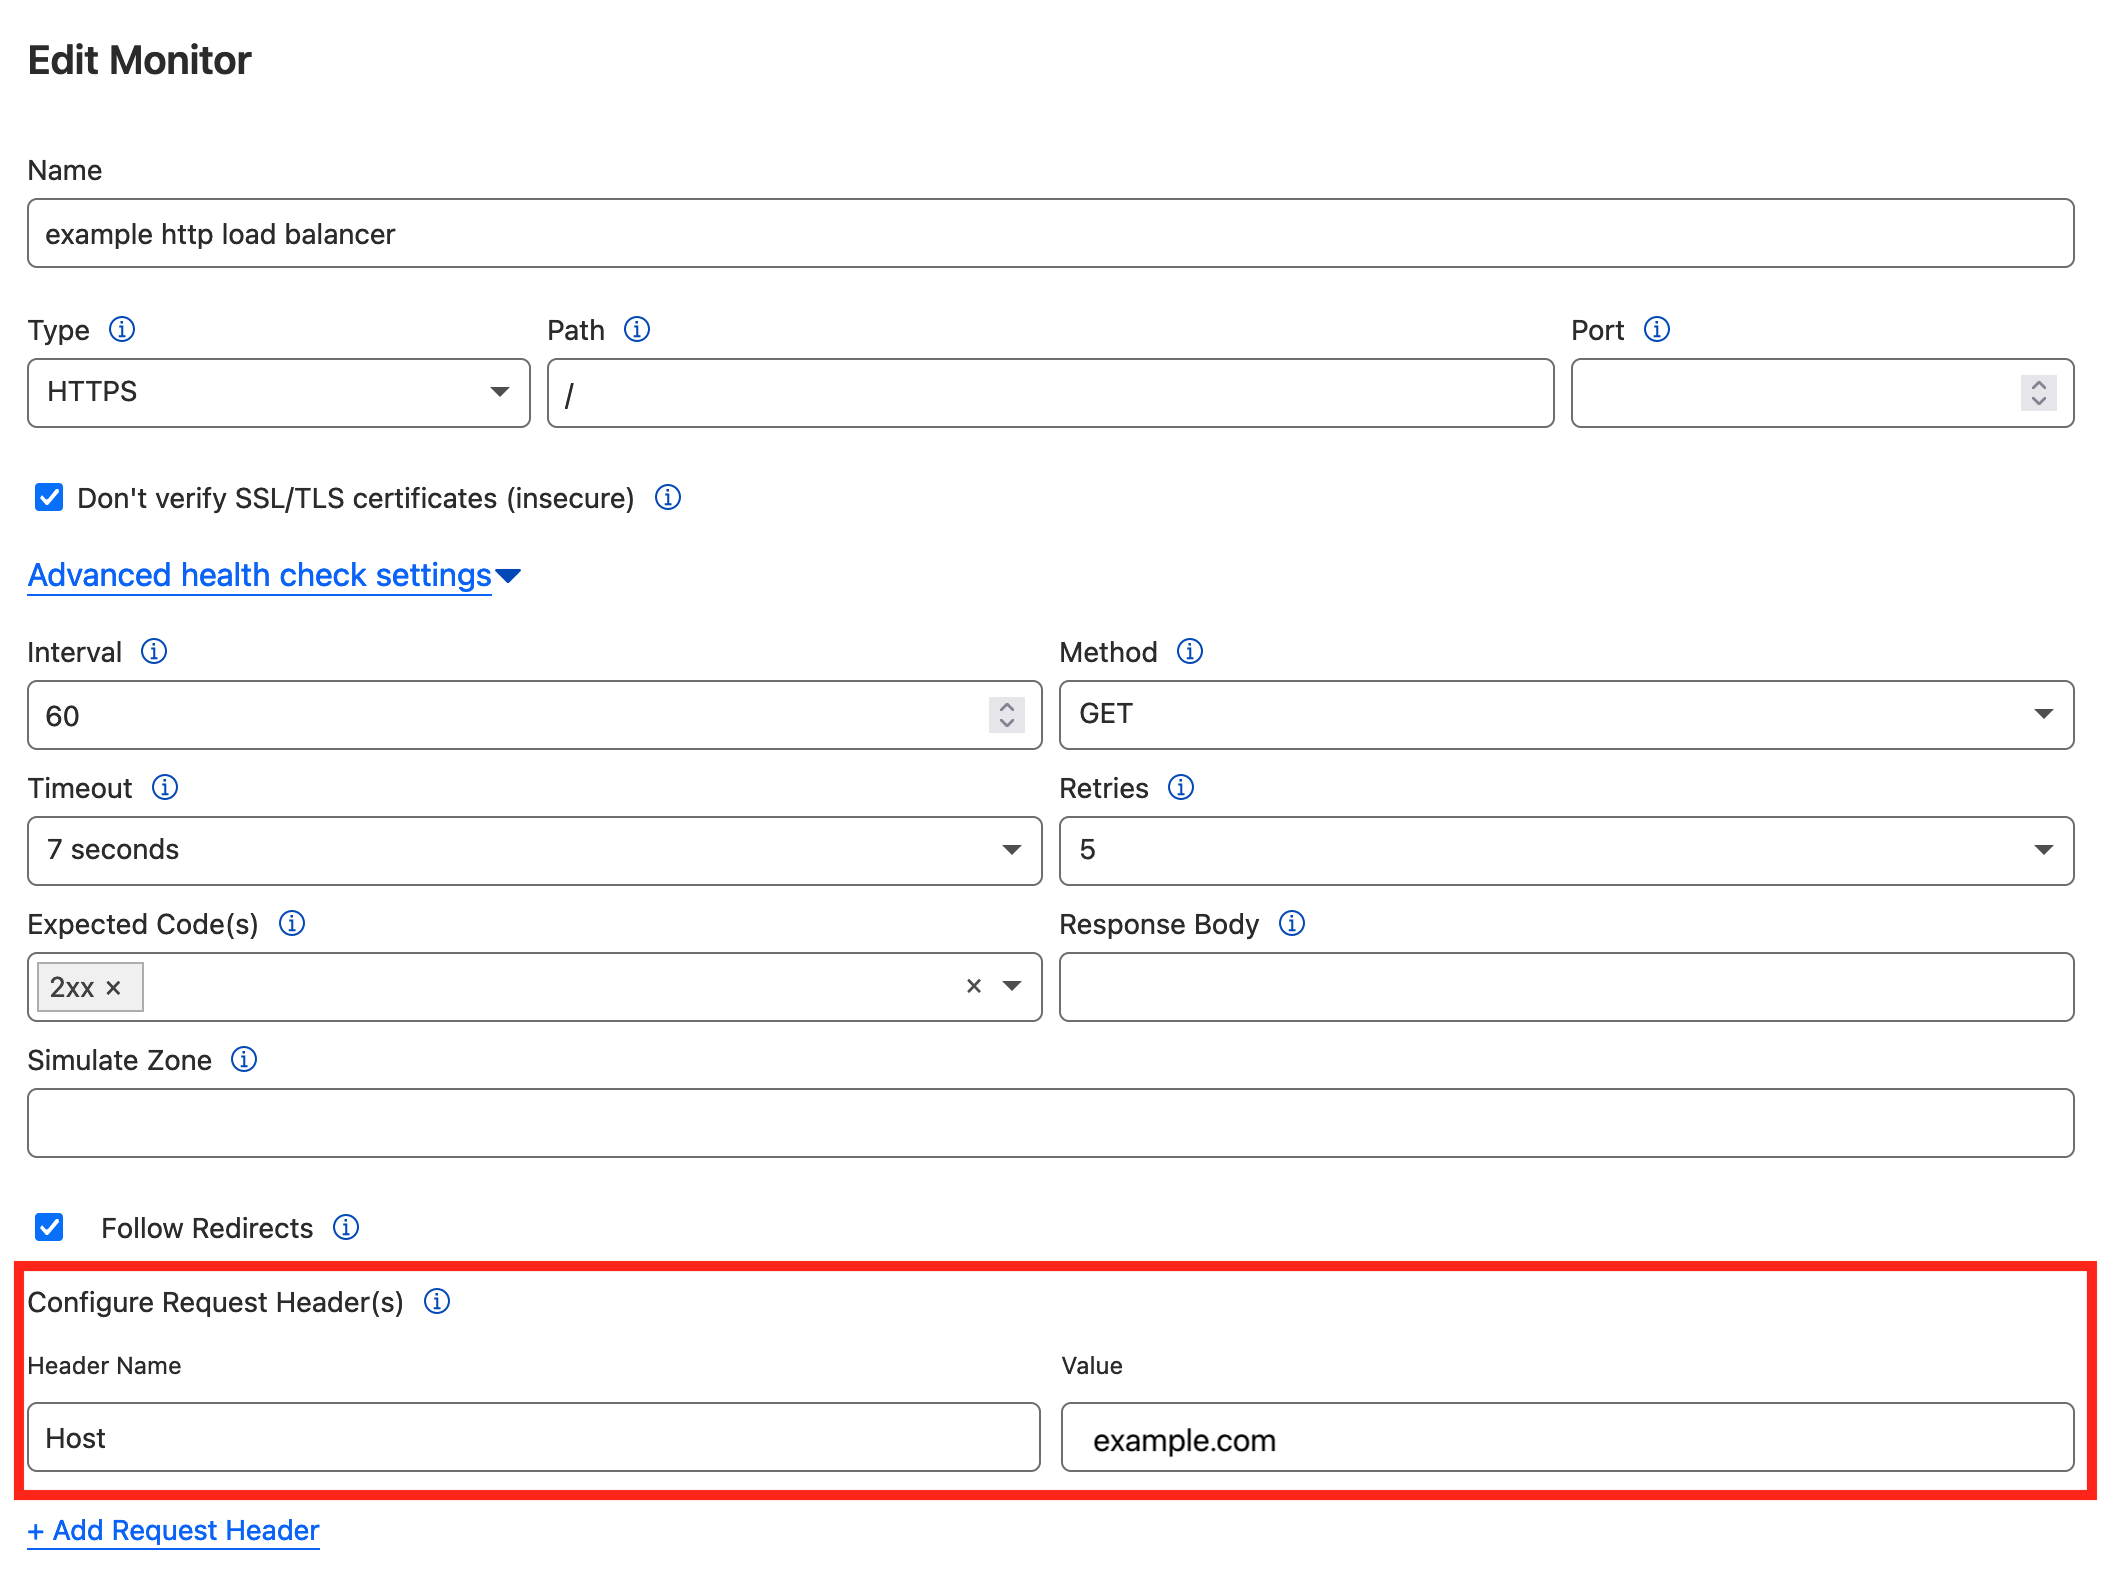
Pool Monitor
To allow Pool Monitors to monitor the tunnel origins, configure the value of the Host header to example.com in “Advanced health check settings”[2].
Health Check
Monitor and Health Check are two different features. Health Check(Traffic -> Health Checks)is a paid feature and not related with Load Balancer. See official document for how to use Health Check: Overview · Cloudflare Health Checks docs
Tunnel Replication is Not Load Balancing
Tunnel replication[3] is often confused with load balancing, but it’s NOT load balancing.
A Cloudflare Tunnel can have multiple connectors(see image below). Each connector points to the same tunnel. This ensures that origins can be reached if one of the connectors goes down. We refer to these unique connectors/cloudflared clients as replicas.
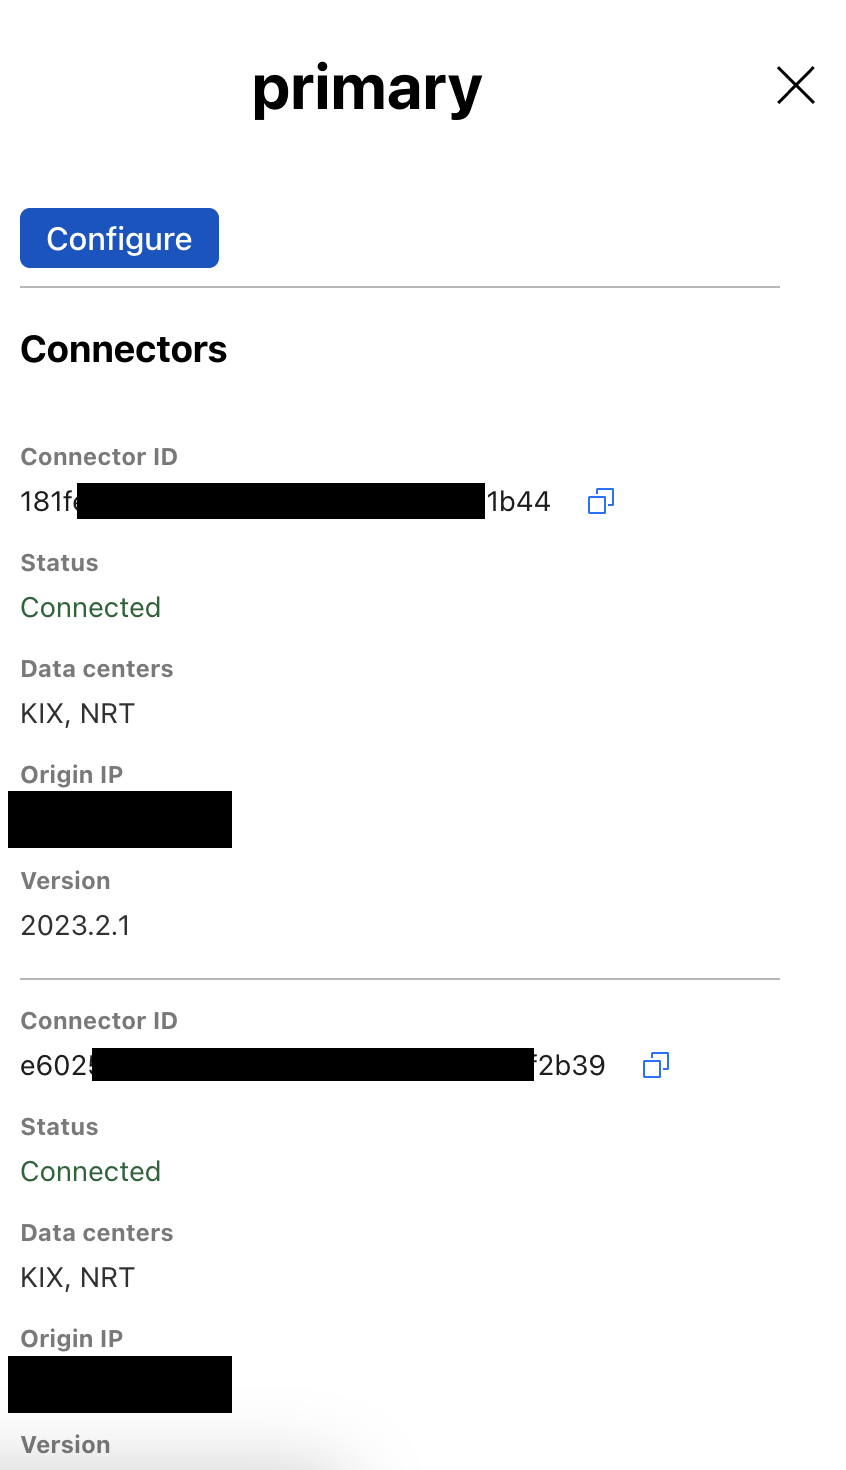
Multiple connectors in same tunnel
Replicas can be located on different servers, even different geographic regions, but replicas do not offer any traffic steering, which Load Balancer does. When a request arrives to Cloudflare, the network will pick any connection available to the origin. If a connection fails, Cloudflare will retry others, but there is no guarantee about which connection is chosen.
Summary
Here is a summary of the configuration values of every Cloudflare component through the life of a packet.
References
[1] Virtual hosting – IBM Documentation
[2] Load balancers · Cloudflare Zero Trust docs
[3] Tunnel availability and failover · Cloudflare Zero Trust docs
Recommend
About Joyk
Aggregate valuable and interesting links.
Joyk means Joy of geeK