

node 的 crypto 模块
source link: https://wangyulue.com/2022/11/node-%E7%9A%84-crypto-%E6%A8%A1%E5%9D%97/
Go to the source link to view the article. You can view the picture content, updated content and better typesetting reading experience. If the link is broken, please click the button below to view the snapshot at that time.

node 的 crypto 模块

crypto 模块是对 OpenSSL 的封装,主要功能有 哈希、对称加密以及非对称加密。
下面是一些介绍。
hash 通常给数据签名,它是不可逆的。 hash 算法有很多种,取决于当前机器 OpenSSL 的版本。
# 查看 openssl 版本(以 Ubuntu 18.04 为例)
openssl version

# out:
# OpenSSL 1.1.1  11 Sep 2018
使用 openssl list-message-digest-algorithms 可以查看支持哪些 hash 算法:
openssl list-message-digest-algorithms

# out:
# DSA
# DSA-SHA
# DSA-SHA1 => DSA
# DSA-SHA1-old => DSA-SHA1
# DSS1 => DSA-SHA1
# gost-mac
# streebog512
# streebog256
# md_gost94
# MD4
# MD5
# MD5-SHA1
# RIPEMD160
# RSA-MD4 => MD4
# RSA-MD5 => MD5
# RSA-RIPEMD160 => RIPEMD160
# RSA-SHA1 => SHA1
# RSA-SHA1-2 => RSA-SHA1
# RSA-SHA224 => SHA224
# RSA-SHA256 => SHA256
# RSA-SHA384 => SHA384
# RSA-SHA512 => SHA512
# SHA1
# SHA224
# SHA256
# SHA384
# SHA512
# ...
常用的 hash 算法有 md5、sha256、sha512,下面是一些运算例子:
const crypto = require("crypto");

function createHash(text, hashtype) {
  const hash = crypto.createHash(hashtype).update(text).digest("hex");
  console.log(hashtype, hash, hash.length);
}

["md5", "sha256", "sha512"].forEach((type) => {
  createHash("hello", type);
});

// out:
// md5 5d41402abc4b2a76b9719d911017c592 32
// sha256 2cf24dba5fb0a30e26e83b2ac5b9e29e1b161e5c1fa7425e73043362938b9824 64
// sha512 9b71d224bd62f3785d96d46ad3ea3d73319bfbc2890caadae2dff72519673ca72323c3d99ba5c11d7c7acc6e14b8c5da0c4663475c2e5c3adef46f73bcdec043 128
Hmac 算法也是一种哈希算法,它可以利用 MD5 或 SHA256 等哈希算法,不同的是,Hmac 还需要一个密钥(俗称加盐)。
参考一个例子:
const crypto = require("crypto");

const result = crypto.createHmac("md5", "123456").update("hello").digest("hex");

console.log(result);

// out:
// 9c699d7af73a49247a239cb0dd2f8139
为什么要加盐? 因为相同密码的 hash 值是相同的,所以很容易通过彩虹表来破解密码(彩虹表可以简单理解为 明文->密文 的键值对),加盐后,破解的概率几乎为零。
对称加密和前面的 hash 不同,它是可逆的。对称加密算法也有很多种,取决于当前机器 OpenSSL 的版本。
使用 openssl list-cipher-commands 可以查看支持哪些对称加密算法:
openssl list-cipher-commands

# out:
# aes-128-cbc
# aes-128-ecb
# aes-192-cbc
# aes-192-ecb
# aes-256-cbc
# aes-256-ecb
# base64
# bf
# bf-cbc
# bf-cfb
# bf-ecb
# bf-ofb
# camellia-128-cbc
# camellia-128-ecb
# camellia-192-cbc
# camellia-192-ecb
# camellia-256-cbc
# camellia-256-ecb
# ...
常见的对称加密算法有 aes-256-cbc。
crypto 模块中提供了 createCipheriv 和 createDecipheriv 来进行加密和解密的功能:
crypto.createCipheriv(algorithm, key, iv)crypto.createDecipheriv(algorithm, key, iv)
这两个方法都接收 3 个参数:
algorithm:加密解密的类型key: 加密解密的密钥iv: 初始向量
下面是一个例子:
const crypto = require("crypto");

// 生成符合规范长度的密钥
function genkey(secret, length = 32) {
  return crypto
    .createHash("sha256")
    .update(String(secret))
    .digest("base64")
    .substr(0, length);
}

// 加密字符串
function encryptByAes256(content, secretkey, iv) {
  const cipher = crypto.createCipheriv(
    "aes-256-cbc",
    genkey(secretkey),
    genkey(iv, 16)
  );
  let enc = cipher.update(content, "utf8", "hex");
  enc += cipher.final("hex");
  return enc;
}

// 解密字符串
function decryptByAes256(content, secretkey, iv) {
  const decipher = crypto.createDecipheriv(
    "aes-256-cbc",
    genkey(secretkey),
    genkey(iv, 16)
  );
  let dec = decipher.update(content, "hex", "utf8");
  dec += decipher.final("utf8");
  return dec;
}

const encContent = encryptByAes256("hello", "a", "b");

console.log(encContent);

const decContent = decryptByAes256(encContent, "a", "b");

console.log(decContent);
注意 createCipheriv 和 createDecipheriv 对 key 和 iv 的长度有要求,所以上例子中用 genkey 做了一次转换。下面是 AES 算法对长度的具体要求(以 key 和 iv 都是字符串类型为例):
| 算法类型 | key | iv |
|---|---|---|
| aes128 | 16 | 16 |
| aes192 | 24 | 16 |
| aes256 | 32 | 16 |
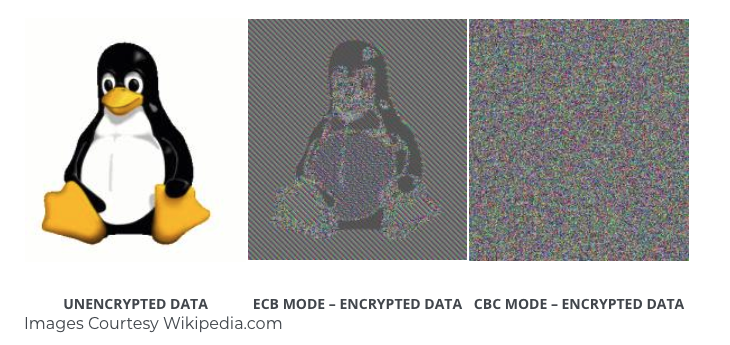
另外,细心的同学会看到 aes256 具体有 aes-256-cbc 和 aes-256-ecb 两种算法。aes-256-cbc 算法相对更加安全,下面的图看出它们的区别:
非对称加密
我们刚才了解了下对称加密,即加密和解密用的都是相同的密钥。
非对称加密不一样,它有一对密钥,公钥和私钥。公钥用来加密内容,然后私钥解密加密的内容。非对称加密有避免了私钥的传输,大大增加了安全性。
常见的非对称加密算法有 RSA。
下面是 node 使用非对称性加密的例子:
1、创建一个私钥:
openssl genrsa -out rsa_private.key 1024
2、根据私钥创建对应的公钥:
openssl rsa -in rsa_private.key -pubout -out rsa_public.key
在 node 中使用
const crypto = require("crypto");
const fs = require("fs");

const pub_key = fs.readFileSync("./rsa_public.key");
const priv_key = fs.readFileSync("./rsa_private.key");

const text = "hello";

const crypted_buffer = crypto.publicEncrypt(pub_key, Buffer.from(text));

const crypted_text = crypted_buffer.toString("base64");

const decryptd_buffer = crypto.privateDecrypt(
  priv_key,
  Buffer.from(crypted_text, "base64")
);

const decryptd_text = decryptd_buffer.toString();

console.log(crypted_text);
console.log(decryptd_text);
或者使用 node-rsa 模块:
const NodeRSA = require("node-rsa");
const fs = require("fs");

const pub_key = fs.readFileSync("./rsa_public.key");
const priv_key = fs.readFileSync("./rsa_private.key");
const key = new NodeRSA(pub_key + priv_key);

const text = "admin@123456";

const crypted_text = key.encrypt(text, "base64");
console.log("encrypted: ", crypted_text);

const decrypted_text = key.decrypt(crypted_text, "utf8");
console.log("decrypted: ", decrypted_text);
跨语言 RSA 加解密问题
实际工作过程中,遇到 node 端公钥加密, python 端私钥解密的场景;
python 端用的是 rsa 模块,具体代码如下:
import rsa
import base64

f1 = open("./rsa_public.key",encoding = "utf-8")
pubkey_text = f1.read()
f1.close()

f2 = open("./rsa_private.key",encoding = "utf-8")
prikey_text = f2.read()
f2.close()

prikey = rsa.PrivateKey.load_pkcs1(prikey_text)
pubkey = rsa.PublicKey.load_pkcs1(pubkey_text)

text = "admin@123456"

# 公钥加密
cipher_text = rsa.encrypt(text.encode('utf-8'), pubkey)
encode_text = base64.b64encode(cipher_text).decode('utf-8')

print('encode_text:',encode_text)

# 私钥解密
decrypt_text = rsa.decrypt(base64.b64decode(encode_text.encode('utf-8')),prikey)
decode_text = decrypt_text.decode('utf-8')
print(decode_text)
对接过程中发现:同一套公私钥下,node 加密的密文, python 无法解密;反之也是这样。
后来排查发现是默认 padding 不同,python 默认是 pkcs1,node 默认是 pkcs1_oaep;
需要在 publicEncrypt 和 privateDecrypt 函数中添加 padding 选项,将上面的 node 代码改成如下即可:
const crypto = require("crypto");
const fs = require("fs");

const pub_key = fs.readFileSync("./rsa_public.key");
const priv_key = fs.readFileSync("./rsa_private.key");

const text = "admin@123456";

const crypted_buffer = crypto.publicEncrypt(
  {
    key: pub_key,
    padding: crypto.constants.RSA_PKCS1_PADDING,
  },
  Buffer.from(text)
);

const crypted_text = crypted_buffer.toString("base64");

const decryptd_buffer = crypto.privateDecrypt(
  {
    key: priv_key,
    padding: crypto.constants.RSA_PKCS1_PADDING,
  },
  Buffer.from(crypted_text, "base64")
);

const decryptd_text = decryptd_buffer.toString();

console.log(crypted_text);
console.log(decryptd_text);
在 node-rsa 中则是添加 setOptions({encryptionScheme: 'pkcs1'}) 即可;
pkcs1 和 pkcs8
rsa 有 pkcs1 和 pkcs8 两种格式
pkcs1以 ‘—–BEGIN RSA PUBLIC KEY—–’ 或者 ‘—–BEGIN RSA PRIVATE KEY—–’ 开头pkcs8以 ‘—–BEGIN PUBLIC KEY—–’ 或者 ‘—–BEGIN PRIVATE KEY—–’ 开头
其他 RSA 注意点
加密出来的文本
对于一段文本,RSA 共钥每次加密出来的密文都不一样
openssl 导出的公钥格式
默认 openssl 生成的 publickey 是 pkcs8 格式,这就导致 python 的 rsa 模块无法使用(rsa 只支持 pkcs1)
可以用 openssl 将 pkcs8 公钥 转换为 pkcs1 公钥,命令是 openssl rsa -pubin -in public.pem -RSAPublicKey_out,其他转换可以参考 openssl RSA 密钥格式 PKCS1 和 PKCS8 相互转换 这篇文章
Diffie-Hellman
DH 算法是一种密钥交换协议,它可以让双方在不泄漏密钥的情况下协商出一个密钥来。
DH 算法的数学基础如下:
- 假设 A = K^X mod M,已知 X 的情况下,很容易算出 A;已知道 A 的情况下,很难算出 X;
- (K^X mod M)^Y mod M = K^(X * Y) mod M
用 node 模拟 HD 算法过程
X 先选一个素数和一个底数:素数 M=97,底数 K=31(底数可以任选),再选择一个秘密整数 X=5,计算 A=K^X mod M=86,然后告诉 Y:K=31,M=97,A=86; Y 收到 X 发来的 K,M,A 后,也选一个秘密整数 Y=7,然后计算 B=K^Y mod M=2,并告诉 X:B=2;
X 自己计算出 key=B^Y mod M=32; Y 也自己计算出 key=A^Y mod M=32;
因此,最终协商的密钥 key 为 32。
const K = 31; // 底数
const M = 97; // 取模(需要是质数)

const X = 5; // X 的私钥
const A = Math.pow(K, X) % M; // 86

const Y = 7; // Y 的私钥
const B = Math.pow(K, Y) % M; // 2

console.log(Math.pow(B, X) % M); // X 计算出的密钥:32
console.log(Math.pow(A, Y) % M); // Y 计算出的密钥:32
使用 crypto 中的 DH 算法
const crypto = require("crypto");

// X 生成 key
const X = crypto.createDiffieHellman(512);

const prime = X.getPrime(); // 公开的随机数
console.log("Prime: " + prime.toString("hex"));

const X_PublicKey = X.generateKeys(); // X 生成用于交换的 key
const X_PrivateKey = X.getPrivateKey(); // X 自己的私钥

console.log("X_PublicKey", X_PublicKey.toString("hex"));
console.log("X_PrivateKey", X_PrivateKey.toString("hex"));

// Y 生成 keys
const Y = crypto.createDiffieHellman(prime); // 根据公开的随机数创建 Y
const Y_PublicKey = Y.generateKeys(); // Y 生成用于交换的 key
const Y_PrivateKey = Y.getPrivateKey(); // Y 自己的私钥

console.log("Y_PublicKey", Y_PublicKey.toString("hex"));
console.log("Y_PrivateKey", Y_PrivateKey.toString("hex"));

// 交换生成协商密钥:
console.log("Secret of X: " + X.computeSecret(Y_PublicKey).toString("hex"));
console.log("Secret of Y: " + Y.computeSecret(X_PublicKey).toString("hex"));

// out:
// Prime: c17a5d01bf84632f164b45cea4061602f0bb9d37b34ab6fcd8afff029172ce1bf3b6459244be0fe54c31b59efca7a439d58da18e90471def8a5d4195c0aa9bab
// X_PublicKey a4612c019051615204760e62623b04fc4740f33575704314f3f4286c79ed3b87d1764391e03df3b783c3455b31afb5c24e5db69345a93159ac6b81ef49f5f0b5
// X_PrivateKey 44b54320bc5f3c3fd12183f2d4cdee0fe097f2a9f014c8fdec08e0510be3b68bf713dbdd58b7a689f72fa63f8d778d4d3f2756736ed626dc72d3c118171dc024
// Y_PublicKey 473ba37e71c54034aa98492825301b587e483845cb176d42f663b81598b685706d05bfe2b5531e6873f799de067ffb8281245c8461d0a4d5a8897bf1cd6252f2
// Y_PrivateKey 6e8940a33f92f69d9dca023958db8e10f5a39180b243c68e18d4efbfcdee1d795ac608fef29294affc777a80fe301ea8ba8a32c71318d4914a99f53d7d2e9b32
// Secret of X: bf26f9654e2ec0c0c504ed321ab41b55d7014aabff0d89bb4d3a542fcf179342c293627443c3141cfe04c34cac357977bae610175e889d4d8557bce89e431b31
// Secret of Y: bf26f9654e2ec0c0c504ed321ab41b55d7014aabff0d89bb4d3a542fcf179342c293627443c3141cfe04c34cac357977bae610175e889d4d8557bce89e431b31
可以看到 X 和 Y 在没有暴露自己的私钥的情况下,最后生成了相同的密钥。
DH 算法的用途
DH 算法可以用于 HTTPS 中,相对于 RSA 算法,他有如下优势:
1.当服务器私钥已泄露时,如果采用 RSA 算法,监听者即可获取全部的报文内容与信息(pre-master 密钥可直接解出)。采用 DH 算法则监听者必须攻破服务器/客户端之一,才能获得 DH 算法的密钥。
2.当 client 的随机数生成器有问题时,RSA 算法生成的随机数 premaster-secret 其随机性未获得保证。而使用 DH 算法,则密钥 s 的随机性由 client/server 两端的随机数生成器保障。
数字签名基于非对称加密,过程与非对称加密的过程正好相反,是使用私钥进行加密签名,然后使用公钥进行解密的签名验证。
数字签名主要有如下作用:
- 验证发送者的身份
- 保证信息传输的完整性
想了解细节的同学可以看阮一峰的 数字签名是什么? 这篇文章。
下面是在 node 中使用数字签名的例子:
const crypto = require("crypto");
const fs = require("fs");

const pub_key = fs.readFileSync("./rsa_public.key");
const priv_key = fs.readFileSync("./rsa_private.key");

const text = "hello";

// 生成签名
const sign = crypto.createSign("RSA-SHA256");
sign.update(text);
const signed = sign.sign(priv_key, "hex");

// 验证签名
const verify = crypto.createVerify("RSA-SHA256");
verify.update(text);
const verifyResult = verify.verify(pub_key, signed, "hex");

console.log("sign", signed); // 244ea5f09e474380669351d605c6868625daee6f35734859c30d1de9a1bc06f16359b198b1eb860e2ae9b42ecf591b473511f4a0243eed9ca1ebea7cabfd3d270a352ed752bbb95bc190a8d539538e19cb759162009fb984b3eb504ee02e7a182531dee16cb134b7c416767ff666a9f370aa09d394e15347087cedb074b5b695
console.log("verifyResult", verifyResult); // true
其他注意点
不同平台下的 md5 计算
# 对字符串进行 md5
md5 -s hello

# 对文件进行 md5
md5 hello.md
ubuntu
# 对字符串进行 md5
echo -n hello | md5sum

# 对文件进行 md5
md5sum hello.md
上面的 echo 因为默认会加换行符,导致 echo hello | md5sum 这样写实际上 md5 的是 hello 加一个换行符,所以这里需要加 -n 忽略换行。
另外,用 vim 编辑文本默认也会折行,所以也会有以上的问题。
const crypto = require("crypto");

const md5hash = crypto.createHash("md5").update("hello").digest("hex");
console.log(md5hash);
使用第三方模块 md5 、js-md5 或者 crypto-js:
const md5_1 = require("md5");
const md5_2 = require("js-md5");
const md5_3 = require("crypto-js/md5");

console.log(md5_1("hello"));
console.log(md5_2("hello"));
console.log(md5_3("hello").toString());
最后,推荐一个科普密码学很好的视频计算机科学速成课 p33 加密
Recommend
About Joyk
Aggregate valuable and interesting links.
Joyk means Joy of geeK