

How I Create My UX Case Studies
source link: https://uxplanet.org/how-i-create-my-ux-case-studies-9953a6c8e462
Go to the source link to view the article. You can view the picture content, updated content and better typesetting reading experience. If the link is broken, please click the button below to view the snapshot at that time.

How I Create My UX Case Studies
Guide for Creating Personal UX/UI Case Studies in 2023

Creating UX/UI case studies is a crucial part of showcasing your design skills and demonstrating the impact of your work to potential clients and employers.
In this article, I will share my personal approach to creating compelling and effective UX/UI case studies.
From conducting user research and defining the design problem to presenting the design solutions and demonstrating the impact, I will walk you through the process step-by-step.
Whether you are a seasoned designer or just starting out, this article will provide you with insights and practical tips for creating impactful UX/UI case studies that showcase your design skills and expertise.
1. Choose the Platform First

The first step in creating a personal UX case study is deciding on a design platform, such as iOS, Android, or the Web.
After choosing it, I turn to the guidelines like Apple’s HIG and Google Material Guidelines.
2. Creating Problem Statements

Then, choose the problem you want to solve with your design; you can choose any problem, but I always make sure it’s personal and relatable for me, which motivates me to dive a little deeper because of my interest.
Creating Problem Statement with ChatGPT
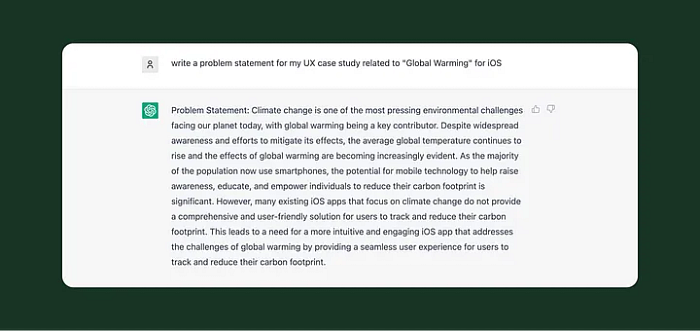
In 2023, ChatGPT will be one of the best tools for creating problem statements, and I recommend everyone use it as you can create very personalized problem statements with it, as in the above image.
I ask ChatGPT for a problem statement related to global warming (a personal topic) and for iOS (a specific platform), which is far superior to other tools and can be asked to elaborate.
Note: It’s based on freemium model and might not accepting new users right now but don’t worry you can generate problem statements with other tools like uxchallenge.co or https://sharpen.design/
3. Do the Research on the Problem

After choosing the one problem statement that interests me from 10–15 of them, I jump onto the internet and start searching for the actual problem to find out more about it and learn more about the problem and possible solutions.
I look for the current solutions to the problem in the market, install them, and sign up for their app or website to learn about what they are providing the user with.
I looked up the reviews and comments from the users. basically doing my primary research.
Primary research includes basic googling and searching.
Secondary Research includes User interviews, Surveys, etc.
For personal case studies, I prefer primary research but for others, I request people on the Facebook group for the interviews for just 5$/hour or try platforms like usertesting.com
UX Research Strategy: A Guide to Nailing UX Research | Maze
To succeed in UX research, you need a strategy. To get you started, here's our guide to creating the ultimate UX…
4. Ideate on Paper

I love sketching and ideating on paper about any of my ideas, and in this process, I design the wireframes on paper to lay out the solution for the problem statement.
I prefer paper because drawing a new screen is faster and easier on paper than on Figma or XD. This takes a lot of time, but after a day or two, I jump to designing the actual apps.
5. Build Systems before Designing

Sketching makes things quite easy for me to design, but I always make sure to create systems, I follow the Google Material Design library or Apple’s HIG library for designing.
Always make sure your layers side is fill of instances and components rather than unique elements, as it makes the work easy.
6. Then I Jump to Designing

When jumping into the design, I always make sure to design a minimum of 8–10 screens for the possible solution and not focus on the login and signup screens but on the actual screen of the app.
7. Add Loom or Prototype

After designing the screens, it’s always better to create a prototype with animation and micro-interactions.
I prefer Figma for the prototype as it’s easy and simple, and you can learn it in a day or two of practice. The best way to learn to prototype is to go to Figma’s Youtube channel.
Loom is a tool that helps you create an explainer video with your face and the screen showing at the same time.
It always helps if you can create a video explaining your case study. Make sure not to explain the solution for more than 5 minutes, as the recruiters and managers don’t have that much time.
The preferred time for the explainer video is 3 minutes.
8. Uploading to Portfolio

After all the work, I jump to my portfolio and upload my work there. If you don’t have a portfolio, just go and upload your case study on Notion or Medium.
I have done that too. I started off publishing my case studies on Medium, and after that, I jumped onto my portfolio website.
Publishing on Medium and Notion helps you focus on the content over the design or aesthetics of the portfolio.
And it’s way easier and cheaper than a site, and the best thing about Medium is claps and comments, as when other people read your case studies, they can give advice in the comments about what’s best and what’s needs to be improved.
Note: There is no right or wrong way to create a UX case study, all the things discussed above are the key things I follow in every single case study basically it’s the flow of my UX case study creation.
One of the best ways to learn about the case study is to read other people’s case studies from their portfolios and the best way to do that is to visit cofolio.com where you can see several designer’s portfolio from big companies like Google, Twitter, Airbnb, Apple, Amazon, etc.
Recommend
About Joyk
Aggregate valuable and interesting links.
Joyk means Joy of geeK