

Informing users of newly enrolled devices
source link: https://www.petervanderwoude.nl/post/informing-users-of-newly-enrolled-devices/
Go to the source link to view the article. You can view the picture content, updated content and better typesetting reading experience. If the link is broken, please click the button below to view the snapshot at that time.

Informing users of newly enrolled devices
This week is all about a nice small new feature that became general available with the latest service release of Microsoft Intune (2301). That feature is enrollment notification. Enrollment notifications provide organizations with an easy method to notify users when a new device is enrolled. That provides organizations with more grip on the devices that are enrolled within the environment, as users will be informed when a new device was enrolled using their credentials. Besides that, it also provides organizations with an alternative method to welcome employees. In other words, a great way to trigger users. Enrollment notifications can be used for Windows, Android, iOS/iPadOS, and MacOS devices that are enrolled by using the user-driven enrollment methods. The notifications can be email notifications and push notifications in the Company Portal app for Andriod, iOS/iPadOS, and MacOS devices. Push notifications aren’t supported in the Company Portal for Windows. This post will start with a walk through the steps for configuring enrollment notifications, and will end with the user experience.
Important: Push notifications are not supported in the Company Portal app for Windows devices.
Note: Keep in mind that enrollment notifications are only supported for user-driven enrollment methods.
Configuring enrollment notifications
When looking at enrollment notifications, it all starts with the configuration. The configuration is actually done per platform, but the configuration steps are identical for every platform. Only the starting point differs per platform. Before starting with the configuration of enrollment notifications, it’s important that the branding and customization settings are configured within the tenant. That can be achieved via Tenant administration > Customization. Those customizations can be reused within the configuration of the different enrollment notifications. The following steps walk through the configuration of enrollment notifications for Windows enrollments.
- Open Microsoft Endpoint Manager admin center navigate to Devices > Enroll devices > Windows devices
Note: For enrollment notifications for other platforms, select Apple devices or Android devices instead.
- On the Enroll devices | Windows enrollment page, select Create notifications
Note: For Apple devices choose between iOS Notifications or macOS Notifications, and for Android devices choose between Android Enterprise Notifications or Android device administrator Notifications.
- On the Basics page, specify a valid Name and optionally a Description and click Next
- On the Notification settings page, provide the following information and click Next
- Push Notification (as shown below in Figure 1)
- Switch slider with Send Push Notification to On to enable push enrollment notifications
- Subject: Provide the subject of the enrollment notification
- Message: Provide the message, explaining the purpose of the enrollment notification (max. 2000 characters).
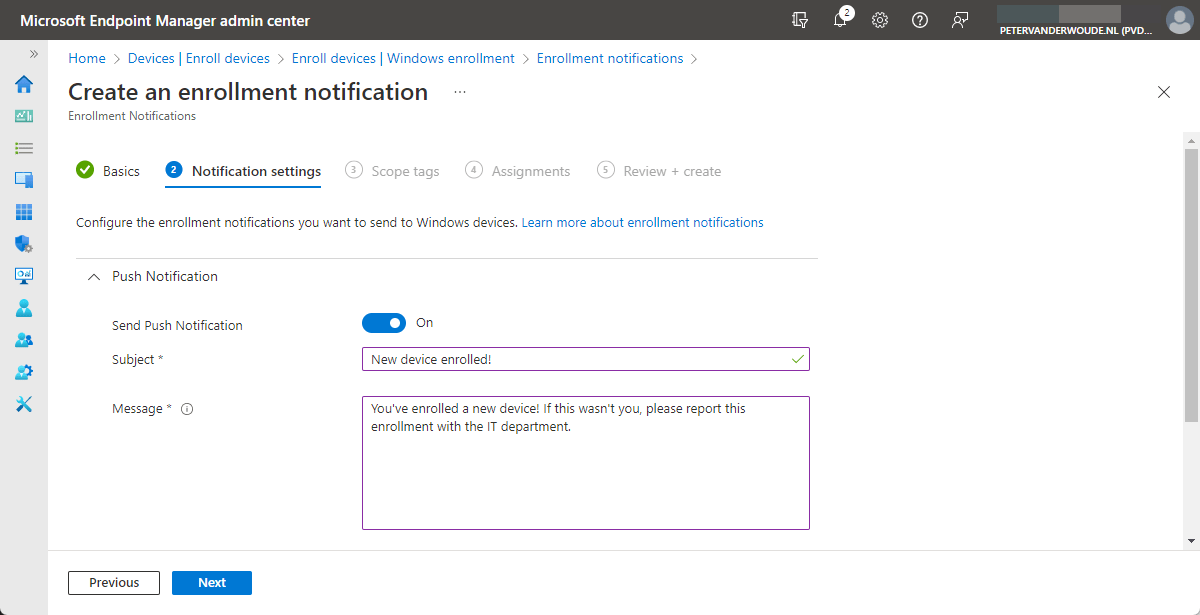
Figure 1: Overview of the push notification settings
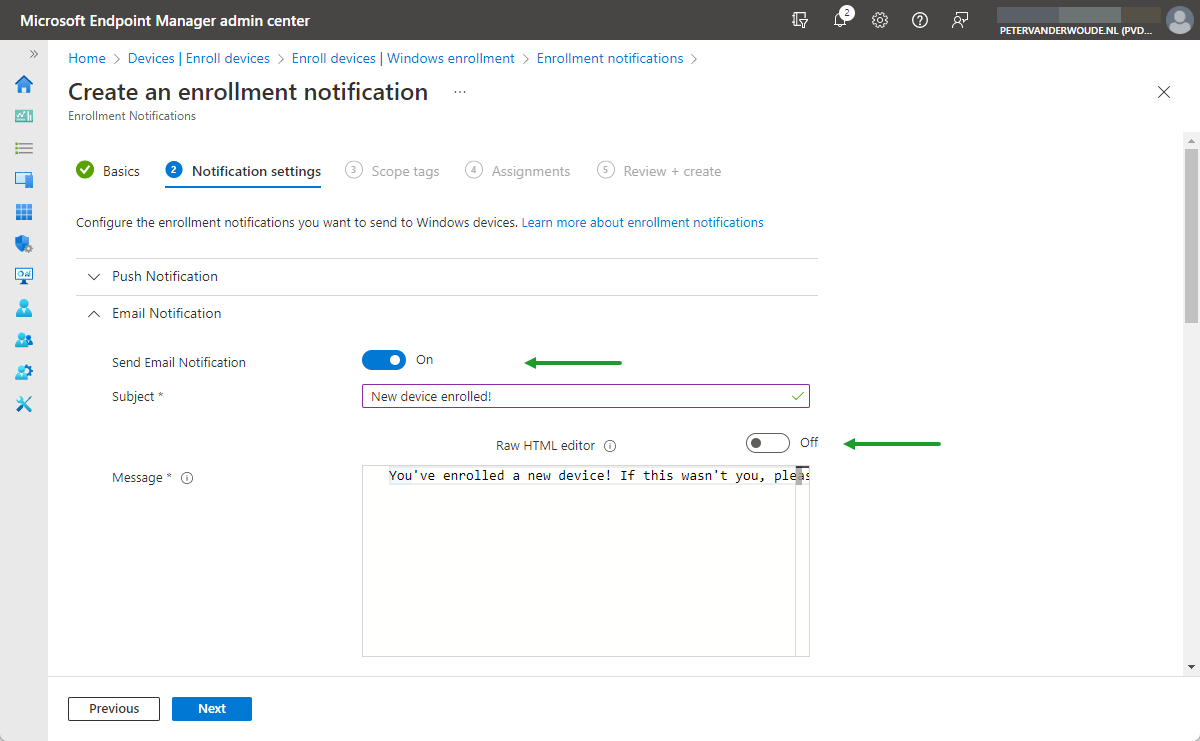
- Email Notification (as shown below in Figure 2 and Figure 3)
- Switch slider with Send Email Notification to On to enable email enrollment notifications
- Subject: Provide the subject of the enrollment notification
- Message: Provide the message, explaining the purpose of the enrollment notification (max. 2000 characters).
- Switch slider with Raw HTML editor to On to enable HTML formatting in the message
- Email header
- Switch slider with Show company logo to On to use the company logo in the email header
- Email footer
- Switch slider with Show device details to On to show the details of the enrolled device in the email footer
- Switch slider with Show company name to On to show the company name in the email footer
- Switch slider with Show contact information to On to show the contact information in the email footer
- Switch slider with Show company portal website link to On to show the website link in the email footer

Important: Keep in mind that the device details are not shown by default, as retrieving those device details can cause a delay in email notifications being received.
Note: Keep in mind that the additional information, that can be shown in the email header and footer, is coming from the tenant branding and customization settings.
- On the Scope tags page, configure the required scope tags click Next
- On the Assignments page, configure the required user group assignment and click Next
- On the Review + create page, review the configuration and click Create
Note: When creating multiple enrollment notifications for a single platform, different priorities can be used to determine which enrollment notification is applicable when multiple enrollment notifications are assigned.
Experiencing enrollment notifications
After configuring enrollment notifications, it’s pretty simple and straight forward to experience the enrollment notifications. Simply enrolling a device by using a user enrollment on a platform with enrollment notifications configured, will trigger the configured enrollment notification. When the user already has a mobile device enrolled (Android and/or iOS/iPadOS), the user will receive a push notification in the Company Portal app, or the Microsoft Intune app. After reading that message, the user can always go back to that message in the app by navigating to Notifications > Updates from your organization. The email notification will become available on any device with company email configured. Below in Figure 4 is an example of receiving that notification on a Windows device in the Outlook app.
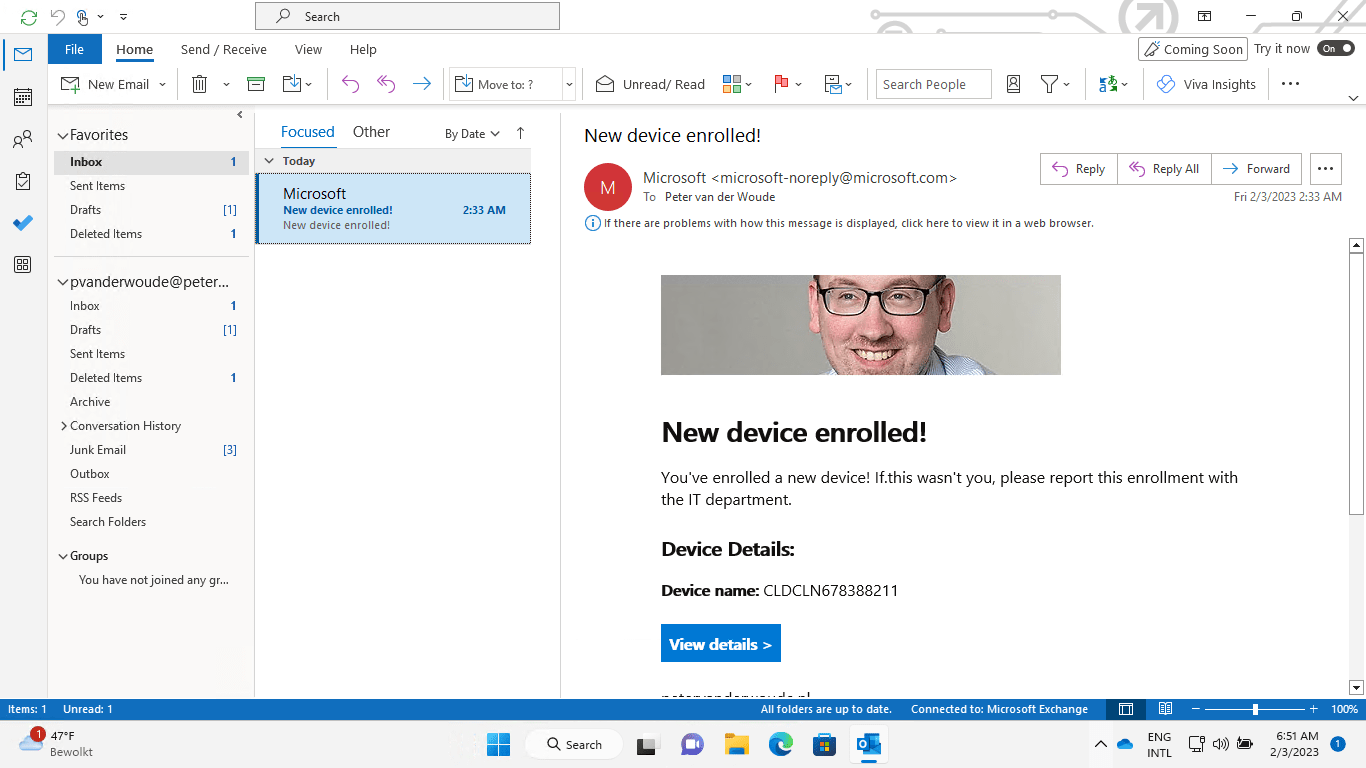
Figure 4: Overview of the user experience with an email notification on Windows
More information
For more information about configuring enrollment notifications, refer to the following docs.
Recommend
About Joyk
Aggregate valuable and interesting links.
Joyk means Joy of geeK