
5

快速实现一个简单阉割版的HashMap - 帝莘
source link: https://www.cnblogs.com/zaevn00001/p/17099630.html
Go to the source link to view the article. You can view the picture content, updated content and better typesetting reading experience. If the link is broken, please click the button below to view the snapshot at that time.

简单实现一个底层数据结构为数组 + 链表的HashMap,不考虑链表长度超过8个时变为红黑树的情况。
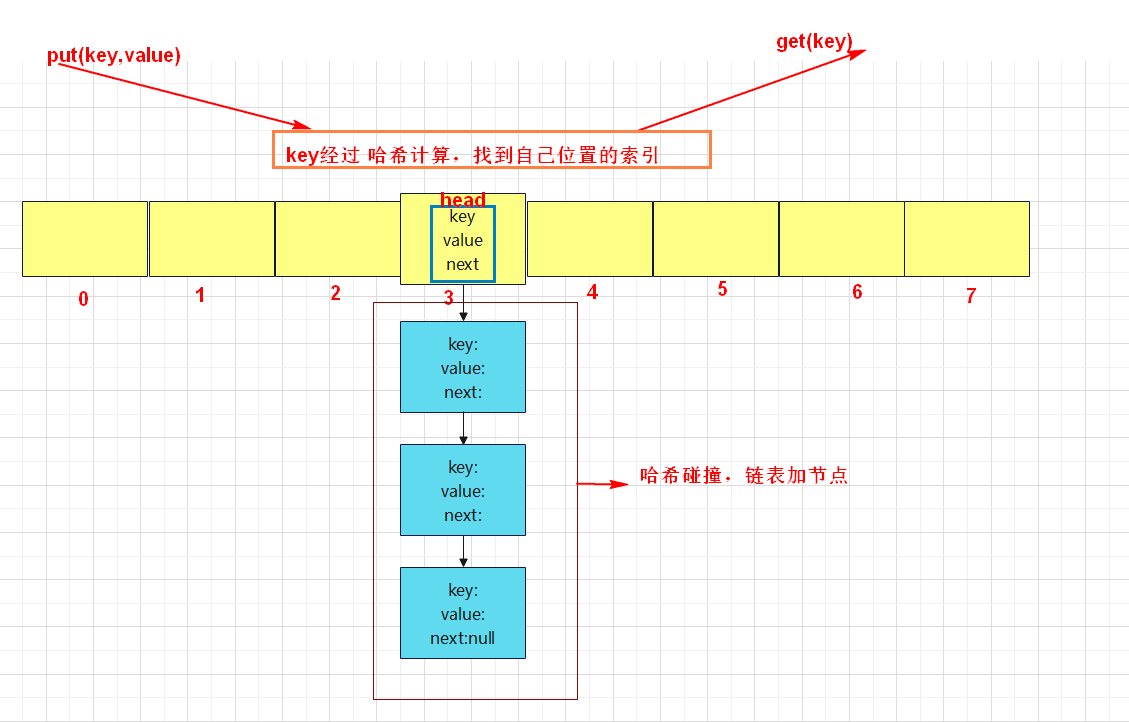
1.示例图
2.分析需求
- put数据时:
- key值hash后的索引处没有元素,需要创建链表头节点,放到该位置的数组空间里。
- key值hash后的索引处有元素,说明产生Hash碰撞,需要在链表中结尾处挂载节点,如果在遍历链表的过程中,发现了同key的数据,则执行覆盖即可,不再继续往下遍历去挂载新节点。
- 假设数组使用的空间超过了总长度的75%,那么对数组进行扩容。先创建新数组,把旧数据写到新数组中(此时需要重新根据key计算Hash,因为数据长度变化了,影响计算结果了),在用新数据替换掉原来的旧数组。
- get数据时:
- key值hash后的索引下标处的元素为空的话,则不存在数据。
- key值hash后的索引下标处存在链表的话,需要遍历链表,找到key相对应的value值。
3.代码实现
-
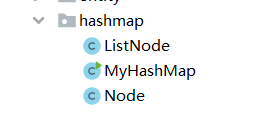
Node类实现
package com.zaevn.hashmap; /** * @author: zae * @date: 2023/1/30 * @time: 11:25 */ public class Node { String key; String value; Node next; public Node(String key, String value, Node nextNode) { this.key = key; this.value = value; this.next = nextNode; } } -
LinkNode类实现
package com.zaevn.hashmap; /** * @author: zae * @date: 2023/1/30 * @time: 11:27 */ public class ListNode { // 头节点 Node head; /** * 添加数据,挂载链表的节点 * @param key * @param value */ public void addNode(String key,String value){ // 如果头节点是空,则结束 if(head == null ){return;} // 如果头节点不为空,则往下挂载节点 Node node = new Node(key,value,null); Node temp = head; while(true){ // 遇到相同的key,覆盖数据 if(key.equals(temp.key)){ temp.value = value; return; } if(temp.next == null){ break; } temp = temp.next; } // 循环结束后则挂上数据 temp.next = node; } /** * 获取数据 * @param key * @return */ public String getNode(String key){ if(head == null ){return null;} Node temp = head; while(true){ if(key.equals(temp.key)){ return temp.value; } if(temp.next == null){ break; } temp = temp.next; } return null; } } -
MyHashMap类实现
package com.zaevn.hashmap;

/**
 * @author: zae
 * @date: 2023/1/30
 * @time: 11:27
 */
public class MyHashMap {
    // 数组初始化:2的n次方
    ListNode[] map = new ListNode[8];
    // ListNode的个数
    int size;

    // 由于扩容时是先创建一个新数组,因此先声明出来
    ListNode[] mapNew;
    int sizeNew;

    /**
     * put方法
     * @param key
     * @param value
     */
    public void put(String key,String value){
        if(size>map.length * 0.75){
            System.out.println("开始进行扩容,当前size="+size+",数组长度为:"+map.length);
            doExtendMap();
            System.out.println("扩容结束,当前size="+size+",数组长度为:"+map.length);
        }

        // 1.对key进行hash算法然后取模
        int index = Math.abs(key.hashCode())%map.length;

        ListNode listNode = map[index];
        // 如果索引位置的元素为空,则新加一个元素(创建头节点)
        if(listNode == null){
            ListNode listNodeNew = new ListNode();
            Node node = new Node(key,value,null);
            listNodeNew.head = node;
            map[index] = listNodeNew;
            size ++;
        }else{
            // 如果索引位置的元素不为空,则往链表中挂载数据
           listNode.addNode(key,value);
        }
    }

    public String get(String key){
        // 1.对key进行hash算法然后取模
        int index = Math.abs(key.hashCode())%map.length;

        if(map[index] == null){
            return null;
        }else{
            return map[index].getNode(key);
        }
    }

    /**
     * 达到阈值后开始进行扩容
     */
    public void doExtendMap(){
        sizeNew = 0;
        // 1.先创建一个新的数组,长度为原来的二倍
        mapNew = new ListNode[map.length * 2];

        // 2.将旧数据映射到新的数组上(因为数组长度变化,因此hash规则变化,所有的值需要重新计算hash值)
        for(int i = 0;i<map.length;i++){
            ListNode listNode = map[i];
            if(listNode == null){
                continue;
            }
            Node temp = listNode.head;
            while (true){
                doPutData(mapNew,temp.key,temp.value);
                if(temp.next == null){
                    break;
                }
                temp = temp.next;
            }
        }

        // 3.将新的数组替换旧的数组
        map = mapNew;
        this.size = sizeNew;
    }

    private void doPutData(ListNode[] mapParam,String key,String value){
        int index = Math.abs(key.hashCode())%mapParam.length;
        ListNode listNode = mapParam[index];
        if(listNode == null){
            ListNode listNodeNew = new ListNode();
            Node node = new Node(key,value,null);
            listNodeNew.head = node;
            mapParam[index] = listNodeNew;
            sizeNew ++;
        }else{
            listNode.addNode(key,value);
        }
    }

    public static void main(String[] args) {
        // 1、一般校验
        MyHashMap hashMap0=new MyHashMap();
        hashMap0.put("key1","value1");
        System.out.println("一般校验:"+hashMap0.get("key1"));
        System.out.println("--------------------------------------------");


        // 2、同key覆盖校验
        MyHashMap hashMap1=new MyHashMap();
        hashMap1.put("key2","value00");
        hashMap1.put("key2","value01");
        System.out.println("同key覆盖校验:"+hashMap1.get("key2"));
        System.out.println("--------------------------------------------");

        // 3、哈希碰撞校验(k1和k9的经过哈希计算后得到的索引都是6)
        MyHashMap hashMap2=new MyHashMap();
        hashMap2.put("k1","value_k1");
        hashMap2.put("k9","value_k9");
        System.out.println("哈希碰撞校验:k1:"+hashMap2.get("k1")+"  k9:"+hashMap2.get("k9"));
        System.out.println("--------------------------------------------");


        // 4、扩容校验
        MyHashMap hashMap3=new MyHashMap();
        hashMap3.put("m3","cccccc");
        hashMap3.put("c1","kkkkkk");
        hashMap3.put("c2","mmmmmmm");
        hashMap3.put("b1","bbbbbbb");
        hashMap3.put("m1","cccccc");
        hashMap3.put("c3","kkkkkk");
        hashMap3.put("c4","mmmmmmm");
        hashMap3.put("b2","bbbbbbb");
        hashMap3.put("m2","cccccc");
        hashMap3.put("c5","kkkkkk");
        hashMap3.put("c6","mmmmmmm");
        hashMap3.put("b3","bbbbbbb");
        System.out.println("扩容后的c4:"+hashMap3.get("c4"));
        System.out.println("扩容后的b3:"+hashMap3.get("b3"));
    }

}
3.运行结果

Recommend
About Joyk
Aggregate valuable and interesting links.
Joyk means Joy of geeK