

漫谈Nuclear Web组件化入门篇
source link: https://blogread.cn/it/article/8106?f=hot1
Go to the source link to view the article. You can view the picture content, updated content and better typesetting reading experience. If the link is broken, please click the button below to view the snapshot at that time.

漫谈Nuclear Web组件化入门篇
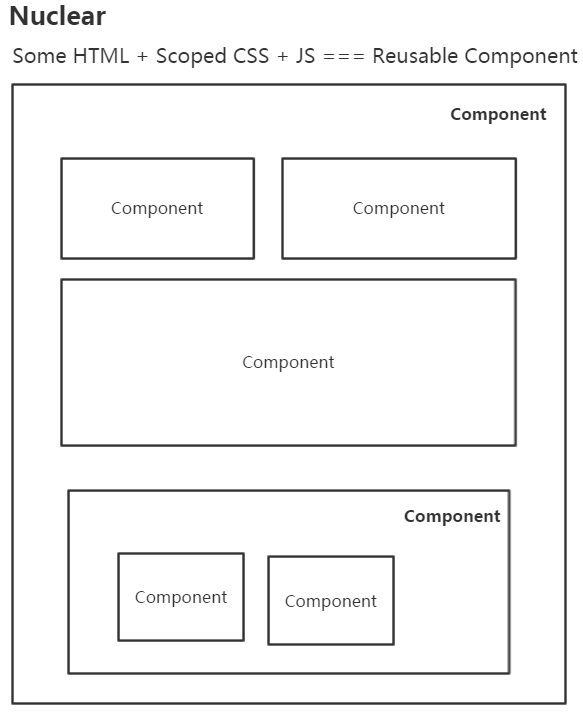
目前来看,团队内部前端项目已全面实施组件化开发。组件化的好处太多,如:按需加载、可复用、易维护、可扩展、少挖坑、不改组件代码直接切成服务器端渲染(如Nuclear组件化可以做到,大家叫同构)…
怎么做到这么强大的优势,来回忆下以前见过的坑,或者现有项目里的坑。
CSS层叠样式?保佑不要污染别的HTML!
在web前端,一般一个组件必须要有骨架HTML和装饰的CSS以及JS逻辑。而CSS要是可以是局部作用域那就再好不过了!就不用写长长的前缀了,浪费带宽不说,而且费劲。
如
.ui-popup-arrow-xx-xxxxx-xxxx-container{ |
这回够长了吧,不会污染别的HTML了吧。真的太长了,没有办法,因为CSS不是局部的,怕污染其他的HTML,规划好长长的namespace、module是以前的最佳实践。
怎么优雅绑定事件?只能定义在window下?
如果HTML绑定的事件是局部作用域那就再好不过了!我真的见过模版代码里出现下面的代码:
<div onclick="xxx()"></div> |
然后在js里找到了下面的代码:
<script> window.xxx=function(){ </script> |
要绑定的事件一多,得污染多少全局变量啊。所以还有的工程师这么干:
<div onclick="ns.xxx()"></div> <div onclick="ns.xxxx()"></div> |
然后在js里找到了下面的代码:
<script> window.ns={}; ns.xx=function(){ ns.xxx=function(){ </script> |
这里貌似比不设定namespace好很多,但是还是妥协的结果。一般希望能封装成组件,组件的HTML里绑定的事件就是组件内定义的事件,内聚内聚!!
通过js动态绑定事件的坏处我以前专门写了一篇文章来阐述,主要是lazy bind会导致用户看到了页面,但是页面确无法响应用户的交互,这里不再阐述。
需求变更?找不到在哪改代码?
大型项目如游戏什么的为啥都是面向对象式的写法?如果一个组件刚好又能是一个Class那就再好不过,Class base可以更方便地抽象现实世界的物体及其属性或者逻辑算法,所以甚至有些编程语言都是面向对象的(这里逆向逻辑),如JAVA、C#…整体过程式的代码对于大型项目几乎没法维护(如基于jQuery就能容易写出整体都是过程式的组织结构),整体OO,局部过程式是可以接受的。
组件需要嵌套?只能复制粘贴原组件?
扁平无嵌套组件还是比较简单,对模板的字符串处理下,把绑定的事件全指向组件自身定义的方法,生命周期也好处理。在真正的业务里经常需要组件嵌套,这样也更利于复用。虽然大量模板引擎支持引用子模板、共享数据等,但是组件是有生命周期的,模板嵌套不能真正解决组件嵌套的问题。能支持组件嵌套并且声明式嵌套就那就再好不过了!
数据变了?重新生成HTML替换一下?
怎么替换?先查找dom?什么?你还在查找dom?你还在背诵CSS选择器?替换一下?不能增量更新吗?或者diff一下吧?不要每次全部替换啊!
首屏太慢?以前抽象的组件没法复用?
什么?首屏太慢?改成直出(服务器渲染)?以前代码没法复用?要推翻重写?什么?怎么搞?排期?产品不给排期?需求没变为什么要给排期?
下面来看下Nuclear怎么解决上面问题。
install Nuclear
npm install alloynuclear |
Hello,Nuclear!
varHelloNuclear=Nuclear.create({ render:function(){ return'<div>Hello , {{name}} !</div>'; newHelloNuclear({name:"Nuclear"},"body"); |
内置了mustache.js无逻辑模板。
varEventDemo=Nuclear.create({ clickHandler:function(evt,target,other1,other2){ //MouseEvent {isTrusted: true, screenX: 51, screenY: 87, clientX: 51, clientY: 21…} console.log(evt); //<div onclick="Nuclear.instances[0].clickHandler(event,this,'otherParameter1','otherParameter2')">Click Me!</div> console.log(target); //otherParameter1 console.log(other1); //otherParameter2 console.log(other2); alert("Hello Nuclear!"); render:function(){ return'<div onclick="clickHandler(event,this,\'otherParameter1\',\'otherParameter2\')">Click Me!</div>' newEventDemo({seen:true},"body"); |
varConditionDemo=Nuclear.create({ render:function(){ return'{{#seen}}\ <div>\ you can see me\ </div>\ {{/seen}}\ {{^seen}}\ <div>\ yan can not see me\ </div>\ {{/seen}}' varcd=newConditionDemo({seen:true},"body"); setTimeout(function(){ cd.option.seen=false; },2000); |
2秒后改变seen,dom会自动变更。
varLoopDemo=Nuclear.create({ render:function(){ return'<ul>{{#list}}<li>姓名:{{name}} 年龄:{{age}}</li>{{/list}}</ul>' varld=newLoopDemo({ list:[ {name:"dntzhang",age:18}, {name:"vorshen",age:17} },"body"); setTimeout(function(){ ld.option.list.push({name:"lisi",age:38}); },1000); setTimeout(function(){ ld.option.list[0].age=19; },2000); setTimeout(function(){ ld.option.list.splice(0,1); },3000); |
Array的变更也能监听到,能够自动触发Dom的变更。
局部CSS
<body> <div>I'motherdiv!!mycolorisnotred!!</div> <script src="../dist/nuclear.js"></script> <script type="text/javascript"> varScopedCSSDemo=Nuclear.create({ clickHandler:function(){ alert("my color is red!"); render:function(){ return'<div onclick="clickHandler()">my color is red!</div>' style:function(){ return'div { cursor:pointer; color:red }'; //第三个参数true代表 增量(increment)到body里,而非替换(replace)body里的 newScopedCSSDemo({seen:true},"body",true); </script> </body> |
组件外的div不会被组件内的CSS污染。
讨厌反斜杠?
讨厌反斜杠可以使用 ES20XX template literals、或者split to js、css和html文件然后通过构建组装使用。也可以用template标签或者textare存放模板。
<template id="myTemplate"> <style> color:red; button { color:green; </style> <div> <div> <h3>TODO</h3> <ul>{{#items}}<li>{{.}}</li>{{/items}}</ul> <form onsubmit="add(event)"> <input nc-id="textBox"value="{{inputValue}}"type="text"> <button>Add#{{items.length}}</button> </form> </div> </div> </template> <script> varTodoApp=Nuclear.create({ install:function(){ this.todoTpl=document.querySelector("#myTemplate").innerHTML; add:function(evt){ evt.preventDefault(); this.inputValue=""; this.option.items.push(this.textBox.value); render:function(){ returnthis.todoTpl; newTodoApp({inputValue:"",items:[]},"body"); </script> |
<script> varTodoList=Nuclear.create({ render:function(){ return'<ul> {{#items}} <li>{{.}}</li> {{/items}}</ul>'; </script> <script> varTodoTitle=Nuclear.create({ render:function(){ return'<h3>{{title}}</h3>'; </script> <script> varTodoApp=Nuclear.create({ install:function(){ //pass options to children this.childrenOptions=[{title:"Todo"},{items:[]}]; this.length=0; add:function(evt){ evt.preventDefault(); //this.nulcearChildren[1].option.items.push(this.textBox.value); this.list.option.items.push(this.textBox.value); this.length=this.list.option.items.length; this.textBox.value=""; render:function(){ //or any_namespace.xx.xxx.TodoList 对应的 nc-constructor="any_namespace.xx.xxx.TodoList" return'<div>\ <child nc-constructor="TodoTitle"></child>\ <child nc-constructor="TodoList" nc-name="list"></child>\ <form onsubmit="add(event)" >\ <input nc-id="textBox" value="{{inputValue}}" type="text" />\ <button>Add #'+this.length+'</button>\ </form>\ </div>'; newTodoApp({inputValue:""},"body"); </script> |
通过在父对象的install里设置this.childrenOptions来把option传给子节点。
服务器端渲染
functiontodo(Nuclear,server){ varTodo=Nuclear.create({ add:function(evt){ evt.preventDefault(); this.option.items.push(this.textBox.value); render:function(){ return`<div> <h3>TODO</h3> <ul>{{#items}}<li>{{.}}</li> {{/items}}</ul> <form onsubmit="add(event)"> <input nc-id="textBox"type="text" value=""/> <button>Add#{{items.length}}</button> </form> </div>`; style:function(){ return`h3{color:red;} button{color:green;}`; server:server returnTodo; if(typeofmodule==="object"&&typeofmodule.exports==="object"){ module.exports= todo; }else{ this.todo=todo; |
通过第二个参数server来决定是服务器端渲染还是客户端渲染。server使用的代码也很简单:
varkoa=require('koa'); varserve=require('koa-static'); varrouter=require('koa-route'); varapp=koa(); varjsdom=require('jsdom'); varNuclear=require("alloynuclear")(jsdom.jsdom().defaultView); varTodo=require('./component/todo')(Nuclear,true); app.use(serve(__dirname+'/component')); app.use(router.get('/todos',function*(){ var str=require('fs').readFileSync(__dirname+'/view/index.html','utf8'); vartodo=newTodo({items:["Nuclear2","koa",'ejs']}); this.body=Nuclear.Tpl.render(str,{ todo: todo.HTML Nuclear.destroy(todo); app.listen(3000); |
浏览器端使用的代码:
<!DOCTYPEhtml> <html> <head> </head> <body> {{{todo}}} <script src="./nuclear.js"></script> <script src="./todo.js"></script> <script> newtodo(Nuclear)('body'); </script> </body> </html> |
这样,组件的代码不需要任何变更就可以在server和client同时使用。
Nuclear如何做到同构的?
内置三条管线如下所示:

比如一般前后端分离的开发方式,仅仅会走中间那条管线。而同构的管线如下所示:
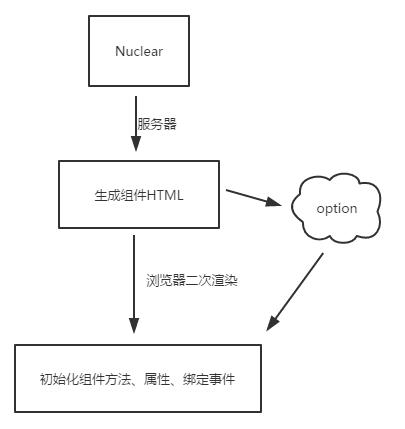
这里前后后端会共用option,所以不仅仅需要直出HTML,option也会一并支持给前端用来二次渲染初始一些东西。
Nuclear优势
1.节约流量
2.提升用户体验
3.加载更加灵活
4.Dom查找几乎绝迹
5.搭积木一样写页面
6.提升代码复用性
7.可插拔的模板引擎
8.Lazy CSS首屏更轻松
9.Nuclear文件大小6KB (gzip)
10.零行代码修改无缝切到同构直出
…
…
Nuclear Github
https://github.com/AlloyTeam/Nuclear
建议继续学习:
扫一扫订阅我的微信号:IT技术博客大学习
Recommend
About Joyk
Aggregate valuable and interesting links.
Joyk means Joy of geeK