

Make a Resume in LaTeX!
source link: https://drshika.me/2022/04/15/latex-resumes
Go to the source link to view the article. You can view the picture content, updated content and better typesetting reading experience. If the link is broken, please click the button below to view the snapshot at that time.

Make a Resume in LaTeX!Skip to the content.
Make a Resume in LaTeX!
Apr 15th, 2022
Prerequisites
This tutorial assumes you either have (1) a text editor where you can edit LaTeX and the corresponding TeX distribution for your OS to compile it into a PDF or (2) access to a site where you can edit and compile LaTeX. Additionally, you should have some basic knowledge of LaTeX syntax. If this is your first time with LaTeX, I highly recommend trying these tutorials to get familiar with how it works: link
This tutorial will not cover how to write an effective resume. Try to have your resume content prepared, so you can follow along with the tutorial. A good starting point is this guide for writing a good resume by a Technical Recruiter at Tesla: link
Introduction
Creating and updating a resume can be difficult. There are many word processing software options to choose from, like Microsoft Word and Google Docs. It’s very hard to find a good template and make adjustments some combination of the margins, font size, and line spacing to get all the resume content to fit the page just right. Keeping track of multiple versions of your resume is difficult and redundant.
LaTeX is an excellent solution to all of these problems! LaTeX is used as a professional typesetting system that is free to use and runs on any system or even online with Overleaf and works great to typeset your resume.
Tutorial Goals
This tutorial will teach you how to make this resume [overleaf link here]. You will learn about creating sections and subsections, overwriting commands, and making custom environments in LaTeX. You can clone the project on Overleaf or follow the instructions in this guide from a blank file.

Vocabulary
Some keywords I will be using in this guide are:
- Macro = a shortcut that that runs some predefined lines of code.
- Environment = perform an action or set of actions on a block of content (delimited by begin and end statements).
- Commands/Control Sequences = macros defined by your kernel.
- Package = a set of macros/commands defined by an author that you can import into your project to use (analogous to libraries for programming languages)
Why LaTeX?
- Separates content from formatting/styling
Many users find it frustrating to edit resume contents in Microsoft Word or Google Docs because they have to worry about the formatting whenever they try to add or remove entries from any sections on the resume. Instead of worrying about styling each entry on the resume individually, you can automate the styling part for the entries in one section and focus on your content. In LaTeX, the content is separated from the styling/formatting. This separation allows you to write without worrying about the page’s aesthetics.
- Modular
Since LaTeX is a programming language, you can easily customize your resume for different positions by commenting and uncommenting. This technique is a massive advantage if you’re trying to apply for two or more types of jobs (like Software Engineering and Product Management). You want your resume to highlight different experiences for each. Alternatively, if you are typesetting your CV and resume in the same project, you can write one thing in your content file and then configure two LaTeX templates to make your CV and Resume.
- Version Control
Since LaTeX is plaintext, you can use any version control system (like Git) to keep track of the different versions you have created and quickly revert to an older version. Additionally, it’s easy to share your resume with others using Overleaf or GitHub.
- Formatting
You can download packages to do nearly any type of complex formatting in LaTeX. If you need glyphs or special characters for any reason, LaTeX is perfect for this. Additionally, there are many preexisting document templates that you can fork, modify, and adapt to for your needs.
- FOSS
LaTeX is Free and Open Source Software (FOSS), which means the source code is publicly available. Additionally, this software has existed since the 80s, so it’s unlikely that a document you make now using LaTeX will be incompatible with the language in the future. It’s also easily converted to nearly any format like PDF, HTML, Markdown, or any other format (see Pandoc: https://pandoc.org/)
There are some drawbacks to making your resume in LaTeX, like the learning curve, but you can quickly remedy this issue by learning using this tutorial.
While making your own resume, you might also hear things about TeX, KaTeX, or MathJaX, so here’s this diagram to help simplify your understanding. They both use LaTeX syntax but are limited in scope
LaTeX is a collection of helpful TeX macros that run some TeX commands to format your document. TeX allows you to write custom commands, functions, and macros to help speed up your publishing process. In addition, LaTeX will enable you to add extra packages for specific typesetting purposes like custom fonts, tables, math symbols, and nice link formatting.
You can also download some fun packages: one for making sheet music, sudoku creators/solvers, coffee-stain makers, and so much more.

Setup
I highly recommend following along with this tutorial in Overleaf [https://www.overleaf.com/project] since it allows you to share LaTeX files with other people, and they can make comments on your document to offer feedback. Overleaf works on Chrome/Chromium Browsers/Firefox and mobile devices (like tablets) with most functionality.
I wrote this tutorial using Overleaf. However, you are welcome to follow along using any text editor and tex distribution of your choice if you are more comfortable and familiar with that. See https://www.latex-project.org/get/ for download links for your operating system.
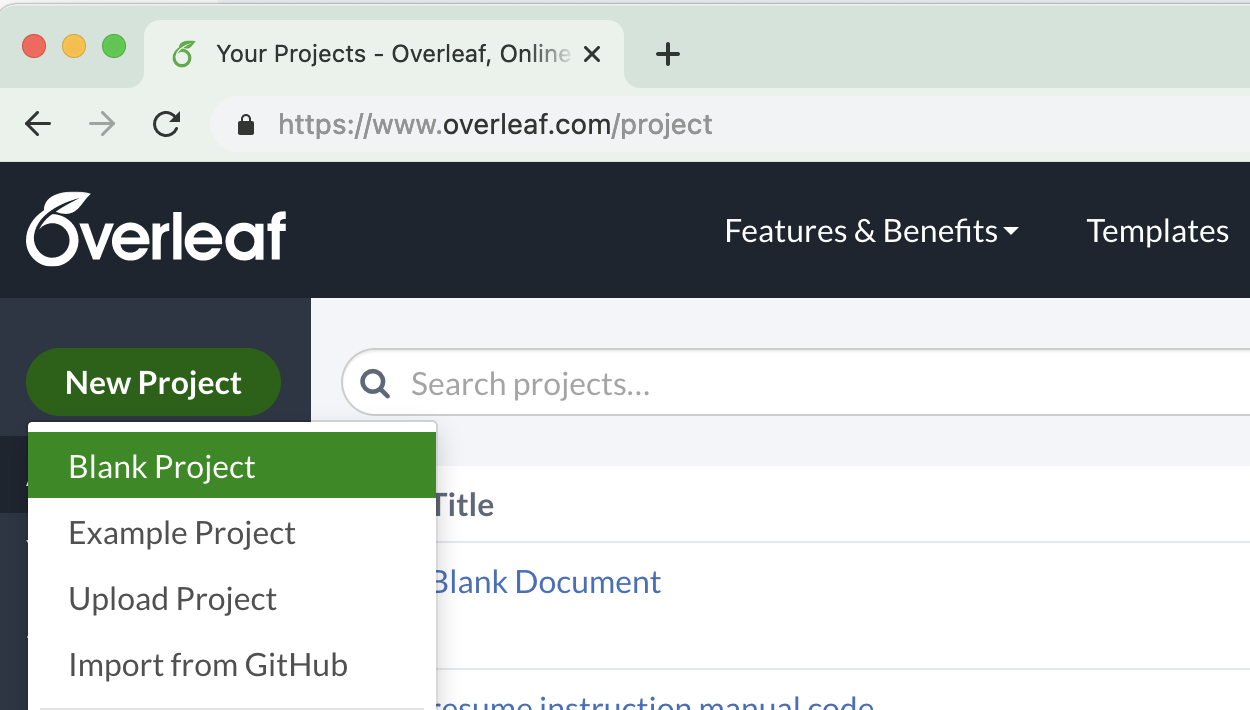
If you choose to use Overleaf, here are the steps you must follow.
-
Navigate to the ‘Projects’ page

-
Click on the ‘Blank Project’ option under ‘New Project’
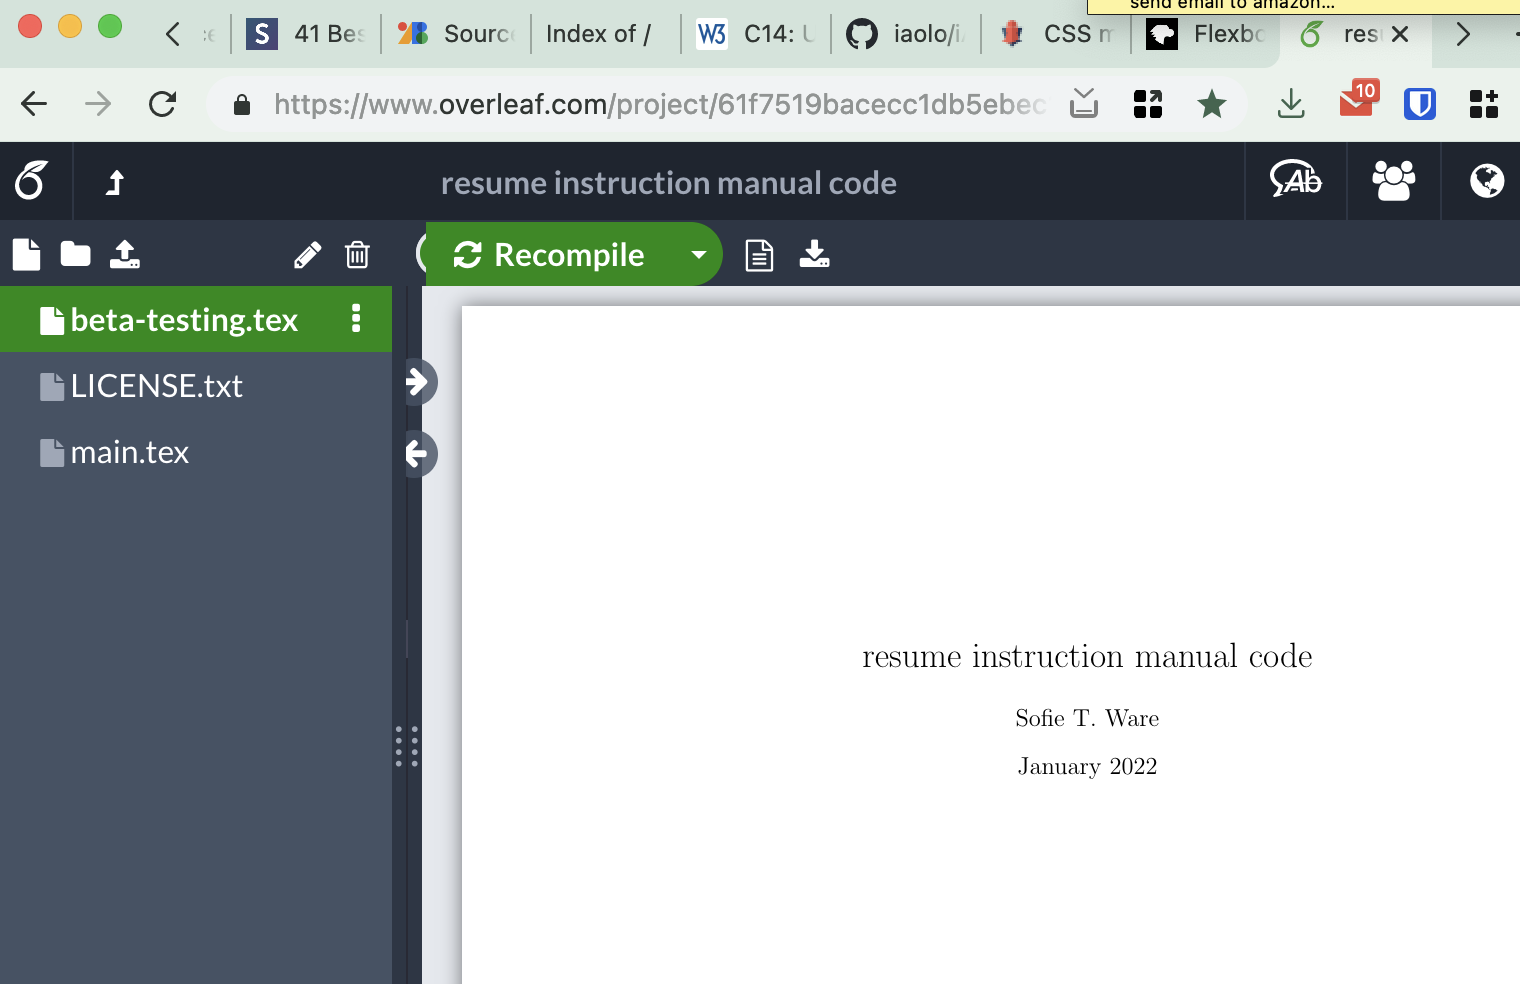
-
Hit
Recompileto render the project in the pane to the right. Done! Your project should look something like this.
Step 1: Add your Content
First, let’s start by creating a basic document in LaTeX. If you are using Overleaf and followed the setup instructions from above, you should get this:
\documentclass{article}
    \usepackage[utf8]{inputenc}
    \usepackage{titlesec}

    \title{resume instruction manual code}
    \author{Sofie T. Ware}
    \date{January 2022}

\end{document}
The code below is just what Overleaf gives you when you create a new document, so don’t worry if you don’t understand what it means just yet.
If you are not using Overleaf, here are the steps you must follow: Use the article class for your document. Use the package titlesec to generate a title for your article. Fill in the appropriate values for the \title \author and \date macros. Make sure to add the \end{document} tag to close the document environment.
You don’t need to worry about what you have in the title field since you will be overwriting the class definition in later steps.
Hit the Recompile button to render your changes. You must do this to update the preview any time you have made changes to the document.
Here’s what that looks like
The next things you would want to include on your resume might be education or the cool projects you have built! Let’s add that after our date field. Use the \section{} command to make a new section and \subsection{} and \subsubsection{} for creating sub headings underneath that. Fill these sections in with the information you want under each section. Here’s an example of what you should end up with for one section from my demo resume:
\section{Skills}
    \subsection{Technical Skills}
    Java, Python, Rust, Haskell
        \subsection{Tools}
        \LaTeX
    \subsubsection{Soft Skills}
    Making squishy brownies
Once you’re satisfied with everything here, you can move on to the next step, which is styling. Here’s what the code looks like once you’re done with the first part.
% the stuff above this is the '\usepackage{}' commands
\begin{document}

\maketitle

\section{Education}
\subsection{UIUC}
    \textbf{Coursework:} Computer Science I, Computer Science II, Computer Science III, Ethics for Computer Science \\
    \textbf{Awards:} Professional paper towel Juggler of the year 2020

\section{Experience}
\subsection{A Company}
    \textbf{November 2018 - Present}
    \textit{Business Analyst}
    \item I was responsible for writing user stories for ROA Template, testing user stories, gathering and analysing data.
    \item I also created a wireframe for a feature that will be added on BT Panorama and designed a landing page for both investors and advisers.
    \item Aside from my responsibilities as a Business Analyst, I also led a team of interns in making a strategy to understand and resolve the problem underlying the BT Panorama.

\subsection{B Company}
    \textbf{November 2008 - 2018}
    \textit{Business Analyst}
    \item I was responsible for writing user stories for ROA Template, testing user stories, gathering and analysing data.
    \item I also created a wireframe for a feature that will be added on BT Panorama and designed a landing page for both investors and advisers.
    \item Aside from my responsibilities as a Business Analyst, I also led a team of interns in making a strategy to understand and resolve the problem underlying the BT Panorama.

\section{Leadership}
\subsection{ACM @ UIUC}
    \textbf{November 2018 - Present}
    \textit{President}

        I basically was the supreme ruler of the largest student run chapter of ACM at UIUC.

\subsection{UIUC Ducky}
    \textbf{November 2020- Present}
    \textit{President}

            Spearheaded a inititative to give debugging ducks to everyone at UIUC.
\section{Publications}
\subsection{Deconstructing smell based socia media}
    \textbf{Oct 2019}
    \textit{ACM CSCW}

    This paper takes a systematic approach for characterizing phermonic based social media platforms and introduces a framework to classify affordances in platform design.

\section{Skills}
\subsubsection
    {Technical Skills}
    Java, Python, Rust, Haskell

    \vspace{-1.5em}

\subsubsection
    {Soft Skills}
    Making squishy brownies

\end{document}
Your code should render like this:

Step 2: Defining Sections and Styling
We’re going to start by modifying how sections appear. Add the following line below your document class declaration:
You want to override the behavior of the \section tag. Use the \titleformat{} command and pass the \section command as a parameter. The \titleformat{} command takes four parameters, of which the third one is mandatory.
Make the text bold and larger using the \huge size and the \bfseries macro. Then, set the spacing to be 0em in the third parameter. Finally, add a line beneath the heading by appending the [\titlerule] selector after the brackets for the last parameter.
The final code snippets look like this:
% The line above this is:
\usepackage{titlesec}
    \titleformat{\section}
    {\huge\bfseries} % purple = primary styling
    {} % blue = leading text
    {0em} % red = space before the section heading
    {} %green = any functions to apply
    [\titlerule] %yellow = formatting below the section heading

A diagram explaining what each of the parameters in the \titleformat{} do.
Now apply the same styling to the subsection and subsubsection titles. It would make logical sense to make each sub heading a size smaller. Change the size of the subsection to be large using the \Large macro and bold it using \bfseries. Bold the subsubsection with \bfseries. Here’s what the final code snippets look like.
\titleformat{\subsection}{\bfseries\Large}{}{0em}{}
\titleformat{\subsubsection}[runin]{\bfseries}{}{0em}{}
Optionally, add the [runin] modifier to the subsubsection category. I decided to use this since I wanted the body of the subsubsection to be inline with the heading. In the demo resume, you can use that this styling was used in the skills subsection.
2.1 Page Layout Setup
Now let’s set the page layout. Since I live in the US, I decided to set the page size to be letter and the margins to be 1” since that’s standard here. You can change the margins or page size (like A4) based on what the standards are in your country. To do this you have to use a package called geometry, so import it with the \usepackage{} command. Then, set the options for page size and margins. Here’s what the final code snippet looks like:
\usepackage{geometry} % add this where your other package declarations are
% this can go right below the package declarations
\geometry{
         letterpaper,
         left=1in,
         top=1in,
    }
Now it’s so much nicer! Our content has some room to breathe.
2.2 Title Setup
Next, you need to set up the title properly since it’s currently just the document title and the date. You have to use the titling package to use \theauthor in places other than the beginning of the document.
Import the titling package and use the \renewcommand command to override the default behavior of \maketitle. Center align the title using the center environment. In the first line, add your name using the \theauthor macro. Make your name bigger and bold using the \huge and \bfseries commands. Optionally, add some white space following your name.
Here’s what the final code snippet looks like:
\usepackage{titling} % add this where your other package declarations are

% This replaces the following ---------
% \title{resume instruction manual code}
% \author{Sofie T. Ware}
% \date{January 2022}
%--------------------------------------

\renewcommand{\maketitle} {
    \begin{center} % environment to center the enclosed items
    {\huge\bfseries\theauthor} % add large, bolded author name
    \vspace{.25em} % add some vertical space/padding below the name
    \end{center}
}
Another thing that could be nice to include would be your email and GitHub link below your name. Import the hyperref package into your document (make sure that this is the last import). Add hyperlinks below your name using the \href{}{} command.
\renewcommand{\maketitle} {
    \begin{center}
    {\huge\bfseries\theauthor}
    [email protected] |
    \href{github.com/sofie}{https://github.com} |
    \href{www.linkedin.com}{linkedin.com/in/sofie}
    \vspace{.25em}
    \end{center}
}
The hyperlinks currently look pretty boring; I can’t even tell that you can click on them right now! Let’s fix that by changing some of the styling. Use the \hypersetyp{} command to change the linkcolor to be blue, urlcolor to be cyan, set colorlinks to be true and make the pdfpagemode to be fullscreen.
Here’s what the final code snippet should look like:
\usepackage{hyperref}
% this can go right below the package declarations
\hypersetup{
        colorlinks=true,
        linkcolor=blue,
        urlcolor=cyan,
        pdfpagemode=FullScreen,
    }
To summarize, here’s what you just added:
\usepackage{titlesec} % Makes a section for the title
\usepackage{titling} % Allows you to format the title
\usepackage{geometry} % Allows us to modify page setup
\usepackage{hyperref} % Required for hyperlinks

%-------------------------------------------------------------------------------
%   PAGE FORMATTING
%-------------------------------------------------------------------------------
\geometry{ % Page layout setup
         letterpaper,
         left=.5in,
         top=.5in,
         bottom=.5in,
         right=.5in
    }

\hypersetup{ % Hyperlink layout setup
    colorlinks=true,
    linkcolor=blue,
    urlcolor=cyan,
    pdfpagemode=FullScreen,
}

\titleformat{\section}{\huge\bfseries}{}{0em}{}[\titlerule] % Sections have largest text and underline
\titleformat{\subsection}{\bfseries\Large}{}{0em}{} % Subsections are bolded and large
\titleformat{\subsubsection}[runin]{\bfseries}{}{0em}{} % Subsubsections are appended to the end of subsections

%-------------------------------------------------------------------------------
%   TITLE FORMATTING
%-------------------------------------------------------------------------------

\author{Sofie T. Ware} % Change this to your name

\renewcommand{\maketitle}{
        \begin{center}
            {\huge\bfseries\theauthor} \\ % Renders your name
            [email protected] | % Email
            \href{https://github.com}{github.com/sofie} % Github URL
            | \href{www.linkedin.com}{linkedin.com/in/sofie} % Linkedin URL
        \end{center}
        \vspace{-1.5em} % Add some whitespace
    }
And here’s our progress so far:

This on it’s own isn’t a bad resume… but you can make it better!
Step 3: Modularization with Environments
Now this is where it starts getting fancy! Environments in LaTeX allow you to define a certain set of macros on the elements inside all at once. Think of it like a div in HTML. If you set the color=green; in a div, it applies to all of the HTML elements inside. You can initialize a text block in an environment using the \begin{}command.
3.1 Introduction to Environments
\begin{center} is an example of a environment that we talked about earlier. You will now define your own environment that allows you to generate nicely formatted resume entries. To demonstrate how Environments work, here’s a quick example that you can follow along with (but is not on the resume itself).
- To define our new environment, use the
\newenvironment{}command. This example creates a centered text box. So I created two more environments inside this boxed environment that center the text:\begin{center}and put the text in a box:\begin{tabular}.
\newenvironment{boxed}
    {\begin{center}
       \begin{tabular}{|p{0.9\textwidth}|}
       \hline\\ % creates a horizontal line spanning the entire document
    }
    {
        \\\\\hline
        \end{tabular}
        \end{center}
    }
Then you can call our environment in the document to see how it renders! Use the \begin{boxed} command to begin the boxed syntax.
\begin{boxed}
    This is the text formatted by the boxed environment
\end{boxed}
Here’s a visual overview of what you just did:
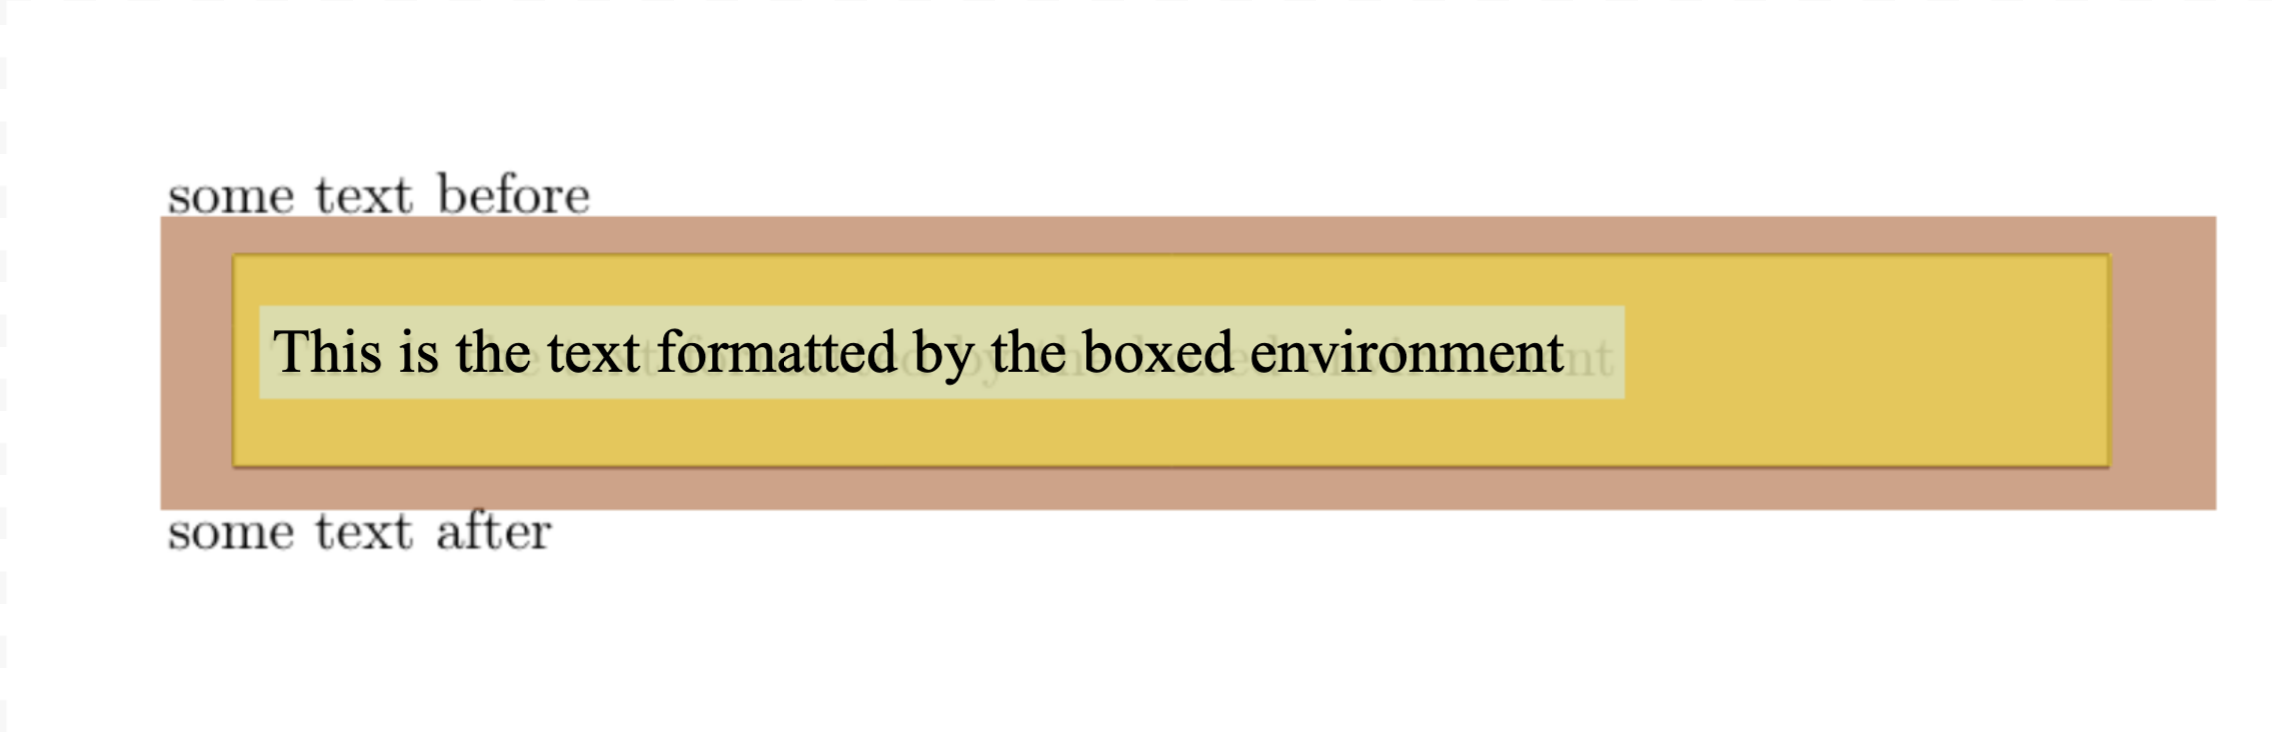
You first created the centered environment [red box], then the tabular environment [yellow box], and finally, our text is in the center [blue box].
-
You can also define an environment with parameters and designate one to be optional. In the context of this tutorial, this could be useful when you want to make the location of one of your resume entries optional to include. So the final syntax would look like this:
\newenvironment{<name>}{<begin code>}{<end code>}This defines an environment with no parameters.
\newenvironment{<name>}[<number>][<default>]This defines an environment with
<number>of parameters of which<default>is the value to set for all uninitialized parameters.If you want to make more parameters optional, you have to use an additional package like enumitem. Also, see this stack overflow article for further reading.
 \newenvironment{boxed}[1]
     {\begin{center}
     #1\\[1ex]
     \begin{tabular}{|p{0.9\textwidth}|}
     \hline\\
     }
     {
     \\\\\hline
     \end{tabular}
     \end{center}
     }
Then, when you go to use the
boxedenvironment, the parameter for the title will show up in the center above the box.\begin{boxed}{Title of the Box} This is the text formatted by the boxed environment \end{boxed}
3.2 Creating the Resume Subsection Environment
Now that you know how to create an environment, let’s define a custom environment for a resume entry.
First, let’s make a list of the attributes in a resume entry. For example, you have the title, position name, dates, and location. So you know that you have to create an environment with four parameters. For this example, let’s make the location parameter optional.
Finally, you need to decide on a name for this environment. I went with rSubsection for resume subsection, but you could call it anything as long as the name is not already used for a standard environment or command. Initialize it using the \newenvironment command as detailed above.
\newenvironment{rSubsection}[4]{}
The first two things you need to display is the name and duration of the position like this:
Google May-August 2020
To display each passed parameter, use the #1 symbol where the 1 is the number of the parameter (1 = first parameter, 2 = second parameter, 3 = third parameter so on). Add some flexible horizontal space between the name and the dates using the \hfill macro.
{\bf #1} \hfill {#2}
I’m also choosing to bold the company name using \bf to help differentiate it from the position that will go below. Add a newline with \\ , and then you can move on to the second line, which looks like this:
Software Engineering Intern **** Mountain view, CA
Since the location parameter is optional, you need to handle the case that it is not passed using the \ifthenelse command. If the compiler is not provided with variable #4, print variable #3. Otherwise, print both #3 and #4. Optionally, use \em to italicize the position name and location.
 \ifthenelse{\equal{#3}{}}{}{
      \\
      {\em #3} \hfill {\em #4}
 }
If you want the entries on your resume to be in bullet points, you have to create a list environment. For the bullet points, I used the $\cdot$ command. I added some optional styling to the left margin, separation between list items, and some vertical space so that each resume entry has some breathing room. You are welcome to take this code and adapt it to your purpose and space needs:
\begin{list}{$\cdot$}{\leftmargin=0em}
       \itemsep -0.5em \vspace{-0.5em}
      }{
      \end{list}
Here’s the final code snippet (I added some comments for readability):
%-----------------------------------------------------------------------------
% SECTION FORMATTING
%-----------------------------------------------------------------------------

\newenvironment{rSubsection}[4]{ % 4 input arguments - company name, year(s) employed, job title and location
 {\bf #1} \hfill {#2} % Bold company name and date on the right
 \ifthenelse{\equal{#3}{}}{}{ % If the third argument is not specified, don't print the job title and location line
  \\
  {\em #3} \hfill {\em #4} % Italic job title and location
  }
  \begin{list}{$\cdot$}{\leftmargin=0em} % \cdot used for bullets, no indentation
   \itemsep -0.5em \vspace{-0.5em} % Compress items in list together for aesthetics
  }{
  \end{list}
  \vspace{0.5em} % Some space after the list of bullet points
}

\begin{document}
Now, add the following packages to the top of your file to allow what you just wrote to work:
\usepackage{ifthen}— Required for\ifthenelsestatements\usepackage[parfill]{parskip}— Removes indent on new paragraphs\pagestyle{empty}— Suppresses page numbers
Now that you have finally finished defining your environment, you can start using it! Here is an example job experience that demonstrates how easy it is to input your information. LaTeX takes care of all the heavy formatting work for you.
\begin{rSubsection}{Westpac - BT Financials}{November 2018 - Present}{Business Analyst}{Barangaroo, Sydney}
\item I was responsible for writing user stories for ROA Template, testing user stories, gathering and analysing data.
\item I also created a wireframe for a feature that will be added on BT Panorama and designed a landing page for both investors and advisers.
\item Aside from my responsibilities as a Business Analyst, I also led a team of interns in making a strategy to understand and resolve the problem underlying the BT Panorama.
\end{rSubsection}
Result:

Step 4: Macros
Now, let’s make some macros to simplify parts of our resume that you are typing a lot. For example, Sofie goes to UIUC, and she doesn’t want to have to type out University of Illinois at Urbana-Champaign or Champaign, IL every time. Also, Sofie collaborates very often with Harsh on school projects. So, let’s add a macro to link to his GitHub every time she mentions him. You can make this easier by creating some macros.
Initialize a new macro using \newcommand{}{} and set the first argument to be the name of your macro. Set the second argument to be the expanded text that you want the macro to generate. Your final macros should look like this:
% section formatting from previous step goes here

\newcommand{\uiuc}{University of Illinois at Urbana-Champaign}
\newcommand{\loc}{Champaign, IL}
\newcommand{\harsh}{github.com/harsh183}

\begin{document}
Now to use this in our code, you can type out the macro \uiuc wherever you want the compiler to spit out University of Illinois at Urbana-Champaign
\section{Education}
    \begin{rSubsection}
        {\uiuc}{August 2020 - May 2024}{BS Computer Science}{\loc}
        \textbf{Coursework:} Computer Science I, Computer Science II, Computer Science III, Ethics for Computer Science \\
        \textbf{Awards:} Professional paper towel Juggler of the year (2020)
    \end{rSubsection}
Here’s an example of the Macros being used in the Education subsection.
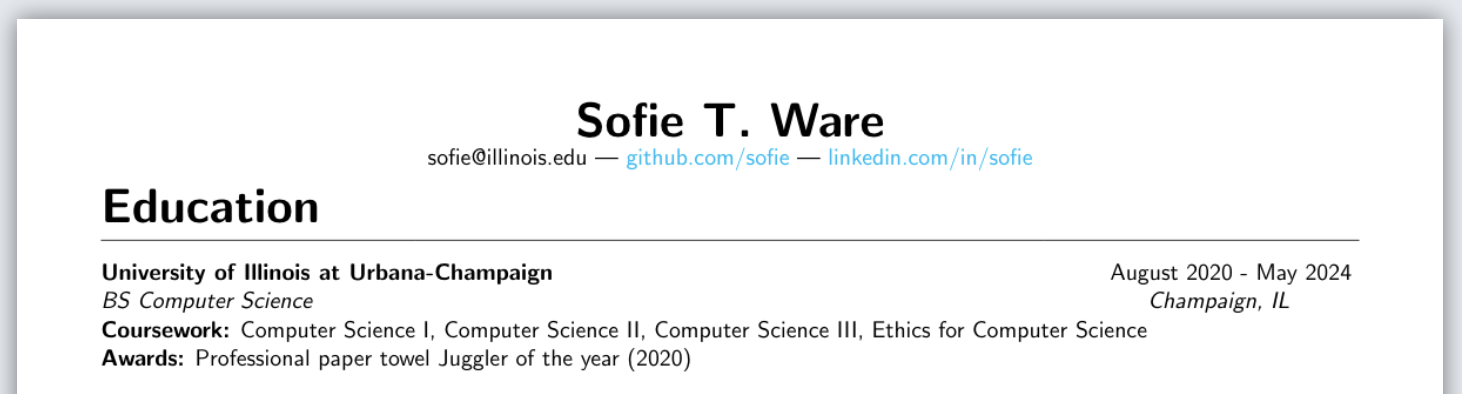
It looks pretty much the same in the preview, but it’s just so much quicker for you to type now!
Finished product
Congratulations, you just made an amazing resume using LaTeX! This tutorial has introduced you to some of the fundamentals of LaTeX for document-making and helped you build your resume. Best of luck on your job search!
References / Additional Reading
Here are some sites that I used as inspiration/background information while making this guide. Feel free to use it as you develop your resume further.
Made with lots of <3 by Drshika Asher
Recommend
About Joyk
Aggregate valuable and interesting links.
Joyk means Joy of geeK