

使用 Java 21 Vanilla构建 PostgreSQL Wire 协议服务器
source link: https://www.jdon.com/64517.html
Go to the source link to view the article. You can view the picture content, updated content and better typesetting reading experience. If the link is broken, please click the button below to view the snapshot at that time.

使用 Java 21 Vanilla构建 PostgreSQL Wire 协议服务器
使用现代Java 21 Vanilla构建PostgreSQL Wire协议服务器 这是一个教程,旨在显示如何用途:
- - PostgreSQL Wire
- 显示自 JDK 17 以来的大部分新功能的实际示例,包括:
- 记录 (JEP 395)
- 密封型 (JEP 360/JEP 409)
- 开关模式匹配 (JEP 406)
- 虚拟线程又名 Project Loom (JEP 425)
- Foreign-Function & Memory API (FMM) 又名 Project Panama (JEP 424)(同时给出java.nio'sAsynchronousChannelGroup和'的实际例子,AsynchronousServerSocketChannel网上例子很少)
PostgreSQL Wire 协议简介
PostgreSQL 有线协议是一种二进制协议,用于在 PostgreSQL 客户端和服务器之间进行通信。
该协议记录在PostgreSQL 协议文档中。
在我看来,这份文件并不是最容易理解的。如果您想了解有关该协议的更多信息,我推荐以下演示文稿:
我们今天关心的,主要是以下几条信息:
- Postgres 客户端向服务器发送两种类型的消息:启动消息和命令
- 可选地,启动消息之前可以有SSL 协商消息,其中客户端询问服务器是否支持 SSL
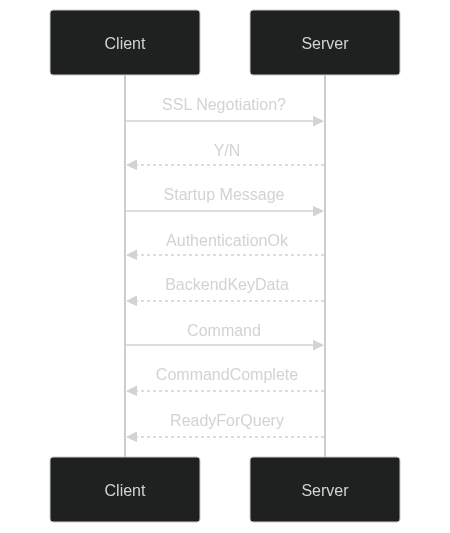
命令有很多种,但今天我们只关注Query命令,它用于执行SQL 查询。
我们将从实现一个基本java.nio.channels.AsynchronousServerSocketChannel服务器开始,它将接受连接并打印出它收到的消息:
步骤 1.1 - 初始服务器框架
下面是我们服务器的初始框架。
- 我们创建一个java.nio.channels.AsynchronousServerSocketChannel并将其绑定到localhost默认的 Postgres 端口 ( 5432)。
- 一个ExecutorService已创建,它将用于java.nio.channels.AsynchronousChannelGroup为我们的服务器创建一个。
- 我们使用该newVirtualThreadPerTaskExecutor方法,它将Virtual Thread为服务器线程池创建一个新的 Loom。
- 然后,我们接受连接并打印出我们收到的消息。
package postgres.wire.protocol;

import java.net.InetSocketAddress;
import java.nio.ByteBuffer;
import java.nio.channels.AsynchronousChannelGroup;
import java.nio.channels.AsynchronousServerSocketChannel;
import java.nio.channels.AsynchronousSocketChannel;
import java.nio.channels.CompletionHandler;
import java.util.concurrent.ExecutorService;
import java.util.concurrent.Executors;
import java.util.concurrent.Future;

class AsynchronousSocketServer {
    private static final String HOST = "localhost";
    private static final int PORT = 5432;

    public static void main(String[] args) throws Exception {
        ExecutorService executor = Executors.newVirtualThreadPerTaskExecutor();
        AsynchronousChannelGroup group = AsynchronousChannelGroup.withThreadPool(executor);

        try (AsynchronousServerSocketChannel server = AsynchronousServerSocketChannel.open(group)) {
            server.bind(new InetSocketAddress(HOST, PORT));
            System.out.println("[SERVER] Listening on " + HOST + ":" + PORT);

            for (;;) {
                Future<AsynchronousSocketChannel> future = server.accept();
                AsynchronousSocketChannel client = future.get();
                System.out.println("[SERVER] Accepted connection from " + client.getRemoteAddress());
                ByteBuffer buffer = ByteBuffer.allocate(1024);
                client.read(buffer, buffer, new CompletionHandler<>() {
                    @Override
                    public void completed(Integer result, ByteBuffer attachment) {
                        attachment.flip();
                        if (result != -1) {
                            onMessageReceived(client, attachment);
                        }
                        attachment.clear();
                        client.read(attachment, attachment, this);
                    }

                    @Override
                    public void failed(Throwable exc, ByteBuffer attachment) {
                        System.err.println("[SERVER] Failed to read from client: " + exc);
                        exc.printStackTrace();
                    }
                });
            }
        }
    }

    private static void onMessageReceived(AsynchronousSocketChannel client, ByteBuffer buffer) {
        System.out.println("[SERVER] Received message from client: " + client);
        System.out.println("[SERVER] Buffer: " + buffer);
    }
}

class MainSimplest {
    public static void main(String[] args) throws Exception {
        AsynchronousSocketServer.main(args);
    }
}
|
如果我们启动它,我们应该看到:
Running Gradle on WSL... > Task :app:compileJava > Task :app:processResources NO-SOURCE Note: Some input files use preview features of Java SE 21. Note: Recompile with -Xlint:preview for details. > Task :app:classes > Task :app:MainSimplestWalkThrough.main() <p class="indent">[SERVER] Listening on localhost:5432 |
连接到服务器psql
现在,我们可以使用以下方式连接到我们的服务器psql:
$ psql -h localhost -p 5432 -U postgres |
我们应该psql在提示符处看到挂起,服务器应该打印出以下内容:
[SERVER] Accepted connection from /127.0.0.1:41826 <p class="indent">[SERVER] Received message from client: sun.nio.ch.UnixAsynchronousSocketChannelImpl[connected local=/127.0.0.1:5432 remote=/127.0.0.1:41826] <p class="indent">[SERVER] Buffer: java.nio.HeapByteBuffer[pos=0 lim=8 cap=1024] |
我们现在可以接收来自客户端的消息。
步骤 1.2 - 响应 SSL 协商消息和启动消息
我们想要做的只是确保我们能够从客户端接收消息,并响应:
- 带'N'字节的初始 SSL 协商消息(表示否)
- 带有AuthenticationOk消息的 Startup Message
最后,我们会写一个:
- BackendKeyData消息,用于标识与客户端的连接
- ReadyForQuery消息,表示服务器已准备好接受命令。
以下是更新后的代码:
private static void onMessageReceived(AsynchronousSocketChannel client, ByteBuffer buffer) {
        System.out.println("[SERVER] Received message from client: " + client);
        System.out.println("[SERVER] Buffer: " + buffer);

        // First, write 'N' for SSL negotiation
        ByteBuffer response = ByteBuffer.allocate(1);
        response.put((byte) 'N');
        response.flip();
        Future<Integer> writeResult = client.write(response);

        // Then, write AuthenticationOk
        ByteBuffer authOk = ByteBuffer.allocate(9);
        authOk.put((byte) 'R'); // 'R' for AuthenticationOk
        authOk.putInt(8); // Length
        authOk.putInt(0); // AuthenticationOk
        authOk.flip();
        writeResult = client.write(authOk);

        // Then, write BackendKeyData
        ByteBuffer backendKeyData = ByteBuffer.allocate(17);
        backendKeyData.put((byte) 'K'); // Message type
        backendKeyData.putInt(12); // Message length
        backendKeyData.putInt(1234); // Process ID
        backendKeyData.putInt(5678); // Secret key
        backendKeyData.flip();
        writeResult = client.write(backendKeyData);

        // Then, write ReadyForQuery
        ByteBuffer readyForQuery = ByteBuffer.allocate(6);
        readyForQuery.put((byte) 'Z'); // 'Z' for ReadyForQuery
        readyForQuery.putInt(5); // Length
        readyForQuery.put((byte) 'I'); // Transaction status indicator, 'I' for idle
        readyForQuery.flip();
        writeResult = client.write(readyForQuery);

        try {
            writeResult.get();
        } catch (Exception e) {
            System.err.println("[SERVER] Failed to write to client: " + e);
        }
    }
|
从现在开始,能够可视化我们正在发送和接收的消息将很有用。
您可以使用一些工具来执行此操作:
我推荐使用 Wireshark 的 GUI,它最容易使用。对于本教程,我将使用pgs-debug, 有两个原因:
- Wireshark 不适用于 WSL
- 我希望能够将 ASCII 输出粘贴到教程中
注意:如果你想要一个关于如何使用 Wireshark 捕获 Postgres 流量的视频教程,我在我的pgprotoktrepo 上有一个简短的演示:
要使用 捕获输出pgs-debug,我将使用以下命令:
# Capture on loopback interface $ sudo pgs-debug --interface lo |
如果我们启动服务器并连接psql,我们应该看到以下内容:
- psql客户端:
[user@MSI ~]$ psql -h localhost -p 5432 -U postgres psql (15.0, server 0.0.0) WARNING: psql major version 15, server major version 0.0. Some psql features might not work. Type "help" for help. postgres=> |
- pgs-debug输出:
[user@MSI ~]$ sudo pgs-debug --interface lo Packet: t=1673886702.924458, session=213070643347544 PGSQL: type=SSLRequest, F -> B SSL REQUEST Packet: t=1673886702.928187, session=213070643347544 PGSQL: type=SSLAnswer, B -> F SSL BACKEND ANSWER: N Packet: t=1673886702.928222, session=213070643347544 PGSQL: type=StartupMessage, F -> B STARTUP MESSAGE version: 3 application_name=psql database=postgres client_encoding=UTF8 user=postgres Packet: t=1673886702.928318, session=213070643347544 PGSQL: type=AuthenticationOk, B -> F AUTHENTIFICATION REQUEST code=0 (SUCCESS) Packet: t=1673886702.970239, session=213070643347544 PGSQL: type=BackendKeyData, B -> F BACKEND KEY DATA pid=1234, key=5678 Packet: t=1673886702.970239, session=213070643347544 PGSQL: type=ReadyForQuery, B -> F READY FOR QUERY type=<IDLE> |
- 服务器输出:
[SERVER] Listening on localhost:5432 <p class="indent">[SERVER] Accepted connection from /127.0.0.1:47544 <p class="indent">[SERVER] Received message from client: sun.nio.ch.UnixAsynchronousSocketChannelImpl[connected local=/127.0.0.1:5432 remote=/127.0.0.1:47544] <p class="indent">[SERVER] Buffer: java.nio.HeapByteBuffer[pos=0 lim=8 cap=1024] <p class="indent">[SERVER] Received message from client: sun.nio.ch.UnixAsynchronousSocketChannelImpl[connected local=/127.0.0.1:5432 remote=/127.0.0.1:47544] <p class="indent">[SERVER] Buffer: java.nio.HeapByteBuffer[pos=0 lim=84 cap=1024] |
步骤 1.3 - 区分 SSL/身份验证请求和命令消息
我们需要能够区分 SSL 协商消息、身份验证请求和标准命令消息。
这样我们就可以将消息正确路由到适当的处理程序。否则我们将无法一次为多个客户提供服务。
为此,我们可以创建一些谓词助手来测试消息类型以确定它是 SSL 请求还是启动消息。
    static Predicate<ByteBuffer> isSSLRequest = (ByteBuffer b) -> {
        return b.get(4) == 0x04
                && b.get(5) == (byte) 0xd2
                && b.get(6) == 0x16
                && b.get(7) == 0x2f;
    };

    static Predicate<ByteBuffer> isStartupMessage = (ByteBuffer b) -> {
        return b.remaining() > 8
                && b.get(4) == 0x00
                && b.get(5) == 0x03 // Protocol version 3
                && b.get(6) == 0x00
                && b.get(7) == 0x00;
    };


    private static void onMessageReceived(AsynchronousSocketChannel client, ByteBuffer buffer) {
        System.out.println("[SERVER] Received message from client: " + client);
        System.out.println("[SERVER] Buffer: " + buffer);

        Future<Integer> writeResult = null;

        if (isSSLRequest.test(buffer)) {
            System.out.println("[SERVER] SSL Request");
            ByteBuffer sslResponse = ByteBuffer.allocate(1);
            sslResponse.put((byte) 'N');
            sslResponse.flip();
            writeResult = client.write(sslResponse);
        } else if (isStartupMessage.test(buffer)) {
            System.out.println("[SERVER] Startup Message");

            // Then, write AuthenticationOk
            ByteBuffer authOk = ByteBuffer.allocate(9);
            authOk.put((byte) 'R'); // 'R' for AuthenticationOk
            authOk.putInt(8); // Length
            authOk.putInt(0); // AuthenticationOk
            authOk.flip();
            writeResult = client.write(authOk);

            // Then, write BackendKeyData
            ByteBuffer backendKeyData = ByteBuffer.allocate(17);
            backendKeyData.put((byte) 'K'); // Message type
            backendKeyData.putInt(12); // Message length
            backendKeyData.putInt(1234); // Process ID
            backendKeyData.putInt(5678); // Secret key
            backendKeyData.flip();
            writeResult = client.write(backendKeyData);

            // Then, write ReadyForQuery
            ByteBuffer readyForQuery = ByteBuffer.allocate(6);
            readyForQuery.put((byte) 'Z'); // 'Z' for ReadyForQuery
            readyForQuery.putInt(5); // Length
            readyForQuery.put((byte) 'I'); // Transaction status indicator, 'I' for idle
            readyForQuery.flip();
            writeResult = client.write(readyForQuery);
        } else {
            System.out.println("[SERVER] Unknown message");
        }

        try {
            System.out.println("[SERVER] Write result: " + writeResult.get());
        } catch (Exception e) {
            System.err.println("[SERVER] Failed to write to client: " + e);
            e.printStackTrace();
        }
    }
|
如果我们重新启动并重新连接psql,我们现在应该看到:
[SERVER] Listening on localhost:5432 <p class="indent">[SERVER] Accepted connection from /127.0.0.1:35090 <p class="indent">[SERVER] Received message from client: sun.nio.ch.UnixAsynchronousSocketChannelImpl[connected local=/127.0.0.1:5432 remote=/127.0.0.1:35090] <p class="indent">[SERVER] Buffer: java.nio.HeapByteBuffer[pos=0 lim=8 cap=1024] <p class="indent">[SERVER] SSL Request <p class="indent">[SERVER] Write result: 1 <p class="indent">[SERVER] Received message from client: sun.nio.ch.UnixAsynchronousSocketChannelImpl[connected local=/127.0.0.1:5432 remote=/127.0.0.1:35090] <p class="indent">[SERVER] Buffer: java.nio.HeapByteBuffer[pos=0 lim=84 cap=1024] <p class="indent">[SERVER] Startup Message <p class="indent">[SERVER] Write result: 6 |
步骤 1.4 - 处理查询并返回数据行
现在,您可能一直在等待的那一刻。让我们处理一个查询并返回一些数据行。
在这种情况下,“处理”意味着我们将只返回一组硬编码的行,而不是实际查询数据库(抱歉让你失望了!)。我确实说过“没有图书馆” =(
为此,我们需要处理Query消息,然后发送RowDescription消息,然后是DataRow每一行的消息,最后是CommandComplete消息。
- 对于我们的RowDescription消息,我们将发送两列,名称为“id”和“name”
- 对于我们的DataRow消息,我们将发送两行,值 (1, "one") 和 (2, "two")
要完成循环,我们最后需要跟进一条ReadyForQuery消息。
这是协议中最复杂的部分,因此下面的注释代码有望帮助您理解发生了什么:
} else {
    System.out.println("[SERVER] Unknown message");
    // Let's assume it's a query message, and just send a simple response
    // First we send a RowDescription. We'll send two columns, with names "id" and "name"
    ByteBuffer rowDescription = ByteBuffer.allocate(51);
    rowDescription.put((byte) 'T'); // 'T' for RowDescription
    rowDescription.putInt(50); // Length
    rowDescription.putShort((short) 2); // Number of fields/columns
    // For each field/column:
    rowDescription.put("id".getBytes()).put((byte) 0); // Column name of column 1 (null-terminated)
    rowDescription.putInt(0); // Object ID of column 1
    rowDescription.putShort((short) 0); // Attribute number of column 1
    rowDescription.putInt(23); // Data type OID of column 1
    rowDescription.putShort((short) 4); // Data type size of column 1
    rowDescription.putInt(-1); // Type modifier of column 1
    rowDescription.putShort((short) 0); // Format code of column 1

    rowDescription.put("name".getBytes()).put((byte) 0); // Column name of column 2 (null-terminated)
    rowDescription.putInt(0); // Object ID of column 2
    rowDescription.putShort((short) 0); // Attribute number of column 2
    rowDescription.putInt(25); // Data type OID of column 2
    rowDescription.putShort((short) -1); // Data type size of column 2
    rowDescription.putInt(-1); // Type modifier of column 2
    rowDescription.putShort((short) 0); // Format code of column 2
    rowDescription.flip();
    writeResult = client.write(rowDescription);

    // Then we send a DataRow for each row. We'll send two rows, with values (1, "one") and (2, "two")
    ByteBuffer dataRow1 = ByteBuffer.allocate(19);
    dataRow1.put((byte) 'D'); // 'D' for DataRow
    dataRow1.putInt(18); // Length (4)
    dataRow1.putShort((short) 2); // Number of columns (5-6)
    dataRow1.putInt(1); // Length of column 1 (7-10)
    dataRow1.put((byte) '1'); // Value of column 1 (11-11)
    dataRow1.putInt(3); // Length of column 2 (12-15)
    dataRow1.put("one".getBytes()); // Value of column 2 (16-18)
    dataRow1.flip();
    writeResult = client.write(dataRow1);

    ByteBuffer dataRow2 = ByteBuffer.allocate(19);
    dataRow2.put((byte) 'D'); // 'D' for DataRow
    dataRow2.putInt(18); // Length
    dataRow2.putShort((short) 2); // Number of columns
    dataRow2.putInt(1); // Length of column 2
    dataRow2.put((byte) '2'); // Value of column 2
    dataRow2.putInt(3); // Length of column 2
    dataRow2.put("two".getBytes()); // Value of column 2
    dataRow2.flip();
    writeResult = client.write(dataRow2);

    // We send a CommandComplete
    ByteBuffer commandComplete = ByteBuffer.allocate(14);
    commandComplete.put((byte) 'C'); // 'C' for CommandComplete
    commandComplete.putInt(13); // Length
    commandComplete.put("SELECT 2".getBytes()); // Command tag
    commandComplete.put((byte) 0); // Null terminator
    commandComplete.flip();
    writeResult = client.write(commandComplete);

    // Finally, write ReadyForQuery
    ByteBuffer readyForQuery = ByteBuffer.allocate(6);
    readyForQuery.put((byte) 'Z'); // 'Z' for ReadyForQuery
    readyForQuery.putInt(5); // Length
    readyForQuery.put((byte) 'I'); // Transaction status indicator, 'I' for idle
    readyForQuery.flip();
    writeResult = client.write(readyForQuery);
}
|
如果我们运行它,我们应该看到以下输出:
psql客户端:
$ psql -h localhost -p 5432 -U postgres psql (15.0, server 0.0.0) WARNING: psql major version 15, server major version 0.0. Some psql features might not work. Type "help" for help. postgres=> select 1; id | name ----+------ 1 | one 2 | two (2 rows) postgres=> |
详细点击标题
Recommend
About Joyk
Aggregate valuable and interesting links.
Joyk means Joy of geeK