

Create a Multiple Instances Socket React Context Library: a Step-by-Step Guide
source link: https://blog.bitsrc.io/creating-a-multiple-instances-socket-react-context-library-a-step-by-step-guide-52443cd1d19a
Go to the source link to view the article. You can view the picture content, updated content and better typesetting reading experience. If the link is broken, please click the button below to view the snapshot at that time.
Create a Multiple Instances Socket React Context Library: a Step-by-Step Guide
Introduction
In this article, we will go through the process of creating a multiple instances socket React context library. React context is a powerful feature that allows you to share state and props across your entire application without the need for props drilling.
In this article, we will be using socket.io to create a real-time communication between different parts of your application. We will also be using React hooks to manage the state of our library.
Basic Architecture
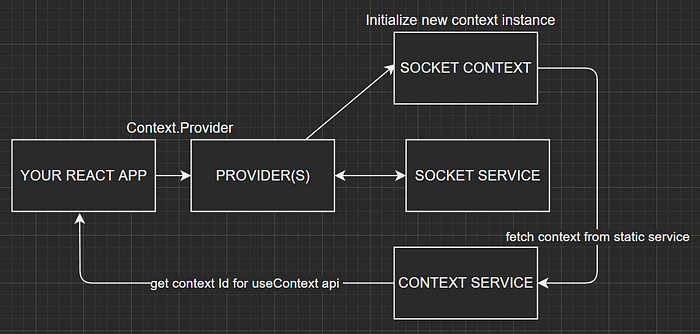
This is the basic architecture of our library.
The Providers component serves as the starting point for initializing various modules for a complete separate instance.
The Socket Service, which contains basic methods such as initializing socket.io, event listeners, subscriptions, and unsubscriptions etc is also initialized here.
The core feature of our library is the SocketContextService (simple static class), which is responsible for maintaining a map of contexts and updating or removing them as needed.
The ContextService is a simple function that retrieves the active context from the SocketContextService and wraps it with the native useContext hook.
This context is then passed down to child components and updates in real-time whenever an event is emitted from the socket service’s callback.
In summary, the React app imports the standalone Provider component, which wraps a child component and initializes the SocketService and SocketContext as a separate instance. The ContextService then retrieves the context, which can be accessed in child components using the basic useContext hook.
socket-context-provider.js
import React, {
  useEffect, useMemo,
  useRef,
  useState
} from "react";
import SocketContext from "./socket-context";
import SocketService from "./socket-service";
export default function SocketContextProvider({ url, socketContextId, incomingEvents , children}) {
  const [data, setData] = useState(null);
  const Context = useMemo(
    () => SocketContext.createContext(socketContextId),
    []
  );
  const { current } = useRef(new SocketService({ url }));
  useEffect(() => {
    return () => {
      SocketContext.removeContext(socketContextId)
      current.socket.disconnect()
    };
  }, []);
  useMemo(() => {
    current.onEventResponse({
      cb: (e, response) => {
        setData({ name: e, response });
      },
      events: incomingEvents,
    });
  }, []);
  return (
    <Context.Provider
      value={{
        data,
        socket: current.getSocket(),
        sentEvent: current.sentEvent,
        subscribeEvents : current.updateEvents,
        unsubscribeEvents : current.removeEvents
      }}
    >
      {children}
    </Context.Provider>
  );
}
SocketContextProvider creates a context for sharing data and functions related to socket.io connection across multiple components in the application.
It accepts props such as url, socketContextId, and incomingEvents and uses hooks like useEffect, useMemo, useRef and useState to create state variable data, initialize context, create socket service and handle incoming events, disconnection and context removal. It also exports socket, sentEvent, subscribeEvents and unsubscribeEvents as value to be consumed by the child components.
get-socket-context.js
import { useMemo } from "react";
import SocketContext from "./socket-context";
export default function getSocketContext(socketContextId) {
  const socketContext = SocketContext.getContextById(socketContextId);
  if (!socketContext) {
    throw new Error("Socket context not found");
  }
  return socketContext?.context || {};
}
This function is just to fetch the context from static class which has all the instances.
socket-service.js
import { io } from "socket.io-client";
export default class SocketService {
  socket;
  #events = new Set();
  #cb = () => {};
  constructor({ url }) {
    this.socket = io(url);
  }

onEventResponse({ events, cb }) {
    this.#cb = cb;
    this.#events = new Set(events);
    this.#addListener(this.#events);
  }

updateEvents(newEvents) {
    const uniqueEvents = newEvents.filter(
      (newEvent) => !this.#events.has(newEvent)
    );
    if (uniqueEvents.length === 0) return;
    this.#events = new Set([...Array.from(this.#events), ...uniqueEvents]);
    this.#addListener(uniqueEvents);
  }

removeEvents(events) {
    events.forEach((e) => this.socket.off(e, this.#cb));
  }

#addListener = (events) => {
    events.forEach((e) => this.socket.on(e, (data) => this.#cb?.(e, data)));
  };

sentEvent = (event, data) => {
    this.socket.emit(event, data);
  };

getSocket() {
    return this.socket;
  }
}
This is a pretty straight forward socketservice class which creates a connection to a socket.io server using the url provided in the constructor.
It has methods for handling socket events such as onEventResponse, updateEvents, removeEvents, and sentEvent, and properties for storing event listeners and callbacks.
It also has a method called addListener which is used to listen for new events, and getSocket which returns the socket object.
socket-context.js
import { createContext } from "react";

export default class SocketContext {
  static #contexts = new Map();
  static createContext(id) {
    const context = createContext({ data: null });
    this.#contexts.set(id, { context });
    return context;
  }
  static removeContext(id) {
    this.#contexts.delete(id);
  }
  static getContextById(id) {
    return this.#contexts.get(id);
  }
}
This class is responsible for handling and retrieving multiple instances of sockets. It is important to note that it should never be exposed in our library.
index.js
import getSocketContext from "./get-socket-context";
import SocketContextProvider from "./socket-context-provider";
export default { getSocketContext, SocketContextProvider };
exporting only Provider and getSocketContext (for useContext in child nodes)
Now, the spicy part exporting it to NPM ecosystem.
Before that we need to transpile our code using babel or any other transpiler you feel like :)
create a .babelrc file in root directory & add below line
{
  "presets": ["@babel/preset-react"]
}
And edit package.json build script, post building push it to your repository.
{
  "name": "react-socket.io-context",
  "version": "1.0.0",
  "main": "dist/index.js",
  "types": "./index.d.ts",
  "dependencies": {
    "react": "^18.2.0",
    "socket.io-client": "^4.5.4"
  },
  "repository": {
    "type": "git",
    "url": "git+https://github.com/MUKUL47/react-socket.io-context.git"
  },
  "scripts": {
    "build": "babel lib -d dist"
  },
  "devDependencies": {
    "@babel/cli": "^7.7.7",
    "@babel/core": "^7.7.7",
    "@babel/plugin-proposal-class-properties": "^7.7.4",
    "@babel/preset-env": "^7.7.7",
    "@babel/preset-react": "^7.7.4",
    "babel-loader": "^8.0.6",
    "core-js": "^3.27.1"
  }
}
Log in to NPM and publish your library by running the commands “npm login” and “npm publish”. It’s important to note that if you make any changes to your repository, you will need to update the version before publishing. You can refer to the npm documentation for more information on how to do this.
Usage
install the library first: npm i react-socket.io-context
import { useContext } from "react";
import ReactSocket from "react-socket.io-context";
const MY_CONTEXT = "MY_CONTEXT";
const MY_CONTEXT_TWO = "MY_CONTEXT_TWO";
function App() {
  return (
    <div>
      <ReactSocket.SocketContextProvider
        url="http://localhost:8080"
        socketContextId={MY_CONTEXT}
        incomingEvents={["CONNECT", "HELLO"]}
      >
        <SocketChild />
      </ReactSocket.SocketContextProvider>

<h1>SECOND SOCKET</h1>

<ReactSocket.SocketContextProvider
        url="http://localhost:8081"
        socketContextId={MY_CONTEXT_TWO}
        incomingEvents={["CONNECT!!!", "HELLO!!!"]}
      >
        <SocketChild_TWO />
      </ReactSocket.SocketContextProvider>
    </div>
  );
}
function SocketChild({}) {
  const Context = useContext(ReactSocket.getSocketContext(MY_CONTEXT));
  console.log(Context);
  /**
   * context
   *
   * data => { name : EVENT_NAME, response : DATA_FROM_SERVER }
   * socket => socket.io client instance
   * subscribeEvents => Function (add additional events on demand)
   * unsubscribeEvents => Function (remove events on demand)
   * sendEvent => Function(eventName, data)
   */
  useEffect(()=>console.log("Got new data from server"),[Context.data])
  return "SocketChild";
}
function SocketChild_TWO({}) {
  const Context = useContext(ReactSocket.getSocketContext(MY_CONTEXT_TWO));
  return "SocketChild_TWO";
}
export default App;
My project links:
https://www.npmjs.com/package/react-socket.io-context
https://github.com/MUKUL47/react-socket.io-context
Conclusion
the react-socket.io-context library is an efficient and easy way to handle multiple instances of sockets in your React application. By providing a unique ID, the library allows you to easily create, update, and remove socket contexts, while also handling event subscriptions and unsubscriptions.
The use of the native useContext hook makes it easy to integrate into any React application, and the library’s architecture makes it easy to understand and maintain.
Overall, this library is a great choice for anyone looking to simplify the management of multiple sockets in a React application. I hope you found this article helpful and any feedback is highly appreciated.
Happy coding!
Bonus: Build real-time React apps with reusable components
Bit’s open-source tool help 250,000+ devs to build apps with components.
Turn any UI, feature, or page into a reusable component — and share it across your applications. It’s easier to collaborate and build faster.
Split apps into components to make app development easier, and enjoy the best experience for the workflows you want:
→ Micro-Frontends
→ Design System
→ Code-Sharing and reuse
→ Monorepo
Recommend
About Joyk
Aggregate valuable and interesting links.
Joyk means Joy of geeK