

UI/UX Design: Generating Assets with Midjourney 2023
source link: https://uxplanet.org/ui-ux-design-generating-assets-with-midjourney-2023-c0458a2efc6
Go to the source link to view the article. You can view the picture content, updated content and better typesetting reading experience. If the link is broken, please click the button below to view the snapshot at that time.


UI/UX Design: Generating Assets with Midjourney 2023
How to generate, prepare, and apply design assets created with Midjourney.
Overview
So you’re sick of not being able to find the assets you’re looking for and want to use Midjourney to generate them? You’ve come to the right article!
Today, we’ll go over how to generate, prepare, and apply design assets created with Midjourney.
Let’s get to it.
Legal disclaimer
I am not an intellectual property rights lawyer, nor any type of lawyer for that matter, and this article EXPRESSLY DOES NOT constitute any form of legal advice, whatsoever.
The fact is that the laws surrounding AI generated content are still incredibly muddy, because the technology is still very new.
THAT BEING SAID: there is a HIGH likelihood that we will begin seeing lawsuits against generated content because in many cases it represents derivative work, rather than transformative work.
So, if you’re gonna use it in your final products, be aware that you may be walking into a legal minefield.
'Legal minefield': The risk of commercialising AI-generated images
Jonathan Løw of JumpStory says the legal risk may fall on the end user if their AI-generated image enters a copyright…
Preliminaries
To do this, you’re gonna need the following at a bare minimum:
- A discord account.
- A Midjourney account.
- Design software of your choice.
- A stable internet connection (at least temporarily).
If you have all of these things, great. If not, I’ll show you exactly how to get each one.
How to get started with Midjourney
To get started with Midjourney, go to:
Discord | Your Place to Talk and Hang Out
where you can belong to a school club, a gaming group, or a worldwide art community. Where just you and a handful of…
And create a new Discord account.
Then go to:
Midjourney
Midjourney is an independent research lab exploring new mediums of thought and expanding the imaginative powers of the…
And follow the instructions to get invited to the Midjourney Discord.
Once you’re in, you’ll have access to the main Midjourney Discord, and can go to one of the newcomer rooms here:

Inside of the newcomer room, you will see a feed that looks something like this:
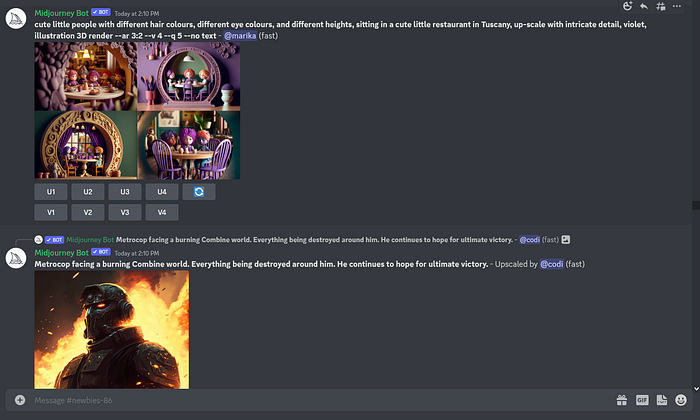
DO NOT WORRY about the other stuff in the feed. Your only job is to tap the box at the bottom, and type:
/imagine
This will open the prompt which will allow you to create whatever your heart desires (more or less).
For a full tutorial on how to do this correctly, you can check out this video here:
Prompts, system controls, and arguments
Once you have typed in
/imagine
And opened the prompt, you will see something that looks like this:

This is how you create the assets that you’re looking for.
Prompts
The prompt is the main information that you’re feeding the AI to get it to generate an image. It can be nearly anything you can think of, the more specific, the better.
For example, you could use:
iphone floating over a planet, 3d matte finish, modern,
soft pastels, aurora, on white background
And that’s a pretty decent prompt.
But we can do better.
System controls & arguments
Suppose you want more control over the output of your prompt. There are multiple system controls which can be passed to Midjourney as arguments (that’s a fancy way of saying sub-commands) that will let you do just that.
For example:
iphone floating over a planet, 3d matte finish, modern,
soft pastels, aurora, on white background --v 4 --ar 1:1
Notice the
--v 4 --ar 1:1
This means the following:
- Version: 4, allows you to specify the version of renderer used.
- Aspect ratio: 1:1, allows you to specify the aspect ratio of your output.
For all possible arguments and system controls, you can refer to the docs available here:
List of Midjourney Commands
To use Midjourney, you need to use the "/imagine" command followed by keywords. Other than the "/imagine", command…
For this example, I have generated the following image:

Downloading assets
Easiest way to download your assets once you have them the way that you want them is to simply click the image, select “open in browser” from the bottom left hand corner, and then save the image to your computer.

Preparing assets for production
In order to prep this asset for production use, you’ll want to use the tool:
Remove Background from Image - remove.bg
Thanks to remove.bg's clever AI, you can slash editing time - and have more fun! No matter if you want to make a…
It’s completely free up to 500x500px, and it saves you having to open up Photoshop and mess with selection settings.
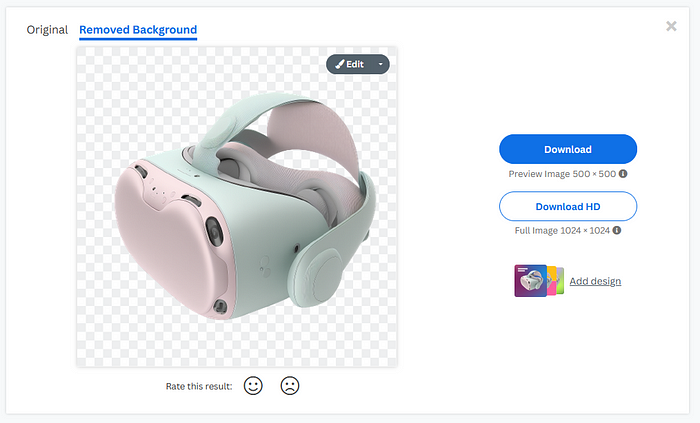
As you can see, I uploaded the photo, and it removed the background with basically zero effort.
So now we have this, feel free to download it if you like:

And we can move on to applying it to our designs.
Applying assets
Let’s see this in action by starting off with a really boring example:

See what I mean? Boring as hell, but watch this.

Not bad. But what if we matched the colors up and added a few more assets from Midjourney?

You see what I’m talking about here? Without even breaking a sweat we applied our assets, some colors, and now we’ve got a composition that’s a hell of a lot less boring!

Bringing this all together
So what does all this mean for you as a designer?
- You can create design assets with Midjourney.
- We’re not sure exactly how AI generated asset use will play out legally so keep that in mind if you decide to use them in your designs.
- You can use prompts and system commands to get really granular on exactly what you’re looking for.
- You can use remove.bg to make prepping your assets a breeze.
- You can mix and match generated assets to produce final compositions that look exactly the way that you want them to.
If you’re interested, there’s a great tutorial by Gary Simon, which you can check out here:
You know the drill: slap that clap button a few times and follow if you’re interested in more bangers like this one.
Until next time my friends.
Recommend
About Joyk
Aggregate valuable and interesting links.
Joyk means Joy of geeK