

How to generate stunning images using Stable Diffusion
source link: https://uxplanet.org/how-to-generate-stunning-images-using-stable-diffusion-1a868061a07f
Go to the source link to view the article. You can view the picture content, updated content and better typesetting reading experience. If the link is broken, please click the button below to view the snapshot at that time.


Image generated by Stable Diffusion.
How to generate stunning images using Stable Diffusion
A quick practical guide on how to make the most of this tool
Stable Diffusion is a text-to-image model. It is primarily used to generate detailed images based on text descriptions. Stable Diffusion is an excellent alternative to tools like midjourney and DALLE-2. And the great thing about this tool is that you can run it locally on your computer or use services like Dream Studio or Hugging Face.
In this guide, I will show how to use individual settings of Stable Diffusion to achieve excellent results in image generation. And I will use Dream Studio.
This guide is also available in the format of a video:
Prompt
The first thing that we need to do is to write the right prompt. Prompt is a text string that we submit to the system so that it can create an image for you.

Prompt string in Dream Studio user interface.
Generally, the more specific details you provide, the better results the system will generate for you. But finding the right prompt can be challenging.
To make things easier, you can use resources like Lexica to find a relevant prompt.

Lexica is a collection of images with prompts.
So once you find a relevant image, you can click on it to see the prompt.

Prompt string along with the model and seed number.
Copy the prompt, paste it to the Stable Diffusion and press Generate to see generated images.

Images generated by Stable Diffusion based on the prompt we’ve provided.
However, as you can see, the tool didn’t generate an exact copy of the original image. Instead, you see a few variations of the image. And it’s how Stable Diffusion works. If you want a close copy of the original image found at Lexica, you need to specify the Seed (you can read about the Seed below).
Tip: If you submit a long prompt and want to tell the AI to focus on one particular word, you can highlight the words to the AI using parenthesis. Put parenthesis around the highly important words, and it will accentuate these words to the Stable Diffusion so that this combination of words will have more weight for the image generator.

Using parenthesis around the part “concept art.”
Model
The results you will get using a prompt might different for different models of Stable Diffusion. Currently, two major releases and a few versions of Stable Diffusion are available in each release.

Model number for Stable Diffusion.
The latest stable release is version 2.1. If you want to learn more about the difference between models, check the article Stable Diffusion 1 vs 2.

Different versions of the Model in Stable Diffusion.
Steps
Think of steps as iterations of the image creation process. During the first steps, the image looks more like a visual noise where individual elements are blurry. With every iteration, the system changes the image by adding more details to the existing visual composition or changing the image itself.

Sampling steps in Stable Diffusion.
The default sampling step is 30. It is a relatively low number of steps. Let’s see how our image looks with 30 sampling steps, and now let’s look for 70 steps.

Changing steps in Dream Studio.
Seed is one of the most critical settings in Stable Diffusion. Once you generate an image you like and want to adjust it a bit to make it look perfect, you cannot simply run Dream again because Stable Diffusion will likely produce a completely new image. You need to save the number of image in the field Seed.

Seed number becomes available when you hover the mouse over the image.
When you keep the number & type it into the Seed input field and run Stable Diffusion again with a slightly different prompt, you will see an alternative version of the original image.

For example, here is what we will see if we add a new property to the prompt, such as “with two moons.”

Using the Seed number to generate a new version of the original image.
Width and Height
Width and Height define the size of the generated image.
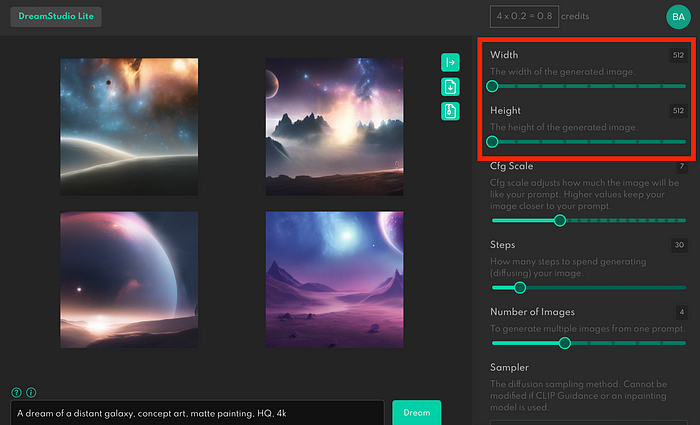
Width and Height for a generated image.
By default, Stable Diffusion generates images in sizes 512 to 512 pixels. You will get the most consistent result when you use this size. You can change the size, but it will require more computational power. So you can notice that when we change the image’s size, the cost of operation (credits in the top right corner) increases.
CFG Scale
This setting says how close the Stable Diffusion will listen to your prompt. Let’s use the same prompt but play with the CFG Scale. Lowering the scale to zero means that AI will consider only some parts of the prompt.

Result of generation using the CFG Scale equal to 1.
When we up the scale to the max, AI will strictly follow the prompt.

Result of generation using the CFG Scale equal to 18.
Usually, it’s better not to make the scale too high and to choose a value like 15.
Image to Image generation (img2img)
We can use an image as a source for Stable Diffusion so that the system can create images from it.

Click on this element to upload the image that will be used as a source.
Let’s go to Lexica to find our image and prompt.

Prompt and image that we will use as a source.
Download the image and prompt and paste it to the Dream Studio. You can see the new setting called Image Strength.

Image Strength setting becomes visible once you upload the image.
The closer the Image Strength goes to 0%, the less AI relies on the original image.

Setting Image Strength to 5%.
The closer the Image Strength goes to 100%, the closer AI copies the original image.

Setting Image Strength to 99%.
Originally published at babich.biz
Recommend
About Joyk
Aggregate valuable and interesting links.
Joyk means Joy of geeK