
7

可视化—AntV G6 高亮相邻节点的两种方式 - Echoyya、
source link: https://www.cnblogs.com/echoyya/p/16867203.html
Go to the source link to view the article. You can view the picture content, updated content and better typesetting reading experience. If the link is broken, please click the button below to view the snapshot at that time.

通过官方文档,可知高亮相邻节点分为两种方法,文档描述并不是很清楚,对刚接触这个库的小白并不是很友好,慢慢总结慢慢来吧
内置的高亮节点
是通过内置的Behavior activate-relations来实现,Behavior 是 G6 提供的定义图上交互事件的机制。与交互模式 Mode配合使用
activate-relations:当鼠标移到某节点时,突出显示该节点以及与其直接关联的节点和连线;
- 参数:
trigger: 'mouseenter'。表示出发机制,可以是mouseenter、click;activeState: 'active'。活跃节点状态,默认为active,可以与 graph 实例的xxxStateStyles结合实现丰富的视觉效果。inactiveState: 'inactive'。非活跃节点状态,默认值为inactive。同样可以与 graph 实例的xxxStateStyles结合实现丰富的视觉效果。- 文档上还提到了另外两个参数,但是本案例中并未使用,暂不做说明 resetSelected、shouldUpdate(e)
let drawGraph = document.getElementById("drawGraph");
this.graphWidth = drawGraph.scrollWidth;
this.graphHeight = drawGraph.scrollHeight || 1200;

graphG = new this.G6.Graph({
  container: "drawGraph",
  width: this.graphWidth,
  height: this.graphHeight,
  modes: {
    default: [
      { type: "activate-relations", activeState: 'active', inactiveState: 'inactive' },
    ],
    // default: ['activate-relations']  // 由于活跃节点及非活跃节点状态均采用默认值,因此可以简写为这种形式
  },
  nodeStateStyles:{},    // 配置节点状态样式
  edgeStateStyles:{},    // 配置边状态样式
  comboStateStyles:{},   // 配置分组状态样式
}
graphG.data(data);
graphG.render();
如果仅采用内置的高亮节点,会采用默认的样式,最终的渲染效果为:
自定义高亮
这种方式是通过自定义状态,在通过实例提供的setItemState、 clearItemStates设置和清除目标的状态信息,同样需要与graph 实例的 xxxStateStyles 结合实现。
graphG = new this.G6.Graph({
  container: "drawGraph",
  width: this.graphWidth,
  height: this.graphHeight,
  nodeStateStyles:{  // 配置节点状态样式,此处就先写一个,后续会有完整的案例分享
    highlight: {
        fill: "#db4437",
        shadowColor: '#fff',
        stroke: "#db4437",
        cursor: "pointer",
        'text-shape': {
          lineWidth: 1,
          fill: "#db4437",
          stroke: "#db4437",
        },
      },
  },
  edgeStateStyles:{},    // 配置边状态样式
  comboStateStyles:{},   // 配置分组状态样式
}
graphG.data(data);
graphG.render();
graphG.on("combo:mouseenter", (e) => {
  let edgeItem = e.item
  graphG.setItemState(edgeItem, 'highlight', true)
  edgeItem.getEdges().forEach(edge => {
    graphG.setItemState(edge.getTarget(), 'highlight', true)
    graphG.setItemState(edge.getSource(), 'highlight', true)
    graphG.setItemState(edge, 'highlight', true)
  })
  graphG.paint()
  graphG.setAutoPaint(true)
});

graphG.on('combo:mouseleave', (e) => {
  graphG.setAutoPaint(false)
  graphG.getNodes().forEach(node => {
    graphG.clearItemStates(node)
  })
  graphG.getEdges().forEach(edge => {
    graphG.clearItemStates(edge)
  })
  graphG.getCombos().forEach(combo => {
    graphG.clearItemStates(combo)
  })
  graphG.paint()
  graphG.setAutoPaint(true)
})
如果仅采用自定义高亮节点,最终的渲染效果为:
自定义高亮时保持原始颜色
通过上面的案例,可以看出,combo:mouseenter时相关联的边和点全部高亮,并且统一了连线的颜色,此时可能会与我们的需求相违背,可能连线还是想要保持原来的颜色,因为不同的颜色描述两点之间的不同类型的指向关系。那么此时在处理鼠标事件时,需要获取要节点和连线 原始样式。
graphG.on("combo:mouseenter", (e) => {
        let comboItem = e.item;
        const originStyle = comboItem._cfg.originStyle["circle-combo"].fill;
        comboItem._cfg.styles.highlight.fill = originStyle;
        graphG.setItemState(comboItem, "highlight", true);
        comboItem.getEdges().forEach((edge) => {
          const originStyle = edge._cfg.originStyle["edge-shape"].stroke; // 获取边edge 原始颜色
          edge._cfg.styles.highlight.stroke = originStyle;
          let edgeSource = edge.getSource();
          let edgeTarget = edge.getTarget();

          if ( edgeSource._cfg.type === "combo" && edgeSource._cfg.model.id =="100-600" ) {
            const originStyle = edgeSource._cfg.originStyle["circle-combo"].fill; // 获取分组combo 原始颜色
            edgeSource._cfg.styles.highlight.fill = originStyle;
          }
          if ( edgeTarget._cfg.type === "combo" && edgeTarget._cfg.model.id =="100-600" ) {
            const originStyle = edgeTarget._cfg.originStyle["circle-combo"].fill;
            edgeTarget._cfg.styles.highlight.fill = originStyle;
          }
          graphG.setItemState(edgeSource, "highlight", true);
          graphG.setItemState(edgeTarget, "highlight", true);
          graphG.setItemState(edge, "highlight", true);
        });
      });
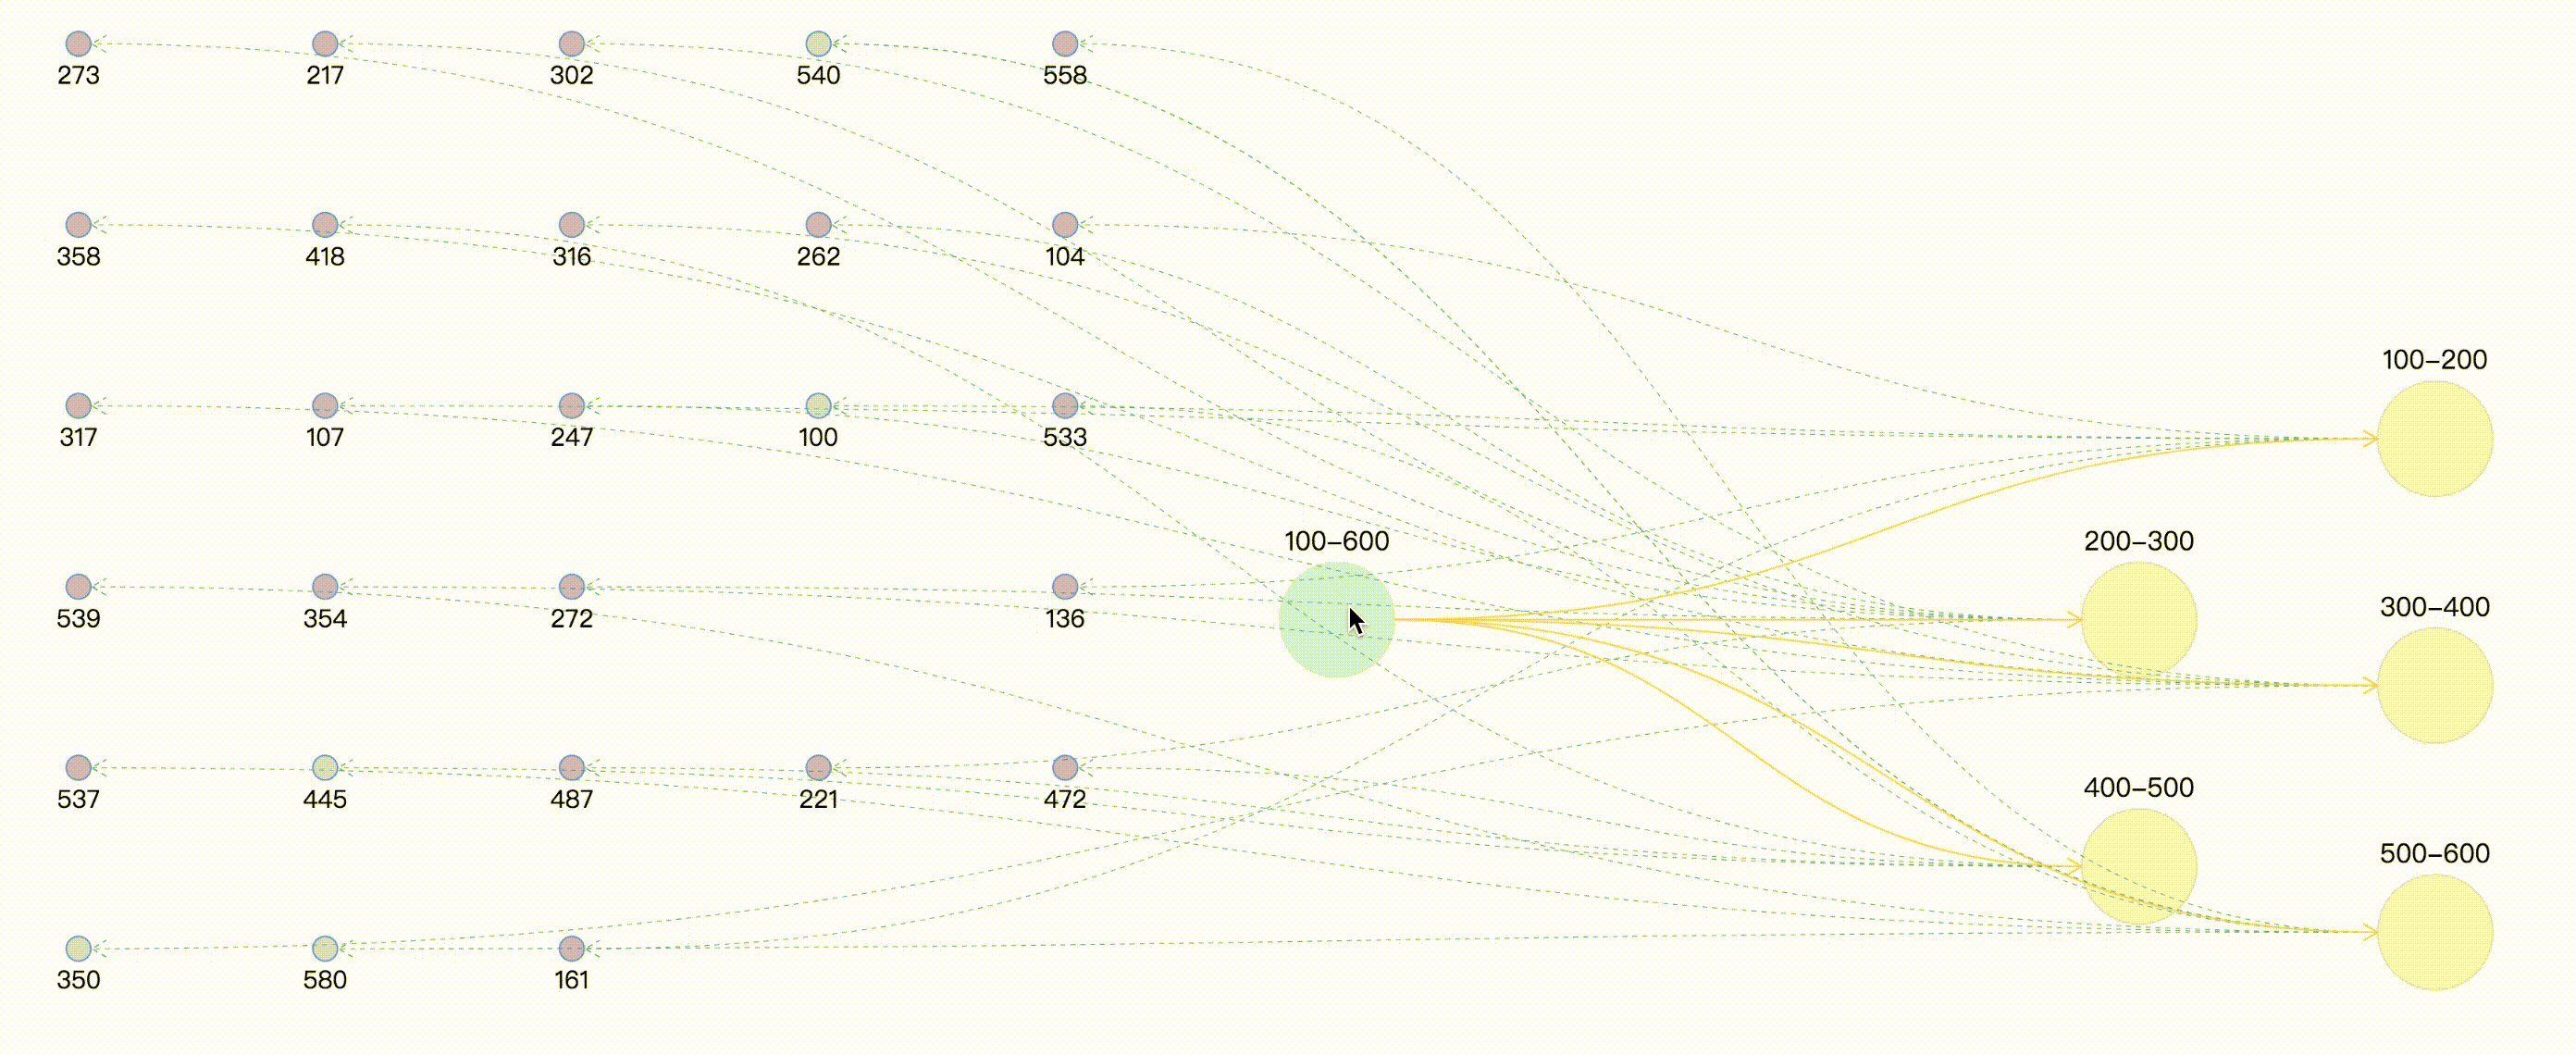
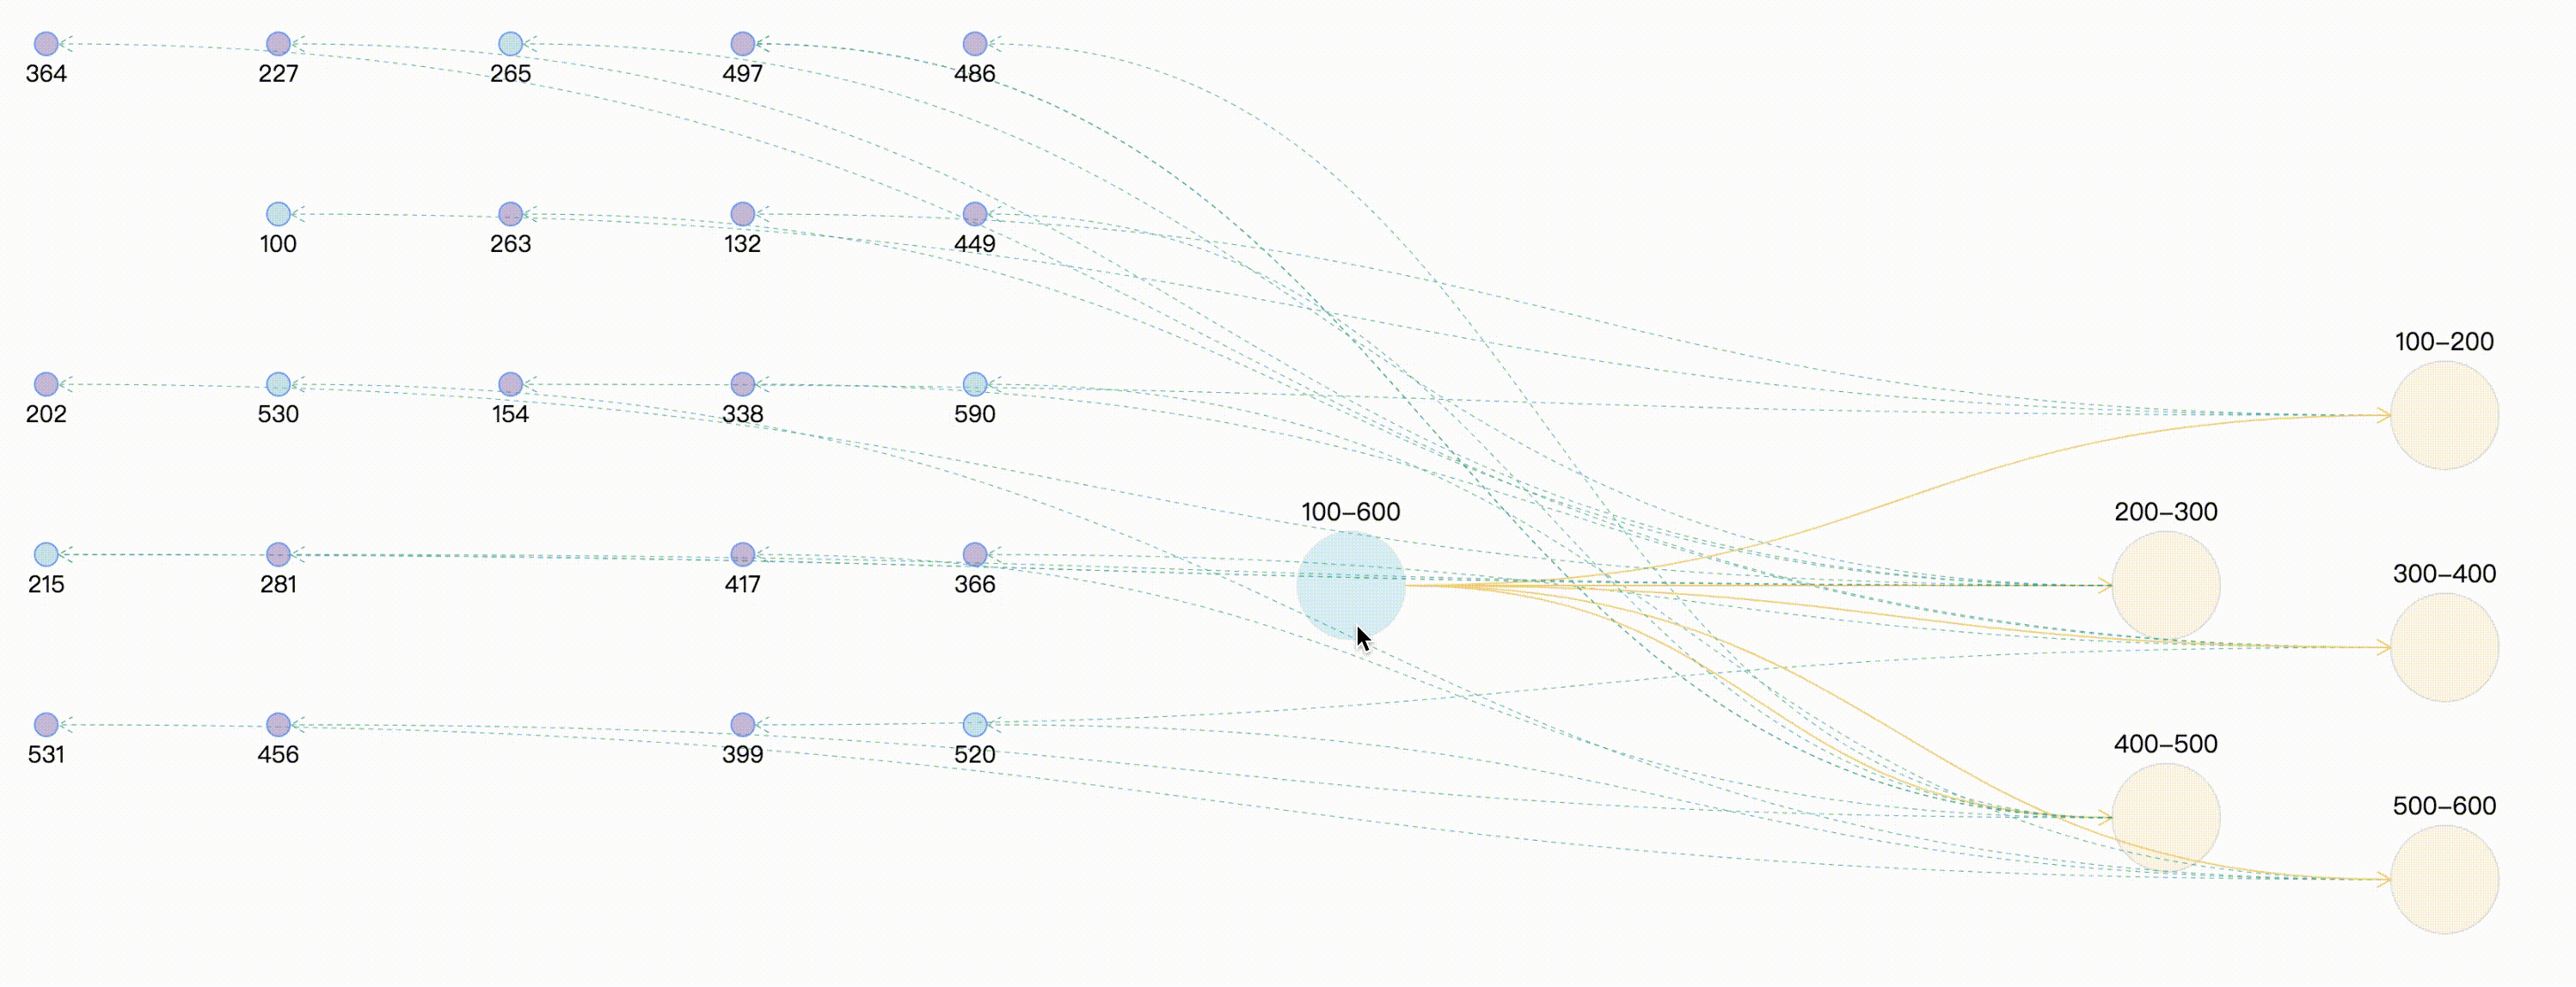
那么此时最终的效果为:

其实两种方法与异曲同工之妙,都是进行状态的处理,只不过一个是帮我们处理了一部分状态与样式,可以直接拿来用,但往往内置的样式与我们实际使用时不相符,因此可以使用两者结合的方式,最终效果及完整demo,采用随机数来模拟实体与关系。
案例完整代码
<template>
  <div>
    <div id="drawGraph"></div>
  </div>
</template>

<script>
let graphG = null
export default {
  mounted() {
    this.initData();
  },
  methods: {
    initData() {
      let combos = [
        { id: '100-600', label: '100-600' },
        { id: '100-200', label: '100-200' },
        { id: '200-300', label: '200-300' },
        { id: '300-400', label: '300-400' },
        { id: '400-500', label: '400-500' },
        { id: '500-600', label: '500-600' },
      ]
      let edges = [
        { source: '100-600', target: '100-200' },
        { source: '100-600', target: '200-300' },
        { source: '100-600', target: '300-400' },
        { source: '100-600', target: '400-500' },
        { source: '100-600', target: '500-600' },
      ]
      // 生成(20-30)随机数 模拟节点node
      let randomCount = Math.floor(Math.random() * 10) + 20;
      let row_clo = Math.floor(Math.sqrt(randomCount));
      let origin = [-150, 50], row = 110, clo = 150;
      let nodes = []
      for (let i = 0; i < randomCount; i++) {
        let randomNum = String(Math.floor(Math.random() * 500) + 100);    // 生成100-600之间的随机数,并与combo进行连线
        let rowindex = Math.floor(i / row_clo);
        let cloindex = i % row_clo;
        let x = origin[0] + clo * cloindex
        let y = origin[1] + row * rowindex
        let node = {
          label: randomNum,
          id: randomNum,
          x,
          y,
          style: {
            fillOpacity: 0.5,
            cursor: "pointer",
            fill: randomNum % 5 == 0 ? "#81C7D4" : "#986DB2"
          }
        }
        let index = Math.floor(randomNum / 100)
        let edge = {
          source: combos[index].id,
          target: randomNum,
          lineWidth: 1,
          style: {
            lineDash: [3, 3],
            lineWidth: 0.5,
            stroke: "#00AA90"
          }
        }
        nodes.push(node)
        edges.push(edge)
      }
      let data = { combos, edges, nodes }
      console.log(data);
      this.makeRelationData(data);
    },
    // 分组 点 连线处理
    makeRelationData(data) {
      if (graphG) {
        graphG.destroy();
      }
      let drawGraph = document.getElementById("drawGraph");
      this.graphWidth = drawGraph.scrollWidth;
      this.graphHeight = drawGraph.scrollHeight || 1200;
      let origin = [this.graphWidth / 2, 100];
      let row = 150, clo = 180;
      let combos = data.combos
      let row_clo = Math.floor(Math.sqrt(combos.length));
      for (let i = 0; i < combos.length; i++) {
        let rowindex = Math.floor(i / row_clo) + 1;
        let cloindex = (i % row_clo) + 1;
        // 分组默认样式设置
        if (i === 0) {
          combos[i].x = this.graphWidth / 3
          combos[i].y = this.graphHeight / 3
          combos[i].style = {
            fill: "#a5e4f0",
            opacity: 0.5,
            cursor: "pointer",
          };
        } else {
          // 分组定位
          combos[i].x = origin[0] + clo * cloindex;
          combos[i].y = origin[1] + row * rowindex;
          if (i % 2 === 1) {
            combos[i].y += 40;
          }
          combos[i].style = {
            fill: "#f6cd6b",
            fillOpacity: 0.2,
          }
        }
      }
      this.drawQfast(data)
    },
    drawQfast(data) {
      graphG = new this.G6.Graph({
        container: "drawGraph",
        width: this.graphWidth,
        height: this.graphHeight,
        modes: {
          default: [
            { type: "zoom-canvas", enableOptimize: true, optimizeZoom: 0.2 },
            { type: "drag-canvas", enableOptimize: true },
            { type: "drag-node", enableOptimize: true, onlyChangeComboSize: true },
            { type: "drag-combo", enableOptimize: true, onlyChangeComboSize: true },
            { type: "activate-relations", activeState: 'active', inactiveState: 'inactive' },
          ],
        },
        defaultEdge: {
          type: 'cubic-horizontal',
          lineWidth: 1,
          style: {
            endArrow: true,
            stroke: "#FAD069",
          },
        },
       defaultNode: {
          type: "circle",
          size: 15,
          labelCfg: {
            position: "bottom",
            style: {
              fontSize: 15,
            },
          },
        },
        defaultCombo: {
          cursor: "pointer",
          opacity: 0,
          type: "circle",
          lineWidth: 1,
          collapsed: true,
          labelCfg: {
            position: "top",
            refY: 5,
            style: {
              fontSize: 16,
            },
          },
        },
        nodeStateStyles: {
          highlight: {
            fill: "#db4437",
            shadowColor: '#fff',
            stroke: "#db4437",
            cursor: "pointer",
            'text-shape': {
              lineWidth: 1,
              fill: "#db4437",
              stroke: "#db4437",
            },
          },
          inactive: {
            stroke: '#eee',
            lineWidth: 1,
            'text-shape': {
              fill: "#eee",
              stroke: "#eee",
            },
          },
        },
        edgeStateStyles: {
          hover: {
            lineWidth: 3,
          },
          highlight: {
            stroke: '#00AA90',
            lineWidth: 3,
          },
        },
        comboStateStyles: {
          highlight: {
            fill: "#f6cd6b",
            opacity: 0.7,
            cursor: "pointer",
            'text-shape': {
              fill: "#A5E4F0",
              stroke: "#A5E4F0",
              lineWidth: 1,
            },
          },
          inactive: {
            stroke: '#eee',
            lineWidth: 1,
            'text-shape': {
              fill: "#eee",
              stroke: "#eee",
            },
          },
        },
      });
      graphG.data(data);
      graphG.render(); // 渲染图

      graphG.on("edge:mouseenter", (e) => {
        graphG.setItemState(e.item, "hover", true);
      });

      graphG.on("edge:mouseleave", (e) => {
        graphG.setItemState(e.item, "hover", false);
      });
       graphG.on("combo:mouseenter", (e) => {
        let comboItem = e.item;
        const originStyle = comboItem._cfg.originStyle["circle-combo"].fill;
        comboItem._cfg.styles.highlight.fill = originStyle;
        graphG.setItemState(comboItem, "highlight", true);
        comboItem.getEdges().forEach((edge) => {
          const originStyle = edge._cfg.originStyle["edge-shape"].stroke; // 获取边edge 原始颜色
          edge._cfg.styles.highlight.stroke = originStyle;
          let edgeSource = edge.getSource();
          let edgeTarget = edge.getTarget();

          if ( edgeSource._cfg.type === "combo" && edgeSource._cfg.model.id =="100-600" ) {
            const originStyle = edgeSource._cfg.originStyle["circle-combo"].fill; // 获取分组combo 原始颜色
            edgeSource._cfg.styles.highlight.fill = originStyle;
          }
          if ( edgeTarget._cfg.type === "combo" && edgeTarget._cfg.model.id =="100-600" ) {
            const originStyle = edgeTarget._cfg.originStyle["circle-combo"].fill;
            edgeTarget._cfg.styles.highlight.fill = originStyle;
          }
          graphG.setItemState(edgeSource, "highlight", true);
          graphG.setItemState(edgeTarget, "highlight", true);
          graphG.setItemState(edge, "highlight", true);
        });
      });


      graphG.on('combo:mouseleave', () => {
        graphG.setAutoPaint(false)
        graphG.getNodes().forEach(node => {
          graphG.clearItemStates(node)
        })
        graphG.getEdges().forEach(edge => {
          graphG.clearItemStates(edge)
        })
        graphG.getCombos().forEach(combo => {
          graphG.clearItemStates(combo)
        })
        graphG.paint()
        graphG.setAutoPaint(true)
      })

    },
  }
};
</script>
Recommend
About Joyk
Aggregate valuable and interesting links.
Joyk means Joy of geeK