

How To Split a Monolith Into Microservices with Jitar
source link: https://betterprogramming.pub/how-to-split-a-monolith-into-microservices-with-jitar-95caf6f81e08
Go to the source link to view the article. You can view the picture content, updated content and better typesetting reading experience. If the link is broken, please click the button below to view the snapshot at that time.

How To Split a Monolith Into Microservices with Jitar
Learn how to use the Jitar runtime for transforming a monolith into microservices without refactoring

In my previous article, I wrote about my journey towards a just-in-time architectural style that enabled me to split up a monolith into microservices without refactoring. The key solution I found was a combination of automated API creation and a flexible segmentation strategy. This has led to the creation of Jitar, a distributable runtime for JavaScript (and TypeScript) applications.
In this article, I want to dive deeply into building a splittable monolith and split it into microservices using the Jitar runtime. We’ll use the small online store example from the previous article. I recommend reading the previous article if you haven’t done that yet, but it isn’t required. The application and transformation will be explained step by step so you can follow along. The final result is also available on GitHub.
Before starting, ensure you have Node.js version 18.7 or higher installed on your machine. I like to be type-safe, so I’ll use TypeScript for the example. Make sure you have version 4.4.2 or higher installed. I use VS Code as an editor, but feel free to use another. Also, I work on a MacBook. The commands in this article work on Mac OS and Linux. Ready, set, go!
Step 1: Setup the Application
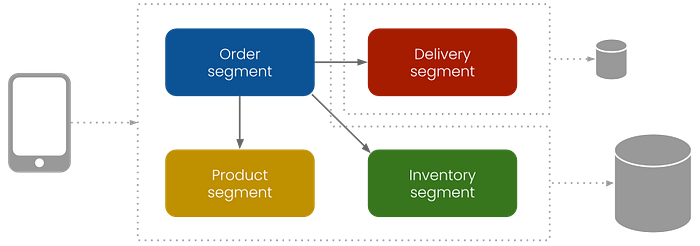
Let’s take a closer look at the online store first. Although the company behind the store is small, it’s divided into four departments. Each with its own unique responsibility.

Our application will automate the order placement process with the following steps:

We need to create a new NPM project to set up the application.
mkdir jitar-microservices
cd jitar-microservices
npm init
I’ve entered my way through the initialization to use the default settings. Feel free to make other choices here. Jitar heavily depends on the ES module system. Node uses the CommonJS module system by default, so we need to change this in the package.json file by setting the type to module.
{
    "type": "module",
    /* name, version, description, etc. */
}
For setting up TypeScript, we need to add a configuration file. We can use the following command:
touch tsconfig.json
I use the following configuration:
{
    "compilerOptions":
    {
        "target": "esnext",
        "module": "es2022",
        "rootDir": "./src/",
        "moduleResolution": "node",
        "outDir": "./dist",
        "removeComments": true,
        "forceConsistentCasingInFileNames": true,
        "strict": true,
        "skipLibCheck": true
    },
    "exclude": ["cache", "dist", "node_modules"]
  }
Note that we need to make sure that the ES module system is used as an output format by the compiler.
Of course, we’ll also need a source folder for our code files.
mkdir src
Now we’re ready to identify and set up the application modules. To keep things simple, we’ll use the decomposition by business capability for identifying the modules. In this case, we can translate each department into a module.
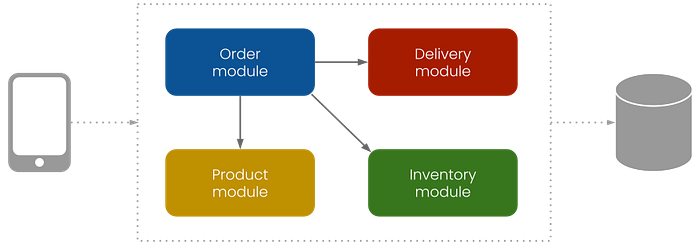
To set up the basic application structure, we’ll create a separate subfolder per module in the source folder.
cd src
mkdir order product inventory delivery
Next, we can look at the implementation. I’ve created a sequence diagram to visualize the interaction between the modules. This always helps me with the translation to code.
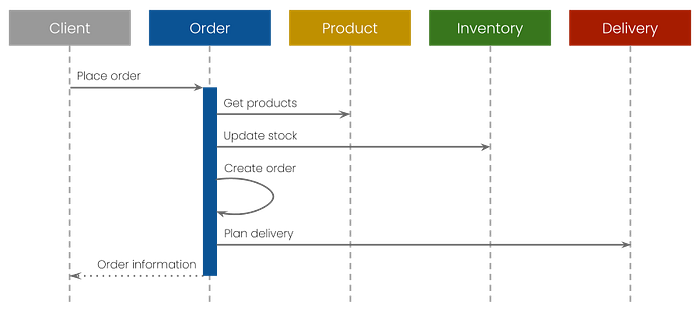
The diagram shows that the order module controls the process, meaning it has a strong relationship with the other modules. This is fine for smaller applications, but larger applications might benefit from a more decoupled approach.
Time to build the application. We’ll create a separate file for each component. This is not mandatory, but I think this is good practice because it avoids stepping on each other’s toes when working with multiple developers. We need two types of components: functional and data. Let’s create the files first.
touch order/placeOrder.ts product/getProducts.ts product/Product.ts inventory/updateStock.ts order/createOrder.ts order/Order.ts delivery/planDelivery.ts delivery/Delivery.ts
We’ll start with writing the main functional component, which is implementing the place order process. We’ll create a function for the implementation that calls the functions from the other modules.
// src/order/placeOrder.ts
import { planDelivery } from '../delivery/planDelivery.js';
import { updateStock } from '../inventory/updateStock.js';
import { getProducts } from '../product/getProducts.js';
import { createOrder } from './createOrder.js';

export async function placeOrder(productIds: string[], address: string): Promise<string>
{
    const products = await getProducts(productIds);
    await updateStock(productIds);

const order = await createOrder(products);
    const delivery = await planDelivery(address);

return `Your order #${order.id} with ${order.productCount} products `
         + `will be delivered to "${delivery.address}" on ${delivery.dateString}`;
}
Note that this function and all other functions are async. This is an important addition that enables splitting the application.
Next, we’ll implement the other functions in the order they are called. Here’s the code:
// src/product/getProducts.ts
import { Product } from "./Product.js";

const products =
[
    new Product("1", "Product 1"),
    new Product("2", "Product 2"),
    new Product("3", "Product 3"),
    new Product("4", "Product 4"),
    new Product("5", "Product 5")
]

export async function getProducts(productIds: string[]): Promise<Product[]>
{
    return products.filter(product => productIds.includes(product.id));
}
For simplicity, I’ve replaced the database with a simple static list of products. For the implementation of a product, we’ll create a data component.
// src/product/Product.ts
export class Product
{
    #id: string;
    #name: string;

constructor(id: string, name: string)
    {
        this.#id = id;
        this.#name = name;
    }

get id(): string { return this.#id; }

get name(): string { return this.#name; }
}
Note that I’ve used private fields to encapsulate the data. A product can’t be updated after its creation, making it immutable. This is common practice when working with distributed systems and is essential when breaking up and scaling an application without refactoring.
// src/inventory/updateStock.ts
export async function updateStock(productIds: string[]): Promise<void>
{
    // Update stock per product
    // Throw error if product is out of stock
}
I’ve added the update stock function for demonstration purposes but haven’t implemented it to keep an eye on the ball.
// src/order/createOrder.ts
import { Product } from '../product/Product.js';
import { Order } from './Order.js';

export async function createOrder(products: Product[]): Promise<Order>
{
    const id = Math.floor(Math.random() * 1000);

return new Order(id, products);
}
Also, here’s a simple implementation for order creation using a data component:
// src/order/Order.ts
import { Product } from '../product/Product.js';

export class Order
{
    #id: number;
    #products: Product[];

constructor(id: number, products: Product[])
    {
        this.#id = id;
        this.#products = products;
    }

get id(): number { return this.#id; }

get products(): Product[] { return this.#products; }

get productCount(): number { return this.#products.length; }
}
Note that data components are transferred across the network automatically when an application is split up. Jitar can (de)serialize primary types (numbers, booleans, etc.) and complex objects (maps, dates, etc.). It supports private fields as long as the object can be reconstructed using the constructor or a setter. This is where other (de)serializers I’ve tried fail.
// src/delivery/planDelivery.ts
import { Delivery } from './Delivery.js';

export async function planDelivery(address: string): Promise<Delivery>
{
    const today = new Date();
    const tomorrow = new Date();

tomorrow.setDate(today.getDate() + 1);

return new Delivery(address, tomorrow);
}
We don’t want our customers to wait too long, so we always deliver the next day :-).
// src/delivery/Delivery.ts
export class Delivery
{
    #address: string;
    #date: Date;

constructor(address: string, date: Date)
    {
        this.#address = address;
        this.#date = date;
    }

get address(): string { return this.#address; }

get date(): Date { return this.#date; }

get dateString(): string { return this.#date.toDateString(); }
}
That’s it for the coding part. We have all the components needed to get our application up and running.
Step 2: Run the Application
To use Jitar as runtime, we add its Node.js server as a dependency.
cd ..
npm install jitar-nodejs-server
Because we start with a monolith, we only need a single backend segment that contains all four modules. The order module is our main module, so we can start with an order segment.

The placeOrder component needs to be exposed to the outside world to start the process. We can configure this in a segment configuration file. When splitting the application, we will create more segment files. So we’ll create a separate folder for the segments first. This folder is placed in the project root folder.
mkdir segments
Now we can create the first segment file.
touch segments/order.segment.json
And add the following content:
{
    "./order/placeOrder.js": { "placeOrder": { "access": "public" } }
}
The structure of a segment file is very similar to the JavaScript module system. In this case, we import placeOrder from ./order/placeOrder.js. Additionally, we set the access to public (private by default).
Note that the file path is relative to the source root of the application and that it imports the compiled JavaScript file (ends with .js). Jitar will import this component with the other components when loading the segment file.
To load the segment file, we need to configure Jitar. This is done by creating a new configuration file. But first, we’ll create a new folder because we’ll add more configurations later.
mkdir jitar
In this folder, we’ll create the first configuration file.
touch jitar/standalone.json
And add the following content:
{
    "url": "http://127.0.0.1:3000",
    "standalone":
    {
        "source": "./dist",
        "cache": "./cache"
    }
}
This will configure a standalone setup, meaning that all required runtime services are bundled into a single Jitar server instance. It also tells Jitar to read the compiled JavaScript from the dist folder and write its cache to the cache folder.
To start Jitar, we need to create a bootstrapper in the source root folder. Here’s how to do that:
touch src/jitar.ts
And add the following content:
import { startServer } from 'jitar-nodejs-server';

const moduleImporter = async (specifier: string) => import(specifier);

startServer(moduleImporter);
With the start of a server, we need to provide a module importer that imports Node dependencies from the local application context instead of the Jitar context. Although the theory behind this is quite interesting, I’ll leave the details out for now.
Lastly, we need to add build and run scripts to the package.json file.
{
    "scripts": {
        "build": "tsc",
        "standalone": "node --experimental-network-imports --experimental-fetch dist/jitar.js --config=jitar/standalone.json"
  },
}
And we’re all done and ready to go. We can test both scripts with the following commands:
npm run build
npm run standalone
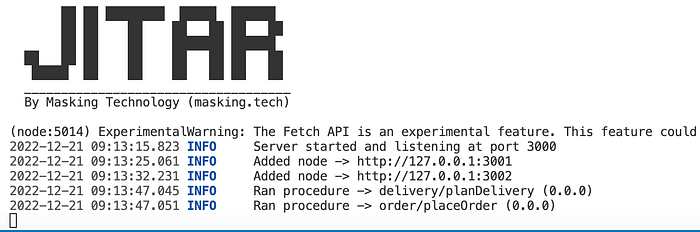
After starting Jitar, you should see something like this:
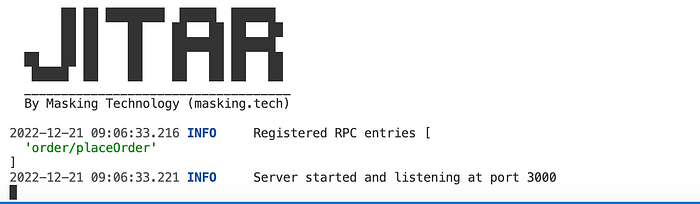
Note that our component has been registered successfully as an RPC entry. This means that we can call it using Jitar’s PRC API. I like to use HTTP files for creating and sharing test requests, so I’ll create one here too.
touch request.http
And add a test request.
POST http://localhost:3000/rpc/order/placeOrder HTTP/1.1
content-type: application/json

{
 "productIds": [ "1", "3", "5" ],
 "address": "My Secret Lair"
}
This will call the component using a POST request with the product ids and delivery address as the body. For the execution, I use the REST Client plugin for VS Code, but feel free to use any API tool you want.
If everything goes well, you should get a response like this:
Your order #952 with 3 products will be delivered to "My Secret Lair"
on Thu Dec 22 2022
That’s it for setting up Jitar and running the application. We now have everything we need to scale out.
Step 3: Split the Application
In the previous article, I used the introduction of a track and trace feature as an example reason for splitting off and load balancing the delivery module (I’m not the only one refreshing all the time, right?). It’s time to bring this into practice and transform the delivery module into a microservice.

As the image shows, we need to create a separate segment for the delivery. Like the order segment, we need to add a segment file to the segments folder.
touch segments/delivery.segment.json
With the following content:
{
    "./delivery/planDelivery.js": { "planDelivery": { "access": "public" } }
}
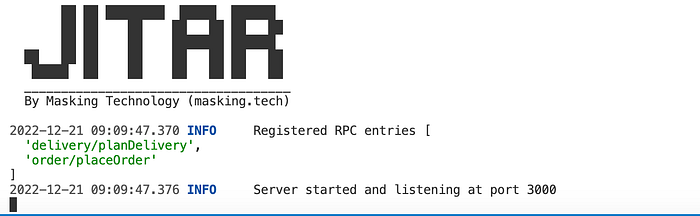
When restarting the application using the npm run standalone command, we should now see that also the planDelivery component has been registered.
When starting Jitar as a standalone server, it will scan and register all *.segment.json files automatically and runs the application as a monolith. This works great when developing the application, but to split them in production, we need to configure Jitar differently.
Jitar comes with several runtime services that are combined in the standalone mode. To split an application, we need to split the runtime. For this example, we can use the following setup:

This setup uses three different runtime services:
- A gateway for locating and load-balancing the components
- A repository holding and providing the components
- Two nodes for loading and running segment components
Clients use the gateway as a central access point for the application. The gateway will forward the requests to the appropriate nodes. This should look very familiar if you have some experience with microservices. The repository is the only stranger in our midst, but don’t let it fool you. It plays the most important role of all.
When a node (worker) starts, it loads the components of the segments assigned to it. These components can import from other segments that do not run on this node. The repository is segment aware and knows exactly when to provide a remote implementation instead of the actual implementation.
We need to add a separate Jitar configuration per service to create this setup.
touch jitar/repository.json jitar/gateway.json jitar/node-order.json jitar/node-delivery.json
We’ll create them in starting order, beginning with the repository in the repository.json file.
{
    "url": "http://127.0.0.1:4000",
    "repository":
    {
        "source": "./dist",
        "cache": "./cache"
    }
}
This setup looks very similar to the standalone configuration. That’s because the standalone mode handles the configuration of the other services.
Next, we’ll configure the gateway in the gateway.json file. We only need to set the repository location because the nodes will register themselves at the gateway.
{
    "url": "http://127.0.0.1:3000",
    "gateway":
    {
        "repository": "http://127.0.0.1:4000"
    }
}
Because we have two nodes, we need to configure them separately. The first will load and run the order segment configured in the node-order.json file.
{
    "url": "http://127.0.0.1:3001",
    "node":
    {
        "repository": "http://127.0.0.1:4000",
        "gateway": "http://127.0.0.1:3000",
        "segments": [ "order" ]
    }
}
The second node will load and run the delivery segment and is configured in the node-delivery.json file.
{
    "url": "http://127.0.0.1:3002",
    "node":
    {
        "repository": "http://127.0.0.1:4000",
        "gateway": "http://127.0.0.1:3000",
        "segments": [ "delivery" ]
    }
}
Note that each configuration uses a different port in the URL specification. This way, we can run the services on the same machine, which is convenient for now.
To start the services, we need to add scripts for them in the package.json file. In total, the scripts section looks like this:
{
    "scripts": {
        "build": "tsc",
        "standalone": "node --experimental-network-imports --experimental-fetch dist/jitar.js --config=jitar/standalone.json",
        "repository": "node --experimental-network-imports --experimental-fetch dist/jitar.js --config=jitar/repository.json",
        "gateway": "node --experimental-network-imports --experimental-fetch dist/jitar.js --config=jitar/gateway.json",
        "order": "node --experimental-network-imports --experimental-fetch dist/jitar.js --config=jitar/node-order.json",
        "delivery": "node --experimental-network-imports --experimental-fetch dist/jitar.js --config=jitar/node-delivery.json"
    },
}
Time for testing. We haven’t touched the application, so we can skip the build step. We need to start each service from a separate terminal in the following order:
npm run repository
npm run gateway
npm run order
npm run delivery
With the start of the order node, we should see that it only registers the placeOrder component. The delivery node should only register the planDelivery component. If this is the case, then the segmentation works. We can check this by executing the request again. The gateway should tell us that it has run both components separately.
Congratulations! You’ve just transformed a module into a service without refactoring.
From here, it’s easy to set up load balancing for the delivery service. We only need to start the delivery node for a second, third, … time. This doesn’t work on your local machine because the port is already in use. But we can copy the configuration to a new file.
cp jitar/node-delivery.json jitar/node-delivery2.json
And increase the port number in the URL in the node-delivery2.json file.
{
    "url": "http://127.0.0.1:3003",
    "node":
    {
        "repository": "http://127.0.0.1:4000",
        "gateway": "http://127.0.0.1:3000",
        "segments": [ "delivery" ]
    }
}
Don’t forget to add a script to the package.json file.
"delivery2": "node --experimental-network-imports --experimental-fetch dist/jitar.js --config=jitar/node-delivery2.json"
Start the node, and see what happens when executing the request multiple times.
npm run delivery2
The gateway should now divide the load round robin over both delivery nodes.
In the current setup, the order segment contains the order, product, and inventory modules. Depending on your needs, creating a separate segment for each module and running them on the same node is possible.
This can be done by creating new segment files and adding the segments to the node configuration.
{
    "url": "http://127.0.0.1:3001",
    "node":
    {
        "repository": "http://127.0.0.1:4000",
        "gateway": "http://127.0.0.1:3000",
        "segments": [ "order", "product", "inventory" ]
    }
}
The effect will be the same as the current setup but adds a lot of flexibility to the deployability. If you’re developing a single-tenant application used by multiple customers, nodes can be configured to always fit the current (cloud) hosting needs. Running segments on a single node for as long as possible can help reduce operational costs.
Conclusions
Jitar makes a developer’s life easier by enabling splitting and distributing applications without refactoring. This doesn’t mean that building distributable applications have become super simple, but it adds a lot of flexibility that I haven’t found elsewhere. For example, applications can be developed as a monolith and deployed as microservices.
Although this article focuses on the backend, Jitar also allows splitting up the frontend. In an earlier article, I wrote about how to create a full-stack application with Jitar. That article uses a single segment, but multiple segments can be created the same way we did in this article.
Before I sign off, I want to thank you for reading this article. I’m always open to feedback and happy to answer any question. In upcoming articles, I want to dive deeply into details like dealing with data(bases), authorization, etc. Suggestions/requests are welcome.
Recommend
About Joyk
Aggregate valuable and interesting links.
Joyk means Joy of geeK