

Connecting to Exchange Online PowerShell by passing an access token
source link: https://www.michev.info/Blog/Post/4249/connecting-to-exchange-online-powershell-by-passing-an-access-token
Go to the source link to view the article. You can view the picture content, updated content and better typesetting reading experience. If the link is broken, please click the button below to view the snapshot at that time.
Connecting to Exchange Online PowerShell by passing an access token
December 2022 has certainly been an eventful month for Exchange Online PowerShell, with bunch of new improvements to cover, and the news of the planned deprecation of RPS-based modules and methods hitting last week. We will leave the Remote PowerShell deprecation news for another article, and will focus on covering one small, but impactful addition introduced with the latest (preview) version of the “V3” Exchange Online PowerShell module – namely the addition of the -AccessToken parameter and support for passing access tokens in general.
To start of, you will need the latest preview version of the module installed. At the time of writing, this is the 3.1.0-Preview1 version, which you can download over at the PowerShell Gallery. As you can see from the release notes, not much has changed in this release:
v3.1.0-Preview1 :
1. Support for providing an Access Token with Connect-ExchangeOnline.
2. Bug fixes in Connect-ExchangeOnline and Get-ConnectionInformation.
Unfortunately, that’s pretty much all the information you can find about the new -AccessToken parameter, as no documentation has been published on how to use it. The only clue we can get is from the Connect-ExchangeOnline cmdlet help:
-AccessToken
Note: This parameter is available in version 3.1.0-Preview1 or later of the module.
The AccessToken parameter specifies the OAuth JSON Web Token (JWT) that’s used to connect to ExchangeOnline.
Depending on the type of access token, you need to use this parameter with the Organization, DelegatedOrganization, or UserPrincipalName parameter.
In this article, I will describe the steps required to connect to Exchange Online via this new method. Those of you that have already played with certificate-based authentication or used the unsupported variations (such as the methods detailed here or here) will find the process quite familiar, as the introduction of the –AccessToken parameter basically makes such methods officially supported. For example, you can now use the -AccessToken parameter together with the -Organization one in order to connect via a client secret, instead of using the unsupported methods outlined in the second article above.

You can use any existing method in order to obtain the access token, such as the ADAL/MSAL-based snippets used in the articles above. The important thing is that once the token is obtained, you can now pass it directly to the Connect-ExchangeOnline cmdlet, instead of using the unsupported, and likely to be deprecated, method based on the New-PSSession cmdlet used in said articles. And, depending on the flow used, you will either have to provide some additional details, such as the -Organization identifier when connecting as a service principal using the application permissions model, or the -UserPrincipalName when connecting in the context of a user within the delegate permissions model.
But I digress. The idea behind this article was to show you how to enable the latter scenario, namely connecting in the context of a given user while passing an access token. To start with, you will need an Azure AD application with the necessary permissions granted. When connecting in the context of a user, you can and you should be leveraging the built-in Microsoft application (clientID of fb78d390-0c51-40cd-8e17-fdbfab77341b), unless you have a valid reason to use your own. If you are reading this article, I will assume you do, so let’s continue with creating the Azure AD app registration.
Open the Azure AD blade, go to App registrations and hit the New registration button. Enter a Name for you app, and for Supported account types, select the first option, Accounts in this organizational directory only. Other values can also work, but that’s not relevant for the current scenario. Lastly, under Redirect URI, select Public client/native (mobile & desktop) from the dropdown menu and enter a value for the URI. Again, some caveats apply here, but for the purposes of our scenario we can enter something like https://blabla. Hit the Register button to complete the process.

The app registration will now be created and you will be redirected to the Overview page for the new object, where you can see some important details we will need later on. Take a note of the Application (client) ID value and copy it. You can also copy the Directory (tenant) ID value, if you don’t already know it. At this point we can already fetch an Access token for our newly registered app, however, the permissions that will allow us to access Exchange Online PowerShell have not been granted yet. In order to ensure proper access, go to API permissions, hit the Add a permission button, select APIs my organization uses, then search for and select the Office 365 Exchange Online entry. Next, select Delegated permissions, expand the Exchange node and select Exchange.Manage entry. Finally, hit the Update permissions button.
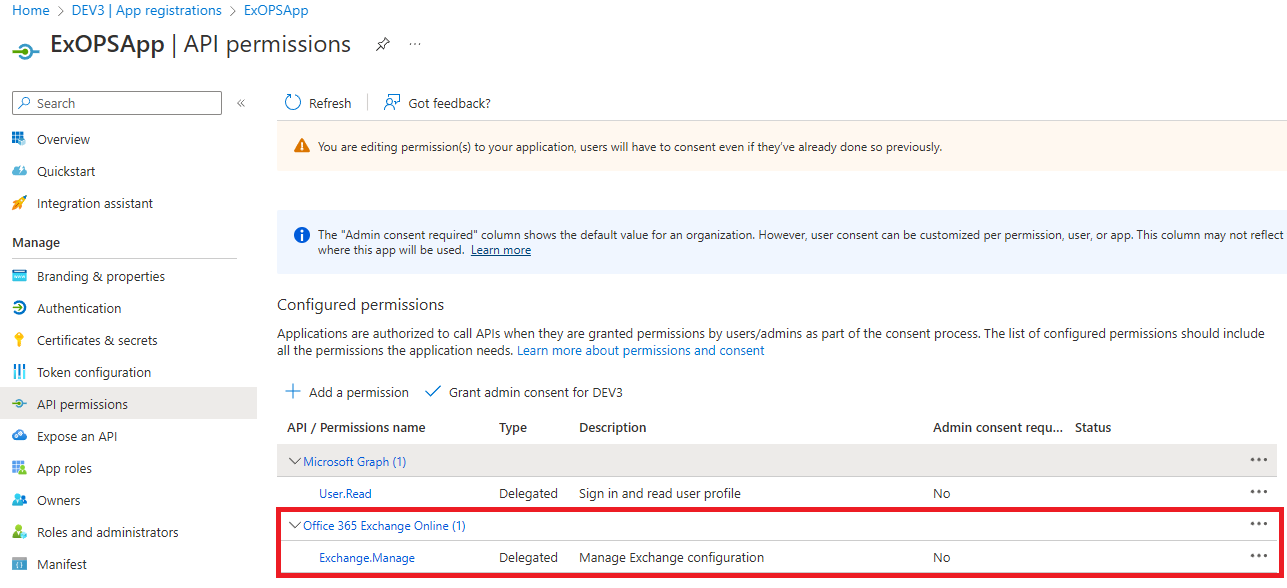
The screenshot above illustrates how the API permissions should look like for our newly registered app. This is an important step – without the Exchange.Manage permission you will be presented with an UnAuthorized error when trying to connect to Exchange Online PowerShell. Also note that the Exchange.Manage permission does not require any sort of admin consent, so every user will be able to leverage our new app to obtain a valid access token for Exchange Online PowerShell. The usual RBAC and protocol-level controls apply though, so this is not a security issue. In addition, you can also restrict who gets access to our new app, but toggling the Assignment Required property for the corresponding service principal object, and adding Users and groups as needed.
So, we now have an application we can leverage to obtain an access token for Exchange Online management. All that is left now is actually fetching the token and then passing it to the Connect-ExchangeOnline cmdlet. To obtain the token, you can use a variety of methods, such as the MSAL- and ADAL-based snippets shown below, the various SDKs, direct HTTPS requests, even “borrowing” a token obtained from the module itself. The method doesn’t really matter, as long as the token is a valid one and contains the Exchange.Manage permission.
#Obtain an access token via MSALAdd-Type -Path "C:\Program Files\WindowsPowerShell\Modules\MSAL\Microsoft.Identity.Client.dll"$app2 = [Microsoft.Identity.Client.PublicClientApplicationBuilder]::Create("59bd1626-xxxx-xxxx-xxxx-4b5ec0b5532b").WithTenantId("xxxxxxxx-xxxx-xxxx-xxxx-xxxxxxxxxxxx").WithRedirectUri("https://ExOPSApp").WithBroker().Build #Azure Android app$Scopes = New-Object System.Collections.Generic.List[string]$Scope = "https://outlook.office365.com/.default"$Scopes.Add($Scope)$token = $app2.Invoke().AcquireTokenInteractive($Scopes).WithLoginHint("[email protected]").ExecuteAsync().Result#Obtain an access token via ADALAdd-Type -Path 'C:\Program Files\WindowsPowerShell\Modules\AzureAD\2.0.1.10\Microsoft.IdentityModel.Clients.ActiveDirectory.dll' #-PassThru$authContext3 = New-Object "Microsoft.IdentityModel.Clients.ActiveDirectory.AuthenticationContext" -ArgumentList "https://login.windows.net/tenant.onmicrosoft.com"$plat = New-Object Microsoft.IdentityModel.Clients.ActiveDirectory.PlatformParameters -ArgumentList "Auto"$authenticationResult = $authContext3.AcquireTokenAsync("https://outlook.office365.com", "59bd1626-xxxx-xxxx-xxxx-4b5ec0b5532b", "https://ExOPSApp",$plat);$token = $authenticationResult.Result.AccessToken |
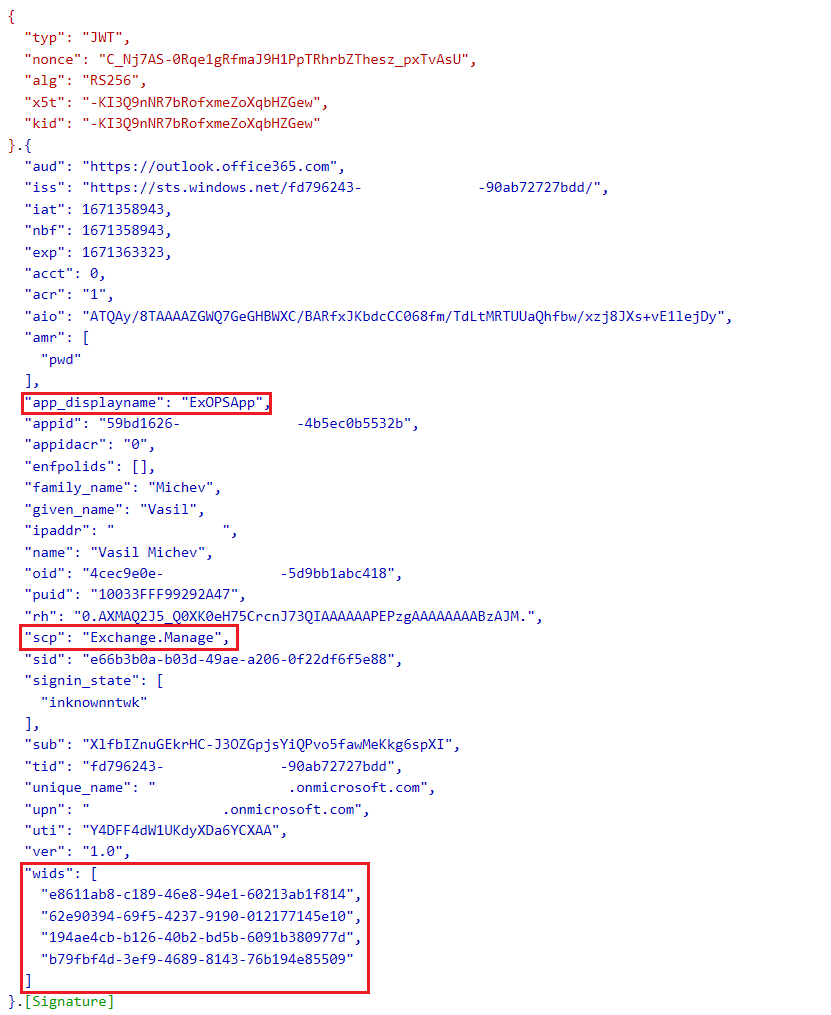
For the sake of completeness, here’s how a decoded token should look like. Note the presence of the Exchange.Manage permission under the scp claim. And since we’re obtaining a token in the context of a given user, you can also find the relevant user claims, including the list of admin roles assigned to the user.
As mentioned above, no admin consent is required for the Exchange.Manage permission. Still, the first time a given user tries to obtain a token via our app, a consent screen will popup, screenshot of which I’m also adding for the sake of completeness:

Now that we have a valid token, all that’s left is to pass it to the Connect-ExchangeOnline cmdlet, by providing it as value for the -AccessToken parameter. And since we obtained a token in the context of a user, we will also use the -UserPrincipalName parameter. And that’s it:
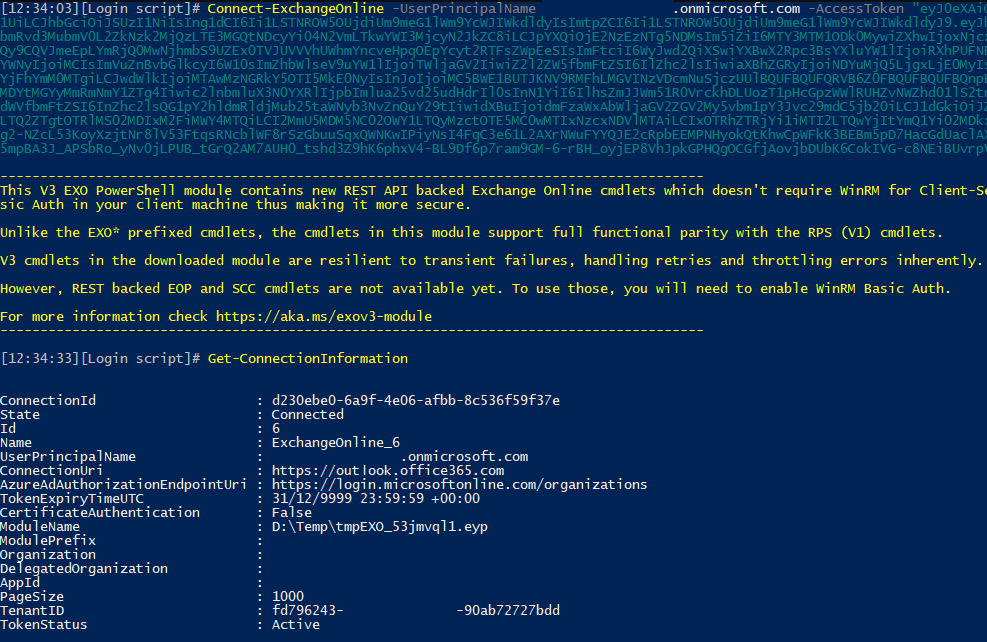
From here on, it’s business as usual – the user will get access to the set of cmdlets granted to him based on the roles/admin permissions assigned. It is important to understand however that this method DOES NOT cater to token expiration, session renewal and so on. Lots of the goodness added with the V2/V3 versions of the Exchange Online PowerShell module revolves around making things easier, more reliable and performant, and by leveraging this semi-automated method, you will be impacting your experience, in a negative way. While it’s a good thing to have the added flexibility of using this method, I wouldn’t recommend doing so, unless you have a valid reason/requirements.
And of course, we can pass a parameter obtained in the context of an application, combined with the –Organization parameter, to emulate the CBA-based experience, with a token obtained outside of the module (such as one leveraging the client credentials flow). The process is the same – obtain an access token with sufficient permissions, but this time in the application context, then pass it to the –AccessToken parameter. Refer to the article above for all the details on how to set up an app and obtain a token for this scenario.
Before closing the article, a small warning – pay attention to the value you provide for the -UserPrincipalName parameter. Why Microsoft does not validate the value, or leverage the corresponding claim directly from the access token, if beyond me. But a mistake therein can have quite interesting repercussions… more on that in another article 
Recommend
About Joyk
Aggregate valuable and interesting links.
Joyk means Joy of geeK