

Single-Tap Wi-Fi Test
source link: https://rowelldionicio.com/single-tap-wi-fi-test/
Go to the source link to view the article. You can view the picture content, updated content and better typesetting reading experience. If the link is broken, please click the button below to view the snapshot at that time.
Single-Tap Wi-Fi Test
How much time does it take you to troubleshoot a Wi-Fi network? Do you have a specific methodology in place to document every layer of connectivity? And how quickly does it take you to determine the issue was not even Wi-Fi related?
When the network engineer is made aware of a Wi-Fi issue it usually happened in the past. This makes it difficult to triage.
The issue is often too vague such as “Wi-Fi was slow” or “Wi-Fi dropped for a few minutes”. It can be puzzling where to even begin troubleshooting.
In my workflow, I’ve been using the NetAlly AirCheck G3 or EtherScope nXG which both have an app called AutoTest.
AutoTest is a simple way to verify the layers of connectivity with a single tap of the button.
By leveraging an AutoTest profile, I can have various settings, tests, and thresholds preconfigured. AutoTest will use the Wi-Fi test port to run these profiles in a sequence I specify.
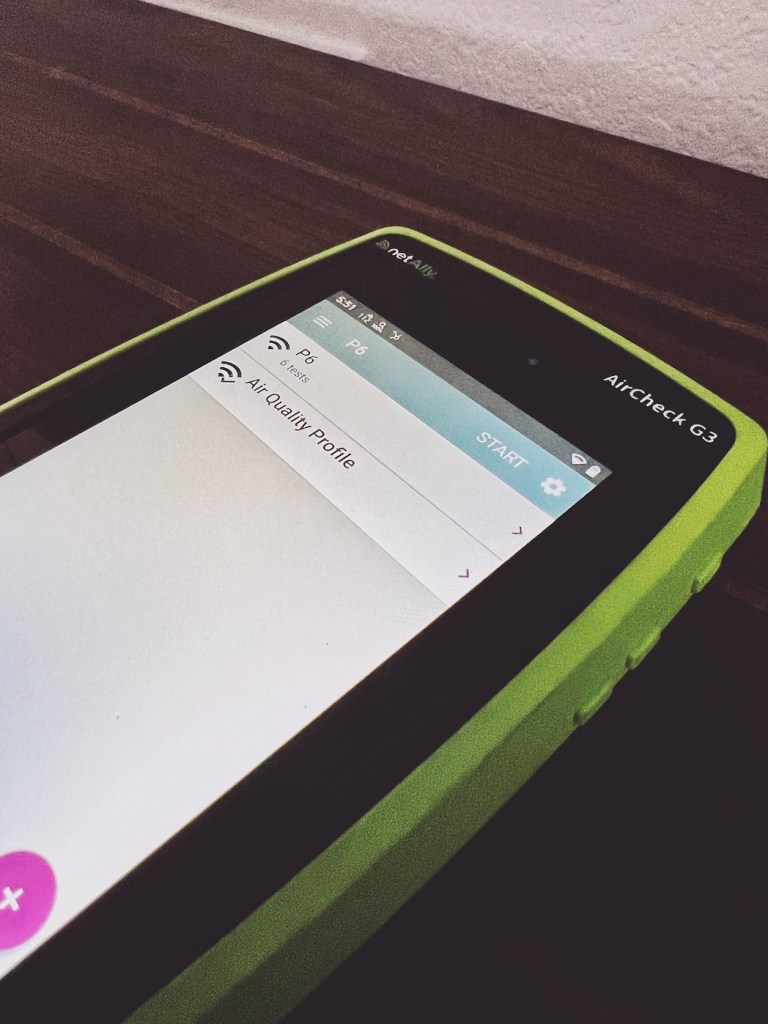
Wi-Fi AutoTest Profile
You can configure, save, and load different profiles depending on the environment you walk into. In my example, I have a P6 profile configured that makes a Wi-Fi connection to an SSID – SIXCAST. I’ve set the WPA3 password for the SSID. I also set up another Wi-Fi Profile to test against a second SSID.
The NetAlly handheld tool will associate to the best signal it detects for the SSID, but you can also configure it to connect to a specific BSSID.
When associating, it will check for 802.11 and non-802.11 channel utilization. My profile is set with the thresholds I’ve determined. If I’m seeing more than 50% 802.11 utilization then I’ll get a warning. I’ll get a failure indication with 75% channel utilization. That could be a hint towards capacity. Likewise, I have thresholds set for any interference.
AirCheck G3 AutoTest Parameters

AutoTest app on screen
Once associated, we should get an IP address which we test for and set a response time threshold of 60 seconds. When an IP is has been acquired I then test against different targets such as the gateway address, a DNS address, and a public IP address. Each of those tests can easily tell me where an issue exists. In many cases, we cannot ping the gateway address due to some firewall policy but we should be able to resolve hostnames and reach the Internet (or a known good target).
If you need something beyond basic ping and DNS test targets, it is possible to set up TCP port connection , an HTTP, and FTP test.

Air Quality Profile
An Air Quality Profile will scan through channels to measure utilization and interference. It’s not a spectrum analysis but the handheld tool can detect non-802.11 signals. The Air Quality Profile has configurable thresholds to your preference and can report on co-channel interference and adjacent channel interference.
The co-channel and adjacent channel interference thresholds can be configurable to your requirements.
After completing the test, Air Quality Profile will display 3 tables for each band you have enabled.
The table will show the top 4 channels for high utilization, interference, and co-channel interference.
Warning indicators will be yellow and failures will be in red. It’s possible to save these tables by tapping on the three dots and tap on Upload graphs to Link-Live.

Periodic Testing
Previously, I mentioned how users can describe issues in the past or happen intermittently. With the great battery capacity of the AirCheck G3 or EtherScope nXG, you can configure these tests to run periodically.
It’s as simple as enabling Periodic AutoTest, configure your desired interval, and how long of a duration you intend to test for. Set the handheld tool in the location where the issue occurs and let the test run.
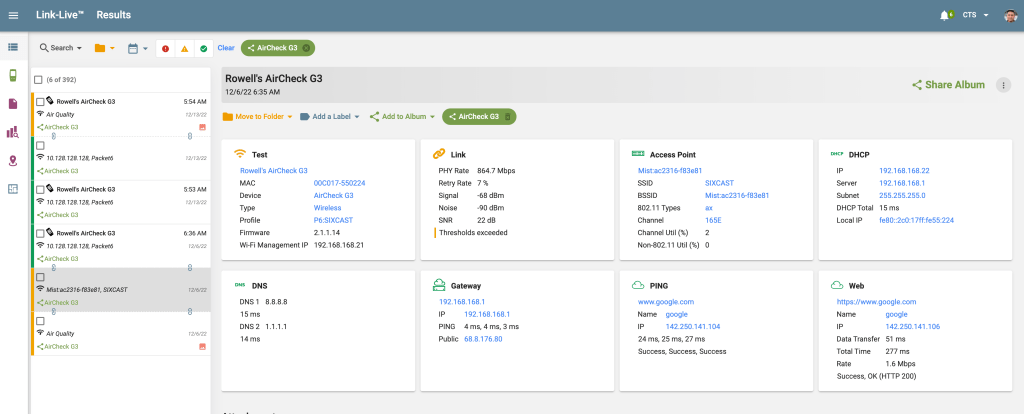
Since the handheld tools have a Wi-Fi management port, you can remotely control the AirCheck G3 or EtherScope through Link-Live and analyze the results as soon as it is uploaded.
Conclusion
In many engagements, I’ve used the AutoTest to perform quick tests across different parameters. And in some cases I’ve tested against specific BSSIDs to identify issues relating to high channel utilization and co-channel interference.
Most useful for me is documenting all the results into NetAlly’s Link-Live for future analysis. You’re not limited to a small screen and you can collaborate with others.
Recommend
About Joyk
Aggregate valuable and interesting links.
Joyk means Joy of geeK