

Django之视图层 - 失忆的小王子
source link: https://www.cnblogs.com/chen-ao666/p/16980901.html
Go to the source link to view the article. You can view the picture content, updated content and better typesetting reading experience. If the link is broken, please click the button below to view the snapshot at that time.

视图层介绍
一个视图函数,简称视图,是一个简单的 Python 函数,它接受 Web 请求并且返回 Web 响应。
响应可以是一个 HTML 页面、一个 404 错误页面、重定向页面、XML 文档、或者一张图片…
每个视图函数都负责返回一个 HttpResponse 对象,对象中包含生成的响应。
代码写在哪里都可以,只要在 Python 目录下面,一般约定是将视图放置在项目或应用程序目录中的名为views.py的文件中。
视图层作用
- 作用:主要存放业务核心逻辑代码
视图层,熟练掌握两个对象即可:请求对象(request)和响应对象(HttpResponse)
视图层之必会三板斧
django视图函数必须要返回一个HttpResponse对象
否则报错:The view app01.views.func1 didn't return an HttpResponse object. It returned None instead.提示你没有返回一个Httpresponse对象而是返回了一个None。

为什么必须要返回这个对象呢?我们 Ctrl + 鼠标点击分别查看三者的源码来查探究竟。
HttpResponse源码
class HttpResponse(HttpResponseBase):
    """
    An HTTP response class with a string as content.

    This content that can be read, appended to or replaced.
    """
    streaming = False

    def __init__(self, content=b'', *args, **kwargs):
        super(HttpResponse, self).__init__(*args, **kwargs)
        # Content is a bytestring. See the `content` property methods.
        self.content = content
由此可得,HttpResponse()就是对象,括号内直接跟一个具体的字符串作为响应体,示例如下
HttpResponse(): 返回文本,参数为字符串,字符串中写文本内容。如果参数为字符串里含有 html 标签,也可以渲染。
 def runoob(request):
    # return HttpResponse("百度首页")
    return HttpResponse("<a href='https://www.baidu.com/'>百度首页</a>")
render源码
- 底层返回的也是 HttpResponse 对象
def render(request, template_name, context=None, content_type=None, status=None, using=None):
        """
        Returns a HttpResponse whose content is filled with the result of calling
        django.template.loader.render_to_string() with the passed arguments.
        """
        content = loader.render_to_string(template_name, context, request, using=using)
        return HttpResponse(content, content_type, status)

'''
render(request, template_name[, context])`  `结合一个给定的模板和一个给定的上下文字典,并返回一个渲染后的 HttpResponse 对象。
参数:
     request: 用于生成响应的请求对象。

     template_name:要使用的模板的完整名称,可选的参数

     context:添加到模板上下文的一个字典。默认是一个空字典。如果字典中的某个值是可调用的,视图将在渲染模板之前调用它。

render方法就是将一个模板页面中的模板语法进行渲染,最终渲染成一个html页面作为响应体。
'''
redirect源码
- redirect内部是继承了HttpRespone类


小结:
响应对象
- 响应对象主要有三种形式:HttpResponse(),render(),redirect()
- HttpResponse():返回文本,参数为字符串,字符串中写文本内容。
- render():返回文本,第一个参数为request,第二个参数为 字符串(或html页面文件),第三个参数为字典(可选参数,向页面传递的参数:键为页面参数名,值为views参数名)
- redirect():重定向,跳转到新页面。参数为字符串,字符串中填写页面路径。一般用于form提交数据后跳转到新页面
三板斧本质
- ender 和 redirect 是在 HttpResponse 的基础上进行了封装:
- render:底层返回的也是 HttpResponse 对象
- redirect:底层继承的是 HttpResponse 对象
JsonResponse对象
全称:JSON的全称是"JavaScript Object Notation", 意思是JavaScript对象表示法
作用:前后端交互一般使用的是json实现数据的跨域传输
2.向前端返回一个json格式字符串的两种方式
方法一:直接自己序列化
import json
def index_func(request):
user_dict = {'name':'alex','age':'18','性别':'女'}
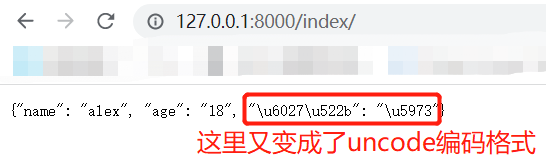
user_json = json.dumps(user_dict,ensure_ascii=False)
return HttpResponse(user_json)
# 添加ensure_ascii=False 参数是为了让中文保持正常显示, 不然会转换成uncode格式

方法二:使用JsonResponse对象
from django.http import JsonResponse

def index_func(request):
    user_dict = {'name':'alex','age':'18','性别':'女'}
    return JsonResponse(user_dict)
问题:bJsonResponse 对象没有 ensure_ascii 参数来保证中文正常显示吗?
首先,我们来查看源码。
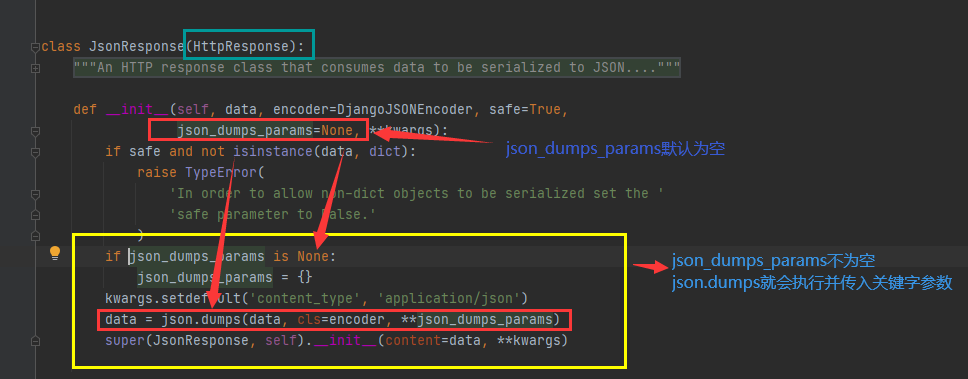
由源码可知,json_dumps_params是一个字典,接下来我们为json_dumps_params传入参数。
from django.http import JsonResponse

def index_func(request):
    user_dict = {'name':'alex','age':'18','性别':'女'}
    return JsonResponse(user_dict,json_dumps_params={'ensure_ascii':False})
ps:以后写代码很多时候可能需要参考源码及所学知识扩展功能
class JsonResponse():
    def __init__(self,data,json_dumps_params=None):
        json.dumps(data,**json_dumps_params)
JsonResponse主要序列化字典,针对非字典的其他可以被序列化的数据需要修改safe参数为False
from django.http import JsonResponse

def index_func(request):
    user_list = [11,22,33,44,55]
    return JsonResponse(user_list,json_dumps_params={'ensure_ascii':False})
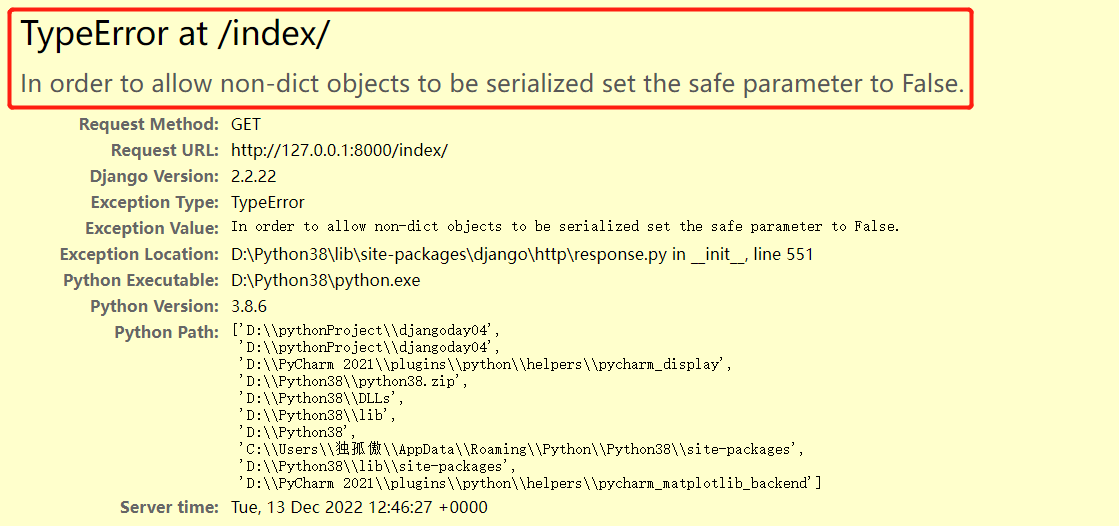
提示为了让非字典对象能够被序列化,设置safe参数为false。
我代码没有写这个啊,这是哪来的呢?
凭空捏造??且看JsonResonse源代码
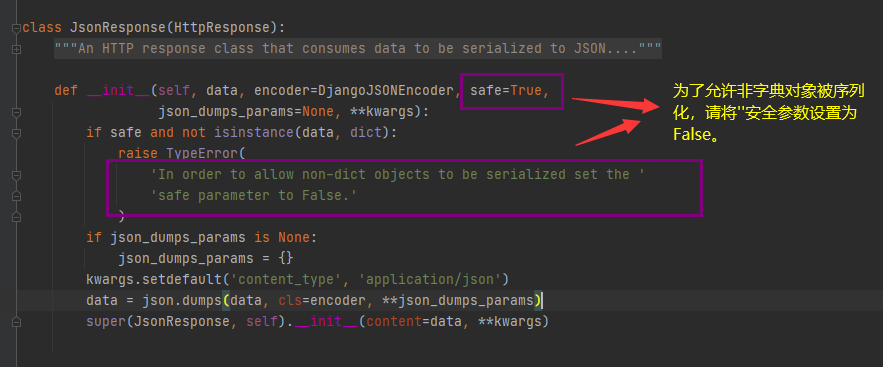
加入 safe=False 参数, 让其允许非 dict 对象被序列化
from django.http import JsonResponse

def index_func(request):
    user_list = [11,22,33,44,55]
    return JsonResponse(user_list,safe=False,json_dumps_params={'ensure_ascii':False})
ps:JsonResponse返回的也是HttpResponse对象
class JsonResponse(HttpResponse):  # 继承了HttpResponse
    ...
视图层之request对象获取文件
request.FILES # 获取文件对象
1.form表单上传文件注意事项
method必须是postenctype参数修改为multipart/form-data
2.实现代码
index_Page.html文件
<!DOCTYPE html>
<html lang="en">
<head>
    <meta charset="UTF-8">
    <title>Title</title>
    <script src="https://cdn.bootcdn.net/ajax/libs/jquery/3.6.1/jquery.js"></script>
</head>
<body>
    <form action="" method="post" enctype="multipart/form-data">
        <p>file:
            <input type="file" name="file" multiple="multiple">
        </p>
        <input type="submit" value="提交">
    </form>
</body>
</html>
views.py文件
from django.shortcuts import render

def index_func(request):
    if request.method == 'POST':
        # 获取文件数据
        print(request.FILES)    # <MultiValueDict: {'file': [<InMemoryUploadedFile: 试卷.pdf (application/pdf)>]}>
     # 获取文件数据对象
        file_obj = request.FILES.get('file')
        print(file_obj,type(file_obj))      # 试卷.pdf   <class 'django.core.files.uploadedfile.InMemoryUploadedFile'>
        # 获取文件对象字符串名
        print(file_obj.name,type(file_obj.name))    # 试卷.pdf   <class 'str'>

        with open(r'%s' % file_obj.name, 'wb') as f:
            for line in file_obj:
                f.write(line)

    return render(request,'indexPage.html')
FBV与CBV
FBV基于函数的视图(Function base view)
- 之前我们在视图层都用的是基于函数的视图,使用函数来处理不同的请求。
基于视图的函数我们学习Django的时候就就已经在使用了,示例如下:
urls.py文件
urlpatterns = [
    path("login/", views.login),
]
views.py文件
from django.shortcuts import render,HttpResponse

def login(request):
    if request.method == "GET":
        return HttpResponse("GET 方法")
    if request.method == "POST":
        user = request.POST.get("user")
        pwd = request.POST.get("pwd")
        if user == "shawn" and pwd == "123456":
            return HttpResponse("POST 方法")
        else:
            return HttpResponse("POST 方法1")
如果我们在浏览器中直接访问 http://127.0.0.1:8000/login/ ,输出结果为:GET 方法
CBV基于类的视图(Class base view)
基本介绍
- 采用采用面向对象的方法写视图文件。
- 使用类来处理视图层的请求
基本使用
视图层views.py文件
from django import views

class MyloginView(views.View):
    def get(self, request):
        return HttpResponse('from CBV get function')
    def post(self,request):
        return HttpResponse('from CBV post function')
路由层urls.py文件
from django.contrib import admin
from django.urls import path
from app01 import views

urlpatterns = [
    path('login/',views.MyloginView.as_view())
]
CBV会自动根据请求方法的不同自动匹配对应的方法并执行
CBV源码剖析(重要)
1.储备知识
- 面向对象属性查找顺序
- 类方法特性
- 反射中getattr( ) 提前了解一下
2.突破口
path('login/', views.MyLoginView.as_view()) # as_view() 是什么东西
我们 Ctrl + 点击查看其源码
发现它是一个类方法, 查看其整体结构(只看框起来的即可, 其他的不用管), 该方法内部有一个 view 方法, 并且返回值是 view 的内存地址, 类似于闭包函数
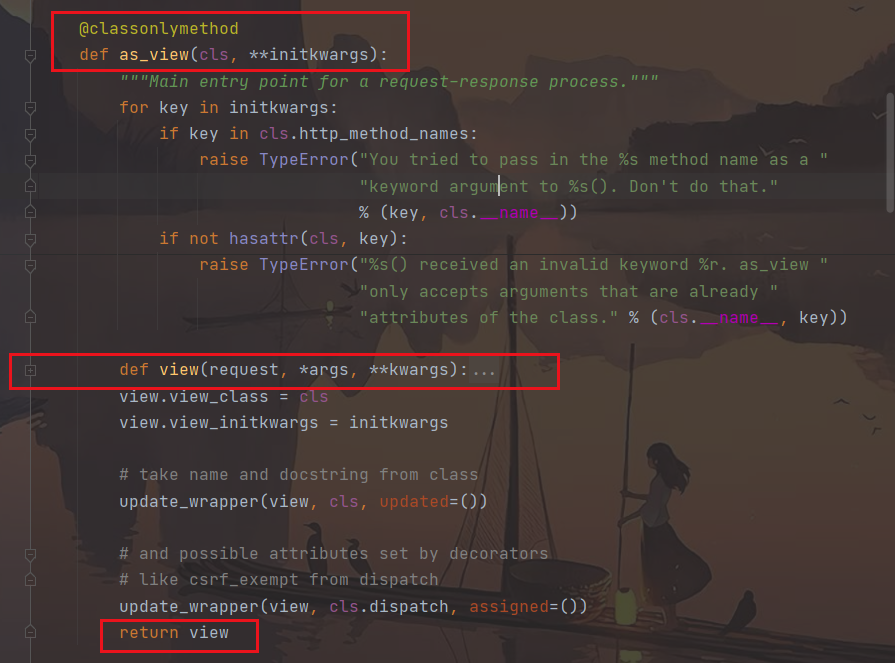
于是我们就可以得到一些初步结果
path('login/', views.MyLoginView.as_view())    # 等同于下面
path('login',views.view)    # 看着是不是与普通的路由没有什么区别了 : 通过匹配触发视图函数的运行
那么 view 是一个什么样的函数呢? 现在突破口变成了 view 方法了
我们再看其源码(只看框起来的即可,其他的不用管) :
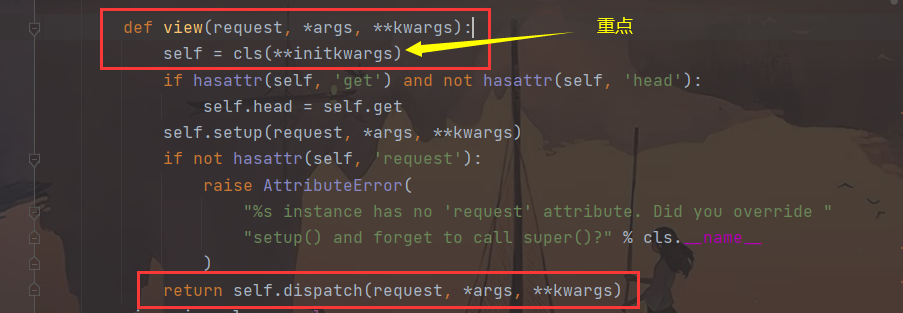
"self = cls(**initkwargs)"
# cls是什么? 记得上面的类方法吗? 类调用时传入类本身
# 我们是通过MyView来调用as_view的, 那么cls也就是MyView
# 类加括号实例化得到对象self, 这个self就是我们自己的类产生的对象 : self=MyView(**initkwargs),我们不用去管里面的参数
# 接下来看看view的返回值 : self.dispatch(request, *args, **kwargs)
# 也就是去MyView类实例出的对象里面去找dispatch方法并执行,很显然self对象中没有该方法,于是去类中去找,也没有
# 最后到父类View中去找,发现就在as_view类方法的下面找到了
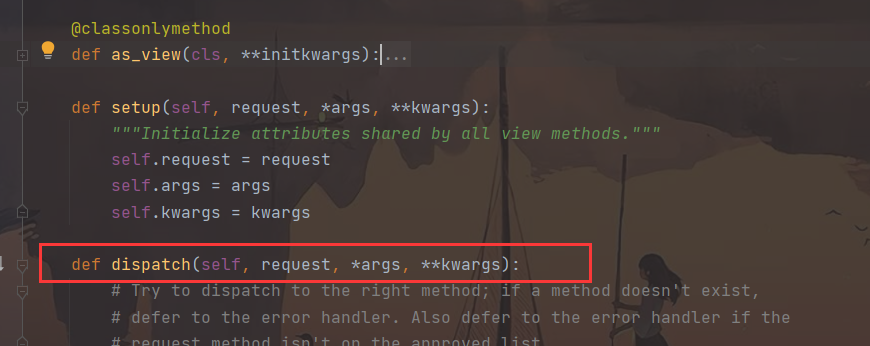
我们在看它下面的逻辑代码
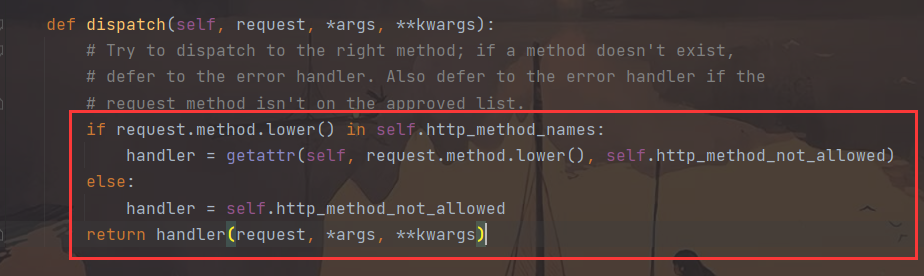
逻辑很简单,使用了反射的知识点
# 先是拿到当前请求方式的大写字符转成小写, 然后判断在不在后面的 self.http_method_names 里面
# Ctrl+点击 看看这是个什么东西 :
'http_method_names = ['get', 'post', 'put', 'patch', 'delete', 'head', 'options', 'trace']'
# 发现是8种常用的请求方式列表, 接着返回dispatch源码查看,为了方便我们假设现在的是get请求方式
# 判断get请求在请求列表里面,于是执行紧跟其下的代码...我们先看看getattr()得到的是什么结果
# 判断我们的self是否有名叫get的属性或方法,如果有则返回该属性的值或方法的内存地址,否则返回 self.http_method_not_allowed, 这是个啥,我们 Ctrl+点击 也来看看:

# 原来是一个报错信息 : 提示方法不允许,整理下思路,也就是说self中有get返回值或者内存地址,没有则报错
# 很显然我们的self是有get这个名字的,并且是一个方法,于是将get方法的内存地址赋值给handler
# 我们再来看dispatch的返回值 : handler + (括号), 不就是执行该方法吗!也就是执行了我们的get方法打印了"触发了get方法--->"
Recommend
About Joyk
Aggregate valuable and interesting links.
Joyk means Joy of geeK