

Simplifying A/B/n Testing of Backend Services
source link: https://dzone.com/articles/simplifying-abn-testing-of-backend-services
Go to the source link to view the article. You can view the picture content, updated content and better typesetting reading experience. If the link is broken, please click the button below to view the snapshot at that time.

Simplifying A/B/n Testing of Backend Services
Learn how to easily run A/B/n experiments in Kubernetes using the Iter8 SDK. Iter8 makes it simple to collect business metrics for your apps/ML models.
A/B/n testing, or split testing, is a testing process by which user traffic is randomly distributed between two or more versions of an application (or application component). Business metrics are evaluated to identify a winning version — the version which results in the greater profit or business value. For example, a shopping application might use revenue and user engagement as business metrics.
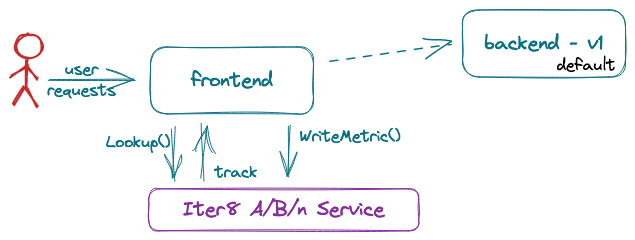
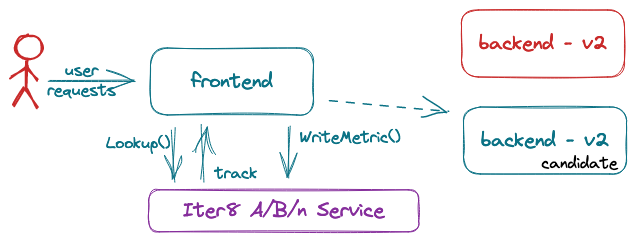
We focus on A/B/n testing of backend services deployed in Kubernetes. For example, in the figure below, the frontend might be a Node.js based online store. It relies on a backend recommendation service to make product suggestions to users. We are interested in A/B/n testing multiple versions of the recommendation service. In the figure, we have two versions, v1 (the current or default version) and v2 (the candidate version).

Computing Business Metrics
A/B/n testing relies on the evaluation of business metrics. Such metrics measure the benefit or value of a particular version of an application. For example, in an online store application, relevant metrics might be sales revenue or user engagement. Business metrics are application specific; they cannot be computed by the infrastructure but must be computed by the application itself. When a metric such as sales revenue is computed by an application component such as the frontend online store above, the contribution of the backend recommendation engine is indirectly included. However, the frontend component cannot associate the metric value with a particular version of the backend because it usually does not know which version of the backend service was used.
Iter8 SDK
In order to correctly attribute metrics to backend versions, it is necessary for the front end to be aware of which version of the backend is being used for each user session. To assist a frontend service, the Iter8 SDK can be used. Iter8 is an open-source Kubernetes release optimizer that can help you get started with testing Kubernetes apps in seconds. With Iter8, you can perform various kinds of experiments, such as SLO validation, canary tests, chaos injection tests, and now A/B/n tests. The Iter8 SDK provides two interfaces:
Lookup(component, user_session),which identifies a version of a component that a caller should use to send requests to for a given user session.WriteMetric(metric_value, component, user_session),which associates a metric with the recommended version of the component.
The following sequence diagram shows the use of these interfaces for our shopping app:
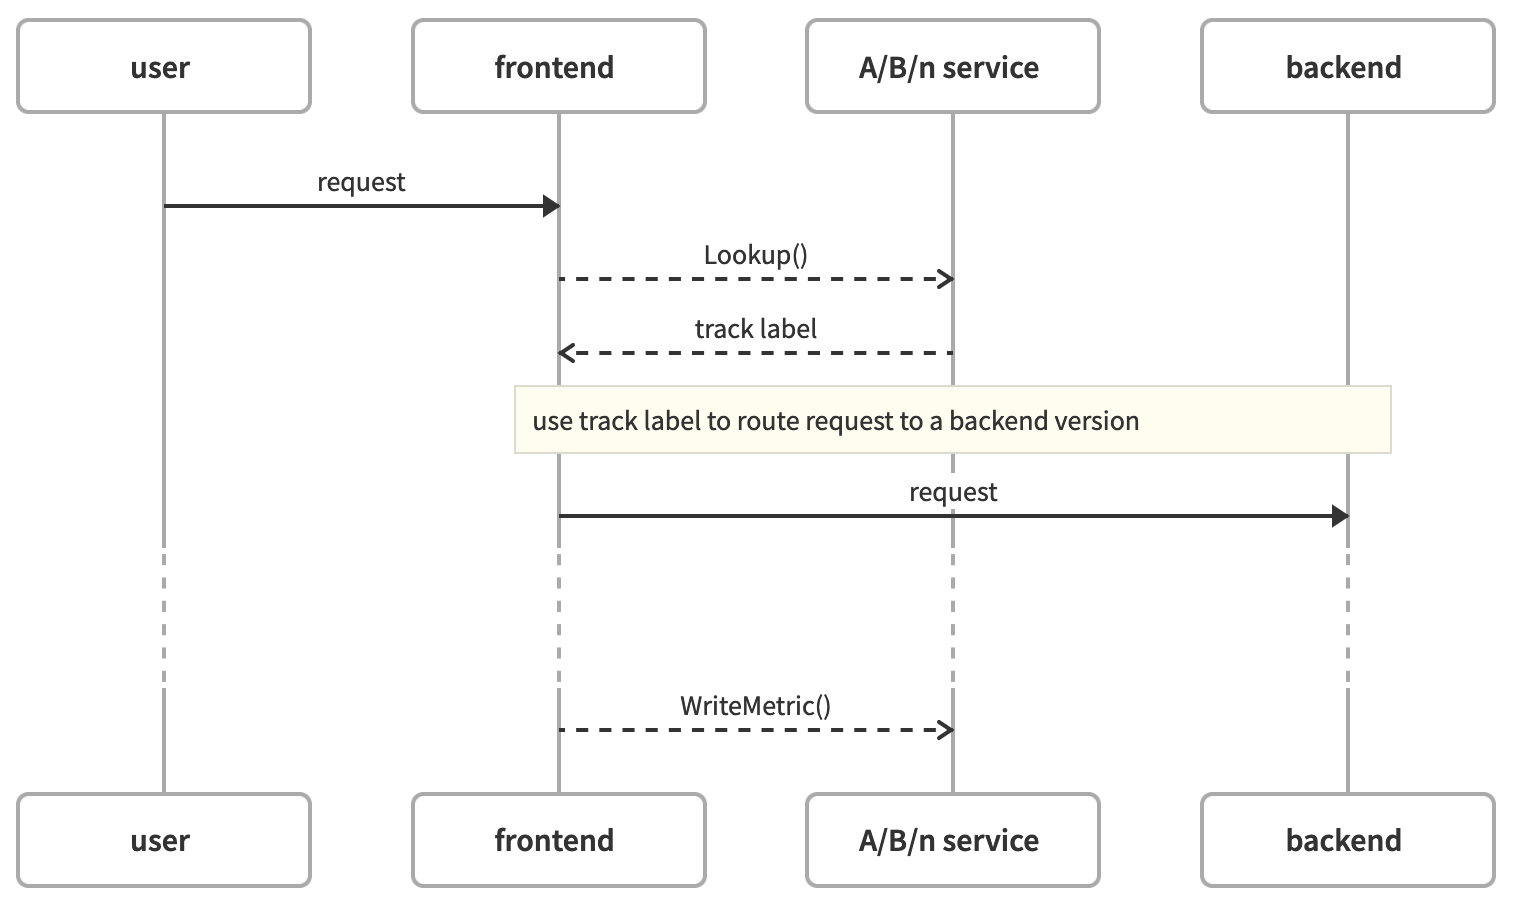
In response to a user request, the frontend component calls Lookup() to identify which version of the backend component to use. Lookup() returns one of a fixed number of user-defined track labels. Lookup() guarantees that the same track label will be recommended for the same user session, ensuring that subsequent calls to the backend will be sent to the same version. The frontend service then sends its request to the recommended backend using the track as a key to the routing. When the front end later computes a business metric for the user session, it can be safely associated with the recommended backend version. WriteMetric() can be used to do this, eliminating the need for the front end to keep track of the mapping to backend versions.
Since Lookup() returns one of a fixed set of track labels, the frontend service must be configured to route traffic to a fixed set of services — one for each track. The mapping of the version to track varies over time and is done as part of the deployment of candidate versions using labels on the deployed Kubernetes objects.
Clearly, the introduction of an SDK imposes a requirement on the developer of the frontend components of an application. Furthermore, the approach relies on an assumption that the frontend application can route backend requests based on a set of track identifiers. This implies requirements on the configuration of the application. We demonstrate, with an example, how easy it is to use the Iter8 SDK.
The Iter8 SDK is implemented using gRPC. The interfaces are described in this protocol buffer document. Language-specific code can be generated from this for a variety of languages. The interfaces themselves are implemented by an A/B/n service.
Application Development for A/B/n Testing
We will consider a simple two-tier application. The front end, written in Node.js, represents an online store. The backend, written in Go, represents a recommendation engine called by the front end to present alternative products to the user. The full source code for this application can be found here.
The frontend component supports two interfaces:
/getRecommendationwhich ask for product recommendations./buywhich completes a purchase.
As a side effect of a purchase (/buy request), a business metric for the user session is computed. The implementation of the /getRecommendation interface relies on the backend recommendation service. We want to run A/B/n tests on this backend recommendation service.
The Iter8 SDK is implemented using gRPC. The interfaces are described in this protocol buffer document. Language-specific code can be generated from this for a variety of languages. The code we generated is in the sample application and can be copied directly for use in your own application.
To use the Iter8 SDK, require gRPC and the generated libraries:
var grpc = require('@grpc/grpc-js');
var messages = require('./abn_pb.js');
var services = require('./abn_grpc_pb.js');
and instantiate a client:
var client = new services.ABNClient(abnEndpoint, gprc.credentials.createInsecure());This client is used in both use cases: before calling backend services and when writing metric values.
Calling Backend Services
Before calling the backend recommendation service, the Lookup() method should be called. The returned track identifier should be used as an index to select the route to which to send the request. In our sample frontend, this can be implemented as follows:
// map of track to route to backend service
const trackToRoute = {
   "default":   "http://backend:8091",
   "candidate": "http://backend-candidate:8091",
}
...
// identify default route
route = trackToRoute['default'];
...
var application = new messages.Application();
application.setName('default/backend');
application.setUser(req.header('X-User'));
client.lookup(application, function(err, session) {
    if (!err) {
        // use route determined by recommended track
        route = trackToRoute[session.getTrack()];
    }
    // call backend service using session.getTrack() as index to list of endpoints
    http.get(route + '/recommend', ... )
}
In this implementation, the user session is extracted from the request header X-User. Note that if there are any problems interacting with the Iter8 SDK, the default route will be selected. The full sample code can be found here.
Writing Metrics
When the /buy interface is called, indicating the completion of a sale, business metrics are computed. In our sample application, a random value is assigned to the metric sample_metric:
// export metric
var mv = new messages.MetricValue();
mv.setName('sample_metric');
mv.setValue(random({min: 0, max: 100, integer: true}).toString());
mv.setApplication('default/backend');
mv.setUser(user);
That’s it! No further changes are required, no matter how many A/B/n tests are run – or none.
The full sample frontend code can be found here (Node.js). Alternative implementations are provided in Python and Go. As with the node example, the generated code can be copied directly to your own applications.
Deploying an Application for A/B/n Testing
When deploying the application components that will be A/B/n tested, the only requirement is to add the labels that the Iter8 A/B/n service uses to identify the component version. In our case, we plan to test only the backend recommendation component.
The Iter8 SDK requires that at least one of the resource instances deployed for each version include the following labels:
app.kubernetes.io/name: the application (component) name.app.kubernetes.io/version: the version name.iter8-tools/track: the track label to be used for this version.iter8-tools/abn: a flag indicating whether or not the version is ready to receive traffic.
As an illustration, the following commands can be used to manually deploy the sample application. Firset, deploy the frontend online store component:
kubectl create deployment frontend --image=iter8/abn-sample-frontend-node:latest
kubectl expose deployment frontend --name=frontend --port=8090
Next, deploy the current, or default, version of the sample backend recommendation component. We add the required labels to the deployment object because we wish to run A/B/n tests on this component.
kubectl create deployment backend --image=iter8/abn-sample-backend:latest
kubectl expose deployment backend --name=backend --port=8091

kubectl label deployment backend app.kubernetes.io/name=backend
kubectl label deployment backend app.kubernetes.io/version=v1
kubectl label deployment backend iter8.tools/track=default
kubectl label deployment backend iter8.tools/abn=true
Finally, deploy Iter8 Service, if not already deployed:
helm install --repo https://iter8-tools.github.io/hub iter8-abn iter8-abn \
--set "resources={deployments,services}" \
--set "namespaces={default}"
Running an A/B/n Test
We are now ready to run an A/B test comparing the currently deployed default version of the backend recommendation component and a new candidate version. There are two steps to running the test. The first step is to deploy one or more candidate versions of the component. Using our sample application, we show the steps needed to deploy a candidate version of the backend recommendation engine. Once the candidate version is fully deployed, the Iter8 Service will begin to send the track label assigned to it to the frontend service. In response, the front-end store will begin to send requests to the new version of the recommendation engine. The second step is to launch an Iter8 experiment to evaluate the collected metrics. We show a multi-loop experiment — one that periodically executes until it is deleted. On each execution, the evaluation of metrics is updated.
Deploying the Candidate Version
Deploying the candidate version can be deployed in any way — manually (as we show) or using a CI workflow. As described above, the required labels must be added to at least one of the Kubernetes resource objects.
To deploy the candidate version of the backend recommendation service in our sample application:
kubectl create deployment backend-candidate --image=iter8/abn-sample-backend:latest
kubectl expose deployment backend-candidate --name=backend-candidate --port=8091

kubectl label deployment backend-candidate app.kubernetes.io/name=backend
kubectl label deployment backend-candidate app.kubernetes.io/version=v2
kubectl label deployment backend-candidate iter8.tools/track=candidate
While deploying the candidate version, care must be taken to ensure that the candidate version is fully initialized before the front end sends any requests to it. This can be ensured by setting the iter8-tools/abn label only after the candidate version is fully initialized. Once it is initialized, the Iter8 A/B/n service will begin to offer the version in response to Lookup() requests.
kubectl label deployment backend-candidate iter8.tools/abn=trueThe steps are depicted in the following diagrams. Initially, only the default version, v1, is deployed and receives all traffic from the frontend.
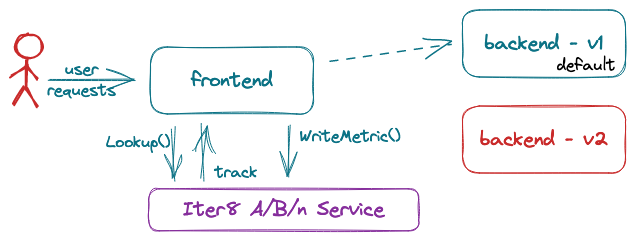
When a candidate version, v2, is deployed, the front end continues to send all requests to the default version.
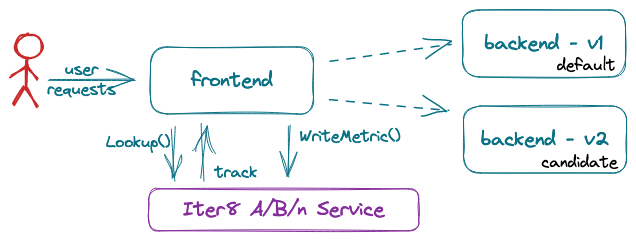
Once the candidate version is ready to receive traffic, for example, when the pods are Ready, set the label iter8.tools/abn. This triggers the Iter8 Service to start recommending it to the front end, which, in turn, starts sending requests to both versions. In our sample application:
kubectl label deployment backend-candidate iter8.tools/abn=true
In practice, testing depends on the user load applied to the frontend service. In this tutorial, we apply load using a script that sends requests to the store endpoints /getRecommendation and /buy. To use, forward local requests to the cluster:
kubectl port-forward svc/frontend 8090:8090and generate load for different users; for example, for users foo and foobar:
curl -s https://raw.githubusercontent.com/iter8-tools/docs/main/samples/abn-sample/generate_load.sh | sh -s -- -u foocurl -s https://raw.githubusercontent.com/iter8-tools/docs/main/samples/abn-sample/generate_load.sh | sh -s -- -u foobarLaunch an Iter8 Experiment
Launch an Iter8 experiment to periodically read the business metrics being written via WriteMetric(). The predefined abnmetrics task can be used:
iter8 k launch \
--set "tasks={abnmetrics}" \
--set abnmetrics.application=default/backend \
--set runner=cronjob \
--set cronjobSchedule="*/1 * * * *"
This command launches an Iter8 experiment that runs the predefined abnmetrics task to read the recorded metrics for the backend application component running in the default namespace. Use of the cronjob runner indicates that the experiment will be run periodically, according to the cronjobSchedule (once a minute in this case). The result of the experiment will be updated over time.
Inspect the results of an experiment and decide whether to promote the candidate version or not. The first report will be available after the experiment tasks run the first time (about one minute). A sample report is as follows:
iter8 k report Experiment summary:
*******************
Experiment completed: false
No task failures: true
Total number of tasks: 1
Number of completed tasks: 18
Latest observed values for metrics:
***********************************
Metric | candidate | default
------- | ----- | -----
abn/sample_metric/count | 765.00 | 733.00
abn/sample_metric/max | 100.00 | 100.00
abn/sample_metric/mean | 50.11 | 49.64
abn/sample_metric/min | 0.00 | 0.00
abn/sample_metric/stddev | 28.63 | 29.25Promoting a Winner
When promoting the candidate version, care must be taken to ensure that no user traffic is accidentally sent to a version being upgraded or deleted. Any approach that can be used to perform the promotion should include the following steps. Manual steps for the sample application are shown as well.
Initially, both the default and candidate versions are receiving requests from the front end.
First, unset the iter8.tools/abn label from the resource associated with the default version. This disables traffic to the default version during the transition — the Iter8 SDK interface Lookup() will remove the default track from its list of recommended backends:
kubectl label deployment backend iter8.tools/abn-
Next, redeploy the objects associated with the default track using the new version.
Once the updated objects are ready, add the iter8.tools/abn label indicating that it is ready to receive traffic.
kubectl label deployment backend iter8.tools/abn=true
At this point, both the default and the candidate track labels are both associated with the same backend version. It is now possible to remove the candidate version. To do so, unset the iter8.tools/abn label to terminate traffic to the candidate resources:
kubectl label deployment backend-candidate iter8.tools/abn-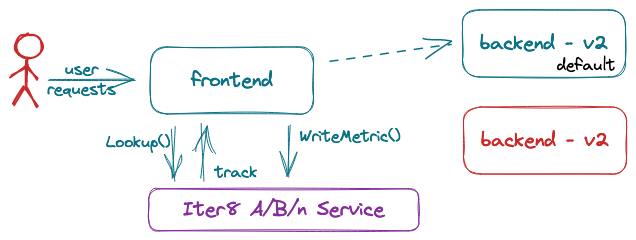
Finally, delete candidate resources.
kubectl delete deployment backend-candidate
kubectl delete service backend-candidate
Final Thoughts
We’ve explored some of the challenges doing A/B/n testing, especially of an application's backend services. The key challenge relates to the inability of a frontend component computing business metrics to correctly associate them with the version of the backend that contributed to their computation. The Iter8 SDK enables a front end to correctly make this association. It does so by providing a lookup interface that allows the frontend service to identify a version of a backend service to use as it processes user requests. In this way, it can reliably assign business metrics to the backend version. We showed how easy it is to modify a frontend service using the Iter8 SDK and to run an A/B/n test.
Only a few lines of additional code were needed to make a one-time change to the front end. Enabling candidate versions for testing simply involves the addition of a few labels.
After trying out the tutorial, try it out with your own application.
Recommend
About Joyk
Aggregate valuable and interesting links.
Joyk means Joy of geeK