

CodeProject.AI Server, Blue Iris and Face Recognition
source link: https://www.codeproject.com/Articles/5348246/CodeProject-AI-Server-Blue-Iris-and-Face-Recogniti
Go to the source link to view the article. You can view the picture content, updated content and better typesetting reading experience. If the link is broken, please click the button below to view the snapshot at that time.

CodeProject.AI Server, Blue Iris and Face Recognition
Recently on the Blue Iris forums I was reading an account of a user who could not get face detection working using Blue Iris and CodeProject.AI Server. Someone kindly responded with an answer to this user, but something told me this was the kind of issue that could do with a step by step guide. So here is how you get face detection working with Blue Iris and CodeProject.AI Server.
If you haven't set up Blue Iris before, or if you haven't set up CodeProject.AI Server with Blue Iris, please see my article How to Setup Blue Iris and CodeProject.AI Server on Windows Using a Wyze Cam. In that article I walk you through installing CodeProject.AI Server, installing and setting up Blue Iris, setting up a Wyze cam, and using all that to detect an object. Because the object I was trying to detect was a dog, all of my Blue Iris are currently set up for that and need to be changed.
My Setup
This is my current setup for this article:
- Windows 10
- CodeProject.AI Server version 1.6.9
- Blue Iris 5 version 5.6.5.3
- Wyze Cam v3
If you are using different versions of either Blue Iris or CodeProject.AI Server, you may experience issues. Please feel free to ask any questions you have on this article's forum, but also please consider the following resources:
- CodeProject.AI Server Discussion thread - This is ground zero for CodeProject.AI Server development. If you have a question, or a complaint, or a feature request, please share it here. The developers are wholeheartedly dedicated in making CodeProject.AI Server better, and they definitely want to hear you.
- ipcamtalk Forum on Blue Iris - There is a magical thread here that is several pages long that contains the long history of users working with Blue Iris and CodeProject.AI Server. If you have a Blue Iris setting or problem you can't sort, they will help you sort it. Specifically the thread 5.5.8 - June 13, 2022 - Code Project’s SenseAI. You can start reading that thread from the beginning to see the entire history of Blue Iris and CodeProject.AI Server integration, but take care in what advice / settings you decide to implement if you start from the first page. Blue Iris and CodeProject.AI Server integration has changed a lot in just a few months.
- Blue Iris Forums - This is also a great resource if you have more Blue Iris-centered questions.
Setting up Facial Recognition in Blue Iris
The first step is to take a snapshot of the face you want to profile. By turning on Facial recognition in Blue Iris, you need to add a Face profile so CodeProject.AI Server has something to recognize.

Make sure the camera is on, look at it directly on, then on the camera settings panel, click the snapshot button. This saves a snapshot to the folder the New folder that stores recordings. There are four folders that store recordings, which can be modified in the Clips and archiving tab in the Blue Iris settings.
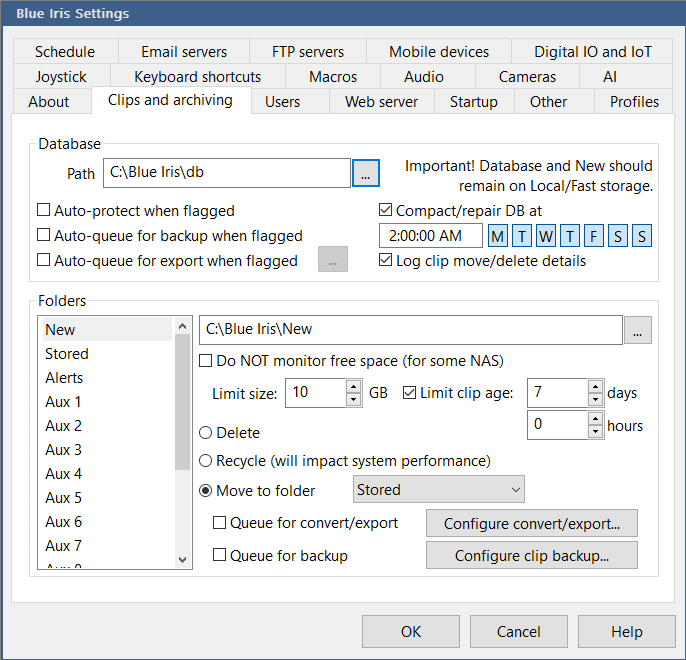
My folder path is C:\Blue Iris\New. This is where the snapshot is stored.

Now go to the AI tab, and check the box for Facial recognition. Then click the Faces... button to create a face profile. From here, click the + symbol, then go to the New folder to select the snapshot, then hit Open. For me, this added the snapshot as face1.

Select face1, click the Edit button (the pencil icon), rename the face to whatever you want (in my case, "Sean"), then hit OK to exit the faces profile window, then OK again to exit the Blue Iris settings.
I've read that you can add multiple profiles under the same name, but every time you add a new image and call it an existing profile name, there is an error "cannot rename (previously named profile name here)."

Now go to the Trigger tab in the camera settings, then hit Artificial Intelligence to launch the camera's AI settings. In the To confirm box, input the name of the face profile just created. In my case, this is "Sean". Hit OK to exit the AI settings, then OK to exit the camera settings.

Before proceeding, make sure that Face Processing is enabled in CodeProject.AI Server. From the AI tab, click Open AI control panel to open CodeProject.AI Server in your browser. Feel free to switch off every other process since we're only using Face Processing. Do this by clicking on the three dots on a process and selecting Stop.
Next, let's look at AI detection on a video source.

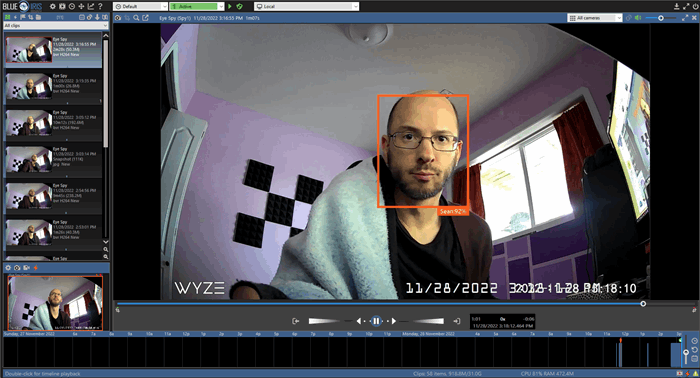
First, go to the "Record Start/Stop" button on the camera display and click it to start recording. Click the button again to stop it. My camera continuously stays on and records once it is activated, so there is only one clip on my list. The recording shows up in the clip menu on the left.

From the All clips sidebar, double-click on the recording clip you want, which opens up the video stream. This loads the stream as a video, which you can scroll through.

The next step is to ensure Testing and Tuning is active. On the video screen, right-click, go to Testing & Tuning, and make sure "Analyze with AI" is checked. Now the stream of video shows detection boxes that indicate what is being detected on video playback.
And voilà! Sean detected!
Setting up Facial Recognition in CodeProject.AI Server
Setting up an AI profile within the Blue Iris AI tab is one way to do facial recognition with Blue Iris and CodeProject.AI Server, another is to do it from the CodeProject.AI Server itself.
With CodeProject.AI Server open, click Open CodeProject.AI Explorer. From the Explorer, click on the Face tab. Under Face Registration input the Person's name. In my case, I put "Sean" again. Then, select the images you want to use for the registered face. I took multiple screenshots within Blue Iris, from multiple angles and making different faces, then selected those images from the C:\Blue Iris\New folder. Then, hit Register Faces.

Finally, under Face Recognition, click Browse, then select a different image than one previously used for Face Registration, hit Open, then hit Recognise.
And voilà! Sean detected again!
One note: If you go back into Blue Iris settings the AI tab at this point, and click the Faces..., this will delete the Registered Face just placed in the CodeProject.AI Explorer.
But other than that, that's it! That's how you get facial recognition working with Blue Iris and CodeProject.AI Server. If you have any questions or problems with the process, please ask them in the article forum below.
Recommend
About Joyk
Aggregate valuable and interesting links.
Joyk means Joy of geeK