

The World’s Greatest Pi-hole (and Unbound) Tutorial 2023
source link: https://www.crosstalksolutions.com/the-worlds-greatest-pi-hole-and-unbound-tutorial-2023/
Go to the source link to view the article. You can view the picture content, updated content and better typesetting reading experience. If the link is broken, please click the button below to view the snapshot at that time.

Welcome! In this article, I am going to detail for you what I consider to be the perfect Pi-hole setup instructions for 2023 (yes, I know – as of the writing of this article, it’s still 2022, but we’re close enough).
WTF is a Pi-hole?
First of all though – what is Pi-hole? Pi-hole is a network-wide ad blocker designed to be run on a Raspberry Pi single-board computer. When Pi-hole is installed, and your computers and devices are configured to use it for their DNS queries, ads and malware are blocked automatically in order to reduce the chances of being tracked, or having malware installed. This increases both security and privacy on your network overall.
“I cAn’T gEt a RaSpBeRrY pI!!”
Yes yes – supply chain issues make it extremely difficult to get your hands on a Raspberry Pi at the moment. But don’t let that stop you! You can also run Pi-Hole in a Docker container (for instance if you have a QNAP or Synology NAS with the Docker app installed), or any one of a number of other operating systems. Don’t let lack of Raspberry Pi availability stop you from doing this project – it’s extremely lightweight, and can be installed on a virtual machine with very little resources allocated.
Another excellent resource is to follow RPilocator on Twitter, or keep an eye on their web page which can send alerts when a Raspberry Pi comes into stock in your geographical location. I used RPilocator to get an 8GB Raspberry Pi 4 recently, and would have been able to get even MORE Raspberry Pi’s if not for stock limits. (Damn you Adafruit! <shakes fist>).
Let’s get started!
Here’s what you need to get started:
- Raspberry Pi – I’m using a Raspberry Pi 2GB for this project, but even that version is total overkill – Pi-hole works great on older units as well if you have any Raspberry Pi 2’s or 3’s lying around. I wouldn’t recommend trying this on any of the Pi Zeros though since it’s much better to have this hard-wired. We won’t be using any of the wireless capabilities of the Pi.
- A microSD card – Does not have to be a big card – 8GB is totally fine. When finished, Raspberry Pi OS + Pi-hole will end up taking up about 1.6GB on the microSD card. I would recommend a decent quality card though – don’t want anything to slow down those DNS lookups!
- Raspberry Pi Imager – This software formats the microSD card and installs your Raspberry Pi OS of choice. It also allows you to set some of the Raspberry Pi defaults before you ever boot it up. Raspberry Pi Imager is available for download on Windows, macOS, and Ubuntu.
Raspberry Pi Imager
Download and run Raspberry Pi Imager on your desktop computer. You’ll also want to insert the microSD card into a microSD card reader. Take note of the drive letter of the microSD card – but no need to format it ahead of time as Raspberry Pi imager will do this for you.

Underneath ‘Operating System’ click ‘CHOOSE OS.’ Then click on Raspberry Pi OS (other) and choose ‘Raspberry Pi OS Lite (64-bit).’


We don’t need any sort of GUI or extra software here, so the Lite version of the Raspberry Pi OS is going to be just fine.
Next, click ‘CHOOSE STORAGE.’ You’ll want to select your microSD card.

MAKE SURE you don’t overwrite any drive that ISN’T the microSD card!! This is the only warning! If you pick the wrong drive and erase Grandma’s 90th birthday pictures, you will never get them back.
Finally, click the gear icon so that we can set some of the Raspberry Pi default settings.

Check the box next to ‘Set hostname:’ and pick a name. I’m going to call mine pihole3.local (since I already have 2 Pi-holes on my network).
Check the box next to ‘Enable SSH’ and then leave the radio button on ‘Use password authentication.’

Scroll down and set a username and password for your Pi-hole SSH. I’m going to leave ‘pi’ as the username, but set a strong password.

Optionally, you can scroll further down and check the box next to ‘Set locale settings’ and then pick your time zone and keyboard layout. When finished, click ‘SAVE.’

Finally, click ‘WRITE’ and your brand new Raspberry Pi OS will be written to the microSD card. This takes about 3-4 minutes. Once complete, remove the microSD card and insert it into your Raspberry Pi.

Boot your Pi-hole
Plug power into your Raspberry Pi to boot it up – the boot process should only take a minute or so. Other than the power cord, you should also have the Pi’s Ethernet port plugged into a network switch.
PRO TIP: I have found that when working with Raspberry Pi’s it’s nice to have an on/off switch. This product works great for being able to easily switch the power on and off of the Raspberry Pi without having to disconnect the USB-C or MicroUSB cable.

Once your Raspberry Pi has booted, it will likely grab an IP address from your network’s DHCP server – but how will you know which IP address it grabbed? There are two main ways to do this.
Option 1: You can check your DHCP lease table in your router. I have an EdgeRouter 4, so I log into the router and navigate to the Services –> DHCP tab. From there, I can drop down the ‘Actions’ box to view DHCP leases for my LAN network. If I sort by the most recent leases, I can see Hostname ‘pihole3’ (exactly as I set in the Raspberry Pi Imager above). This tells me that the ‘pihole3’ host received 192.168.200.182 from the DHCP server.

Now – if you don’t have an EdgeRouter, whichever device you DO have that provides DHCP leases to your client devices will likely have a similar way to view these leases and figure out which IP address your Pi-hole has been given. If you’re using UniFi or a Dream Machine / Dream Router, you can likely find this information in the ‘Clients’ section.
Option 2: If you don’t have any way to check DHCP leases in your DHCP server, you can always hook up a keyboard and monitor to the Raspberry Pi, log in, and then run:
ip aTo get the IP address information.

SSH into the Pi
Once you have your Raspberry Pi’s IP address, use SSH to log in. On Windows, you can SSH from the command prompt by typing:
ssh [email protected]Where ‘pi’ is your username, and 192.168.200.182 is the IP address of your Raspberry Pi.

Alternatively, you can use a program such as PuTTY to log in via SSH. Just download and run PuTTY and then type your IP address in the Host Name field and click ‘Open.’

Finally, on macOS, open ‘Terminal’ and then log in with:
ssh [email protected]Just like you would with the Windows command prompt.
Log in with username ‘pi’ and the password you set in the Raspberry Pi Imager.
Update Raspberry Pi OS
The first thing we want to do is update all packages. To do so, run this command:
sudo apt update && sudo apt upgrade -yUpdating the Pi takes 4-5 minutes.
Set a Static IP Address
We want to ensure that the IP address of the Raspbery Pi never changes, so we need to set a static IP. There are two ways to do this.
Option 1 – Set a DHCP reservation
A DHCP reservation is basically just a way for us to tell the DHCP server to only ever give a specific IP address to the MAC address of our Raspberry Pi. In my EdgeRouter 4, this is pretty simple – I just find the DHCP lease for the Raspberry Pi, and then click the ‘Map Static IP’ button followed by ‘Save.’ Once I have done that, the DHCP server will only ever give out the IP address I picked to the Raspberry Pi. In the settings of the Pi itself, it’s still set to obtain an IP address from DHCP, but my DHCP server knows that it should only ever give the Pi a specific IP…which essentially makes it static.
Option 2 – Set a Static IP on the Raspberry Pi
The other option is to set an IP address statically on the Pi itself – this is the method that I prefer. Open up the dhcpcd.conf file by typing:
sudo nano -w /etc/dhcpcd.confAnd then scroll down until you find the section called ‘Example Static IP configuration:’

This section is commented out by default, so you will need to uncomment some lines and input your own static IP address and network information. For my Pi-hole, I am going to want to use the following information:
Static IP: 192.168.200.52/24
Gateway: 192.168.200.1
DNS Servers: 192.168.200.1, 1.1.1.1
In my case the configuration will look like this:
# Example static IP configuration:
interface eth0
static ip_address=192.168.200.52/24
# static ip6_address=fd51:42f8:caae:d92e::ff/64
static routers=192.168.200.1
static domain_name_servers=192.168.200.1 1.1.1.1
Interface eth0 was uncommented, and then I set a static IPv4 IP address of 192.168.200.52 (don’t use my network subnet information – substitute it with your own). Then I set ‘static routers’ to my gateway IP and set two DNS servers (I removed the IPv6 DNS server).
Once you’re happy with your configuration, press CTRL+X to exit followed by ‘Y’ and ENTER to save.
Now reboot the Pi to take advantage of the new network settings:
sudo rebootInstall Pi-hole
Once you’ve set your Pi-hole’s networking to a static IP address and rebooted (or if you’ve done a DHCP reservation), it’s time to install Pi-hole. Remember to re-connect to the NEW IP address if you set it statically on the Raspberry Pi.
Run this command to install Pi-hole:
curl -sSL https://install.pi-hole.net | bashThis will fire off the installation wizard. When the screen below appears, press ENTER (OK).

The next screen recommends that you DONATE to help the Pi-hole project – I recommend it as well! Press ENTER (OK).

Next, the wizard gives us a warning about using a static IP address – we’ve already covered this, to move the cursor over to Continue and press ENTER.

On this screen, double-check that the IP address shown is the IP address that you want to use for the Pi-hole and then press ENTER (select Yes – Set static IP using current values).

NOTE: If you set a specific static IP, but that is not displayed on this screen, you probably forgot to reboot the Raspberry Pi. Cancel out – reboot, and then re-start the installation wizard.
The next screen is another warning about networking – they REALLY REALLY want you to have a static IP address. Press ENTER (OK).

Now we are going to pick an upstream DNS provider. This is the DNS server that the Pi-hole will use to do DNS lookups (initial lookups – then they get cached). Since we’re going to be installing Unbound, we’ll be making our own DNS lookups to the primary root domain servers on the Internet, so for now, it’s fine to pick any one of these – I’ll be using Cloudflare (1.1.1.1) for this tutorial.

DNS Server Selection – You don’t HAVE to use Unbound to perform your own lookups to the Internet’s primary root domain servers – you an absolutely skip that part of this tutorial and simply pick one of the DNS servers on this list. BUT – if you do choose one of these DNS servers, you should understand that not all DNS servers are equal – some of them simply do any lookup that you request, and others do some level of content filtering. There’s a great breakdown of the various DNS servers in this list (plus some more options), and which ones do phishing/malware/adult content filtering HERE.
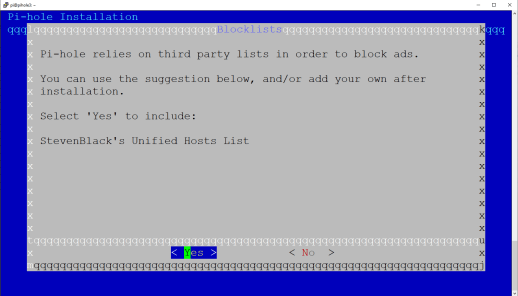
Next we’re asked if we want to use the default included block list – this block list is a list of domains that Pi-hole is going to block for us. This list is perfectly fine, and will block a significant chunk of suspect sites – however, there are many block lists available, and you’ll likely want to add some more – we’ll cover this later in the tutorial. Choose YES and press ENTER.
Next we’re asked if we want to install the Admin Web Interface, which of course we do! Select YES and press ENTER.

Another notice about the web server – just choose YES and press ENTER.

Next, we’re asked if we want to enable query logging. Typically, you will want to say Yes here, but if you’re super security conscious and you don’t want any of your DNS lookups logged, you can also choose No.

Now we’re asked about the level of privacy – you can visit the website listed for more information. For this tutorial, we’re going to select ‘Show everything’ and press Continue.

That’s it! After this step, Pi-hole has all of the information it needs to get started. You’ll see it run through a bunch of scripts in the CLI (takes about 2 minutes), and will eventually be brought to this screen:

This final screen is giving a summary of our install and also shows us our Admin Webpage login password. You don’t need to copy this down – we’re going to change that password in the next step.
Change the Pi-hole Web GUI Admin Password
You’ll want to set a nice strong password for the Pi-hole admin GUI – to do that, run this command:
pihole -a -pThis will have you input a password and then confirm it.

Log into the Pi-hole GUI
We’re now ready to log into the GUI for the first time! Open up a browser and input the IP address followed by /admin in this format:
http://192.168.200.52/admin
(Substitute my IP address with your own). Note also that this is HTTP and not HTTPS.

Enter the Admin password that you set in the previous step and click ‘Log in.’ Upon logging in, we’re presented with the Pi-hole Dashboard – let’s take a look around!

Pi-hole dashboard.
We’re not using this Pi-hole yet, so we don’t have a ton of useful statistics…those will start to populate as soon as we start using this server for our DNS queries.
Down the left-hand side of the dashboard are our menu options. The 4 colored blocks across the top are some statistics. The blue box is the total number of queries Pi-hole has processed. The red box is how many of those queries matched FQDN’s on the block list and were blocked. The yellow box is a percentage of blocked requests (red box divided into the blue box). Finally the green box is the number of domains that are on the block lists. Since we only have a single block list for now, we can see we have about 158,000 domains that will be blocked by this Pi-hole.
Going down the left-hand menu – I won’t cover every single setting, but I will point out some of the more important ones.
Query Log – this shows you the Pi-hole’s history of DNS lookups in descending order (most recent lookups at the top). You can see all domain statuses – both passed and blocked domains. For passed domains, there is a button to blacklist, and for blocked domains, there is a button to whitelist.
Long-Term Data – much like the Query Log, this section gives you a deeper dive look into the Pi-hole’s DNS history and lets you filter into that data in great detail.
Groups and Clients – some pretty interesting functionality here in Groups and Clients – we’re not going to dig into this section for this tutorial, but you can use this section if you wanted to block DNS queries for all devices except for devices in a specific group. Or, if you wanted to ONLY block DNS queries for devices in a specific group – you can get very granular with which clients and groups use which block lists as well.
Domains – this section allows you to specifically add domains to a blacklist or whitelist. For instance, if there are specific stores where you like to shop online, and those stores are being blocked, you can whitelist them here.
Some Blocking Resources – if you’re interested in taking a deeper dive into what block lists you can add to Pi-hole, here are some good resources:
The Best Pi-hole Blocklists – Avoidthehack.com – This article does an excellent job of explaining the different types of block lists, and then lists a number of resources for lists in different categories of blocking.
The Firebog (blocklist collection) – This blocklist resource does an excellent job of providing sources of blocklists in multiple categories such as Suspicious, Advertising, Tracking & Telemetry, & Malicious. It further breaks those lists down into green links and blue links – the green links are the ones least likely to interfere with normal Internet activity. A good rule of thumb is to add one or two of these lists from each category to your Pi-hole.
One more thing to point out – there is a list of commonly whitelisted domains over at Pi-hole.net. If you’re having issues with a particular website or service (say Spotify or Xbox functionality for instance), go see if there are resources for whitelisting that particular service on that page – it may save you a lot of headache.
Adlists – by default, we have the default block list which is well maintained and blocks plenty of sites without breaking normal Internet functionality. That being said, you can get VERY detailed in what you’re blocking – malicious sites, adult content, ad sites, tracking & telemetry sites – there are specific public block lists for each of these types of content, but keep in mind that the MORE sites you add to your block lists, the greater chance you have of breaking something. Then you’ll have your family complaining to you about ‘the Internet’ not working, and you’ll have to deal with it. The trick is to find the happy medium that does plenty of blocking without affecting the user experience.
Since we’re taking a look at various block lists, let’s go ahead and add a few from The Firebog page. Copy the first link under ‘Suspicious Lists’ and paste it into the ‘Address:’ field – then click Add.
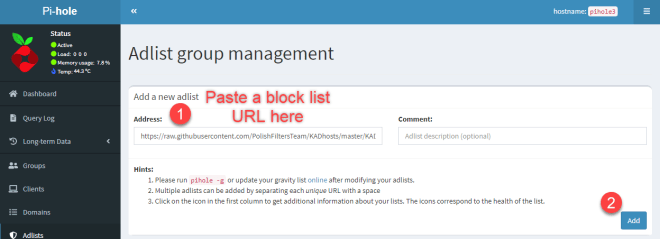
Repeat this for as many block lists as you want – for this tutorial, I’m going to copy/paste the first two green URLs from each of the Firebog sections. Once completed, we need to tell Pi-hole to import these lists.
Navigate to Tools –> Update Gravity and then click the ‘Update’ button. This will comb through all of the block lists and add the blocked URLs to the Pi-hole database. Once complete, you’ll see a green ‘Success’ banner at the top of the screen.

Now click on Dashboard from the left-hand menu – notice anything different? Our ‘Domains on Adlists’ jumped from about 158k to 221k blocked domains.

More blocked domains now!
Let’s go back to our tour of the left-hand menu!
Disable Blocking – this lets you stop Pi-hole from blocking any domains for various amounts of time (or indefinitely). Very useful in troubleshooting – if something isn’t working in your network or Internet browsing, try disabling blocking for 5 minutes and see if that fixes it. If it DOES fix it, then you know there are probably some domains you’re going to have to whitelist.
One extra tip since we’re talking about disabling blocking – logging into the Pi-hole Admin GUI to disable blocking can be cumbersome! I find myself doing this on a fairly regular basis (once or twice a week), and I have multiple Pi-holes running for redundancy! So – it can take some time. To shorten up the time it takes to disable blocking, you can do some scripting. It all starts with this URL:
http://192.168.200.52/admin/api.php?disable=300&auth=PWHASHLet’s break this down – the IP address is the IP address of your Pi-hole (don’t use mine for this). The ‘disable=300’ means disable for 300 seconds (5 minutes), and the auth=PWHASH is the hashed value of WEBPASSWORD which can be found in the /etc/pihole/setupVars.conf file. You can see it if you log into your Pi-hole with SSH and run the command:
cat /etc/pihole/setupVars.conf |grep WEBPASSWORDThis will show you your hashed password – copy and paste everything after the = and append it to the end of the URL above.
 How to find your hashed password value
Pro tip – in PuTTY, you can select text and then do CTRL+INS to copy it to your clipboard.
If you now add that hashed password to the end of the URL string above and then pop it into a browser, this will authenticate to your Pi-hole and disable blocking for 5 minutes. You can now use that URL in scripts for Home Assistant, create a shortcut on your desktop that runs that URL, or do what I did and create a ‘Disable Pi-hole’ button on your Stream Deck!

In the case of my Stream Deck button, it runs the disable URL for my first Pi-hole, pauses 1 second, and then runs the disable URL for my 2nd Pi-hole. Works great!
Local DNS – This allows you to create your own local DNS entries – very useful for using FQDNs with internal servers and devices.
Tools – yea…tools. Check ’em out.
Settings
Last but certainly not least, we have our Settings. This demands its own section of this tutorial. We’ll start with the ‘System’ tab – this shows us various info about the Pi-hole – software versions, resource utilization, etc. We also have the option of controlling DNS and the server itself using the buttons at the bottom.

The DNS tab shows us which upstream providers we’re using for non-cached DNS queries. Since I picked Cloudflare during the setup wizard, we can see Cloudflare is my primary and secondary lookup source. You can also play around with the primary and secondary checkboxes here to have different DNS query sources – for instance, Cloudflare + Google. If you’re doing this full tutorial and installing Unbound, ignore this for now – we’ll be changing this shortly.
One other thing to point out on the DNS tab – on the right hand side is the ‘Interface settings’ section. By default, the Pi-hole is configured to ONLY respond to DNS queries from your local LAN. But in my case, I have 3 separate VLANs in my home network – LAN, Guests, and IoT Devices. I want all of them to be able to use the Pi-hole, so we need to change that setting to allow requests from other subnets. In my case, I’m going to choose the ‘Respond only on interface eth0’ which basically allows any DNS requests that come into the network port.

Be sure to hit Save at the bottom of the screen when you make this change!
DHCP tab – the Pi-hole can be used as a DHCP server if you want, but this is beyond the scope of this tutorial.
API / Web Interface tab – this tab allows you to filter out some specific domains you don’t want to be shown in the dashboard stats. It also lets you change the look and feel of the Admin GUI! Multiple light and dark themes, plus the Star Trek LCARS theme!

The Privacy tab lets you change which domains are displayed or hidden – this was an option in the initial setup wizard – if you want to change these settings…here ya go.
Finally, the Teleporter tab lets you backup and restore your Pi-hole settings. This is incredibly useful for keeping settings in sync across multiple Pi-holes. Once you get your whitelists/blacklists, block lists, and groups in place, you can just back up all of that data and restore it onto your 2nd Pi-hole server.
Configure Devices to use the Pi-hole
Awesome – we’ve got our Pi-hole all up and running, and configured to block ads and other bad guys. But – right now, nothing is using this Pi-hole! Let’s fix that – there are two main ways to configure your devices to use the Pi-hole – manually, and via DHCP.
Manual device configuration – to configure your devices to use the Pi-hole manually, you need to open up your device’s network settings and set your DNS server to be the IP address of the Pi-hole (or Pi-holes if you’re setting up multiple for redundancy).
In Windows 11, you’ll need to go to Network & Internet settings, click on ‘Change adapter options’ (or Properties of the current adapter). Then ‘Edit’ IP settings.

You’ll have to set your IP address for your device to ‘Manual’ and then give it an IP, gateway, and input the IP address of your Pi-hole for ‘Preferred DNS.’ If you have multiple Pi-holes, enter the 2nd one as the ‘Alternate DNS.’

This however means you have to set an IP address statically for your Windows 11 device. Alternatively, you can go to Control Panel –> Network and Internet –> Network Connections, find your NIC, right-click on it, choose Properties, double-click on Internet Protocol Version 4 (TCP/IPv4), and then leave ‘Obtain an IP address automatically’ set at the top, but choose ‘Use the following DNS server addresses:’ down below and then set the IP address of your primary and secondary Pi-hole servers.

Holy crap what a PITA. Now imagine going around and doing this for all of your devices – no thank you.
The far superior method is to use your DHCP server to set these Pi-hole settings. This way, when devices connect to your network and request IP address information, they’re automatically provided with your Pi-hole DNS servers. This method is going to vary depending on your DHCP server, but it’s usually going to be similar to the way I have mine set in the EdgeRouter 4.

Set the Pi-hole IP address as the primary DNS server for your DHCP leases. Add a 2nd Pi-hole as the secondary DNS if you have one.
In the screenshot above, you can see that I added the IP address of my Pi-hole server (192.168.200.52) as the Primary DNS server that my clients will receive when they connect to my network. I have also added a 2nd Pi-hole server IP as DNS 2 for backup purposes.
If you don’t have a second Pi-hole, you can also populate DNS 2 with a public DNS server such as Cloudflare (1.1.1.1). If you go through the list of available upstream DNS providers that Pi-hole offers (Settings –> DNS), there are some that provide similar content filtering to Pi-hole that would work as a decent secondary DNS server for your clients.
Once you’ve made this change, you should shortly start seeing stats hit the Pi-hole dashboard:
 Stuff starting to get blocked!
Unbound Setup
OK – so we have our Pi-hole working and blocking stuff – excellent! But let’s take this a step further. Right now, when we look up a website, if the Pi-hole doesn’t know where to find it, it forwards that request to an upstream DNS provider (as we have it configured right now, that upstream provider is Cloudflare). Those who are more security-conscious may not want some random 3rd party knowing which domains they’re surfing to or looking up (even though Cloudflare doesn’t keep logs of DNS queries).
For those folks, you can install Unbound on your Pi-hole. Unbound is a service that directly queries the DNS root domain servers for any uncached FQDN requests. First we’ll need to install Unbound, and then we’ll configure it for use with our Pi-hole.
To install Unbound, SSH into the Pi-hole and run this command:
sudo apt install unbound -yThis should only take about 10-15 seconds. Next, we need to add a whole wall of text to an Unbound configuration file – create this file by running this command to edit it:
sudo nano -w /etc/unbound/unbound.conf.d/pi-hole.confCopy all of this text below – you can also find this text in the Pi-hole documentation HERE.
server:
# If no logfile is specified, syslog is used
# logfile: "/var/log/unbound/unbound.log"
verbosity: 0

interface: 127.0.0.1
port: 5335
do-ip4: yes
do-udp: yes
do-tcp: yes

# May be set to yes if you have IPv6 connectivity
do-ip6: no

# You want to leave this to no unless you have *native* IPv6. With 6to4 and
# Terredo tunnels your web browser should favor IPv4 for the same reasons
prefer-ip6: no

# Use this only when you downloaded the list of primary root servers!
# If you use the default dns-root-data package, unbound will find it automatically
#root-hints: "/var/lib/unbound/root.hints"

# Trust glue only if it is within the server's authority
harden-glue: yes

# Require DNSSEC data for trust-anchored zones, if such data is absent, the zone becomes BOGUS
harden-dnssec-stripped: yes

# Don't use Capitalization randomization as it known to cause DNSSEC issues sometimes
# see https://discourse.pi-hole.net/t/unbound-stubby-or-dnscrypt-proxy/9378 for further details
use-caps-for-id: no

# Reduce EDNS reassembly buffer size.
# IP fragmentation is unreliable on the Internet today, and can cause
# transmission failures when large DNS messages are sent via UDP. Even
# when fragmentation does work, it may not be secure; it is theoretically
# possible to spoof parts of a fragmented DNS message, without easy
# detection at the receiving end. Recently, there was an excellent study
# >>> Defragmenting DNS - Determining the optimal maximum UDP response size for DNS <<<
# by Axel Koolhaas, and Tjeerd Slokker (https://indico.dns-oarc.net/event/36/contributions/776/)
# in collaboration with NLnet Labs explored DNS using real world data from the
# the RIPE Atlas probes and the researchers suggested different values for
# IPv4 and IPv6 and in different scenarios. They advise that servers should
# be configured to limit DNS messages sent over UDP to a size that will not
# trigger fragmentation on typical network links. DNS servers can switch
# from UDP to TCP when a DNS response is too big to fit in this limited
# buffer size. This value has also been suggested in DNS Flag Day 2020.
edns-buffer-size: 1232

# Perform prefetching of close to expired message cache entries
# This only applies to domains that have been frequently queried
prefetch: yes

# One thread should be sufficient, can be increased on beefy machines. In reality for most users running on small networks or on a single machine, it should be unnecessary to seek performance enhancement by increasing num-threads above 1.
num-threads: 1

# Ensure kernel buffer is large enough to not lose messages in traffic spikes
so-rcvbuf: 1m

# Ensure privacy of local IP ranges
private-address: 192.168.0.0/16
private-address: 169.254.0.0/16
private-address: 172.16.0.0/12
private-address: 10.0.0.0/8
private-address: fd00::/8
private-address: fe80::/10
Once you’ve pasted in that text (use SHIFT+INS to paste into PuTTY), hit CTRL+X followed by Y and ENTER to save and exit. Then we’ll restart the Unbound service:
sudo service unbound restartIf you then run:
sudo service unbound statusYou should see that the Unbound service is active (running).

Note in the Unbound config that we pasted in a few steps ago that we’re running Unbound on IP 127.0.0.1 (localhost) and port 5335. In order to test that Unbound is working, we can send a DNS query to that IP and port:
dig crosstalksolutions.com @127.0.0.1 -p 5335

In this case, we can see that the status is NOERROR and we received an IP address for our query. Looks like we’re ready to use Unbound with Pi-hole!
Using Unbound with Pi-hole
Log into the Pi-hole Admin GUI and navigate to Settings –> DNS.
Uncheck the boxes next to Cloudflare (or whichever DNS provider you picked during the install wizard), and then add a new custom entry for Unbound:
127.0.0.1#5335
Click ‘Save’ at the bottom of this screen. All done! Treat yourself to a beer.
Testing Ad Blocking
If you want to test out Ad Blocking, there’s a great tool for this HERE. Open up that page, and you should be around 90% blocking with this tutorial:

By contrast, if I bypass my Pi-hole and just use 8.8.8.8 (Google) as my DNS resolver, I get 61%. Yikes! Let’s get that Pi-hole back on ASAP!

Updating the Pi-hole
Every so often, you’ll want to update Pi-hole. To do so, simply log into the Pi-hole via SSH and run this command:
sudo pihole -upFirewall considerations
This is beyond the scope of this tutorial, but at least worth mentioning. If you have kids that being blocked from stuff they’re searching for, or if you’re running Pi-hole in your business and your employees want to bypass your blocking attempts, by default, there’s nothing stopping them from manually adjusting their DNS settings to use a non-Pi-hole DNS server.
To help with this, you’ll need to set up some firewall rules. For instance, you may create a rule that allows DNS services on port 53 for the IP addresses of your Pi-holes, but BLOCKS port 53 everywhere else. This way – even if someone is savvy enough to manually bypass their DNS settings to get around your Pi-hole, they still won’t be able to resolve anything. Haha…gotcha sucker.
Thank you!
Thanks so much for using this Pi-hole tutorial – I will update it with any corrections or updates to the installation instructions.
Remember to DONATE to the Pi-hole project if you are getting a lot out of this ad blocking server!
If you would like to support Crosstalk Solutions, you can BUY ME A BEER HERE! Or check out some of the cool stuff we have in our Crosstalk merch store!
Related
Getting Started with Raspberry Pi 4December 17, 2019With 24 comments
Raspberry Pi LAN Speed TestMarch 23, 2021With 7 comments
Raspberry Pi 4 Boot with USBDecember 2, 2020With 17 comments
Recommend
-
60
RxJS: Avoiding Unbound Methods Photo by
-
58
About Unbound-adblock is an easy to use network adblocker. It allows you to block online advertisements network wide and thus block ads on devices that otherwise don't support traditional browser-based adblocke...
-
19
First, we’d like to thank everyone in the community who donated to the cause and made this happen. Our crucial work does not happen without donations from people who care about our cause. If security and privacy on the we...
-
8
Cocoa Unboundmikeash.com: just this guy, you know? Cocoa Unbound by Mike Ash My recent...
-
10
Copy link Contributor thomcc commented...
-
13
An Interview with Brad Stone about Amazon Unbound Posted onThursday, May 13, 2021Friday, May 14, 2021 An interview with Brad Stone about his new book about Amazon, how the company has changed, and his outloo...
-
16
Unbound Finance完成580万美元融资,Pantera Capital及Arrington XRP Capital领投律动 BlockBeats 消息,Unbound Finance 宣布完成 580 万美元融资,本轮融资由 Pantera Capital 及 Arrington XRP Capital 领投。CMS Holdings、Hashed、LedgerTime、L...
-
12
Unbound Finance Raises $5.8M led by Pantera Capital and Michael Arrington’s XRP Capital • CryptoMode Search
-
14
Technical Articles
-
5
Unbound: Worlds Apart was Inspired by Hollow Knight, Ori, Portal, and Diablo 2August 4th 2021 7
About Joyk
Aggregate valuable and interesting links.
Joyk means Joy of geeK