

#盲盒+码##深入浅出学习eTs#(十四)我的专属广告-开源基础软件社区-51CTO.COM
source link: https://ost.51cto.com/posts/19462
Go to the source link to view the article. You can view the picture content, updated content and better typesetting reading experience. If the link is broken, please click the button below to view the snapshot at that time.

#盲盒+码##深入浅出学习eTs#(十四)我的专属广告 原创 精华
【本文正在参加「盲盒」+码有奖征文活动】https://ost.51cto.com/posts/19288
本项目Gitee仓地址:深入浅出eTs学习: 带大家深入浅出学习eTs (gitee.com)
一、需求分析

- 进入APP弹出
- 显示广告内容
- 右上角点击跳过
- 倒计时到达自动跳转
二、控件介绍
页面跳转(Router、Ability)
页面跳转可以分为页面内跳转和页面间跳转,页面内跳转是指所跳转的页面在同一个 Ability 内部,它们之间的跳转可以使用 Router 或者 Navigator 的方式;页面间跳转是指所跳转的页面属与不同的 Ability ,这种跳转需要借助 featureAbility 实现。
本内容主要涉及页面内跳转,实现内部的显示,主要使用到的是Router:
declare namespace router {
  function push(options: RouterOptions):void;
  function replace(options: RouterOptions):void;
  function back(options?: RouterOptions ):void;
  function clear():void;
  function getLength():string;
  function getState():RouterState;
  function enableAlertBeforeBackPage(options: EnableAlertOptions):void;
  function disableAlertBeforeBackPage():void;
  function getParams(): Object;
}
-
push:打开新的页面,新页面在栈顶位置, RouterOptions 定义了以下参数:
-
url:目标页面的路径,该路径必须在 config.json 的 pages 下配置,否则不起作用。
-
params:可选参数,向目标页面传递参数。
-
replace:新页面替换当前页面并把当前页面销毁。
-
back:返回上一页。
-
clear:清空路由栈里的其它页面。
-
getLength:获取当前路由栈里的页面数量。
-
getState:获取当前页面的状态.
-
enableAlertBeforeBackPage:
-
disableAlertBeforeBackPage:
-
getParams:获取通过路由传递过来的参数。

// 第一个页面
@Entry @Component struct ComponentTest {
  build() {
    Column({space: 10}) {
      Text('第一个页面')
        .fontSize(30)
        .width('100%')
        .textAlign(TextAlign.Center)

      Button('打开下一页')
        .onClick(() => {
          router.push({          // 使用push入栈一个新页面
            url: "pages/second"  // 通过url指定新打开的页面
          })
        })
    }
    .size({width: '100%', height: '100%'})
  }
}

// 第二个页面
@Entry @Component struct Second {

  build() {
    Column({space: 10}) {
      Text('第二个页面')
        .fontSize(30)
        .width('100%')
        .textAlign(TextAlign.Center)

      Button('返回上一页')
        .onClick(() => {
          router.back(); // 返回上一页,当前页面会销毁
        })
    }
    .size({width: '100%', height: '100%'})
  }
}
Stack
堆叠容器,子组件按照顺序依次入栈,后一个子组件覆盖前一个子组件。
说明:
该组件从API Version 7开始支持。后续版本如有新增内容,则采用上角标单独标记该内容的起始版本。
Stack(value?: { alignContent?: Alignment })
参数:
| 参数名 | 参数类型 | 必填 | 参数描述 |
|---|---|---|---|
| alignContent | Alignment | 否 | 设置子组件在容器内的对齐方式。 默认值:Alignment.Center |
// xxx.ets
@Entry
@Component
struct StackExample {
  build() {
    Stack({ alignContent: Alignment.Bottom }) {
      Text('First child, show in bottom').width('90%').height('100%').backgroundColor(0xd2cab3).align(Alignment.Top)
      Text('Second child, show in top').width('70%').height('60%').backgroundColor(0xc1cbac).align(Alignment.Top)
    }.width('100%').height(150).margin({ top: 5 })
  }
}

三、UI设计
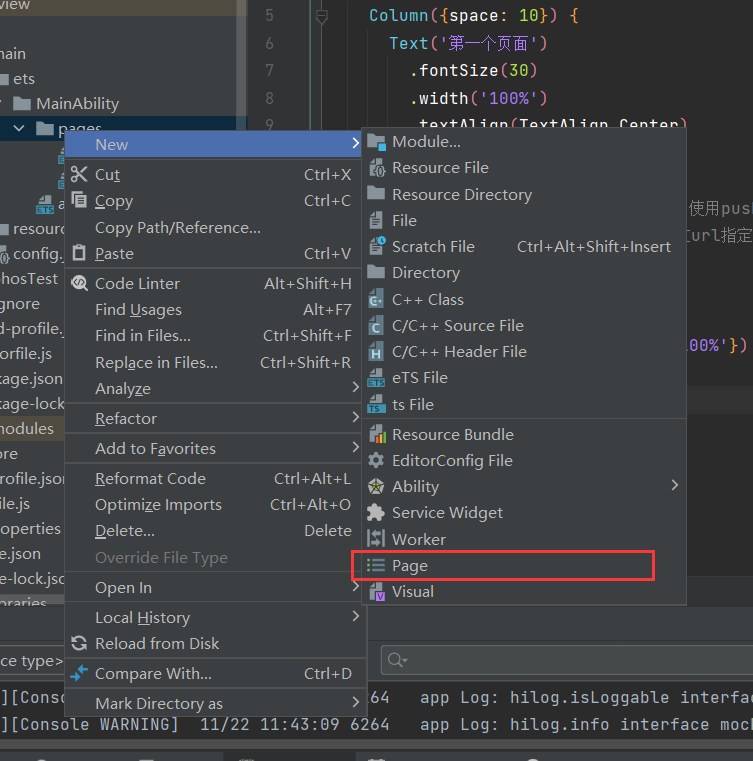
(1)两个页面跳转
(2)广告导入
首先需要一张底图,放在第一个页面

@Entry @Component struct ComponentTest {
  build() {
    Column({space: 10}) {

      Image($r('app.media.2')).objectFit(ImageFit.Fill)


    }
    .size({width: '100%', height: '100%'})
  }
}
此时需要在右上角加入一个标签

      Row() {
        Blank(10)
        Column() {
          Blank().height(10)
          Text('跳过').width('15%').height('5%')
            .backgroundColor(0xc1cbac)
            .align(Alignment.TopEnd)
            .fontSize(20)
            .textAlign(TextAlign.Center)
            .border({
              radius: 15,
            })
        }
        Column(){
          Text(this.Num)
            .fontSize(20)
            .backgroundColor(0xc1cbac)
          Blank(6)
        }

        Blank(10)
      }
(3)定时器实现
首先需要将标签内容和变量进行绑定,创建变量
@State Num: string = '5s'
之后创建定时器,实现秒减
  private Run_Get() {
    var T = setInterval(() => {
      if (this.Num == '0s') {
        clearTimeout(T)
        router.push({          // 使用push入栈一个新页面
          url: "pages/Lal"  // 通过url指定新打开的页面
        })
      } else if(this.Num == '5s')
      {
        this.Num = '4s';
      }else if(this.Num == '4s')
      {
        this.Num = '3s';
      }else if(this.Num == '3s')
      {
        this.Num = '2s';
      }else if(this.Num == '2s')
      {
        this.Num = '1s';
      }else if(this.Num == '1s')
      {
        this.Num = '0s';
      }
    }, 1000)
  }
在开机时候进行使用
  onPageShow(){
    this.Run_Get()
  }
(4)点击跳转
跳转一共有两种形式:时间到了跳转和点击跳转,这里介绍点击跳转
      .onClick(() => {
        router.push({          // 使用push入栈一个新页面
          url: "pages/Lal"  // 通过url指定新打开的页面
        })
      });
四、功能演示


Recommend
About Joyk
Aggregate valuable and interesting links.
Joyk means Joy of geeK