

GitHub - IBM/private-data-collections-on-fabric: This repo demonstrates the use...
source link: https://github.com/IBM/private-data-collections-on-fabric
Go to the source link to view the article. You can view the picture content, updated content and better typesetting reading experience. If the link is broken, please click the button below to view the snapshot at that time.

Private Data Collections on Hyperledger Fabric
In the Medical Supply Chain, there are multiple entities such as the drug manufacturers, wholesellers, pharmacies and patients. These entities share data about the pill as it moves through the chain. However, there are cases where entities want to keep some data about the pill hidden from the other entities. Consider the instance where a manufacturer have negotiated different price rates with the wholesellers. They wouldn't want the different wholesellers to be able to see the various drug rates negotiated. Having all entities on the same channel of the blockchain would inherently make every transaction between any two entities, visible to every other entity. With the introduction of private data collections, certain data parts associated with a given transaction, can be kept private from other entities.
As a drug manufacturer, we will create an account on the Healthcare Platform network. We then add a drug, priced at $450, to the network.

As the drug manufacturer, we can query for the drug that we created, and see the private details of the transaction, such as the price.

The file that shows this network configuration is shown below. Note that
for collectionDrug all mspId's have access to this collection, but for collectionDrugPrivateDetails, which
contains price info, only the patient and the manufacturers have access to this data. This is why the drug
manufacturer is able to see the private details of the transaction, such as the price.
[
  {
    "name": "collectionDrug",
    "policy": {
      "identities": [
        {
          "role": {
            "name": "member",
            "mspId": "manufacturermsp"
          }
        },
        {
          "role": {
            "name": "member",
            "mspId": "pharmacymsp"
          }
        },
        {
          "role": {
            "name": "member",
            "mspId": "patientmsp"
          }
        },
        {
          "role": {
            "name": "member",
            "mspId": "w1msp"
          }
        },
        {
          "role": {
            "name": "member",
            "mspId": "w2msp"
          }
        }
      ],
      "policy": {
        "1-of": [
          {
            "signed-by": 0
          },
          {
            "signed-by": 1
          },
          {
            "signed-by": 2
          },
          {
            "signed-by": 3
          },
          {
            "signed-by": 4
          }
        ]
      }
    },
    "requiredPeerCount": 0,
    "maxPeerCount": 5,
    "blockToLive": 100
  },
  {
    "name": "collectionDrugPrivateDetails",
    "policy": {
      "identities": [
        {
          "role": {
            "name": "member",
            "mspId": "manufacturermsp"
          }
        },
        {
          "role": {
            "name": "member",
            "mspId": "patientmsp"
          }
        }
      ],
      "policy": {
        "1-of": [
          {
            "signed-by": 0
          },
          {
            "signed-by": 1
          }
        ]
      }
    },
    "requiredPeerCount": 0,
    "maxPeerCount": 2,
    "blockToLive": 100
  }
]
As a wholesaler on the network, we can create an account on the platform, and then log in. We can then try and
query for the drug private details - but since we have made sure that wholesalers do not have access to that
data on the network - we will get an error. The reason is that the wholesaler mspId is not included in the
collectionDrugPrivateDetails collection, as shown above.

Lastly, we will create an account as a patient - and then query for the drug price. Since as a patient, we need to know how expensive a drug is to ensure we can buy it, we should have access to the private details of the transaction, such as the price. As shown below, since the user is from the patient organization, we are able to see the price details.

Intro to private data collections
A transaction with private data is different than a typical Fabric transaction in three main ways.
- The data is stored on a private database on the authorized peers (the peers which are listed in the collection definition). If you want to learn more about defining a private data collection, see the collection definition section below.
- The data is sent peer-to-peer, via the gossip protocol. Note that because the gossip protocol is involved, this means that you must set up anchor peers
on the channel, and ensure that the
CORE_PEER_GOSSIP_EXTERNALENDPOINTis configured on each peer. - The hash of the data is sent to all peers, whether they are authorized to see the actual private data, so that it can be used as evidence that the transaction did occur. The hash of the data is displayed in the diagram below.

To learn more about when private data collections, see the Fabric documentation here. To learn a bit more about when to use a collection within a channel vs. a separate channel, go here.
Using private data collections
To use a private data collection within your Hyperledger Fabric application, you must define a private data collection definition. The collection contains one or more private data collections and properties such as which organizations are allowed to access the collection, and how many peers the private data must be disseminated to.
Note that the syntax for the collection definition is slightly different if you are using the Fabric SDK versus the Fabric CLI. We will be using the Fabric SDK syntax. Take, for example, the collection definition below:
[
    {
        "name": "collectionMarbles",
        "policy": {
            "identities": [
                {
                    "role": {
                        "name": "member",
                        "mspId": "Org1MSP"
                    }
                },
                {
                    "role": {
                        "name": "member",
                        "mspId": "Org2MSP"
                    }
                }
            ],
            "policy": {
                "1-of": [
                    {
                        "signed-by": 0
                    },
                    {
                        "signed-by": 1
                    }
                ]
            }
        },
        "requiredPeerCount": 1,
        "maxPeerCount": 2,
        "blockToLive": 100
    },
    {
        "name": "collectionMarblePrivateDetails",
        "policy": {
            "identities": [
                {
                    "role": {
                        "name": "member",
                        "mspId": "Org1MSP"
                    }
                }
            ],
            "policy": {
                "1-of": [
                    {
                        "signed-by": 0
                    }
                ]
            }
        },
        "requiredPeerCount": 1,
        "maxPeerCount": 1,
        "blockToLive": 100
    }
]
In the above example, collectionMarbles allows both Org1 and Org2 members of the channel to have this private data in their
private database.
This is because the mspId of both Org1 and Org2 are listed in the policy property.
"policy": {
    "1-of": [
        {
            "signed-by": 0
        },
        {
            "signed-by": 1
        }
    ]
}
The nested
policy property in the above code specifies the minimum peers required to disseminate the private data as part of endorsement of
the chaincode. This means unless the minimum number of peers are met, only then the chaincode will be endorsed. In the
example above, this means that only 1 peer is required, and it shows signed-by 0 and 1, this means that either Org1 or
Org2 can disseminate the data, and the chaincode will be endorsed.
CollectionMarblesPrivateDetails on the other hand, allows only members of Org1 to have the private data
in their private database.
Writing chaincode with private data collections
The last piece of using private data in Hyperledger Fabric is writing chaincode that will write data to the private databases on the peers. This is done by using the putPrivateData method from the Hyperledger Fabric Node SDK.
The method is similar to the putState method that is commonly used in Fabric chaincode, except that
this method expects an argument which specifies which private collection to write
the key-value pair to.
Similarly, for querying the state of a private data collection, you can use the getPrivateData method.
Private data in healthcare
In this pattern, we showcase 1 manufacturer, 2 wholesalers, 1 pharmacy and 1 patient connected on the same channel on a blockchain ledger. The manufacturer generates a new drug pill, and sells it at different prices to the two wholesellers. Only the manufacturer and the patient have visibility to the two negotiated prices for this example.
This code pattern is for developers who want to learn how to use the private data collections feature introduced into Hyperledger Fabric. When you have completed it, you will understand how to:
- Create multiple organizations with the IBM Blockchain Platform.
- Create a VueJS web app that has multiple dashboards on a Single Page Application, which can communicate in realtime with each other.
- Create a NodeJS server that is deployed to Kubernetes on IBM Cloud.
- Use private data collections to enforce data privacy between organizations on the same channel.
Architecture flow
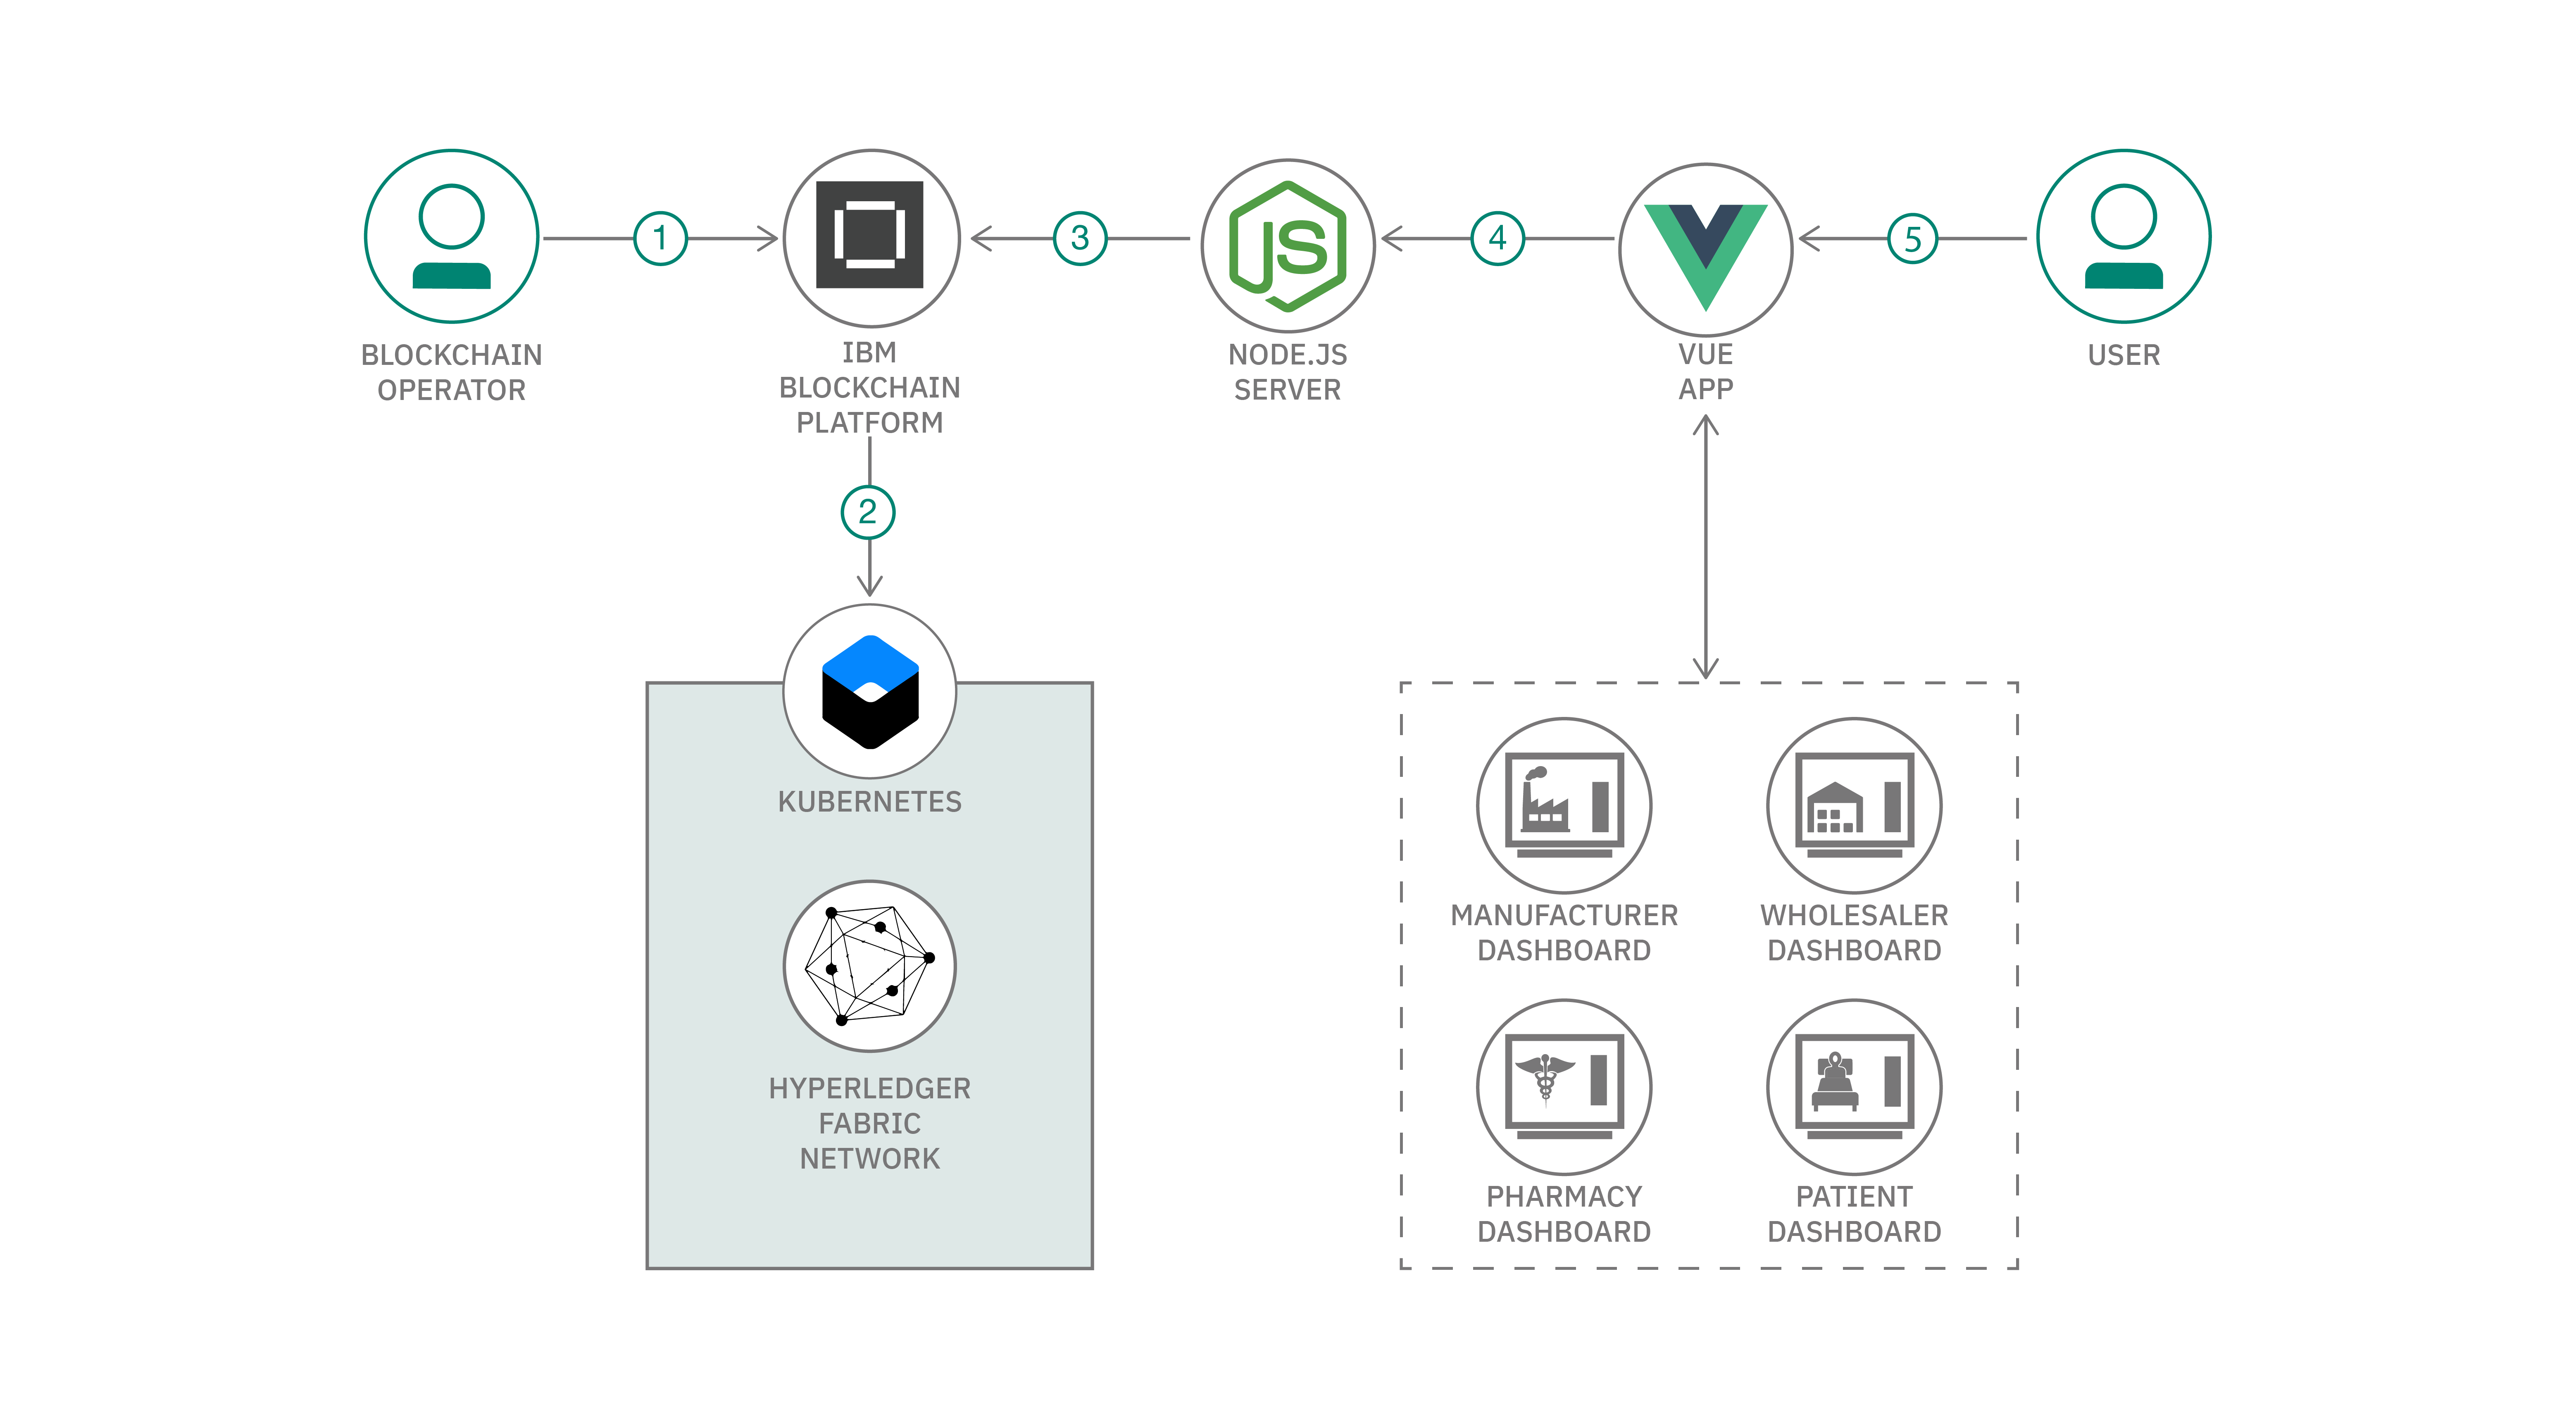
- The blockchain operator creates a IBM Kubernetes Service cluster and an IBM Blockchain Platform 2.0 service.
- The IBM Blockchain Platform 2.0 creates a Hyperledger Fabric network on an IBM Kubernetes Service, and the operator installs and instantiates the smart contract on the network.
- The Node.js application server uses the Fabric SDK to interact with the deployed network on IBM Blockchain Platform 2.0.
- The React UI uses the Node.js application API to interact and submit transactions to the network.
- The user interacts with the supply chain application web interface to update and query the blockchain ledger and state.
Included components
- IBM Blockchain Platform gives you total control of your blockchain network with a user interface that can simplify and accelerate your journey to deploy and manage blockchain components on the IBM Cloud Kubernetes Service.
- IBM Cloud Kubernetes Service creates a cluster of compute hosts and deploys highly available containers. A Kubernetes cluster lets you securely manage the resources that you need to quickly deploy, update, and scale applications.
Featured technologies
- Nodejs is an open-source, cross-platform JavaScript run-time environment that executes JavaScript code server-side.
- Vuejs is a progressive framework for building user interfaces.
- Bootstrap is a free and open-source front-end Web framework. It contains HTML and CSS-based design templates for typography, forms, buttons, navigation and other interface components, as well as optional JavaScript extensions.
- Docker is a computer program that performs operating-system-level virtualization, also known as Containerization.
Prerequisites
Steps (Cloud Network)
Important Note: This pattern is more advanced because it uses five organizations. For this reason, you will likely have to get a paid kubernetes cluster to run this pattern on the cloud, since a free cluster will not have the CPU/storage necessary to deploy all of the pods that we need to run this pattern. There are other patterns that leverage a free Kubernetes cluster (and only two organizations), so if you want to try that one out first, go here.
Step 1. Create IBM Cloud services
-
Create the IBM Cloud Kubernetes Service. You can find the service in the
Catalog. -
Once you reach the create a new cluster page you will need to do the following:
- Choose standard cluster type
- Fill out cluster name
- choose Geography: North America
- Choose Location and availability: Multizone
- Choose Metro: Dallas
- Choose Worker nodes: Dallas 10 only
- Choose Master service endpoint: Both private & public endpoints
- Choose Default worker pool
- Choose Flavor
- Choose Encrypt local disk Yes
- Choose Worker nodes 3
- Click on create cluster. The cluster takes around 15-20 minutes to provision, so please be patient!

- After your kubernetes cluster is up and running, you can deploy your IBM Blockchain Platform V2 Beta on the cluster. Again - wait for the Kubernetes service to indicate it was deployed. The service walks through few steps and finds your cluster on the IBM Cloud to deploy the service on.

- Once the Blockchain Platform is deployed on the Kubernetes cluster, you can launch the console to start operating on your blockchain network.

Step 2. Build a network - Certificate Authority
We will build a network as provided by the IBM Blockchain Platform documentation. This will include creating a channel with a single peer organization with its own MSP and CA (Certificate Authority), and an orderer organization with its own MSP and CA. We will create the respective identities to deploy peers and operate nodes.

-
Create your patient organization CA
- Click Add Certificate Authority.
- Click IBM Cloud under Create Certificate Authority and Next.
- Give it a Display name of
Patient CA. - Specify an Admin ID of
adminand Admin Secret ofadminpw.
-
Create your manufacturer organization CA (process is same as shown in gif above)
- Click Add Certificate Authority.
- Click IBM Cloud under Create Certificate Authority and Next.
- Give it a Display name of
Manufacturer CA. - Specify an Admin ID of
adminand Admin Secret ofadminpw.
-
Create your wholesaler1 organization CA (process is same as shown in gif above)
- Click Add Certificate Authority.
- Click IBM Cloud under Create Certificate Authority and Next.
- Give it a Display name of
W1 CA. - Specify an Admin ID of
adminand Admin Secret ofadminpw.
-
Create your wholesaler2 organization CA (process is same as shown in gif above)
- Click Add Certificate Authority.
- Click IBM Cloud under Create Certificate Authority and Next.
- Give it a Display name of
W2 CA. - Specify an Admin ID of
adminand Admin Secret ofadminpw.
-
Create your pharmacy organization CA (process is same as shown in gif above)
- Click Add Certificate Authority.
- Click IBM Cloud under Create Certificate Authority and Next.
- Give it a Display name of
Pharmacy CA. - Specify an Admin ID of
adminand Admin Secret ofadminpw.

-
Use your CA to associate and register patient identities
- Select the Patient CA Certificate Authority that we created. First you need to associate the CA, click Associate identity
- Give an Enroll ID of
admin, and Enroll Secret ofadminpw. Note that this is the same as the id and secret you gave in the creation step. Then give the Identity Display Name of Patient CA Admin Click Associate Identity. - First, we will register an admin for our Patient Organization. Click on the Register User button. Give an Enroll ID of
patientAdmin, and Enroll Secret ofpatientAdminpw. Set the Type for this identity asclientWe will leave the Maximum enrollments and Add Attributes fields alone. Click Next and then Click Register User. - We will repeat the process to create an identity of the peer. Click on the Register User button. Give an Enroll ID of
patientPeer, and Enroll Secret ofpatientPeerpw. Set the Type for this identity aspeerWe will leave the Maximum enrollments and Add Attributes fields blank. Click Next and then Click Register User.
-
Use your CA to associate and register manufacturer identities (process is same as shown in gif above)
- Select the Manufacturer CA Certificate Authority that we created.
- First you need to associate the CA, click Associate identity
- Give an Enroll ID of
admin, and Enroll Secret ofadminpw. Note that this is the same as the id and secret you gave in the creation step. Then give the Identity Display Name of Manufacturer CA Admin Click Associate Identity. - Then, we will register an admin for our Organization. Again, select the Manufacturer CA Certificate Authority. Click on the Register User button. Give an Enroll ID of
manufacturerAdmin, and Enroll Secret ofmanufacturerAdminpw. Set the Type for this identity asclient. We will leave the root affliation and Add Attributes alone. Click Next and then Click Register User - We will repeat the process to create an identity of the peer. Click on the Register User button. Give an Enroll ID of
manufacturerPeer, and Enroll Secret ofmanufacturerPeerpw. Set the Type for this identity aspeer. We will leave everything else Maximum enrollments and Add Attributes fields alone. Click Next and then Click Register User.
-
Use your CA to associate and register w1 identities (process is same as shown in gif above)
- Select the W1 CA Certificate Authority that we created.
- First you need to associate the CA, click Associate identity
- Give an Enroll ID of
admin, and Enroll Secret ofadminpw. Note that this is the same as the id and secret you gave in the creation step. Then give the Identity Display Name of W1 CA Admin Click Associate Identity. - Then, we will register an admin for our W1 Organization. Click on the Register User button. Give an Enroll ID of
w1Admin, and Enroll Secret ofw1Adminpw. Set the Type for this identity asclient. We will leave the Maximum enrollments and Add Attributes fields alone. Click Next and then Click Register User. - We will repeat the process to create an identity of the peer. Click on the Register User button. Give an Enroll ID of
w1Peer, and Enroll Secret ofw1Peerpw. Set the Type for this identity aspeer. We will leave everything else Maximum enrollments and Add Attributes fields alone. Click Next and then Click Register User.
-
Use your CA to associate and register w2 identities (process is same as shown in gif above)
- Select the W2 CA Certificate Authority that we created.
- First you need to associate the CA, click Associate identity
- Give an Enroll ID of
admin, and Enroll Secret ofadminpw. Note that this is the same as the id and secret you gave in the creation step. Then give the Identity Display Name of W2 CA Admin Click Associate Identity. - Next, we will register an admin for our W2 Organization. Click on the Register User button. Give an Enroll ID of
w2Admin, and Enroll Secret ofw2Adminpw. Set the Type for this identity asclient. We will leave the Maximum enrollments and Add Attributes fields blank. Click Next and then Click Register User. - We will repeat the process to create an identity of the peer. Click on the Register User button. Give an Enroll ID of
w2Peer, and Enroll Secret ofw2Peerpw. Set the Type for this identity aspeer. We will leave the Maximum enrollments and Add Attributes fields blank. Click Next and then Click Register User.
-
Use your CA to associate and register pharmacy identities (process is same as shown in gif above)
- Select the Pharmacy CA Certificate Authority that we created.
- First you need to associate the CA, click Associate identity
- Give an Enroll ID of
admin, and Enroll Secret ofadminpw. Note that this is the same as the id and secret you gave in the creation step. Then give the Identity Display Name of Pharmacy CA Admin Click Associate Identity. - Next, we will register an admin for our Pharmacy Organization. Click on the Register User button. Give an Enroll ID of
pharmacyAdmin, and Enroll Secret ofpharmacyAdminpw. Set the Type for this identity asclient. We will leave the Maximum enrollments and Add Attributes fields alone. Click Next and then Click Register User. - We will repeat the process to create an identity of the peer. Click on the Register User button. Give an Enroll ID of
pharmacyPeer, and Enroll Secret ofpharmacyPeerpw. Set the Type for this identity aspeerWe will leave the Maximum enrollments and Add Attributes fields blank. Click Next and then Click Register User.
Step 3. Build a network - Create MSP Definitions

-
Create the Patient MSP definition
- Navigate to the Organizations tab in the left navigation and click Create MSP definition.
- Enter the MSP Display name as
Patient MSPand an MSP ID ofpatientmsp. - Under Root Certificate Authority details, specify the peer CA that we created
Patient CAas the root CA for the organization. - Give the Enroll ID and Enroll secret for your organization admin,
patientAdminandpatientAdminpw. Then, give the Identity name,Patient MSP Admin. - Click the Generate button to enroll this identity as the admin of your organization and export the identity to the wallet. Click Export to export the admin certificates to your file system. Finally click Create MSP definition.
-
Create the manufacturer MSP definition
- Navigate to the Organizations tab in the left navigation and click Create MSP definition.
- Enter the MSP Display name as
Manufacturer MSPand an MSP ID ofmanufacturermsp. - Under Root Certificate Authority details, specify the peer CA that we created
Manufacturer CAas the root CA for the organization. - Give the Enroll ID and Enroll secret for your organization admin,
manufacturerAdminandmanufacturerAdminpw. Then, give the Identity name,Manufacturer MSP Admin. - Click the Generate button to enroll this identity as the admin of your organization and export the identity to the wallet. Click Export to export the admin certificates to your file system. Finally click Create MSP definition.
-
Create the W1 MSP definition
- Navigate to the Organizations tab in the left navigation and click Create MSP definition.
- Enter the MSP Display name as
W1 MSPand an MSP ID ofw1msp. - Under Root Certificate Authority details, specify the peer CA that we created
W1 CAas the root CA for the organization. - Give the Enroll ID and Enroll secret for your organization admin,
w1Adminandw1Adminpw. Then, give the Identity name,W1 MSP Admin. - Click the Generate button to enroll this identity as the admin of your organization and export the identity to the wallet. Click Export to export the admin certificates to your file system. Finally click Create MSP definition.
-
Create the W2 MSP definition
- Navigate to the Organizations tab in the left navigation and click Create MSP definition.
- Enter the MSP Display name as
W2 MSPand an MSP ID ofw2msp. - Under Root Certificate Authority details, specify the peer CA that we created
W2 CAas the root CA for the organization. - Give the Enroll ID and Enroll secret for your organization admin,
w2Adminandw2Adminpw. Then, give the Identity name,W2 MSP Admin. - Click the Generate button to enroll this identity as the admin of your organization and export the identity to the wallet. Click Export to export the admin certificates to your file system. Finally click Create MSP definition.
-
Create the Pharmacy MSP definition
- Navigate to the Organizations tab in the left navigation and click Create MSP definition.
- Enter the MSP Display name as
Pharmacy MSPand an MSP ID ofpharmacymsp. - Under Root Certificate Authority details, specify the peer CA that we created
Pharmacy CAas the root CA for the organization. - Give the Enroll ID and Enroll secret for your organization admin,
pharmacyAdminandpharmacyAdminpw. Then, give the Identity name,Pharmacy MSP Admin. - Click the Generate button to enroll this identity as the admin of your organization and export the identity to the wallet. Click Export to export the admin certificates to your file system. Finally click Create MSP definition.
Step 4. Build a network - Create Peers

-
Create an Patient peer
- On the Nodes page, click Add peer.
- Click IBM Cloud under Create a new peer and Next.
- Give your peer a Display name of
Patient Peer. - On the next screen, select
Patient CAas your Certificate Authority. Then, give the Enroll ID and Enroll secret for the peer identity that you created for your peer,patientPeer, andpatientPeerpw. Then, select the Administrator Certificate (from MSP),Patient MSP, from the drop-down list and click Next. - The last side panel will ask you to Associate an identity and make it the admin of your peer. Select your peer admin identity
Patient MSP Admin. Click Next. - Review the summary and click Add Peer.
-
Create an manufacturer peer
- On the Nodes page, click Add peer.
- Click IBM Cloud under Create a new peer and Next.
- Give your peer a Display name of
Manufacturer Peer. - On the next screen, select
Manufacturer CAas your Certificate Authority. Then, give the Enroll ID and Enroll secret for the peer identity that you created for your peer,manufacturerPeer, andmanufacturerPeerpw. Then, select the Administrator Certificate (from MSP),Manufacturer MSP, from the drop-down list and click Next. - The last side panel will ask you to Associate an identity and make it the admin of your peer. Select your peer admin identity
Manufacturer MSP Admin. Click Next. - Review the summary and click Add Peer.
-
Create an W1 peer
- On the Nodes page, click Add peer.
- Click IBM Cloud under Create a new peer and Next.
- Give your peer a Display name of
W1 Peer. - On the next screen, select
W1 CAas your Certificate Authority. Then, give the Enroll ID and Enroll secret for the peer identity that you created for your peer,W1Peer, andW1Peerpw. Then, select the Administrator Certificate (from MSP),W1 MSP, from the drop-down list and click Next. - The last side panel will ask you to Associate an identity and make it the admin of your peer. Select your peer admin identity
W1 MSP Admin. Click Next. - Review the summary and click Add Peer.
-
Create an W2 peer
- On the Nodes page, click Add peer.
- Click IBM Cloud under Create a new peer and Next.
- Give your peer a Display name of
W2 Peer. - On the next screen, select
W2 CAas your Certificate Authority. Then, give the Enroll ID and Enroll secret for the peer identity that you created for your peer,W2Peer, andW2Peerpw. Then, select the Administrator Certificate (from MSP),W2 MSP, from the drop-down list and click Next. - The last side panel will ask you to Associate an identity and make it the admin of your peer. Select your peer admin identity
W2 MSP Admin. Click Next. - Review the summary and click Add Peer.
-
Create an Pharmacy peer
- On the Nodes page, click Add peer.
- Click IBM Cloud under Create a new peer and Next.
- Give your peer a Display name of
Pharmacy Peer. - On the next screen, select
Pharmacy CAas your Certificate Authority. Then, give the Enroll ID and Enroll secret for the peer identity that you created for your peer,PharmacyPeer, andpharmacyPeerpw. Then, select the Administrator Certificate (from MSP),Pharmacy MSP, from the drop-down list and click Next. - The last side panel will ask you to Associate an identity and make it the admin of your peer. Select your peer admin identity
Pharmacy MSP Admin. Click Next. - Review the summary and click Add Peer.
Step 5. Build a network - Create Orderer
Go to the Nodes tab.

-
Create your orderer organization CA
- Click Add Certificate Authority.
- Click IBM Cloud under Create Certificate Authority and Next.
- Give it a unique Display name of
Orderer CA. - Specify an Admin ID of
adminand Admin Secret ofadminpw.
-
Use your CA to register orderer and orderer admin identities
- In the Nodes tab, select the Orderer CA Certificate Authority that we created.
- First you need to associate the CA, click Associate identity
- Give an Enroll ID of
admin, and Enroll Secret ofadminpw. Note that this is the same as the id and secret you gave in the creation step. Then give the Identity Display Name of Orderer CA Admin Click Associate Identity. - First, we will register an admin for our organization. Click on the Register User button. Give an Enroll ID of
ordereradmin, and Enroll Secret ofordereradminpw. Set the Type for this identity asclient. We will leave the Maximum enrollments and Add Attributes fields alone. Click Next and then Click Register User. - We will repeat the process to create an identity of the orderer. Click on the Register User button. Give an Enroll ID of
orderer1, and Enroll Secret oforderer1pw. Set the Type for this identity aspeer. We will leave the Maximum enrollments and Add Attributes fields alone. Click Next and then Click Register User.
-
Create the orderer organization MSP definition (check gifs for creating MSP above)
- Navigate to the Organizations tab in the left navigation and click Create MSP definition.
- Enter the MSP Display name as
Orderer MSPand an MSP ID oforderermsp. - Under Root Certificate Authority details, specify the peer CA that we created
Orderer CAas the root CA for the organization. - Give the Enroll ID and Enroll secret for your organization admin,
ordereradminandordereradminpw. Then, give the Identity name,Orderer MSP Admin. - Click the Generate button to enroll this identity as the admin of your organization and export the identity to the wallet. Click Export to export the admin certificates to your file system. Finally click Create MSP definition.
-
Create an orderer (check gifs for creating peers above)
- On the Nodes page, click Add ordering service.
- Click IBM Cloud and proceed with Next.
- Give your peer a Display name of
Orderer. - On the next screen, select
Orderer CAas your Certificate Authority. Then, give the Enroll ID and Enroll secret for the peer identity that you created for your orderer,orderer1, andorderer1pw. Then, select the Administrator Certificate (from MSP),Orderer MSP, from the drop-down list and click Next. - Give the TLS Enroll ID,
admin, and TLS Enroll secret,adminpw, the same values are the Enroll ID and Enroll secret that you gave when creating the CA. Leave the TLS CSR hostname blank. - The last side panel will ask to Associate an identity and make it the admin of your peer. Select your peer admin identity
Orderer MSP Admin. - Click Next, Review the summary and click Add Ordering Service.

-
Add organizations as Consortium Member on the orderer to transact
- Navigate to the Nodes tab, and click on the Orderer that we created.
- Under Consortium Members, click Add organization.
- From the drop-down list, select
Manufacturer MSP. - Click Add Organization.
- Repeat the same steps, but add
W1 MSP,W2 MSP,Pharmacy MSPandPatient MSPas well.
Step 6. Build a network - Create and Join Channel

-
Create the channel
- Navigate to the Channels tab in the left navigation.
- Click Create channel.
- Give the channel a name,
mychannel. - Select the orderer you created,
Ordererfrom the orderers drop-down list. - Select the channel member. This should be
Manufacturer MSP (manufacturermsp). - Select the MSP identifying the organization of the channel creator from the drop-down list. This should be
Manufacturer MSP (manufacturermsp). - Click Add next to the manufacturer organization. Make the organization an Operator.
- Do the same for the other organizations:
- Click Add next to the w1 organization. Make the organization an Operator.
- Click Add next to the w2 organization. Make the organization an Operator.
- Click Add next to the pharmacy organization. Make the organization an Operator.
- Click Add next to the patient organization. Make the organization an Operator.
- Under Channel update policy, Select 1 out of 5.
- Under Creator organization Select Manufacturer MSP under Channel creator MSP. And then select Associate available identity as
Manufacturer MSP Admin. - Click Create channel.

-
Join your peer to the channel
- Click Join channel to launch the side panels.
- Select your
Ordererand click Next. - Enter the name of the channel you just created.
mychanneland click Next. - Select which peers you want to join the channel, click all peers.
- Ensure all peers are anchor peers.
- Click Join channel.
Step 7. Deploy Smart Contract on the network
-
Install a smart contract
-
Clone the repository:
git clone https://github.com/IBM/private-data-collections-on-fabric- Click the Smart contracts tab to install the smart contract.
- Click Install smart contract to upload the drugContract smart contract package file.
- Click on Add file and find your packaged smart contract [email protected] . It is the file in the
private-data-collections-on-fabric/contractdirectory. - Select all peers - we need to install the contract on each peer.
- Once the contract is uploaded, click Install smart contract.
-
Instantiate smart contract
- On the smart contracts tab, find the smart contract from the list installed on your peers and click Instantiate from the overflow menu on the right side of the row.
- On the side panel that opens, select the channel,
mychannelto instantiate the smart contract on. Click Next. - Select the organization members to be included in the policy,
manufacturermsp,w1msp,w2msp,pharmacymsp, patientmsp. Click Next. - Select the peer to approve proposals for instantiating the smart contract. Select Manufacturer Peer from the drop down.
- Setup private data collection. Click on Add file and find your private data json file. It is the file called
collectionsConfig.jsonin theprivate-data-collections-on-fabric/privDataCollectionDefinitiondirectory. - Give Function name of
Initand leave Arguments blank. - Click Instantiate. Note that this may take a couple of minutes.
- To learn more about private data collection go to the following page.
Step 8. Connect application to the network

-
Connect with sdk through connection profile
- Under the Instantiated Smart Contract, click on
Connect with SDKfrom the overflow menu on the right side of the row. - Choose from the dropdown for MSP for connection,
manufacturermsp. - Choose from Certificate Authority dropdown,
Manufacturer CA. - Download the connection profile by scrolling down and clicking Open Connection Profile. Go ahead and copy
and paste the whole json file into the corresponding connectionProfile. For example, for the manufacturer connection
profile, copy and paste the contents into
web-app/server/connectionProfiles/manufacturerConnection.json. Do the same for the other four connection profiles, but make sure to choose the corresponding MSP and CA. For example, for the Patient connection profile, choose the patientmsp and Patient CA from the dropdowns, and then click on Open Connection Profile and copy and paste the contents of the opened file intoweb-app/server/connectionProfiles/patientConnection.json
- Under the Instantiated Smart Contract, click on

- Next, we need to update our config files the Certificate Authority URL from the connection profiles we just
downloaded. From your w1Connection.json, copy and paste the certificate authority url field, and then paste that in to
the
caURLfieldconfigW1.jsonfile in theprivate-data-collections-on-fabric/web-app/server/configdirectory. Do that for all of the four remaining files. The gif only shows this done for w1 and w2 organizations. - Once completed, each of the five files in the
private-data-collections-on-fabric/web-app/server/configdirectory will look like the following, taking configPatient.json as an example:
{
"connection_file": "patientConnection.json",
"appAdmin": "patientApp-admin",
"appAdminSecret": "patientApp-adminpw",
"orgMSPID": "patientmsp",
"caUrl": "https://****************.us-south.containers.appdomain.cloud:7054",
"userName": "patientAdmin",
"gatewayDiscovery": { "enabled": true, "asLocalhost": false }
}
Note that my containers are located in us-south, so your URL will look different based on location.
Step 9. Register Org Admin Users

-
Create manufacturer application admin
- Go to the Nodes tab on the left bar, and under Certificate Authorities, choose your Manufacturer CA.
- Click on Register user.
- Give an Enroll ID and Enroll Secret to administer your application users,
manufacturerApp-adminandmanufacturerApp-adminpw. - Choose
clientas Type. - You can leave the Use root affiliation box checked.
- You can leave the Maximum enrollments blank.
- Under Attributes, click on Add attribute. Give attribute as
hf.Registrar.Roles=*. This will allow this identity to act as registrar and issues identities for our app. Click Add-attribute. - Click Register User.
-
Create w1 application admin
- Go to the Nodes tab on the left bar, and under Certificate Authorities, choose your W1 CA.
- Click on Register user.
- Give an Enroll ID and Enroll Secret to administer your application users,
w1App-adminandw1App-adminpw. - Choose
clientas Type. - You can leave the Use root affiliation box checked.
- You can leave the Maximum enrollments blank.
- Under Attributes, click on Add attribute. Give attribute as
hf.Registrar.Roles=*. This will allow this identity to act as registrar and issues identities for our app. Click Add-attribute. - Click Register User. -->
-
Create w2 application admin
- Go to the Nodes tab on the left bar, and under Certificate Authorities, choose your w2 CA.
- Click on Register user.
- Give an Enroll ID and Enroll Secret to administer your application users,
w2App-adminandw2App-adminpw. - Choose
clientas Type. - You can leave the Use root affiliation box checked.
- You can leave the Maximum enrollments blank.
- Under Attributes, click on Add attribute. Give attribute as
hf.Registrar.Roles=*. This will allow this identity to act as registrar and issues identities for our app. Click Add-attribute. - Click Register User.
-
Create pharmacy application admin
- Go to the Nodes tab on the left bar, and under Certificate Authorities, choose your Pharmacy CA.
- Click on Register user.
- Give an Enroll ID and Enroll Secret to administer your application users,
pharmacyApp-adminandpharmacyApp-adminpw. - Choose
clientas Type. - You can leave the Use root affiliation box checked.
- You can leave the Maximum enrollments blank.
- Under Attributes, click on Add attribute. Give attribute as
hf.Registrar.Roles=*. This will allow this identity to act as registrar and issues identities for our app. Click Add-attribute. - Click Register User.
-
Create patient application admin
- Go to the Nodes tab on the left bar, and under Certificate Authorities, choose your Patient CA.
- Click on Register user.
- Give an Enroll ID and Enroll Secret to administer your application users,
patientApp-adminandpatientApp-adminpw. - Choose
clientas Type. - You can leave the Use root affiliation box checked.
- You can leave the Maximum enrollments blank.
- Under Attributes, click on Add attribute. Give attribute as
hf.Registrar.Roles=*. This will allow this identity to act as registrar and issues identities for our app. Click Add-attribute. - Click Register User.

- go into
private-data-collections-on-fabric/web-app/serverand then run the./enrollAllAdmin.shscript. Your output should look like the following:
server$ ./enrollAllAdmin.sh
msg: Successfully enrolled admin user manufacturerAdmin and imported it into the wallet
msg: Successfully enrolled admin user w1Admin and imported it into the wallet
msg: Successfully enrolled admin user w2Admin and imported it into the wallet
msg: Successfully enrolled admin user patientAdmin and imported it into the wallet
msg: Successfully enrolled admin user pharmacyAdmin and imported it into the wallet
- Nice job! You now have admin identities for each of your organizations, and you can start adding registering more users.
- You're now ready to start the application!
Step 10. Run the application
-
In a terminal window, navigate to the directory
private-data-collections-on-fabric/web-app/ -
Install the server dependencies
cd server npm install- Start the Node.js Express application
npm start -
In a different terminal window, navigate to the directory
private-data-collections-on-fabric/web-app/ -
Install the client dependencies
cd client npm install- Start the Vue.js application
npm run serve -
Go to http://localhost:8080/ in your browser to see the application.
-
Check the directions on how to run that app at the top of the readme
Extra - step by step instructions to run the app
- From the home page - go ahead and click on
Registerat the bottom of the page. - Register a manufacturer user ( one who will be able to access the private collection) details. Make sure to choose the manufacturer from the dropdown.
- Login with the email and password from the user you registered in the previous step.
- Click on
addAsset. Go ahead and create a drug of your choosing, remembering thedrugNumberfield. - Once you're ready to create the drug, click on
addDrugand wait for a confirmation message. - Next, click on
Home, and then click onQuery Private Details Collection. - There, query for the same
drugNumberthat you created earlier, you should have access to the price since you are a member of the organizations that have access to the private details collection. - Next, create a wholesaler member. This is someone who will not have access to the
Private details collectionwhich will include the price of the item. Go ahead and log into the platform with your username and password. From there, click onQuery Private Details Collectionand pass in the samedrugNumberas was created above. - You will see the following message:
GET_STATE failed: transaction ID: a477b81f3a5: private data matching public hash version is not available.This means that you are not part of the organization who is allowed to view this private data collection. - Next, still logged in as the
w1msporw2msp, click onQuery Public Details Collection. Pass inG786and you will see the details of the drug that was created.
Great job! You now know how to implement private data collections with the IBM Blockchain Platform! Go build something great!
License
This code pattern is licensed under the Apache Software License, Version 2. Separate third-party code objects invoked within this code pattern are licensed by their respective providers pursuant to their own separate licenses. Contributions are subject to the Developer Certificate of Origin, Version 1.1 (DCO) and the Apache Software License, Version 2.
Apache Software License (ASL) FAQ
</article
Recommend
About Joyk
Aggregate valuable and interesting links.
Joyk means Joy of geeK