

How to use a Raspberry Pi in kiosk mode
source link: https://www.raspberrypi.com/tutorials/how-to-use-a-raspberry-pi-in-kiosk-mode/
Go to the source link to view the article. You can view the picture content, updated content and better typesetting reading experience. If the link is broken, please click the button below to view the snapshot at that time.

How to use a Raspberry Pi in kiosk mode

Kiosks are designed to offer users specific information or a specific experience, while preventing access to any other activities on the device. They are often found in airports, shops, hospitals, cafes, and museums — any location where people need easy access to information or services like timetables, waiting times, product information, directions, self check-in machines, and so on.
Kiosk mode on your Raspberry Pi allows you to boot straight into a full-screen web page or an application without using the desktop environment. It’s the foundation for many different projects where you want to display information for a dedicated interaction with a user.
What you’ll need
Shopping list
- Raspberry Pi (any model)
- USB-C power supply unit (PSU)
- microSD card
- HDMI cable
- Monitor, TV, or other suitable display
Choosing the right Raspberry Pi and accessories
Kiosk mode will work on any Raspberry Pi. For this tutorial, we’ll be using a Raspberry Pi 4, so you will need a USB-C power supply and a micro-HDMI-to-standard-HDMI cable. Older models will require a micro USB power supply and a standard-HDMI-to-HDMI cable instead.
Kiosks are left powered for long periods of time, so it’s important to have a good quality power supply for your Raspberry Pi. We recommend the official USB-C and micro USB power supplies, as they are designed to provide a consistent +5.1V with captive (attached) USB cables. Don’t be tempted to use an old spare phone charger and cable you may have lying around as they may not provide sufficiently reliable power.
The type of display you require depends very much on your intended project. A TV or monitor with HDMI input is all that’s required for this guide, but you might find you need something more specific for an interactive experience or a more compact display. For example, the Raspberry Pi Touch Display is perfect for information dashboards, such as you might use in a Raspberry Pi weather station.
For the initial SD card setup, you’ll also need:
Another computer connected to your network. We’ll refer to this as “your usual computer”, to distinguish it from the Raspberry Pi computer that you are setting up in Kiosk mode. We’re going to be accessing and controlling the Raspberry Pi via Wi-Fi from this computer, so there is no need for an additional keyboard and mouse to be attached to your Raspberry Pi.
Installing Raspberry Pi OS (32-bit)
We’re going to use Raspberry Pi Imager to install Raspberry Pi OS (32-bit) onto your microSD card. Raspberry Pi Imager is available for free for Windows, macOS, Ubuntu for x86, and Raspberry Pi OS. Download it to your usual computer here.

Connect your microSD card to your usual computer using an SD card adapter if you need one. We recommend a minimum storage size of 16GB. Open Raspberry Pi Imager, click CHOOSE OS, and select Raspberry Pi OS (32-bit), which is the smaller-sized Raspberry Pi OS that includes a desktop environment but doesn’t come with unnecessary additional applications for this project.

CHOOSE STORAGE: Select your microSD card.

Press Ctrl-Shift-X to bring up the Raspberry Pi Imager advanced menu, or click the advanced menu cogwheel button in the bottom right corner:

Set a hostname of your choice; we’re using kioskpi here. Check the Enable SSH (Secure Shell) box and set a username and password. You’ll need these details to access your Raspberry Pi later, so be sure to make a secure note of them. Configure your wireless LAN by checking the box, and replace XXXXXXX with your own SSID (network name) and password.
Click SAVE to close the advanced menu, and finally select WRITE to start the process of writing the operating system to the SD card, which will take a few minutes to complete.

Starting and updating your Raspberry Pi
Insert your microSD card into your Raspberry Pi and connect it to the mains power via a USB-C power supply unit. Your Raspberry Pi will now boot for the first time and will connect to your Wi-Fi network automatically, as we have already given it all the credentials it needs.
Connect to your Raspberry Pi via SSH
Open a terminal session on your usual computer and run the following to access your Raspberry Pi via SSH, replacing “pi” and “kioskpi” with the username and hostname you chose:
$ ssh [email protected]The fist time you do this, confirm that you want to connect. When asked, use the password you created in Raspberry Pi Imager:
$ ssh [email protected]
The authenticity of host 'kioskpi.local (2a00:23c8:3880:d801:34e0:2052:bc72:dd67)' can't be established.
ED25519 key fingerprint is SHA256:NjLggsBZzj6N99rABupQCwyhjNnGpeMT6T9jaoRShu8.
This key is not known by any other names
Are you sure you want to continue connecting (yes/no/[fingerprint])? yes
Warning: Permanently added 'kioskpi.local' (ED25519) to the list of known hosts.
[email protected]'s password:
Linux kioskpi 5.15.32-v7l+ #1538 SMP Thu Mar 31 19:39:41 BST 2022 armv7l

The programs included with the Debian GNU/Linux system are free software;
the exact distribution terms for each program are described in the
individual files in /usr/share/doc/*/copyright.

Debian GNU/Linux comes with ABSOLUTELY NO WARRANTY, to the extent
permitted by applicable law.
Last login: Mon Jun 13 12:17:17 2022 from 2a00:23c8:3880:d801:1c21:ea44:bec7:5113
pi@kioskpi:~ $
It’s best practice to run an update task for a fresh installation of Raspberry Pi OS, and it’s something that you should do regularly. You want to ensure the device is running with the very latest versions of all programs and security. Run the following two commands, typing y and hitting Enter when prompted to continue:
$ sudo apt update
$ sudo apt full-upgrade
Reboot your device to allow any changes to take effect:
$ sudo rebootNow that your Raspberry Pi is fully updated and ready to go, log back in before moving on.
Setting up kiosk mode
You only need two additional packages for kiosk mode to work:
- unclutter — removes the mouse pointer from your display
- xdotool — simulates keyboard and mouse activity
To install these programs, just run the following command:
$ sudo apt install xdotool unclutterIn order to make sure your Raspberry Pi boots straight into the desktop environment when it’s powered up without the need to log in, use the software configuration tool:
$ sudo raspi-config
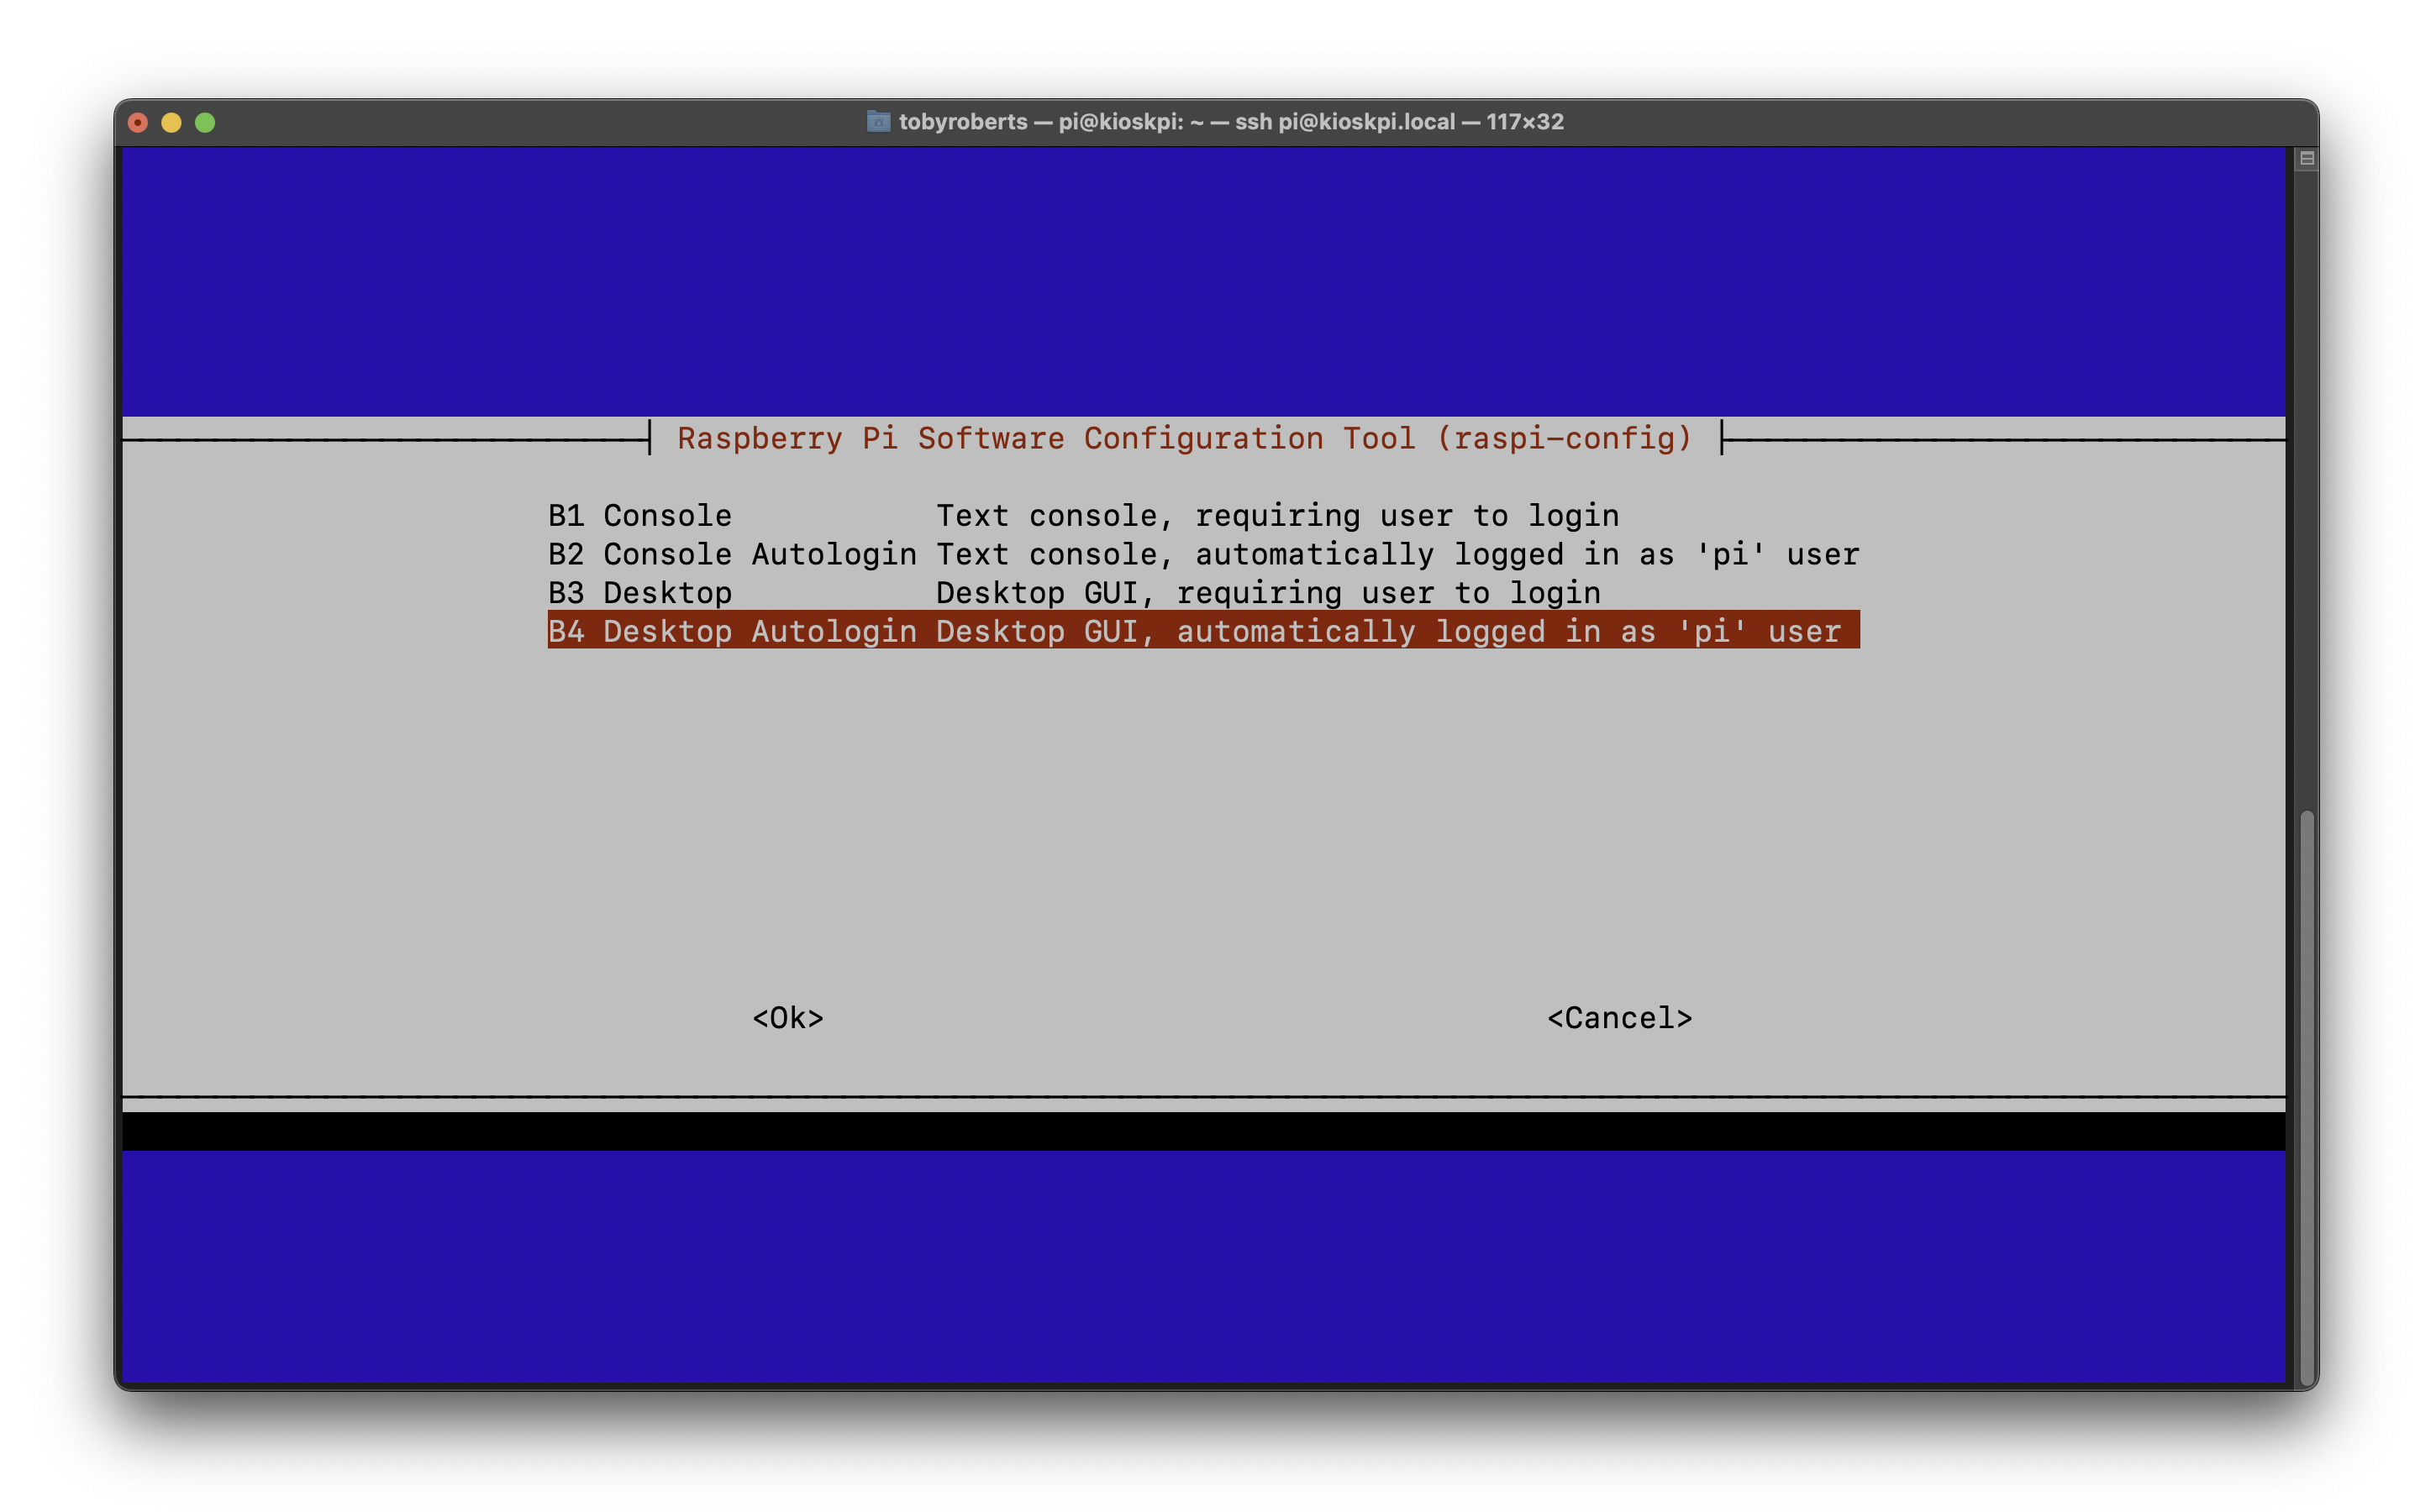
Navigate through the menu, selecting 1 System Options, then S5 Boot / Auto Login, and finally B4 Desktop Autologin — Desktop GUI, automatically logged in as ‘pi’ user:
Press Enter and Finish to save this setting. You will be prompted to reboot again; log back in once you have done this. If you haven’t already connected an HDMI display to your Raspberry Pi, now is the time to do so. Once you have rebooted your Raspberry Pi, you should see the desktop environment on your display.
Next, you need to create a small script to tell your Raspberry Pi what to present in kiosk mode and how to present it. For this tutorial we want to display both the Raspberry Pi and the Greenwich Mean Time webpages, switching back and forth between the two sites. First we’re going to use nano, a text editor, to create our script:
$ sudo nano /home/pi/kiosk.shCopy and paste the following code into your file:
#!/bin/bash

xset s noblank
xset s off
xset -dpms

unclutter -idle 0.5 -root &

sed -i 's/"exited_cleanly":false/"exited_cleanly":true/' /home/pi/.config/chromium/Default/Preferences
sed -i 's/"exit_type":"Crashed"/"exit_type":"Normal"/' /home/pi/.config/chromium/Default/Preferences

/usr/bin/chromium-browser --noerrdialogs --disable-infobars --kiosk https://www.raspberrypi.com/ https://time.is/London &

while true; do
   xdotool keydown ctrl+Tab; xdotool keyup ctrl+Tab;
   sleep 10
done
Let’s break this script down into its component parts in order to understand what it does:
#!/bin/bash — This instructs the operating system to use bash as our command interpreter.
xset s noblank, xset s off, xset -dpms — These commands stop the screensaver function and the desktop environment from interfering with our display.
unclutter -idle 0.5 -root & — This stops the mouse pointer from displaying on the screen.
The two sed lines stop any flags or pop-up warning bars, which would spoil the clean kiosk experience.
The line beginning /usr/bin/chromium-browser specifies which websites appear in the Chromium browser in full screen mode, and stops any user interaction with the sites. (You might not always want to prevent this, but in our example here we do, because we’re making an information-only kiosk.)
Finally, the while true lines are instructions to switch viewing between the two sites every ten seconds. During normal web browsing, the keyboard shortcut Ctrl+Tab will cycle through the currently open browser tabs. Our script uses one of the packages we installed, xdotool, to do this by creating automatic keystrokes.
Press CTRL+X, then Y, and finally Enter to save the new file.
In order to get Raspberry Pi to to run our kiosk whenever it is powered on, we need to create a service. Use the text editor again to create another file to do this:
$ sudo nano /lib/systemd/system/kiosk.servicePaste the following into your file:
[Unit]
Description=Chromium Kiosk
Wants=graphical.target
After=graphical.target

[Service]
Environment=DISPLAY=:0.0
Environment=XAUTHORITY=/home/pi/.Xauthority
Type=simple
ExecStart=/bin/bash /home/pi/kiosk.sh
Restart=on-abort
User=pi
Group=pi

[Install]
WantedBy=graphical.target
You can see the service starts our newly created kiosk.sh bash script. Hit CTRL+X, then Y, and ENTER again to save. Run the following command to enable our new service:
$ sudo systemctl enable kiosk.serviceEither reboot or run the following to start the service:
$ sudo systemctl start kiosk.serviceThe following command will stop the service, if you ever need to close the browser:
$ sudo systemctl stop kiosk.serviceYour display should now be showing the two web pages, toggling between them every ten seconds.
Adding security and failsafe functionality
By their very nature, kiosk mode devices are often left to run unattended for long periods of time. They are frequently turned off and on again at the mains, and left in public places, making them vulnerable to unwanted attention or interference. None of this is conducive to a reliable long-term kiosk mode installation, and kiosks can also be seen as a potential target for hackers. Whilst it’s not realistic to make them 100% secure, there are a number of things we can do to protect them.
Disable ports
As this project currently stands, simply plugging a keyboard and mouse into the USB ports on our Raspberry Pi would give an attacker full control of our device, and potentially any others on the network. Access to the Ethernet port is another weakness. The simplest way to defend against this is to disable all the unused ports. The following command will disable all USB ports:
$ echo '1-1' | sudo tee /sys/bus/usb/drivers/usb/unbindTo reverse this to enable the ports again, run the following:
$ echo '1-1' | sudo tee /sys/bus/usb/drivers/usb/bindIn order to disable the Ethernet port, enter the following command:
$ sudo ifconfig eth0 downReversing this with:
$ sudo ifconfig eth0 upThese disable commands are not persistent, so when power is cycled the ports will, by default, be enabled again. The easiest way to disable them every time the device is powered on is to add to the /etc/rc.local file. The contents of this file are run at the end of every boot process, so it is ideal for our purpose. Edit the file using the following:
$ sudo nano /etc/rc.localAdd the disable commands above the exit 0 line and then hit Ctrl+X, Y, and Enter to save. The file should now look like this:
#!/bin/sh -e
#
# rc.local
#
# This script is executed at the end of each multiuser runlevel.
# Make sure that the script will "exit 0" on success or any other
# value on error.
#
# In order to enable or disable this script just change the execution
# bits.
#
# By default this script does nothing.

echo '1-1' | sudo tee /sys/bus/usb/drivers/usb/unbind

sudo ifconfig eth0 down

exit 0
Each time your Raspberry Pi boots up, the USB and Ethernet ports will now be disabled.
Turn off Bluetooth
By default, Raspberry Pi has Bluetooth turned on. For this tutorial it is not needed, and as such it’s a possible avenue of attack you can do without. To turn it off, simply edit the /boot/config.txt file:
$ sudo nano /boot/config.txtAdd the following line to the bottom of the file:
dtoverlay=disable-btCtrl+X, Y, and Enter to save, then reboot. Bluetooth will be disabled permanently. Simply remove the line you added to enable Bluetooth again if needed.
Set up SSH using keys rather than a password
Until now, connecting to our Raspberry Pi has been via SSH using a password. An added level of security is provided by connecting using pre-generated private-public RSA keys, and removing the ability to log in via username and password altogether. A private key is kept on your usual computer, the one you wish to use to connect to your kiosk, and a public key is kept locally on your Raspberry Pi. The two together provide a far better means of secure connection than a username and password. To create keys, open a terminal on your usual computer and run the following:
$ ssh-keygenAccepting the defaults when prompted will create a private and a public key. The location of these saved files is also given:
$ ssh-keygen
Generating public/private rsa key pair.
Enter file in which to save the key (/Users/pi/.ssh/id_rsa): Enter passphrase (empty for no passphrase):
Enter same passphrase again:
Your identification has been saved in /Users/pi/.ssh/id_rsa
Your public key has been saved in /Users/pi/.ssh/id_rsa.pub
The key fingerprint is:
SHA256:GYBHXNZrjEcDqqG0AV83V/yy8hI35F+8MDa+yWcN/Yo [email protected]
The key's randomart image is:
+---[RSA 3072]----+
|.   .+=.==.      |
| o ...o*  =      |
|  + ... .+ +     |
| . + o  .oB .    |
|  o .   S= o . . |
|        o = = + .|
|         = = = +.|
|        . ..oo+ o|
|         .  E+.. |
+----[SHA256]-----+
$
The id_rsakey is your private key; do not share it or back it up anywhere inappropriately. It will be held locally on your usual computer. Theid_rsa.pub is the public key, and now needs to be transferred to your Raspberry Pi. SSH back in to the device, and create the following required folder and file ready to copy and paste in the contents of the newly created id_rsa.pub key:
$ cd
$ mkdir .ssh
$ cd .ssh
$ nano authorized_keys
The first two lines makes a normally hidden folder called.ssh in your home folder. Then you navigate into the new folder and create a file called authorized_keys using the nano text editor. Copy and paste the contents of id_rsa.pub from your usual computer into this file, then hit Ctrl+X, Y, and Enter to save it.
Reboot your Raspberry Pi and SSH back in. If everything works as expected, you will no longer be prompted to enter a password, and we can now disable password access completely by editing the /etc/ssh/sshd_config file:
$ sudo nano /etc/ssh/sshd_configFind the line that reads #PasswordAuthentication yes. Uncomment it by removing the # to enable the line, and change yes to no, so it looks like this:
# To disable tunneled clear text passwords, change to no here!
PasswordAuthentication no
#PermitEmptyPasswords no
Ctrl+X, Y, and Enter to save the file, and you are done.
SD card read-only mode
Computers do not like being shut down by simply being unplugged; that is likely to result in a system file corruption at some point. Furthermore, our operating system is stored on an SD card, which may eventually fail if used 24/7 for long periods of time. To reduce these risks, you can make your SD card read-only. This should be done as the final process when building in kiosk mode.
Head back into the raspi-config setting with the following command:
$ sudo raspi-configNavigate through the menu system as follows:
- Select 4 Performance options
- Select P3 Overlay File System
- Confirm you would like the overlay file system to be enabled
- Confirm you would you like the boot partition to be write-protected
- Confirm Reboot
This whole process may take a few minutes to complete.
If you need to enable access again to carry out an update or adjust your scripts, SSH back into your device and run this command to allow access temporarily:
$ sudo mount -o remount,rw /bootYou can now carry out any work required. Another reboot will revert your SD card back to a read-only state.
Taking kiosk mode further
This guide explores the basics of setting up a simple web page viewer in kiosk mode. Building on this might take you on a journey to more complex projects, such as a CCTV viewing station, a home automation system, or perhaps the ultimate in kiosk mode projects: Magic Mirror² , the winner in the The MagPi magazine’s 50th issue celebration feature as voted by the Raspberry Pi community.
Recommend
About Joyk
Aggregate valuable and interesting links.
Joyk means Joy of geeK