

使用 Spring Cloud Loadbalancer 实现客户端负载均衡 - Grey Zeng
source link: https://www.cnblogs.com/greyzeng/p/16892071.html
Go to the source link to view the article. You can view the picture content, updated content and better typesetting reading experience. If the link is broken, please click the button below to view the snapshot at that time.
使用 Spring Cloud Loadbalancer 实现客户端负载均衡
作者:Grey
原文地址:
博客园:使用 Spring Cloud Loadbalancer 实现客户端负载均衡
CSDN:使用 Spring Cloud Loadbalancer 实现客户端负载均衡
背景#
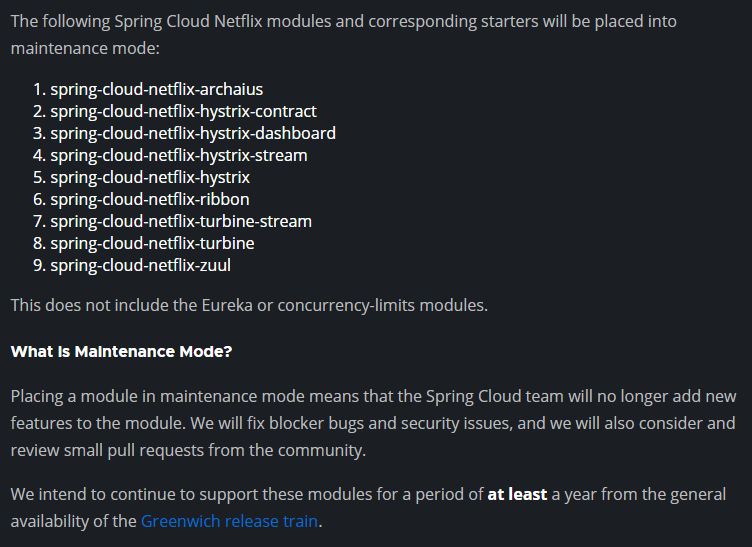
在Spring Cloud G 版发布时提到,
Spring Cloud Netflix 那套组件很多都进入了维护期,如下表所示
同时,针对一些组件,Spring 官方给出了一些替代方案
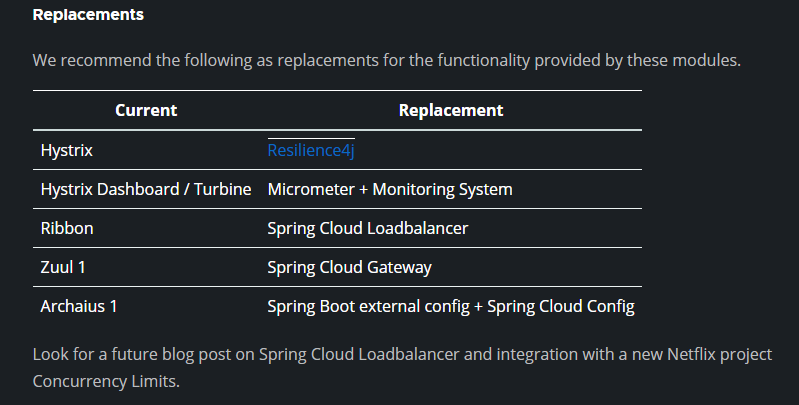
针对 spring-cloud-ribbon 这个负载均衡组件,Spring 官方提出的替换解决方案是 Spring Cloud Loadbalancer。本文主要通过一个示例介绍了 Spring Cloud Loadbalancer 的基础使用。
环境#
-
JDK 1.8+
-
Maven 3.5+
-
Spring Boot 版本:2.7.5
-
Spring Cloud 版本:2021.0.5
项目结构和说明#
- spring-cloud-loadbalanced-usage:父项目名称
- server : 服务端端模块
- pom.xml
- client : 客户端模块
- pom.xml
- pom.xml:父项目 pom 配置
- server : 服务端端模块
流程#
整个过程如下示例图

注:Spring Cloud Loadbalancer 是在客户端实现负载均衡策略。
代码说明#
服务端主要暴露一个服务,未做特殊配置
    @GetMapping("/greeting")
    public String greet() {
        log.info("Access /greeting");
        int randomNum = rand.nextInt(greetings.size());
        return greetings.get(randomNum);
    }
客户端的核心配置如下,主要是针对负载均衡配置:
package git.snippet.client.config;

import org.springframework.cloud.client.DefaultServiceInstance;
import org.springframework.cloud.client.ServiceInstance;
import org.springframework.cloud.client.loadbalancer.LoadBalanced;
import org.springframework.cloud.loadbalancer.annotation.LoadBalancerClient;
import org.springframework.cloud.loadbalancer.core.ServiceInstanceListSupplier;
import org.springframework.context.annotation.Bean;
import org.springframework.context.annotation.Configuration;
import org.springframework.context.annotation.Primary;
import org.springframework.web.reactive.function.client.WebClient;
import reactor.core.publisher.Flux;

import java.util.Arrays;
import java.util.List;

@Configuration
@LoadBalancerClient(name = "server")
public class WebClientConfig {

    @LoadBalanced
    @Bean
    WebClient.Builder webClientBuilder() {
        return WebClient.builder();
    }

    @Bean
    @Primary
    ServiceInstanceListSupplier serviceInstanceListSupplier() {
        return new ServiceInstanceListSupplier() {
            @Override
            public String getServiceId() {
                return "server";
            }

            @Override
            public Flux<List<ServiceInstance>> get() {
                return Flux.just(Arrays.asList(
                        new DefaultServiceInstance(getServiceId() + "1", getServiceId(), "localhost", 8090, false),

                        new DefaultServiceInstance(getServiceId() + "2", getServiceId(), "localhost", 9092, false),

                        new DefaultServiceInstance(getServiceId() + "3", getServiceId(), "localhost", 9999, false)));
            }
        };
    }
}
其中 @LoadBalancerClient(name = "server") 指定了 服务端的名称;
getServiceId()指定了服务端的服务 ID;
serviceInstanceListSupplier()方法中列出了三个服务端实例的地址;
new DefaultServiceInstance(getServiceId() + "1", getServiceId(), "localhost", 8090, false)
new DefaultServiceInstance(getServiceId() + "2", getServiceId(), "localhost", 9092, false)
new DefaultServiceInstance(getServiceId() + "3", getServiceId(), "localhost", 9999, false)
有了这个配置,在客户端的 Controller 中,做如下注入即可
package git.snippet.client.controller;

import org.springframework.cloud.client.loadbalancer.reactive.ReactorLoadBalancerExchangeFilterFunction;
import org.springframework.web.bind.annotation.RequestMapping;
import org.springframework.web.bind.annotation.RequestParam;
import org.springframework.web.bind.annotation.RestController;
import org.springframework.web.reactive.function.client.WebClient;
import reactor.core.publisher.Mono;

@RestController
public class HiController {
    private final WebClient.Builder loadBalancedWebClientBuilder;
    private final ReactorLoadBalancerExchangeFilterFunction lbFunction;


    public HiController(WebClient.Builder loadBalancedWebClientBuilder, ReactorLoadBalancerExchangeFilterFunction lbFunction) {
        this.loadBalancedWebClientBuilder = loadBalancedWebClientBuilder;
        this.lbFunction = lbFunction;
    }

    @RequestMapping("/hi")
    public Mono<String> hi(@RequestParam(value = "name", defaultValue = "Mary") String name) {
        return loadBalancedWebClientBuilder.build().get().uri("http://server/greeting").retrieve().bodyToMono(String.class).map(greeting -> String.format("%s, %s!", greeting, name));
    }

    @RequestMapping("/hello")
    public Mono<String> hello(@RequestParam(value = "name", defaultValue = "John") String name) {
        return WebClient.builder().filter(lbFunction).build().get().uri("http://server/greeting").retrieve().bodyToMono(String.class).map(greeting -> String.format("%s, %s!", greeting, name));
    }
}
启动并测试#
首先启动 server,注意:
启动 server 的时候,需要启动多实例,且每个实例要定义 VM options
实例一定义 VM options 为 -Dserver.port=8090;
实例二定义 VM options 为 -Dserver.port=9092;
实例三定义 VM options 为 -Dserver.port=9999。
如果使用 IDEA Intellij,配置方式如下

三个 Server 启动后,接下来启动 client,运行 ClientApplication,启动完毕后,多次访问: http://localhost:8888/hi
可以通过每个 server 实例的运行日志,查看到每个实例都轮流获取到了请求,实现了负载均衡。
完整代码#
见:spring-cloud-loadbalancer-usage
参考文档#
Spring Tips: Spring Cloud Loadbalancer
Recommend
About Joyk
Aggregate valuable and interesting links.
Joyk means Joy of geeK