

JUC学习笔记——共享模型之管程 - 秋落雨微凉
source link: https://www.cnblogs.com/qiuluoyuweiliang/p/16882650.html
Go to the source link to view the article. You can view the picture content, updated content and better typesetting reading experience. If the link is broken, please click the button below to view the snapshot at that time.

JUC学习笔记——共享模型之管程
在本系列内容中我们会对JUC做一个系统的学习,本片将会介绍JUC的管程部分
我们会分为以下几部分进行介绍:
- 共享问题解决方案
- 线程安全分析
- Monitor
- synchronized锁
- Wait/notify
- 模式之保护性暂停
- 模式之生产者消费者
- 线程状态转换详解
- ReentrantLock
- 同步模式之顺序控制
这小节我们将会介绍共享问题
共享问题概述
我们首先来简单介绍一下贡献问题的产生原因:
- 操作系统目前只操纵一个CPU单位(单核CPU)
- 但是有两个线程都需要CPU来运行程序,所以操作系统采用时间片分配CPU
- 假设一个线程负责i++,一个线程负责i--,但我们需要注意共享数据的存放不是在线程中而是在内存里
- 假设一个线程取到数据,并进行i++操作之后,但并未将数据放入时,发生了上下文转换,这时另一个线程完成了i--操作
- 这时另一个线程的操作结果为0-1:-1,结果这个线程继续操作,将计算后的数据直接放入,结果变为了1,结果错误引发共享问题
实际代码体现
我们采用实际代码给出示例:
// 针对counter,我们一个线程++,一个线程--各运行5000次
static int counter = 0;
public static void main(String[] args) throws InterruptedException {
    Thread t1 = new Thread(() -> {
        for (int i = 0; i < 5000; i++) {
            counter++;
        }
    }, "t1");
    Thread t2 = new Thread(() -> {
        for (int i = 0; i < 5000; i++) {
            counter--;
        }
    }, "t2");
    t1.start();
    t2.start();
    t1.join();
    t2.join();
    log.debug("{}",counter);
}


// 但结果却不是0,经常为-5000~5000之间的数
我们可以从底层代码分析问题:
/*i++底层代码*/

getstatic i // 获取静态变量i的值
iconst_1 	// 准备常量1
iadd 		// 自增
putstatic i // 将修改后的值存入静态变量i

/*i--底层代码*/

getstatic i // 获取静态变量i的值
iconst_1 	// 准备常量1
isub 		// 自减
putstatic i // 将修改后的值存入静态变量i
我们会发现他们的底层代码并不是一步实现,而是多步操作一同实现
在单线程下,按照正常顺序实现自然不会出错:
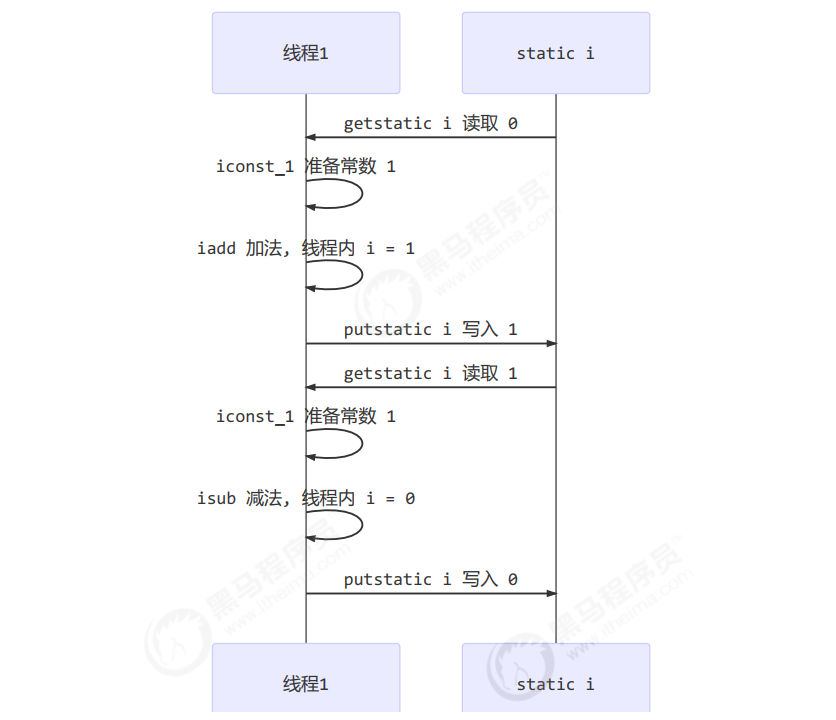
但是如果是多线程,就会因为上下文切换的缘由导致部分步骤出现交杂(我们给出正数示例):
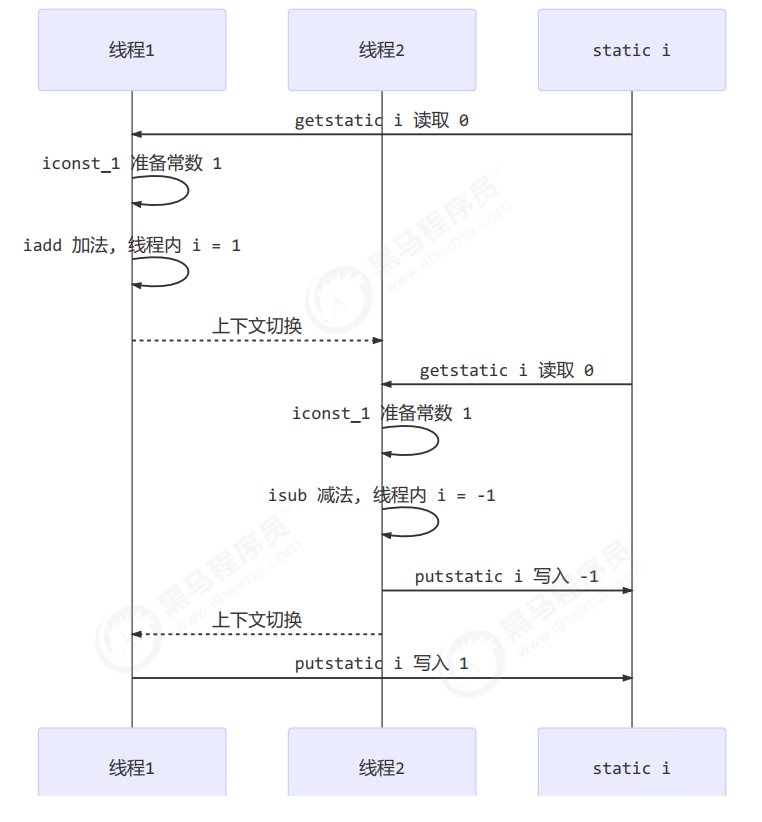
临界区和竞态条件
首先我们来简单介绍一下临界区:
- 一段代码块内如果存在对共享资源的多线程读写操作,称这段代码块为临界区
- 例如我们上述共享问题中的i就是共享资源,而对i操作的i++和i--操作都可以被称为临界区
针对临界区我们需要注意以下内容:
- 一个程序运行多个线程本身是没有问题的
- 多个线程读共享资源其实也没有问题
- 但是在多个线程对共享资源读写操作时发生指令交错,就会出现问题
然后我们再来介绍一下竞态条件:
- 多个线程在临界区内执行,由于代码的执行序列不同而导致结果无法预测,称之为发生了竞态条件
共享问题解决方案
这小节我们将会介绍共享问题解决方案
共享问题解决方案总述
我们的共享问题主要采用以下两种方案解决:
- 阻塞式的解决方案:synchronized,Lock
- 非阻塞式的解决方案:原子变量
synchronized简述
首先我们简单介绍一下synchronized:
- 俗称的【对象锁】,采用互斥的方式使目前至多只有一个线程能持有【对象锁】其它线程再想获取这个【对象锁】时就会阻塞住。
- 这样就能保证拥有锁的线程可以安全的执行临界区内的代码,不用担心线程上下文切换
我们先来介绍synchronized的语法:
// 线程1, 线程2 都使用同一对象作为锁,这样一个运行,另一个处于blocked阻塞
synchronized(对象)
{
    临界区
}
我们再给出相关代码示例:
// 我们创建一个room对象来作为锁,注意处理共享问题的线程需要绑定同一个锁

static int counter = 0;
static final Object room = new Object();
public static void main(String[] args) throws InterruptedException {
    Thread t1 = new Thread(() -> {
        for (int i = 0; i < 5000; i++) {
            synchronized (room) {
                counter++;
            }
        }
    }, "t1");
    Thread t2 = new Thread(() -> {
        for (int i = 0; i < 5000; i++) {
            synchronized (room) {
                counter--;
            }
        }
    }, "t2");
    t1.start();
    t2.start();
    t1.join();
    t2.join();
    log.debug("{}",counter);
}
我们做简单解释:
- synchronized相当于一个方法用来设置一个房间
- room对象相当于一个锁,这个锁控制着房间,而房间中放着所有对应的synchronized里面的代码
- 多个线程谁先进入room就可以获得钥匙,然后如果想要进入这个房间操作,只有有钥匙的线程才可以
- 当该线程操作结束后,就会主动将钥匙让出来,其他线程就可以进行抢夺钥匙,哪个线程获得钥匙就可以继续操作
- 同时我们需要注意时间片结束并不意味着解开锁,就算轮到其他线程的时间片,他们也不能进入到房间里去执行他们的代码
synchronized思考
synchronized 实际是用对象锁保证了临界区内代码的原子性,临界区内的代码对外是不可分割的,不会被线程切换所打断。
我们简单给出三个思考问题:
// - 如果把 synchronized(obj) 放在 for 循环的外面,如何理解?-- 原子性
会将for循环也作为原子性的一部分,会连续执行5000次之后才释放锁给另一个线程使用

// - 如果 t1 synchronized(obj1) 而 t2 synchronized(obj2) 会怎样运作?-- 锁对象
两个线程使用不同的锁,自然就对应不同的房间,不具有安全性

// -如果 t1 synchronized(obj) 而 t2 没有加会怎么样?如何理解?-- 锁对象
一个线程使用锁,另一个不使用,自然不具有互斥关系,不具有安全性
对象解决共享问题
我们同样也可以直接采用一个类和synchronized搭配来解决共享问题
// 我们自定义一个类,里面装有数据,我们采用synchronized解决共享问题
class Room {

    // value值是属于room对象的
    int value = 0;

    // 这里的 synchronized 里面的 this 指的是创建的类的实际对象

    public void increment() {
        synchronized (this) {
            value++;
        }
    }

    public void decrement() {
        synchronized (this) {
            value--;
        }
    }

    public int get() {
        synchronized (this) {
            return value;
        }
    }
}

@Slf4j
public class Test1 {

    public static void main(String[] args) throws InterruptedException {
        // 注意:这里线程1,2采用的是一个roon对象,所以他们的value值是共享的
        Room room = new Room();

        Thread t1 = new Thread(() -> {
            for (int j = 0; j < 5000; j++) {
                room.increment();
            }
        }, "t1");

        Thread t2 = new Thread(() -> {
            for (int j = 0; j < 5000; j++) {
                room.decrement();
            }
        }, "t2");

        t1.start();
        t2.start();
        t1.join();
        t2.join();

        log.debug("count: {}" , room.get());
    }
}
synchronized方法使用
我们的synchronized有时也会用于类的方法中,具有不同的意义:
// 首先是将synchronized放在普通的方法上:下面两个class是等价的,这里的this指的是对象本身

class Test{
    public synchronized void test() {

    }
}

class Test{
    public void test() {
        synchronized(this) {

        }
    }
}

// 再者就是将synchronized放在静态方法上:下面两个class是等价的,这里的Test.class指的是类本身

class Test{
    public synchronized static void test() {
    }
}

class Test{
    public static void test() {
        synchronized(Test.class) {

        }
    }
}
"线程八锁"思考题
我们来给出面试常用的线程八锁思考题来进行自身检测:
/*第1题*/

@Slf4j(topic = "c.Number")
class Number{
    public synchronized void a() {
        log.debug("1");
    }
    public synchronized void b() {
        log.debug("2");
    }
}
public static void main(String[] args) {
    Number n1 = new Number();
    new Thread(()->{ n1.a(); }).start();
    new Thread(()->{ n1.b(); }).start();
}

// 结果:1,2或2,1
// 解析:两者都绑定n1对象锁,互斥关系

/*第2题*/

@Slf4j(topic = "c.Number")
class Number{
    public synchronized void a() {
        sleep(1);
        log.debug("1");
    }
    public synchronized void b() {
        log.debug("2");
    }
}
public static void main(String[] args) {
    Number n1 = new Number();
    new Thread(()->{ n1.a(); }).start();
    new Thread(()->{ n1.b(); }).start();
}

// 结果:1s后1,2或2,1s后1
// 解析:两者都绑定n1对象锁,互斥关系;sleep不具有任何关系

/*第3题*/

@Slf4j(topic = "c.Number")
class Number{
    public synchronized void a() {
        sleep(1);
        log.debug("1");
    }
    public synchronized void b() {
        log.debug("2");
    }
    public void c() {
        log.debug("3");
    }
}
public static void main(String[] args) {
    Number n1 = new Number();
    new Thread(()->{ n1.a(); }).start();
    new Thread(()->{ n1.b(); }).start();
    new Thread(()->{ n1.c(); }).start();
}

// 结果:3 1s 12 或 23 1s 1 或 32 1s 1
// 解析:a,b都是n1对象锁,c不具有锁

/*第4题*/

@Slf4j(topic = "c.Number")
class Number{
    public synchronized void a() {
        sleep(1);
        log.debug("1");
    }
    public synchronized void b() {
        log.debug("2");
    }
}
public static void main(String[] args) {
    Number n1 = new Number();
    Number n2 = new Number();
    new Thread(()->{ n1.a(); }).start();
    new Thread(()->{ n2.b(); }).start();
}

// 结果:2 1s 后 1
// 解析:a是n1的对象锁,b是n2的对象锁,不具有互斥关系

/*第5题*/

@Slf4j(topic = "c.Number")
class Number{
    public static synchronized void a() {
        sleep(1);
        log.debug("1");
    }
    public synchronized void b() {
        log.debug("2");
    }
}
public static void main(String[] args) {
    Number n1 = new Number();
    new Thread(()->{ n1.a(); }).start();
    new Thread(()->{ n1.b(); }).start();
}

// 结果:2 1s 后 1
// 解析:a采用类锁,b采用n1对象锁,不具有互斥关系

/*第6题*/

@Slf4j(topic = "c.Number")
class Number{
    public static synchronized void a() {
        sleep(1);
        log.debug("1");
    }
    public static synchronized void b() {
        log.debug("2");
    }
}
public static void main(String[] args) {
    Number n1 = new Number();
    new Thread(()->{ n1.a(); }).start();
    new Thread(()->{ n1.b(); }).start();
}

// 结果:1s 后12, 或 2 1s后 1
// 解析:两者都是类锁,具有互斥关系

/*第7题*/

@Slf4j(topic = "c.Number")
class Number{
    public static synchronized void a() {
        sleep(1);
        log.debug("1");
    }
    public synchronized void b() {
        log.debug("2");
    }
}
public static void main(String[] args) {
    Number n1 = new Number();
    Number n2 = new Number();
    new Thread(()->{ n1.a(); }).start();
    new Thread(()->{ n2.b(); }).start();
}

// 结果:2 1s 后 1
// 解析:a采用类锁,b采用n2对象锁,不具有互斥关系

/*第8题*/

@Slf4j(topic = "c.Number")
class Number{
    public static synchronized void a() {
        sleep(1);
        log.debug("1");
    }
    public static synchronized void b() {
        log.debug("2");
    }
}
public static void main(String[] args) {
    Number n1 = new Number();
    Number n2 = new Number();
    new Thread(()->{ n1.a(); }).start();
    new Thread(()->{ n2.b(); }).start();
}

// 结果:1s 后12, 或 2 1s后 1
// 解析:两者都是类锁,具有互斥关系
线程安全分析
这小节我们将会介绍线程安全分析
变量线程安全问题
首先我们来思考成员变量和静态变量的安全性:
- 如果它们没有共享,则线程安全
- 如果它们被共享了:如果只有读操作,则线程安全
- 如果它们被共享了:如果有读写操作,则这段代码是临界区,需要考虑线程安全
我们再来思索一下局部变量的安全性:
- 局部变量是线程安全的
- 局部变量引用的对象:如果该对象没有逃离方法的作用访问,它是线程安全的
- 局部变量引用的对象:如果该对象逃离方法的作用范围,需要考虑线程安全
我们通过简单代码进行测试:
/*局部变量*/

// 源代码展示:
public static void test1() {
    int i = 10;
    i++;
}

// 我们查看底层代码:每个线程调用 test1() 方法时局部变量 i,会在每个线程的栈帧内存中被创建多份,因此不存在共享
public static void test1();
 descriptor: ()V
 flags: ACC_PUBLIC, ACC_STATIC
 Code:
 stack=1, locals=1, args_size=0
 0: bipush 10
 2: istore_0
 3: iinc 0, 1
 6: return
 LineNumberTable:
 line 10: 0
 line 11: 3
 line 12: 6
 LocalVariableTable:
 Start Length Slot Name Signature
 3        4     0   i      I

/*成员变量*/

// 源代码展示:
static final int THREAD_NUMBER = 2;
static final int LOOP_NUMBER = 200;
public static void main(String[] args) {
    // 一个test对象
    ThreadUnsafe test = new ThreadUnsafe();
    // 两个线程去操纵
    for (int i = 0; i < THREAD_NUMBER; i++) {
        // 均执行method1方法
        new Thread(() -> {
            test.method1(LOOP_NUMBER);
        }, "Thread" + i).start();
    }
}

class ThreadUnsafe {
    // 这里的list是属于对象的,创建在堆中,属于线程共同操纵对象
    ArrayList<String> list = new ArrayList<>();
    // 不断调用method2,3方法200次
    public void method1(int loopNumber) {
        for (int i = 0; i < loopNumber; i++) {
            // { 临界区, 会产生竞态条件
            method2();
            method3();
            // } 临界区
        }
    }
    private void method2() {
        list.add("1");
    }
    private void method3() {
        list.remove(0);
    }
}

// 运行结果的其中一种:如果线程2 还未 add,线程1 remove 就会报错
Exception in thread "Thread1" java.lang.IndexOutOfBoundsException: Index: 0, Size: 0
 at java.util.ArrayList.rangeCheck(ArrayList.java:657)
 at java.util.ArrayList.remove(ArrayList.java:496)
 at cn.itcast.n6.ThreadUnsafe.method3(TestThreadSafe.java:35)
 at cn.itcast.n6.ThreadUnsafe.method1(TestThreadSafe.java:26)
 at cn.itcast.n6.TestThreadSafe.lambda$main$0(TestThreadSafe.java:14)
 at java.lang.Thread.run(Thread.java:748)

/*成员变量局部优化*/

// 源代码展示
static final int THREAD_NUMBER = 2;
static final int LOOP_NUMBER = 200;
public static void main(String[] args) {
    // 一个test对象
    ThreadUnsafe test = new ThreadUnsafe();
    // 两个线程去操纵
    for (int i = 0; i < THREAD_NUMBER; i++) {
        // 均执行method1方法
        new Thread(() -> {
            test.method1(LOOP_NUMBER);
        }, "Thread" + i).start();
    }
}

class ThreadSafe {
    public final void method1(int loopNumber) {
        // 这里将list变为局部变量,每个线程独自在自己的栈中创建,就不会产生安全问题
        ArrayList<String> list = new ArrayList<>();
        for (int i = 0; i < loopNumber; i++) {
            method2(list);
            method3(list);
        }
    }
    private void method2(ArrayList<String> list) {
        list.add("1");
    }
    private void method3(ArrayList<String> list) {
        list.remove(0);
    }
}

/*方法public化缺陷*/

// 源代码展示:
class ThreadSafe {
    public final void method1(int loopNumber) {
        ArrayList<String> list = new ArrayList<>();
        for (int i = 0; i < loopNumber; i++) {
            method2(list);
            method3(list);
        }
    }
    public void method2(ArrayList<String> list) {
        list.add("1");
    }
    public void method3(ArrayList<String> list) {
        list.remove(0);
    }
}
class ThreadSafeSubClass extends ThreadSafe{
    @Override
    public void method3(ArrayList<String> list) {
        new Thread(() -> {
            list.remove(0);
        }).start();
    }
}

// 如果我们将method2,3改为public,就可能会导致其他线程直接调用method2,3导致安全性问题
// 同时甚至可能出现其他子类继承父类导致修改原方法,同时创建一个线程导致多线程问题出现
常见线程安全类
我们在下面介绍一下我们常用的线程安全类:
- String
- Integer
- StringBuffer
- Random
- Vector
- Hashtable
- java.util.concurrent 包下的类
同时我们需要知道无法改变的类型也是线程安全的:
- String、Integer 等都是不可变类,因为其内部的状态不可以改变,因此它们的方法都是线程安全的
- 这里需要注意:String的各类修改方法都是直接创建一个新的String类型而不是在String本体进行增删
我们再进行简单解释:
- 线程安全类的每个方法是原子的
- 但注意它们多个方法的组合不是原子的!
我们采用代码进行简单解释:
/*下述的单个方法都是原子且安全性的*/

Hashtable table = new Hashtable();

new Thread(()->{
    table.put("key", "value1");
}).start();

new Thread(()->{
    table.put("key", "value2");
}).start();

/*但当这些方法组合起来,就无法保证其线程安全性*/

Hashtable table = new Hashtable();

// 线程1,线程2都执行时,可能出现下述情况
// 线程1get==null,线程2get==null,线程2put,线程1put;导致线程安全性错误出现
if( table.get("key") == null) {
	table.put("key", value);
}
常见题型分析
我们直接给出代码来进行题型分析:
/*题目1*/

// MyServlet是Servlet类,应用于Tomcat的多线程上
public class MyServlet extends HttpServlet {
    // 是否安全?不是,不属于线程安全类
    Map<String,Object> map = new HashMap<>();
    // 是否安全?是,属于不变类型
    String S1 = "...";
    // 是否安全?是,属于不变类型
    final String S2 = "...";
    // 是否安全?不是,不属于线程安全类
    Date D1 = new Date();
    // 是否安全?是,属于不变类型
    final Date D2 = new Date();

    public void doGet(HttpServletRequest request, HttpServletResponse response) {
        // 使用上述变量
    }
}

/*题目2*/

public class MyServlet extends HttpServlet {
    // 是否安全?不是,底层使用Impl,里面包含了count这个共享数据,且没有使用锁
    private UserService userService = new UserServiceImpl();

    public void doGet(HttpServletRequest request, HttpServletResponse response) {
        userService.update(...);
    }
}
public class UserServiceImpl implements UserService {
    // 记录调用次数
    private int count = 0;

    public void update() {
        // ...
        count++;
    }
}

/*题目3*/

// 这里是Spring的@Aspect,属于单例,也是共享
@Aspect
@Component
public class MyAspect {
    // 是否安全? 不是,start属于共享数据
    private long start = 0L;

    @Before("execution(* *(..))")
    public void before() {
        start = System.nanoTime();
    }

    @After("execution(* *(..))")
    public void after() {
        long end = System.nanoTime();
        System.out.println("cost time:" + (end-start));
    }
}

/*题目4*/

public class MyServlet extends HttpServlet {
    // 是否安全 是,调用Dao,不具有可变参数
    private UserService userService = new UserServiceImpl();

    public void doGet(HttpServletRequest request, HttpServletResponse response) {
        userService.update(...);
    }
}
public class UserServiceImpl implements UserService {
    // 是否安全 是,调用Dao,不具有可变参数
    private UserDao userDao = new UserDaoImpl();

    public void update() {
        userDao.update();
    }
}
public class UserDaoImpl implements UserDao {
    public void update() {
        String sql = "update user set password = ? where username = ?";
        // 是否安全 是,因为不具有可变参数
        try (Connection conn = DriverManager.getConnection("","","")){
            // ...
        } catch (Exception e) {
            // ...
        }
    }
}

/*题目5*/

public class MyServlet extends HttpServlet {
    // 是否安全 不是,具有conn可变参数
    private UserService userService = new UserServiceImpl();

    public void doGet(HttpServletRequest request, HttpServletResponse response) {
        userService.update(...);
    }
}
public class UserServiceImpl implements UserService {
    // 是否安全 不是,具有conn可变参数
    private UserDao userDao = new UserDaoImpl();

    public void update() {
        userDao.update();
    }
}
public class UserDaoImpl implements UserDao {
    // 是否安全 不是,具有conn可变参数
    private Connection conn = null;
    public void update() throws SQLException {
        String sql = "update user set password = ? where username = ?";
        conn = DriverManager.getConnection("","","");
        // ...
        conn.close();
    }
}

/*题目6*/

public class MyServlet extends HttpServlet {
    // 是否安全 但是这里是安全的
    // 虽然底层将conn创建在堆里,但是impl层创建了多个userDao对象,导致产生了多个conn不产生安全问题
    private UserService userService = new UserServiceImpl();

    public void doGet(HttpServletRequest request, HttpServletResponse response) {
        userService.update(...);
    }
}
public class UserServiceImpl implements UserService {
    public void update() {
        UserDao userDao = new UserDaoImpl();
        userDao.update();
    }
}
public class UserDaoImpl implements UserDao {
    // 是否安全 不是,具有conn可变参数
    private Connection = null;
    public void update() throws SQLException {
        String sql = "update user set password = ? where username = ?";
        conn = DriverManager.getConnection("","","");
        // ...
        conn.close();
    }
}

/*题目7*/

public abstract class Test {

    public void bar() {
        // 是否安全 不是,局部变量交付给抽象类,抽象类后续子类可能会产生修改:称为外星方法
        SimpleDateFormat sdf = new SimpleDateFormat("yyyy-MM-dd HH:mm:ss");
        foo(sdf);
    }

    public abstract foo(SimpleDateFormat sdf);


    public static void main(String[] args) {
        new Test().bar();
    }
}
经典习题分析
我们给出两个经典习题分析:
/*卖票问题*/

// 源码展示:
public class ExerciseSell {
    public static void main(String[] args) {
        TicketWindow ticketWindow = new TicketWindow(2000);
        List<Thread> list = new ArrayList<>();
        // 用来存储买出去多少张票
        List<Integer> sellCount = new Vector<>();
        for (int i = 0; i < 2000; i++) {
            Thread t = new Thread(() -> {
                // 分析这里的竞态条件
                int count = ticketWindow.sell(randomAmount());
                sellCount.add(count);
            });
            list.add(t);
            t.start();
        }
        list.forEach((t) -> {
            try {
                t.join();
            } catch (InterruptedException e) {
                e.printStackTrace();
            }
        });
        // 买出去的票求和
        log.debug("selled count:{}",sellCount.stream().mapToInt(c -> c).sum());
        // 剩余票数
        log.debug("remainder count:{}", ticketWindow.getCount());
    }
    // Random 为线程安全
    static Random random = new Random();
    // 随机 1~5
    public static int randomAmount() {
        return random.nextInt(5) + 1;
    }
}

// 卖票窗口
class TicketWindow {

    // 票数,属于共享数据
    private int count;

    public TicketWindow(int count) {
        this.count = count;
    }

    public int getCount() {
        return count;
    }

    public int sell(int amount) {
        if (this.count >= amount) {
            this.count -= amount;
            return amount;
        } else {
            return 0;
        }
    }
}

// 问题分析:
TicketWindow卖票窗口的票属于共享数据,对共享数据的修改需要进行上锁处理,所以我们需要对sell使用synchronized

// 修改展示:
public class ExerciseSell {
    public static void main(String[] args) {
        TicketWindow ticketWindow = new TicketWindow(2000);
        List<Thread> list = new ArrayList<>();
        List<Integer> sellCount = new Vector<>();
        for (int i = 0; i < 2000; i++) {
            Thread t = new Thread(() -> {
                int count = ticketWindow.sell(randomAmount());
                sellCount.add(count);
            });
            list.add(t);
            t.start();
        }
        list.forEach((t) -> {
            try {
                t.join();
            } catch (InterruptedException e) {
                e.printStackTrace();
            }
        });
        log.debug("selled count:{}",sellCount.stream().mapToInt(c -> c).sum());
        log.debug("remainder count:{}", ticketWindow.getCount());
    }
    static Random random = new Random();
    public static int randomAmount() {
        return random.nextInt(5) + 1;
    }
}
class TicketWindow {
    private int count;
    public TicketWindow(int count) {
        this.count = count;
    }
    public int getCount() {
        return count;
    }
    //在方法上加一个synchronized即可
    public synchronized int sell(int amount) {
        if (this.count >= amount) {
            this.count -= amount;
            return amount;
        } else {
            return 0;
        }
    }
}
/*转账问题*/

// 源码展示
public class ExerciseTransfer {
    public static void main(String[] args) throws InterruptedException {
        Account a = new Account(1000);
        Account b = new Account(1000);
        Thread t1 = new Thread(() -> {
            for (int i = 0; i < 1000; i++) {
                a.transfer(b, randomAmount());
            }
        }, "t1");
        Thread t2 = new Thread(() -> {
            for (int i = 0; i < 1000; i++) {
                b.transfer(a, randomAmount());
            }
        }, "t2");
        t1.start();
        t2.start();
        t1.join();
        t2.join();
        // 查看转账2000次后的总金额
        log.debug("total:{}",(a.getMoney() + b.getMoney()));
    }
    // Random 为线程安全
    static Random random = new Random();
    // 随机 1~100
    public static int randomAmount() {
        return random.nextInt(100) +1;
    }
}
class Account {
    private int money;
    public Account(int money) {
        this.money = money;
    }
    public int getMoney() {
        return money;
    }
    public void setMoney(int money) {
        this.money = money;
    }
    public void transfer(Account target, int amount) {
        if (this.money > amount) {
            this.setMoney(this.getMoney() - amount);
            target.setMoney(target.getMoney() + amount);
        }
    }
}

// 问题分析:
我们的transfer方法中存在两个对象,一个自身对象,一个被转账用户对象,所以无法使用synchronized方法
但是我们可以暂时将他设置为 static synchronized 直接对账户整体进行上锁来处理问题~

// 修改后代码:
public class ExerciseTransfer {
    public static void main(String[] args) throws InterruptedException {
        Account a = new Account(1000);
        Account b = new Account(1000);
        Thread t1 = new Thread(() -> {
            for (int i = 0; i < 1000; i++) {
                a.transfer(b, randomAmount());
            }
        }, "t1");
        Thread t2 = new Thread(() -> {
            for (int i = 0; i < 1000; i++) {
                b.transfer(a, randomAmount());
            }
        }, "t2");
        t1.start();
        t2.start();
        t1.join();
        t2.join();

        log.debug("total:{}",(a.getMoney() + b.getMoney()));
    }

    static Random random = new Random();

    public static int randomAmount() {
        return random.nextInt(100) +1;
    }
}
class Account {
    private int money;
    public Account(int money) {
        this.money = money;
    }
    public int getMoney() {
        return money;
    }
    public void setMoney(int money) {
        this.money = money;
    }
    public static synchronized void transfer(Account target, int amount) {
        if (this.money > amount) {
            this.setMoney(this.getMoney() - amount);
            target.setMoney(target.getMoney() + amount);
        }
    }
}
Monitor
这小节我们将会介绍Monitor
Java对象头
在正式开始Monitor介绍之前,我们先来介绍一下Java对象头的定义:
# 以下内容均以32位虚拟机为例

# 普通对象
|--------------------------------------------------------------|
|                    Object Header (64 bits)                   |
|------------------------------------|-------------------------|
|       Mark Word (32 bits)          |   Klass Word (32 bits)  |
|------------------------------------|-------------------------|

# 数组对象
|---------------------------------------------------------------------------------|
|                             Object Header (96 bits)                             |
|--------------------------------|-----------------------|------------------------|
|        Mark Word(32bits)       |   Klass Word(32bits)  |  array length(32bits)  |
|--------------------------------|-----------------------|------------------------|

# 其中 Mark Word 结构为
|-------------------------------------------------------|--------------------|
|                  Mark Word (32 bits)                  |        State       |
|-------------------------------------------------------|--------------------|
|    hashcode:25  | age:4 |   biased_lock:0   |   01    |       Normal       |
|-------------------------------------------------------|--------------------|
|thread:23|epoch:2| age:4 |   biased_lock:1   |   01    |       Biased       |
|-------------------------------------------------------|--------------------|
|          ptr_to_lock_record:30              |   00    | Lightweight Locked |
|-------------------------------------------------------|--------------------|
|          ptr_to_heavyweight_monitor:30      |   10    | Heavyweight Locked |
|-------------------------------------------------------|--------------------|
|                                             |   11    |    Marked for GC   |
|-------------------------------------------------------|--------------------|

# 其中Klass Word主要存储对象类型名称

# 64位虚拟机的 Mark Word 结构为
|--------------------------------------------------------------------|--------------------|
|                          Mark Word (64 bits)                       |        State       |
|--------------------------------------------------------------------|--------------------|
| unused:25 | hashcode:31 | unused:1 | age:4 | biased_lock:0 |  01   |        Normal      |
|--------------------------------------------------------------------|--------------------|
| thread:54 |   epoch:2   | unused:1 | age:4 | biased_lock:1 |  01   |        Biased      |
|--------------------------------------------------------------------|--------------------|
|                    ptr_to_lock_record:62                   |  00   | Lightweight Locked |
|--------------------------------------------------------------------|--------------------|
|                 ptr_to_heavyweight_monitor:62              |  10   | Heavyweight Locked |
|--------------------------------------------------------------------|--------------------|
|                                                            |  11   |    Marked for GC   |
|--------------------------------------------------------------------|--------------------|
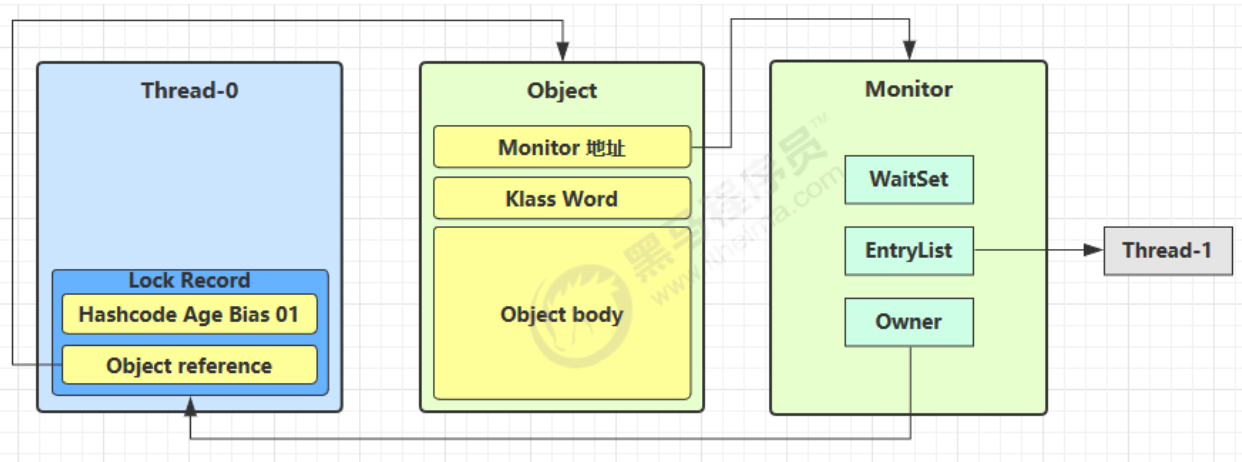
Monitor概述
我们来简单介绍一下Monitor:
- Monitor 被翻译为监视器或管程
- 每个 Java 对象都可以关联一个 Monitor 对象,就是我们之前创建的obj对象
- 如果使用 synchronized 给对象上锁(重量级)之后,该对象头的 Mark Word 中就被设置指向 Monitor 对象的指针
我们给出简单示例图:
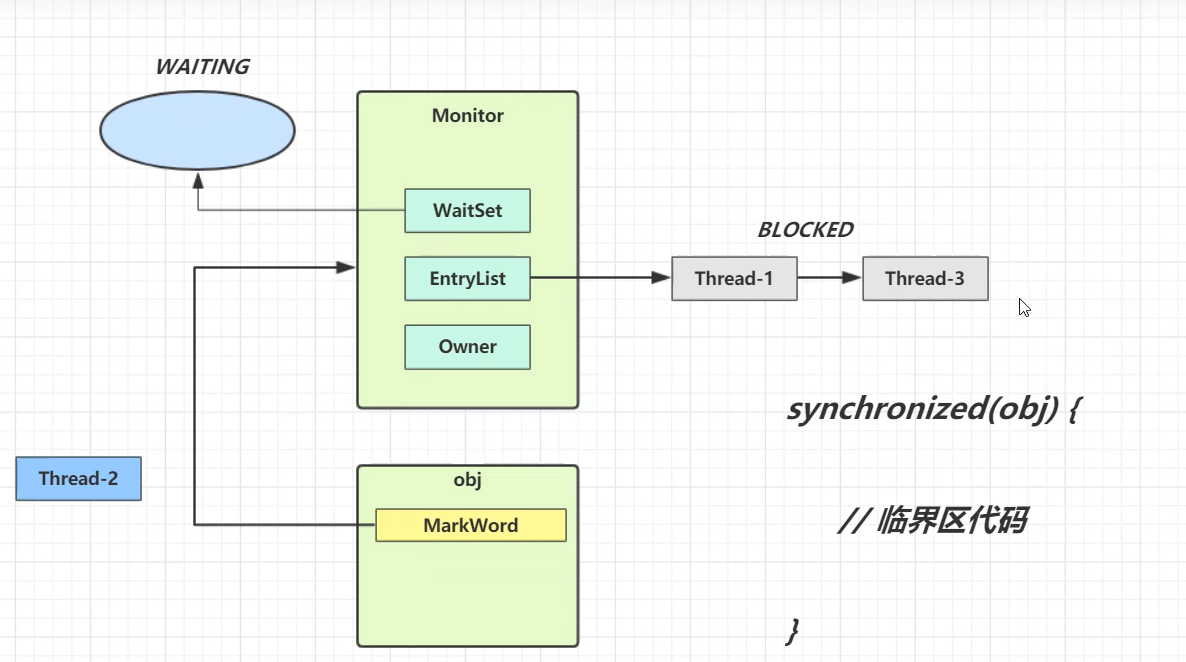
我们来做简单解释:
-
每个obj都由MarkWord来绑定一个Monitor
-
每个线程都需要经过synchronized(obj)方法进入Monitor
-
首先Monitor主要分为三个部分:WaitSet,EntryList,Owner
-
Owner:属于当前Monitor的正常运行区间,例如Thread-2就是目前运行线程
-
EntryList:属于当前Monitor的等待运行区间,需要等到Thread-2结束线程释放锁资源,Thread3等才可以抢夺锁
-
WaitSet:属于之前获得过锁,但条件不满足进入 WAITING 状态的线程,后面讲 wait-notify 时会分析
此外我们还需要注意:
- synchronized 必须是进入同一个对象的 monitor 才有上述的效果
- 不加 synchronized 的对象不会关联监视器,不遵从以上规则
synchronized锁
这小节我们将会介绍synchronized底层原理和相关锁的内容
synchronized原理
我们会从底层代码来讲解synchronized的原理:
/*源码*/

static final Object lock = new Object();
static int counter = 0;
public static void main(String[] args) {
    synchronized (lock) {
        counter++;
    }
}

/*底层字节码*/

public static void main(java.lang.String[]);
descriptor: ([Ljava/lang/String;)V
              flags: ACC_PUBLIC, ACC_STATIC
              Code:
              stack=2, locals=3, args_size=1

              // 下面是正式字节码过程

              // 正常运行阶段
              0: getstatic #2 // <- lock引用 (synchronized开始)
              3: dup
              4: astore_1 // lock引用 -> slot 1(这里提前存储一份锁对象,用于后续的解锁)
              5: monitorenter // 将 lock对象 MarkWord 置为 Monitor 指针(这里进行了上锁)
              6: getstatic #3 // <- i
              9: iconst_1 // 准备常数 1
              10: iadd // +1
              11: putstatic #3 // -> i
              14: aload_1 // <- lock引用
              15: monitorexit // 将 lock对象 MarkWord 重置, 唤醒 EntryList(这里进行了解锁)
              16: goto 24

              // 报错补救阶段(去除锁)
              19: astore_2 // e -> slot 2
              20: aload_1 // <- lock引用
              21: monitorexit // 将 lock对象 MarkWord 重置, 唤醒 EntryList
              22: aload_2 // <- slot 2 (e)
              23: athrow // throw e

              // 代码结束
              24: return

              // 这里是异常检测器:当出现异常时,移动到异常处理底层代码区域进行解锁操作
              Exception table:
              from to target type
              6    16  19    any
              19   22  19    any
              LineNumberTable:
              line 8: 0
              line 9: 6
              line 10: 14
              line 11: 24
              LocalVariableTable:
              Start Length Slot Name Signature
              0     25     0    args [Ljava/lang/String;
              StackMapTable: number_of_entries = 2
              frame_type = 255 /* full_frame */
              offset_delta = 19
              locals = [ class "[Ljava/lang/String;", class java/lang/Object ]
              stack = [ class java/lang/Throwable ]
              frame_type = 250 /* chop */
              offset_delta = 4
我们首先来简单介绍一下轻量级锁:
- 如果一个对象虽然有多线程要加锁,但加锁的时间是错开的(也就是没有竞争),那么可以使用轻量级锁来优化。
我们用一个简单的代码实现轻量级锁:
// 下面两个代码都调用了锁,但是他们归根结底属于一个流程,时间错开,这时系统就会避免直接使用Monitor而是用轻量级锁进行优化

static final Object obj = new Object();
public static void method1() {
    synchronized( obj ) {
        // 同步块 A
        method2();
    }
}
public static void method2() {
    synchronized( obj ) {
        // 同步块 B
    }
}
我们来展示一下实现流程(00轻量级锁,01无锁):
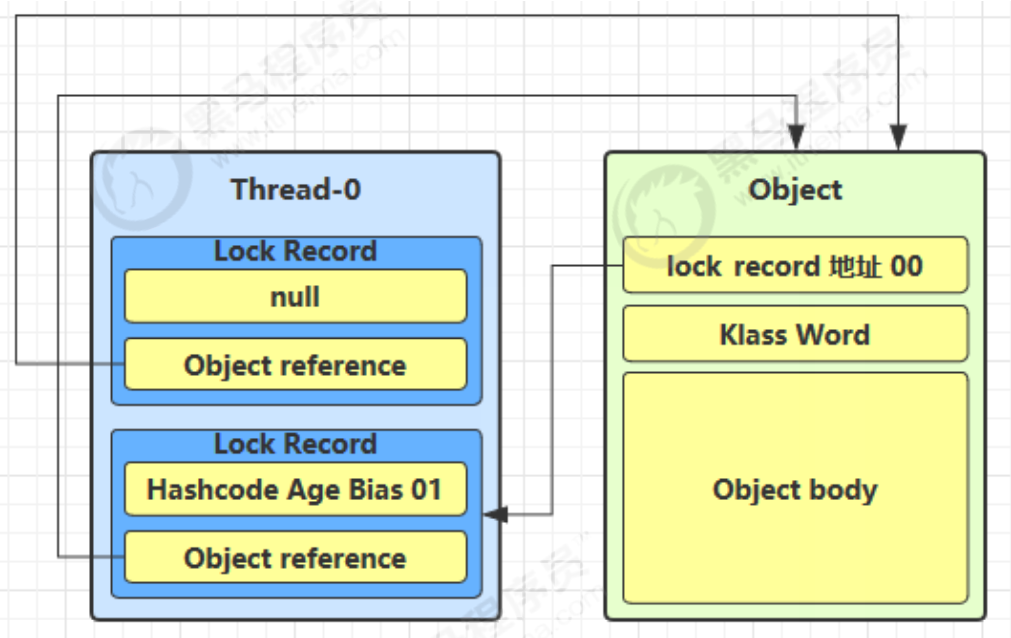
- 创建锁记录(Lock Record)对象,每个线程都的栈帧都会包含一个锁记录的结构,内部可以存储锁定对象的Mark Word
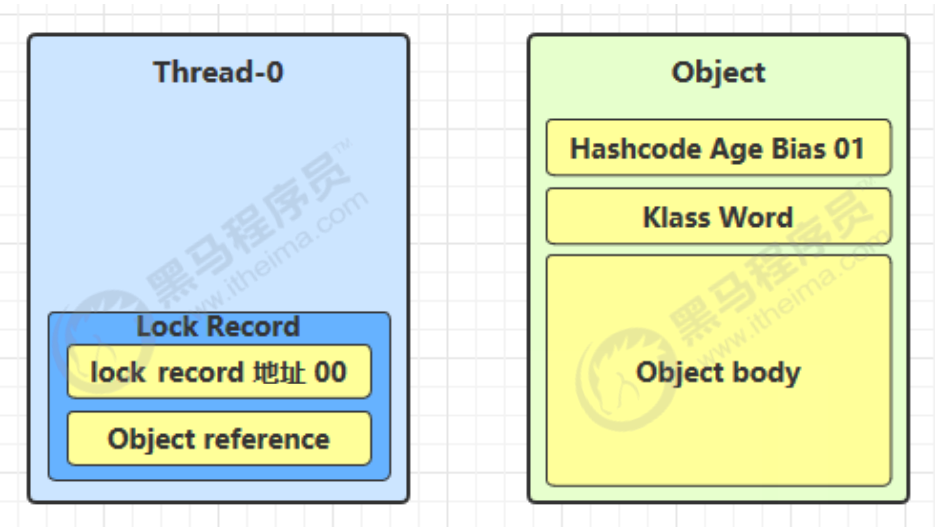
- 让锁记录中 Object reference 指向锁对象,并尝试用 cas 替换 Object 的 Mark Word,将 Mark Word 的值存入锁记录
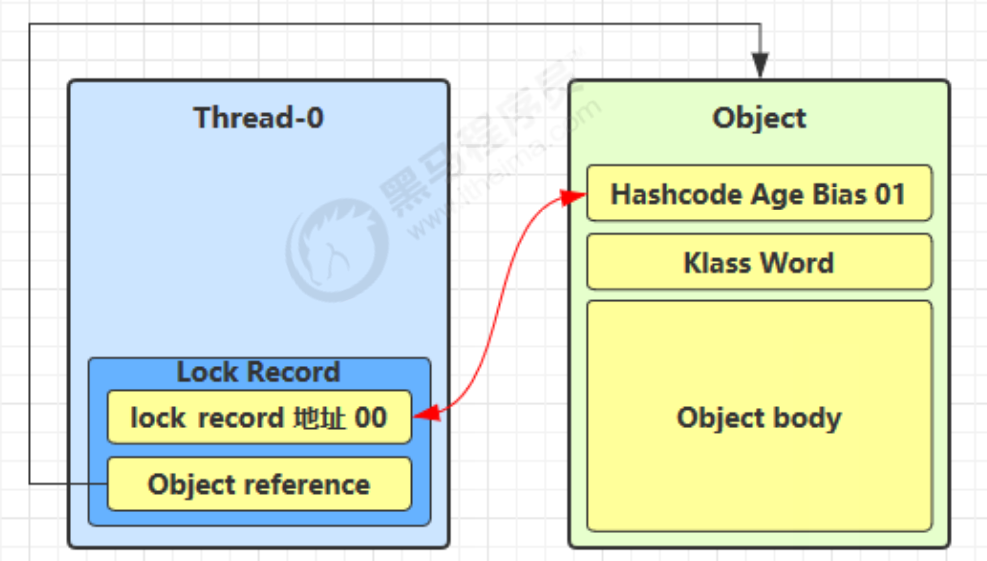
- 如果 cas 替换成功,对象头中存储了 锁记录地址和状态 00 ,表示由该线程给对象加锁,这时图示如下
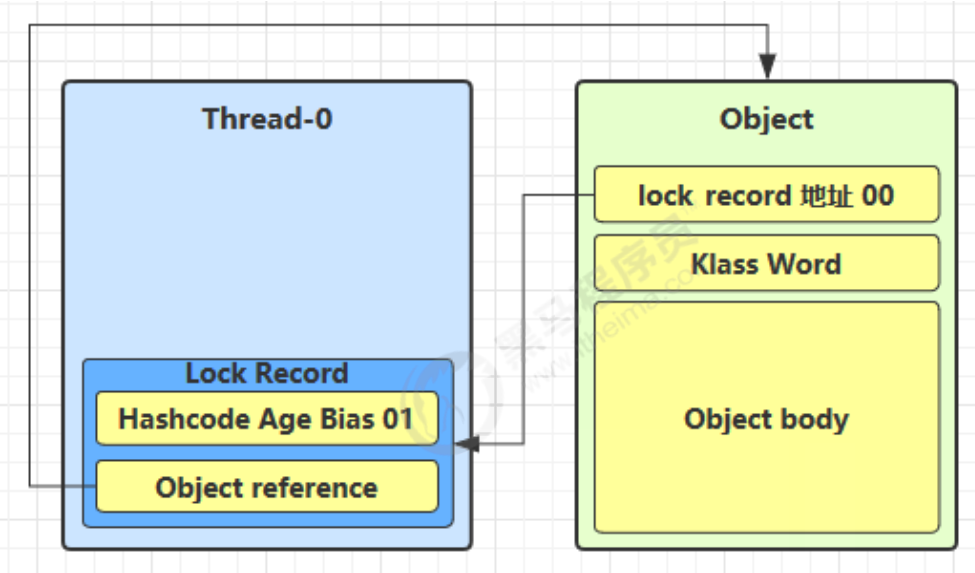
- 当退出 synchronized 代码块(解锁时)如果有取值为 null 的锁记录,表示有重入,这时重置锁记录,表示重入计数减一
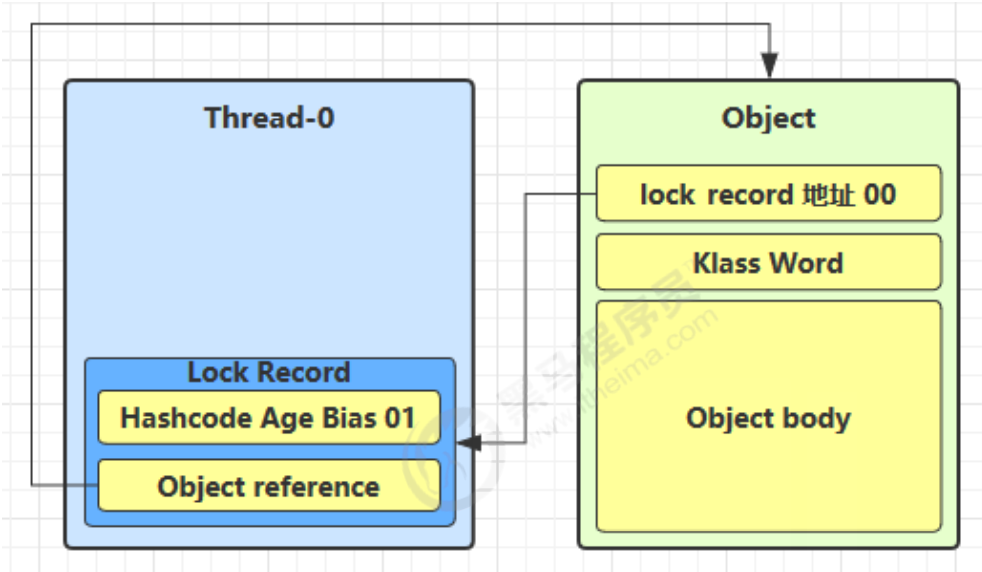
- 当退出 synchronized 代码块(解锁时)锁记录的值不为 null,这时使用 cas 将 Mark Word 的值恢复给对象头
除此之外我们需要注意cas切换不是每次都成功的:
- 如果是其它线程已经持有了该 Object 的轻量级锁,这时表明有竞争,进入锁膨胀过程
- 如果是自己执行了 synchronized 锁重入,那么再添加一条 Lock Record 作为重入的计数
此外最后的cas恢复操作也不是都成功的:
- 成功,则解锁成功
- 失败,说明轻量级锁进行了锁膨胀或已经升级为重量级锁,进入重量级锁解锁流程
我们给出锁重入时的展示图:
我们首先简单介绍一下锁膨胀:
- 如果在尝试加轻量级锁的过程中,CAS 操作无法成功,这时一种情况就是有其它线程为此对象加上了轻量级锁(有竞争)
- 这时需要进行锁膨胀,将轻量级锁变为重量级锁。
我们给出部分内容展示:
- 当 Thread-1 进行轻量级加锁时,Thread-0 已经对该对象加了轻量级锁
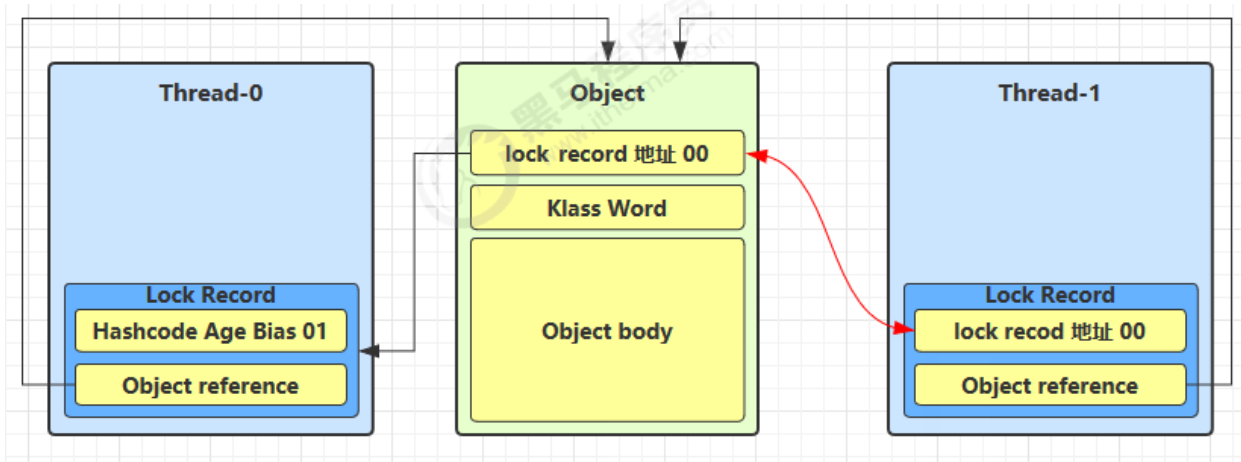
- 这时 Thread-1 加轻量级锁失败,进入锁膨胀流程
- 即为 Object 对象申请 Monitor 锁,让 Object 指向重量级锁地址 ,然后自己进入 Monitor 的 EntryList BLOCKED
- 当 Thread-0 退出同步块解锁时,使用 cas 将 Mark Word 的值恢复给对象头,失败。
- 这时会进入重量级解锁 流程,即按照 Monitor 地址找到 Monitor 对象,设置 Owner 为 null,唤醒 EntryList 中 BLOCKED 线程
我们同样先来介绍一下自旋优化:
- 重量级锁竞争的时候,还可以使用自旋来进行优化
- 如果当前线程自旋成功(即这时候持锁线程已经退出了同步块,释放了锁),这时当前线程就可以避免阻塞。
我们给出自旋成功的案例:
| 线程1 ( core 1上) | 对象Mark | 线程2 ( core 2上) |
|---|---|---|
| - | 10(重量锁) | - |
| 访问同步块,获取monitor | 10(重量锁)重量锁指针 | - |
| 成功(加锁) | 10(重量锁)重量锁指针 | - |
| 执行同步块 | 10(重量锁)重量锁指针 | - |
| 执行同步块 | 10(重量锁)重量锁指针 | 访问同步块,获取 monitor |
| 执行同步块 | 10(重量锁)重量锁指针 | 自旋重试 |
| 执行完毕 | 10(重量锁)重量锁指针 | 自旋重试 |
| 成功(解锁) | 01(无锁) | 自旋重试 |
| - | 10(重量锁)重量锁指针 | 成功(加锁) |
| - | 10(重量锁)重量锁指针 | 执行同步块 |
| - | ... | ... |
我们也给出自旋失败的案例:
| 线程1 ( core 1上) | 对象Mark | 线程2( core 2上) |
|---|---|---|
| - | 10(重量锁) | - |
| 访问同步块,获取monitor | 10(重量锁)重量锁指针 | - |
| 成功(加锁) | 10(重量锁)重量锁指针 | - |
| 执行同步块 | 10(重量锁)重量锁指针 | - |
| 执行同步块 | 10(重量锁)重量锁指针 | 访问同步块,获取monitor |
| 执行同步块 | 10(重量锁)重量锁指针 | 自旋重试 |
| 执行同步块 | 10(重量锁)重量锁指针 | 自旋重试 |
| 执行同步块 | 10(重量锁)重量锁指针 | 自旋重试 |
| 执行同步块 | 10(重量锁)重量锁指针 | 阻塞 |
| - | ... | ... |
我们针对自旋添加一些注意信息:
- Java 7 之后不能控制是否开启自旋功能
- 自旋会占用 CPU 时间,单核 CPU 自旋就是浪费,多核 CPU 自旋才能发挥优势。
- 在 Java 6 之后自旋锁是自适应的,比如对象刚刚的一次自旋操作成功过,那么认为这次自旋成功的可能性会高,就多自旋几次
- 在 Java 6 之后自旋锁是自适应的,比如对象刚刚的一次自旋操作失败,那么就认为这次自旋成功的可能性会低,少自旋甚至不自旋
我们再来介绍一下偏向锁:
-
轻量级锁在没有竞争时(就自己这个线程),每次重入仍然需要执行 CAS 操作。
-
偏向锁:只有第一次使用 CAS 将线程 ID 设置到对象的 Mark Word 头,之后发现 这个线程ID是自己的表示没有竞争,不用重新 CAS。
-
以后只要不发生竞争,这个对象就归该线程所有
我们给出一个简单实例:
// 下述三个操作完全不具有时间冲突,相当于全由m1来管辖,这时m1使用会进行cas更换,后续m2,m3均不会进行cas切换

static final Object obj = new Object();
public static void m1() {
    synchronized( obj ) {
        // 同步块 A
        m2();
    }
}
public static void m2() {
    synchronized( obj ) {
        // 同步块 B
        m3();
    }
}
public static void m3() {
    synchronized( obj ) {
        // 同步块 C
    }
}
我们给出简单示例图:
首先我们回忆一下对象头格式:
|--------------------------------------------------------------------|--------------------|
|                          Mark Word (64 bits)                       |        State       |
|--------------------------------------------------------------------|--------------------|
| unused:25 | hashcode:31 | unused:1 | age:4 | biased_lock:0 |  01   |        Normal      |
|--------------------------------------------------------------------|--------------------|
| thread:54 |   epoch:2   | unused:1 | age:4 | biased_lock:1 |  01   |        Biased      |
|--------------------------------------------------------------------|--------------------|
|                    ptr_to_lock_record:62                   |  00   | Lightweight Locked |
|--------------------------------------------------------------------|--------------------|
|                 ptr_to_heavyweight_monitor:62              |  10   | Heavyweight Locked |
|--------------------------------------------------------------------|--------------------|
|                                                            |  11   |    Marked for GC   |
|--------------------------------------------------------------------|--------------------|
我们进行简单解释:
- Normal:正常锁
- Biased:正常偏向锁
- Lightweight Locked :轻量级锁
- Heavyweight Locked:重量级锁
- biased_lock : 控制偏向锁的开启的码位
我们针对偏向锁进行简单解释:
- 如果开启了偏向锁(默认开启)那么对象创建后,markword值为0x05即最后3位为101,这时它的 thread、epoch、age 都为 0
- 偏向锁是默认是延迟的,不会在程序启动时立即生效
- 如果想避免延迟,可以加 VM 参数- XX:BiasedLockingStartupDelay=0来禁用延迟
- 如果没有开启偏向锁,那么对象创建后,markword 值为 0x01 即最后 3 位为 001
- 这时它的 hashcode、 age 都为 0,第一次用到 hashcode 时才会赋值
- 但是如果调用了hashcode方法就会导致覆盖掉biased_lock关闭偏向锁
撤销偏向状态
我们这里总结了三种撤销偏向状态的方法
撤销 - 调用对象 hashCode
我们给出简单解释:
- hashcode与biased_lock的字节码位置冲突,若调用hashcode方法得到hashcode就会覆盖掉biased_lock位置,导致偏向锁失效
- 调用了对象的hashCode,但偏向锁的对象MarkWord中存储的是线程 id,如果调用hashCode会导致偏向锁被 撤销
- 轻量级锁会在锁记录中记录 hashCode
- 重量级锁会在 Monitor 中记录 hashCode
撤销 - 其它线程使用对象
我们给出简单解释:
- 当有其它线程使用偏向锁对象时,会将偏向锁升级为轻量级锁
我们给出简单示例:
/*主代码*/

private static void test2() throws InterruptedException {
    Dog d = new Dog();
    Thread t1 = new Thread(() -> {
        synchronized (d) {
            log.debug(ClassLayout.parseInstance(d).toPrintableSimple(true));
        }
        synchronized (TestBiased.class) {
            TestBiased.class.notify();
        }
        // 如果不用 wait/notify 使用 join 必须打开下面的注释
        // 因为:t1 线程不能结束,否则底层线程可能被 jvm 重用作为 t2 线程,底层线程 id 是一样的
        /*try {
         	System.in.read();
         } catch (IOException e) {
         	e.printStackTrace();
         }*/
    }, "t1");
    t1.start();
    Thread t2 = new Thread(() -> {
        synchronized (TestBiased.class) {
            try {
                TestBiased.class.wait();
            } catch (InterruptedException e) {
                e.printStackTrace();
            }
        }
        log.debug(ClassLayout.parseInstance(d).toPrintableSimple(true));
        synchronized (d) {
            log.debug(ClassLayout.parseInstance(d).toPrintableSimple(true));
        }
        log.debug(ClassLayout.parseInstance(d).toPrintableSimple(true));
    }, "t2");
    t2.start();
}

/*结果*/
[t1] - 00000000 00000000 00000000 00000000 00011111 01000001 00010000 00000101
[t2] - 00000000 00000000 00000000 00000000 00011111 01000001 00010000 00000101
[t2] - 00000000 00000000 00000000 00000000 00011111 10110101 11110000 01000000
[t2] - 00000000 00000000 00000000 00000000 00000000 00000000 00000000 00000001
撤销 - 调用 wait/notify
我们进行简单解释:
- wait和notify方法都是重量级锁的专属方法,如果调用就会导致升级为重量级锁
我们给出简单代码示例:
/*主代码*/

public static void main(String[] args) throws InterruptedException {
    Dog d = new Dog();
    Thread t1 = new Thread(() -> {
        log.debug(ClassLayout.parseInstance(d).toPrintableSimple(true));
        synchronized (d) {
            log.debug(ClassLayout.parseInstance(d).toPrintableSimple(true));
            try {
                d.wait();
            } catch (InterruptedException e) {
                e.printStackTrace();
            }
            log.debug(ClassLayout.parseInstance(d).toPrintableSimple(true));
        }
    }, "t1");
    t1.start();
    new Thread(() -> {
        try {
            Thread.sleep(6000);
        } catch (InterruptedException e) {
            e.printStackTrace();
        }
        synchronized (d) {
            log.debug("notify");
            d.notify();
        }
    }, "t2").start();
}

/*结果*/
[t1] - 00000000 00000000 00000000 00000000 00000000 00000000 00000000 00000101
[t1] - 00000000 00000000 00000000 00000000 00011111 10110011 11111000 00000101
[t2] - notify
[t1] - 00000000 00000000 00000000 00000000 00011100 11010100 00001101 11001010
批量重偏向
我们先来介绍一下批量重偏向:
-
如果对象虽然被多个线程访问,但没有竞争,这时偏向了线程 T1 的对象仍有机会重新偏向 T2,重偏向会重置对象 的 Thread ID
-
当撤销偏向锁阈值超过 20 次后,jvm 会这样觉得偏向对象错误,于是会在给这些对象加锁时重新偏向至加锁线程
我们给出简单代码示例:
/*主代码*/

private static void test3() throws InterruptedException {
    Vector<Dog> list = new Vector<>();
    Thread t1 = new Thread(() -> {
        for (int i = 0; i < 30; i++) {
            Dog d = new Dog();
            list.add(d);
            synchronized (d) {
                log.debug(i + "\t" + ClassLayout.parseInstance(d).toPrintableSimple(true));
            }
        }
        synchronized (list) {
            list.notify();
        }
    }, "t1");
    t1.start();

    Thread t2 = new Thread(() -> {
        synchronized (list) {
            try {
                list.wait();
            } catch (InterruptedException e) {
                e.printStackTrace();
            }
        }
        log.debug("===============> ");
        for (int i = 0; i < 30; i++) {
            Dog d = list.get(i);
            log.debug(i + "\t" + ClassLayout.parseInstance(d).toPrintableSimple(true));
            synchronized (d) {
                log.debug(i + "\t" + ClassLayout.parseInstance(d).toPrintableSimple(true));
            }
            log.debug(i + "\t" + ClassLayout.parseInstance(d).toPrintableSimple(true));
        }
    }, "t2");
    t2.start();
}

/*结果*/

// 我们会发现,最开始都是101,这里设置了偏向锁
[t1] - 0 00000000 00000000 00000000 00000000 00011111 11110011 11100000 00000101
[t1] - 1 00000000 00000000 00000000 00000000 00011111 11110011 11100000 00000101
[t1] - 2 00000000 00000000 00000000 00000000 00011111 11110011 11100000 00000101
[t1] - 3 00000000 00000000 00000000 00000000 00011111 11110011 11100000 00000101
[t1] - 4 00000000 00000000 00000000 00000000 00011111 11110011 11100000 00000101
[t1] - 5 00000000 00000000 00000000 00000000 00011111 11110011 11100000 00000101
[t1] - 6 00000000 00000000 00000000 00000000 00011111 11110011 11100000 00000101
[t1] - 7 00000000 00000000 00000000 00000000 00011111 11110011 11100000 00000101
[t1] - 8 00000000 00000000 00000000 00000000 00011111 11110011 11100000 00000101
[t1] - 9 00000000 00000000 00000000 00000000 00011111 11110011 11100000 00000101
[t1] - 10 00000000 00000000 00000000 00000000 00011111 11110011 11100000 00000101
[t1] - 11 00000000 00000000 00000000 00000000 00011111 11110011 11100000 00000101
[t1] - 12 00000000 00000000 00000000 00000000 00011111 11110011 11100000 00000101
[t1] - 13 00000000 00000000 00000000 00000000 00011111 11110011 11100000 00000101
[t1] - 14 00000000 00000000 00000000 00000000 00011111 11110011 11100000 00000101
[t1] - 15 00000000 00000000 00000000 00000000 00011111 11110011 11100000 00000101
[t1] - 16 00000000 00000000 00000000 00000000 00011111 11110011 11100000 00000101
[t1] - 17 00000000 00000000 00000000 00000000 00011111 11110011 11100000 00000101
[t1] - 18 00000000 00000000 00000000 00000000 00011111 11110011 11100000 00000101
[t1] - 19 00000000 00000000 00000000 00000000 00011111 11110011 11100000 00000101
[t1] - 20 00000000 00000000 00000000 00000000 00011111 11110011 11100000 00000101
[t1] - 21 00000000 00000000 00000000 00000000 00011111 11110011 11100000 00000101
[t1] - 22 00000000 00000000 00000000 00000000 00011111 11110011 11100000 00000101
[t1] - 23 00000000 00000000 00000000 00000000 00011111 11110011 11100000 00000101
[t1] - 24 00000000 00000000 00000000 00000000 00011111 11110011 11100000 00000101
[t1] - 25 00000000 00000000 00000000 00000000 00011111 11110011 11100000 00000101
[t1] - 26 00000000 00000000 00000000 00000000 00011111 11110011 11100000 00000101
[t1] - 27 00000000 00000000 00000000 00000000 00011111 11110011 11100000 00000101
[t1] - 28 00000000 00000000 00000000 00000000 00011111 11110011 11100000 00000101
[t1] - 29 00000000 00000000 00000000 00000000 00011111 11110011 11100000 00000101
[t2] - ===============>
 // 我们会发现这里从101偏向锁撤销,然后变为000无锁,然后变为001轻量级锁
[t2] - 0 00000000 00000000 00000000 00000000 00011111 11110011 11100000 00000101
[t2] - 0 00000000 00000000 00000000 00000000 00100000 01011000 11110111 00000000
[t2] - 0 00000000 00000000 00000000 00000000 00000000 00000000 00000000 00000001
[t2] - 1 00000000 00000000 00000000 00000000 00011111 11110011 11100000 00000101
[t2] - 1 00000000 00000000 00000000 00000000 00100000 01011000 11110111 00000000
[t2] - 1 00000000 00000000 00000000 00000000 00000000 00000000 00000000 00000001
[t2] - 2 00000000 00000000 00000000 00000000 00011111 11110011 11100000 00000101
[t2] - 2 00000000 00000000 00000000 00000000 00100000 01011000 11110111 00000000
[t2] - 2 00000000 00000000 00000000 00000000 00000000 00000000 00000000 00000001
[t2] - 3 00000000 00000000 00000000 00000000 00011111 11110011 11100000 00000101
[t2] - 3 00000000 00000000 00000000 00000000 00100000 01011000 11110111 00000000
[t2] - 3 00000000 00000000 00000000 00000000 00000000 00000000 00000000 00000001
[t2] - 4 00000000 00000000 00000000 00000000 00011111 11110011 11100000 00000101
[t2] - 4 00000000 00000000 00000000 00000000 00100000 01011000 11110111 00000000
[t2] - 4 00000000 00000000 00000000 00000000 00000000 00000000 00000000 00000001
[t2] - 5 00000000 00000000 00000000 00000000 00011111 11110011 11100000 00000101
[t2] - 5 00000000 00000000 00000000 00000000 00100000 01011000 11110111 00000000
[t2] - 5 00000000 00000000 00000000 00000000 00000000 00000000 00000000 00000001
[t2] - 6 00000000 00000000 00000000 00000000 00011111 11110011 11100000 00000101
[t2] - 6 00000000 00000000 00000000 00000000 00100000 01011000 11110111 00000000
[t2] - 6 00000000 00000000 00000000 00000000 00000000 00000000 00000000 00000001
[t2] - 7 00000000 00000000 00000000 00000000 00011111 11110011 11100000 00000101
[t2] - 7 00000000 00000000 00000000 00000000 00100000 01011000 11110111 00000000
[t2] - 7 00000000 00000000 00000000 00000000 00000000 00000000 00000000 00000001
[t2] - 8 00000000 00000000 00000000 00000000 00011111 11110011 11100000 00000101
[t2] - 8 00000000 00000000 00000000 00000000 00100000 01011000 11110111 00000000
[t2] - 8 00000000 00000000 00000000 00000000 00000000 00000000 00000000 00000001
[t2] - 9 00000000 00000000 00000000 00000000 00011111 11110011 11100000 00000101
[t2] - 9 00000000 00000000 00000000 00000000 00100000 01011000 11110111 00000000
[t2] - 9 00000000 00000000 00000000 00000000 00000000 00000000 00000000 00000001
[t2] - 10 00000000 00000000 00000000 00000000 00011111 11110011 11100000 00000101
[t2] - 10 00000000 00000000 00000000 00000000 00100000 01011000 11110111 00000000
[t2] - 10 00000000 00000000 00000000 00000000 00000000 00000000 00000000 00000001
[t2] - 11 00000000 00000000 00000000 00000000 00011111 11110011 11100000 00000101
[t2] - 11 00000000 00000000 00000000 00000000 00100000 01011000 11110111 00000000
[t2] - 11 00000000 00000000 00000000 00000000 00000000 00000000 00000000 00000001
[t2] - 12 00000000 00000000 00000000 00000000 00011111 11110011 11100000 00000101
[t2] - 12 00000000 00000000 00000000 00000000 00100000 01011000 11110111 00000000
[t2] - 12 00000000 00000000 00000000 00000000 00000000 00000000 00000000 00000001
[t2] - 13 00000000 00000000 00000000 00000000 00011111 11110011 11100000 00000101
[t2] - 13 00000000 00000000 00000000 00000000 00100000 01011000 11110111 00000000
[t2] - 13 00000000 00000000 00000000 00000000 00000000 00000000 00000000 00000001
[t2] - 14 00000000 00000000 00000000 00000000 00011111 11110011 11100000 00000101
[t2] - 14 00000000 00000000 00000000 00000000 00100000 01011000 11110111 00000000
[t2] - 14 00000000 00000000 00000000 00000000 00000000 00000000 00000000 00000001
[t2] - 15 00000000 00000000 00000000 00000000 00011111 11110011 11100000 00000101
[t2] - 15 00000000 00000000 00000000 00000000 00100000 01011000 11110111 00000000
[t2] - 15 00000000 00000000 00000000 00000000 00000000 00000000 00000000 00000001
[t2] - 16 00000000 00000000 00000000 00000000 00011111 11110011 11100000 00000101
[t2] - 16 00000000 00000000 00000000 00000000 00100000 01011000 11110111 00000000
[t2] - 16 00000000 00000000 00000000 00000000 00000000 00000000 00000000 00000001
[t2] - 17 00000000 00000000 00000000 00000000 00011111 11110011 11100000 00000101
[t2] - 17 00000000 00000000 00000000 00000000 00100000 01011000 11110111 00000000
[t2] - 17 00000000 00000000 00000000 00000000 00000000 00000000 00000000 00000001
[t2] - 18 00000000 00000000 00000000 00000000 00011111 11110011 11100000 00000101
[t2] - 18 00000000 00000000 00000000 00000000 00100000 01011000 11110111 00000000
[t2] - 18 00000000 00000000 00000000 00000000 00000000 00000000 00000000 00000001
// 在这里超过阈值之后,直接将该锁的偏向对象设置为t2线程,所有锁都设置为了101偏向锁
[t2] - 19 00000000 00000000 00000000 00000000 00011111 11110011 11100000 00000101
[t2] - 19 00000000 00000000 00000000 00000000 00011111 11110011 11110001 00000101
[t2] - 19 00000000 00000000 00000000 00000000 00011111 11110011 11110001 00000101
[t2] - 20 00000000 00000000 00000000 00000000 00011111 11110011 11100000 00000101
[t2] - 20 00000000 00000000 00000000 00000000 00011111 11110011 11110001 00000101
[t2] - 20 00000000 00000000 00000000 00000000 00011111 11110011 11110001 00000101
[t2] - 21 00000000 00000000 00000000 00000000 00011111 11110011 11100000 00000101
[t2] - 21 00000000 00000000 00000000 00000000 00011111 11110011 11110001 00000101
[t2] - 21 00000000 00000000 00000000 00000000 00011111 11110011 11110001 00000101
[t2] - 22 00000000 00000000 00000000 00000000 00011111 11110011 11100000 00000101
[t2] - 22 00000000 00000000 00000000 00000000 00011111 11110011 11110001 00000101
[t2] - 22 00000000 00000000 00000000 00000000 00011111 11110011 11110001 00000101
[t2] - 23 00000000 00000000 00000000 00000000 00011111 11110011 11100000 00000101
[t2] - 23 00000000 00000000 00000000 00000000 00011111 11110011 11110001 00000101
[t2] - 23 00000000 00000000 00000000 00000000 00011111 11110011 11110001 00000101
[t2] - 24 00000000 00000000 00000000 00000000 00011111 11110011 11100000 00000101
[t2] - 24 00000000 00000000 00000000 00000000 00011111 11110011 11110001 00000101
[t2] - 24 00000000 00000000 00000000 00000000 00011111 11110011 11110001 00000101
[t2] - 25 00000000 00000000 00000000 00000000 00011111 11110011 11100000 00000101
[t2] - 25 00000000 00000000 00000000 00000000 00011111 11110011 11110001 00000101
[t2] - 25 00000000 00000000 00000000 00000000 00011111 11110011 11110001 00000101
[t2] - 26 00000000 00000000 00000000 00000000 00011111 11110011 11100000 00000101
[t2] - 26 00000000 00000000 00000000 00000000 00011111 11110011 11110001 00000101
[t2] - 26 00000000 00000000 00000000 00000000 00011111 11110011 11110001 00000101
[t2] - 27 00000000 00000000 00000000 00000000 00011111 11110011 11100000 00000101
[t2] - 27 00000000 00000000 00000000 00000000 00011111 11110011 11110001 00000101
[t2] - 27 00000000 00000000 00000000 00000000 00011111 11110011 11110001 00000101
[t2] - 28 00000000 00000000 00000000 00000000 00011111 11110011 11100000 00000101
[t2] - 28 00000000 00000000 00000000 00000000 00011111 11110011 11110001 00000101
[t2] - 28 00000000 00000000 00000000 00000000 00011111 11110011 11110001 00000101
[t2] - 29 00000000 00000000 00000000 00000000 00011111 11110011 11100000 00000101
[t2] - 29 00000000 00000000 00000000 00000000 00011111 11110011 11110001 00000101
[t2] - 29 00000000 00000000 00000000 00000000 00011111 11110011 11110001 00000101
我们来简单介绍一下批量撤销:
- 当撤销偏向锁阈值超过 40 次后,jvm 会这样觉得偏向错误,根本就不该偏向。
- 于是整个类的所有对象 都会变为不可偏向的,新建的对象也是不可偏向的。
我们给出简单代码示例:
/*主代码*/

static Thread t1,t2,t3;
private static void test4() throws InterruptedException {
    Vector<Dog> list = new Vector<>();
    int loopNumber = 39;
    t1 = new Thread(() -> {
        for (int i = 0; i < loopNumber; i++) {
            Dog d = new Dog();
            list.add(d);
            synchronized (d) {
                log.debug(i + "\t" + ClassLayout.parseInstance(d).toPrintableSimple(true));
            }
        }
        LockSupport.unpark(t2);
    }, "t1");
    t1.start();
    t2 = new Thread(() -> {
        LockSupport.park();
        log.debug("===============> ");
        for (int i = 0; i < loopNumber; i++) {
            Dog d = list.get(i);
            log.debug(i + "\t" + ClassLayout.parseInstance(d).toPrintableSimple(true));
            synchronized (d) {
                log.debug(i + "\t" + ClassLayout.parseInstance(d).toPrintableSimple(true));
            }
            log.debug(i + "\t" + ClassLayout.parseInstance(d).toPrintableSimple(true));
        }
        LockSupport.unpark(t3);
    }, "t2");
    t2.start();
    t3 = new Thread(() -> {
        LockSupport.park();
        log.debug("===============> ");
        for (int i = 0; i < loopNumber; i++) {
            Dog d = list.get(i);
            log.debug(i + "\t" + ClassLayout.parseInstance(d).toPrintableSimple(true));
            synchronized (d) {
                log.debug(i + "\t" + ClassLayout.parseInstance(d).toPrintableSimple(true));
            }
            log.debug(i + "\t" + ClassLayout.parseInstance(d).toPrintableSimple(true));
        }
    }, "t3");
    t3.start();
    t3.join();
    log.debug(ClassLayout.parseInstance(new Dog()).toPrintableSimple(true));
}

/*运行结果*/
由于过长不做展示了,我们简单介绍一下

最开始a为偏向锁,无撤销行为
然后b开始时进行撤销,为轻量级锁,在撤销20次之后转化为重偏向,改为偏向锁
最后c开始时撤销,但是撤销次20之后(总计40次),导致jvm启动了批量撤销,这时我们的该类中就不会再出现偏向锁,全为轻量级锁和重量锁
我们先来介绍一下锁清除操作:
- 由于系统编译前都会经过JIT即时编译器重新编译
- 如果一个线程被锁固定,但是又没有其他线程争抢锁,就会自动将这个锁去掉来加快速率
JIT即时编译的锁清除操作默认是开启的,我们可以调整参数使其关闭:
- -XX:-EliminateLocks
Wait/notify
这小节我们将会介绍Wait/notify的使用以及相关思想
Wait/notify原理
我们首先介绍一下Wait/notify:
- wait:线程等待,但等待期间会放弃lock锁的所属权
- notify:唤醒等待线程,线程重新进入竞争区竞争lock锁的所属权
我们给出一张原理图:
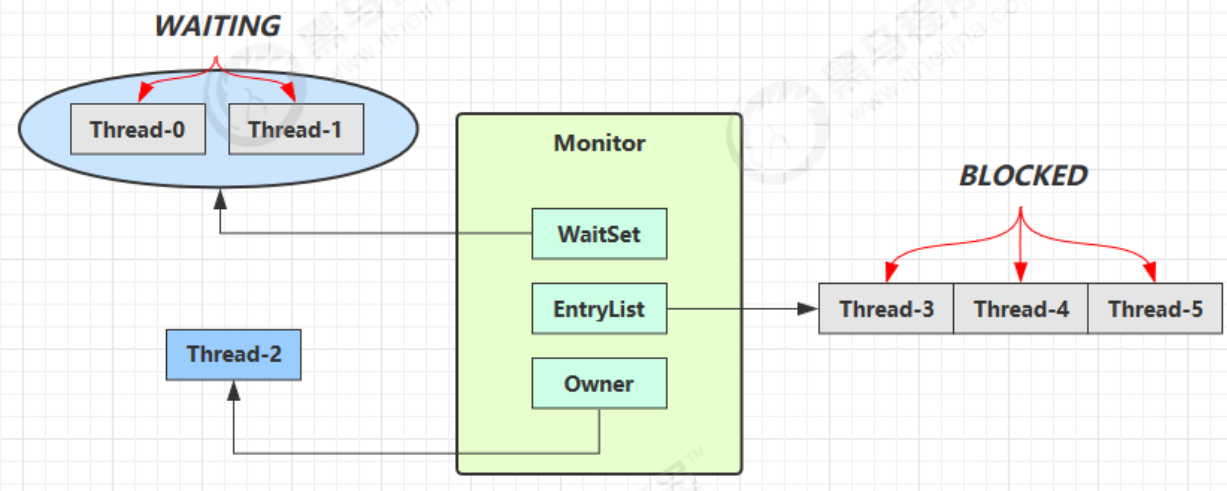
我们对该图进行简单介绍:
- Owner 线程发现条件不满足,调用 wait 方法,即可进入 WaitSet 变为 WAITING 状态
- BLOCKED 和 WAITING 的线程都处于阻塞状态,不占用 CPU 时间片
- BLOCKED 线程会在 Owner 线程释放锁时唤醒
- WAITING 线程会在 Owner 线程调用 notify 或 notifyAll 时唤醒,但唤醒后并不意味者立刻获得锁,仍需进入 EntryList 重新竞争
API 介绍
我们介绍一下常用的Wait/notify的API:
obj.wait()让进入 object 监视器的线程到 waitSet 等待obj.notify()在 object 上正在 waitSet 等待的线程中挑一个唤醒obj.notifyAll()让 object 上正在 waitSet 等待的线程全部唤醒
我们仍旧通过简单的代码展示体验API:
/*主代码*/

// 它们都是线程之间进行协作的手段,都属于 Object 对象的方法。必须获得此对象的锁,才能调用这几个方法
final static Object obj = new Object();
public static void main(String[] args) {
    new Thread(() -> {
        synchronized (obj) {
            log.debug("执行....");
            try {
                obj.wait(); // 让线程在obj上一直等待下去
            } catch (InterruptedException e) {
                e.printStackTrace();
            }
            log.debug("其它代码....");
        }
    }).start();
    // 主线程两秒后执行
    sleep(2);
    log.debug("唤醒 obj 上其它线程");
    synchronized (obj) {
        obj.notify(); // 唤醒obj上一个线程
        // obj.notifyAll(); // 唤醒obj上所有等待线程
    }
}

/*调用notify*/
20:00:53.096 [Thread-0] c.TestWaitNotify - 执行....
20:00:53.099 [Thread-1] c.TestWaitNotify - 执行....
20:00:55.096 [main] c.TestWaitNotify - 唤醒 obj 上其它线程
20:00:55.096 [Thread-0] c.TestWaitNotify - 其它代码....

/*调用notifyAll*/
19:58:15.457 [Thread-0] c.TestWaitNotify - 执行....
19:58:15.460 [Thread-1] c.TestWaitNotify - 执行....
19:58:17.456 [main] c.TestWaitNotify - 唤醒 obj 上其它线程
19:58:17.456 [Thread-1] c.TestWaitNotify - 其它代码....
19:58:17.456 [Thread-0] c.TestWaitNotify - 其它代码....
此外wait方法还可以设置时间:
wait()方法会释放对象的锁,进入 WaitSet 等待区,从而让其他线程就机会获取对象的锁。无限制等待,直到 notify 为止wait(long n)有时限的等待, 到 n 毫秒后结束等待,或是被 notify
Wait/Sleep区别
我们在这里简单介绍一下两者区别:
- sleep 是 Thread 方法,而 wait 是 Object 的方法
- sleep 不需要强制和 synchronized 配合使用,但 wait 需要 和 synchronized 一起用
- sleep 在睡眠的同时,不会释放对象锁的,但 wait 在等待的时候会释放对象锁
- 它们 状态 TIMED_WAITING
wait notify 正常使用
我们通过循序渐进的形式来讲解wait notify的使用:
/*代码介绍*/

我们希望让工人干活,但是工人需要在屋子里干活
小南需要有烟才能干活,小女需要有外卖才能干活,其他人可以直接干活
我们希望模拟最好的干活场景


/*第一层*/

// 主代码
static final Object room = new Object();
static boolean hasCigarette = false;
static boolean hasTakeout = false;

new Thread(() -> {
    synchronized (room) {
        log.debug("有烟没?[{}]", hasCigarette);
        if (!hasCigarette) {
            log.debug("没烟,先歇会!");
            sleep(2);
        }
        log.debug("有烟没?[{}]", hasCigarette);
        if (hasCigarette) {
            log.debug("可以开始干活了");
        }
    }
}, "小南").start();
for (int i = 0; i < 5; i++) {
    new Thread(() -> {
        synchronized (room) {
            log.debug("可以开始干活了");
        }
    }, "其它人").start();
}
sleep(1);
new Thread(() -> {
    // 这里能不能加 synchronized (room)?
    hasCigarette = true;
    log.debug("烟到了噢!");
}, "送烟的").start();

// 结果展示
20:49:49.883 [小南] c.TestCorrectPosture - 有烟没?[false]
20:49:49.887 [小南] c.TestCorrectPosture - 没烟,先歇会!
20:49:50.882 [送烟的] c.TestCorrectPosture - 烟到了噢!
20:49:51.887 [小南] c.TestCorrectPosture - 有烟没?[true]
20:49:51.887 [小南] c.TestCorrectPosture - 可以开始干活了
20:49:51.887 [其它人] c.TestCorrectPosture - 可以开始干活了
20:49:51.887 [其它人] c.TestCorrectPosture - 可以开始干活了
20:49:51.888 [其它人] c.TestCorrectPosture - 可以开始干活了
20:49:51.888 [其它人] c.TestCorrectPosture - 可以开始干活了
20:49:51.888 [其它人] c.TestCorrectPosture - 可以开始干活了

// 问题说明
- 其它干活的线程,都要一直阻塞,效率太低
- 小南线程必须睡足 2s 后才能醒来,就算烟提前送到,也无法立刻醒来
- 加了 synchronized (room) 后,就好比小南在里面反锁了门睡觉,烟根本没法送进门,main 没加 synchronized 就好像 main 线程是翻窗户进来的

// 解决方法
- 使用 wait - notify 机制

/*第二层*/

// 主代码
new Thread(() -> {
    synchronized (room) {
        log.debug("有烟没?[{}]", hasCigarette);
        if (!hasCigarette) {
            log.debug("没烟,先歇会!");
            try {
                room.wait(2000);
            } catch (InterruptedException e) {
                e.printStackTrace();
            }
        }
        log.debug("有烟没?[{}]", hasCigarette);
        if (hasCigarette) {
            log.debug("可以开始干活了");
        }
    }
}, "小南").start();
for (int i = 0; i < 5; i++) {
    new Thread(() -> {
        synchronized (room) {
            log.debug("可以开始干活了");
        }
    }, "其它人").start();
}
sleep(1);
new Thread(() -> {
    synchronized (room) {
        hasCigarette = true;
        log.debug("烟到了噢!");
        room.notify();
    }
}, "送烟的").start();

// 结果
解决了其它干活的线程阻塞的问题

// 问题
但如果有其它线程也在等待条件呢?

/*第三层*/

// 主代码
new Thread(() -> {
    synchronized (room) {
        log.debug("有烟没?[{}]", hasCigarette);
        if (!hasCigarette) {
            log.debug("没烟,先歇会!");
            try {
                room.wait();
            } catch (InterruptedException e) {
                e.printStackTrace();
            }
        }
        log.debug("有烟没?[{}]", hasCigarette);
        if (hasCigarette) {
            log.debug("可以开始干活了");
        } else {
            log.debug("没干成活...");
        }
    }
}, "小南").start();
new Thread(() -> {
    synchronized (room) {
        Thread thread = Thread.currentThread();
        log.debug("外卖送到没?[{}]", hasTakeout);
        if (!hasTakeout) {
            log.debug("没外卖,先歇会!");
            try {
                room.wait();
            } catch (InterruptedException e) {
                e.printStackTrace();
            }
        }
        log.debug("外卖送到没?[{}]", hasTakeout);
        if (hasTakeout) {
            log.debug("可以开始干活了");
        } else {
            log.debug("没干成活...");
        }
    }
}, "小女").start();
sleep(1);
new Thread(() -> {
    synchronized (room) {
        hasTakeout = true;
        log.debug("外卖到了噢!");
        room.notify();
    }
}, "送外卖的").start();

// 结果
20:53:12.173 [小南] c.TestCorrectPosture - 有烟没?[false]
20:53:12.176 [小南] c.TestCorrectPosture - 没烟,先歇会!
20:53:12.176 [小女] c.TestCorrectPosture - 外卖送到没?[false]
20:53:12.176 [小女] c.TestCorrectPosture - 没外卖,先歇会!
20:53:13.174 [送外卖的] c.TestCorrectPosture - 外卖到了噢!
20:53:13.174 [小南] c.TestCorrectPosture - 有烟没?[false]
20:53:13.174 [小南] c.TestCorrectPosture - 没干成活...

// 问题
notify 只能随机唤醒一个 WaitSet 中的线程,这时如果有其它线程也在等待,那么就可能唤醒不了正确的线 程,称之为【虚假唤醒】

// 解决方法
- 改为 notifyAll

/*第四层*/

// 主代码
new Thread(() -> {
    synchronized (room) {
        log.debug("有烟没?[{}]", hasCigarette);
        if (!hasCigarette) {
            log.debug("没烟,先歇会!");
            try {
                room.wait();
            } catch (InterruptedException e) {
                e.printStackTrace();
            }
        }
        log.debug("有烟没?[{}]", hasCigarette);
        if (hasCigarette) {
            log.debug("可以开始干活了");
        } else {
            log.debug("没干成活...");
        }
    }
}, "小南").start();
new Thread(() -> {
    synchronized (room) {
        Thread thread = Thread.currentThread();
        log.debug("外卖送到没?[{}]", hasTakeout);
        if (!hasTakeout) {
            log.debug("没外卖,先歇会!");
            try {
                room.wait();
            } catch (InterruptedException e) {
                e.printStackTrace();
            }
        }
        log.debug("外卖送到没?[{}]", hasTakeout);
        if (hasTakeout) {
            log.debug("可以开始干活了");
        } else {
            log.debug("没干成活...");
        }
    }
}, "小女").start();
sleep(1);
new Thread(() -> {
    synchronized (room) {
        hasTakeout = true;
        log.debug("外卖到了噢!");
        room.notify();
    }
}, "送外卖的").start();

// 结果
20:53:12.173 [小南] c.TestCorrectPosture - 有烟没?[false]
20:53:12.176 [小南] c.TestCorrectPosture - 没烟,先歇会!
20:53:12.176 [小女] c.TestCorrectPosture - 外卖送到没?[false]
20:53:12.176 [小女] c.TestCorrectPosture - 没外卖,先歇会!
20:53:13.174 [送外卖的] c.TestCorrectPosture - 外卖到了噢!
20:53:13.174 [小南] c.TestCorrectPosture - 有烟没?[false]
20:53:13.174 [小南] c.TestCorrectPosture - 没干成活...

// 问题
- 用 notifyAll 仅解决某个线程的唤醒问题,但使用 if + wait 判断仅有一次机会,一旦条件不成立,就没有重新判断的机会了

// 解决方法
- 用 while + wait,当条件不成立,再次 wait

/*第五层*/

// 主代码
while (!hasCigarette) {
    log.debug("没烟,先歇会!");
    try {
        room.wait();
    } catch (InterruptedException e) {
        e.printStackTrace();
    }
}

// 结果
20:58:34.322 [小南] c.TestCorrectPosture - 有烟没?[false]
20:58:34.326 [小南] c.TestCorrectPosture - 没烟,先歇会!
20:58:34.326 [小女] c.TestCorrectPosture - 外卖送到没?[false]
20:58:34.326 [小女] c.TestCorrectPosture - 没外卖,先歇会!
20:58:35.323 [送外卖的] c.TestCorrectPosture - 外卖到了噢!
20:58:35.324 [小女] c.TestCorrectPosture - 外卖送到没?[true]
20:58:35.324 [小女] c.TestCorrectPosture - 可以开始干活了
20:58:35.324 [小南] c.TestCorrectPosture - 没烟,先歇会!
最后我们给出一个wait notify使用的标准模板:
/*标准模板*/

synchronized(lock) {
    while(条件不成立) {
        lock.wait();
    }
    // 干活
}

//另一个线程
synchronized(lock) {
    lock.notifyAll();
}
模式之保护性暂停
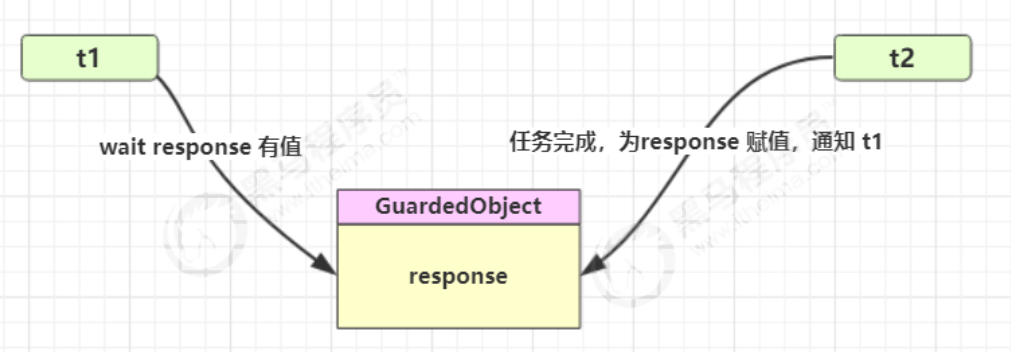
我们将介绍一种新的模式:保护性暂停
我们来介绍一种新的模型:
- 即 Guarded Suspension,用在一个线程等待另一个线程的执行结果
我们讲一下注意点:
- 有一个结果需要从一个线程传递到另一个线程,让他们关联同一个 GuardedObject
- 如果有结果不断从一个线程到另一个线程那么可以使用消息队列(见生产者/消费者)
- JDK 中,join 的实现、Future 的实现,采用的就是此模式
- 因为要等待另一方的结果,因此归类到同步模式‘
我们给出模式图:
我们给出基本实现形式:
/*主函数*/

public static void main(String[] args) {

    GuardedObject guardedObject = new GuardedObject();

    new Thread(() -> {
        try {
            // 子线程执行下载
            List<String> response = download();
            log.debug("download complete...");
            guardedObject.complete(response);
        } catch (IOException e) {
            e.printStackTrace();
        }
    }).start();

    log.debug("waiting...");
    // 主线程阻塞等待
    Object response = guardedObject.get();
    log.debug("get response: [{}] lines", ((List<String>) response).size());
}

/*方法类*/

class GuardedObject {

    // 我们需要提交的结果
    private Object response;

    // 我们统一设置的锁
    private final Object lock = new Object();

    // 这个是得到方法,我们的主线程直接调取方法即可
    public Object get() {
        synchronized (lock) {
			// 条件不满足则等待
            while (response == null) {
                try {
                    lock.wait();
                } catch (InterruptedException e) {
                    e.printStackTrace();
                }
            }
            return response;
        }
    }

    // 这个是提交方法,我们的主线程直接调取方法即可
    public void complete(Object response) {
        synchronized (lock) {
			// 条件满足,通知等待线程
            this.response = response;
            lock.notifyAll();
        }
    }
}

/*运行结果*/
08:42:18.568 [main] c.TestGuardedObject - waiting...
08:42:23.312 [Thread-0] c.TestGuardedObject - download complete...
08:42:23.312 [main] c.TestGuardedObject - get response: [3] lines
实现改进1
我们当然不希望等待线程一直等待下去,所以我们可以设置一个等待的最大限制:
/*主线程*/

public static void main(String[] args) {
    GuardedObjectV2 v2 = new GuardedObjectV2();
    new Thread(() -> {
        sleep(1);
        v2.complete(null);
        sleep(1);
        v2.complete(Arrays.asList("a", "b", "c"));
    }).start();
    Object response = v2.get(2500);
    if (response != null) {
        log.debug("get response: [{}] lines", ((List<String>) response).size());
    } else {
        log.debug("can't get response");
    }
}

/*方法类*/

class GuardedObjectV2 {

    private Object response;
    private final Object lock = new Object();

    public Object get(long millis) {
        synchronized (lock) {
            // 1) 记录最初时间
            long begin = System.currentTimeMillis();
			// 2) 已经经历的时间
            long timePassed = 0;
            while (response == null) {
				// 4) 假设 millis 是 1000,结果在 400 时唤醒了,那么还有 600 要等
                long waitTime = millis - timePassed;
                log.debug("waitTime: {}", waitTime);
                if (waitTime <= 0) {
                    log.debug("break...");
                    break;
                }
                try {
                    lock.wait(waitTime);
                } catch (InterruptedException e) {
                    e.printStackTrace();
                }
				// 3) 如果提前被唤醒,这时已经经历的时间假设为 400
                timePassed = System.currentTimeMillis() - begin;
                log.debug("timePassed: {}, object is null {}",
                        timePassed, response == null);
            }
            return response;
        }
    }

    public void complete(Object response) {
        synchronized (lock) {
			// 条件满足,通知等待线程
            this.response = response;
            log.debug("notify...");
            lock.notifyAll();
        }
    }
}

/*输出(未超时版)*/
08:49:39.917 [main] c.GuardedObjectV2 - waitTime: 2500
08:49:40.917 [Thread-0] c.GuardedObjectV2 - notify...
08:49:40.917 [main] c.GuardedObjectV2 - timePassed: 1003, object is null true
08:49:40.917 [main] c.GuardedObjectV2 - waitTime: 1497
08:49:41.918 [Thread-0] c.GuardedObjectV2 - notify...
08:49:41.918 [main] c.GuardedObjectV2 - timePassed: 2004, object is null false
08:49:41.918 [main] c.TestGuardedObjectV2 - get response: [3] lines

/*输出(超时版)*/
08:47:54.963 [main] c.GuardedObjectV2 - waitTime: 1500
08:47:55.963 [Thread-0] c.GuardedObjectV2 - notify...
08:47:55.963 [main] c.GuardedObjectV2 - timePassed: 1002, object is null true
08:47:55.963 [main] c.GuardedObjectV2 - waitTime: 498
08:47:56.461 [main] c.GuardedObjectV2 - timePassed: 1500, object is null true
08:47:56.461 [main] c.GuardedObjectV2 - waitTime: 0
08:47:56.461 [main] c.GuardedObjectV2 - break...
08:47:56.461 [main] c.TestGuardedObjectV2 - can't get response
08:47:56.963 [Thread-0] c.GuardedObjectV2 - notify...
实现改进2
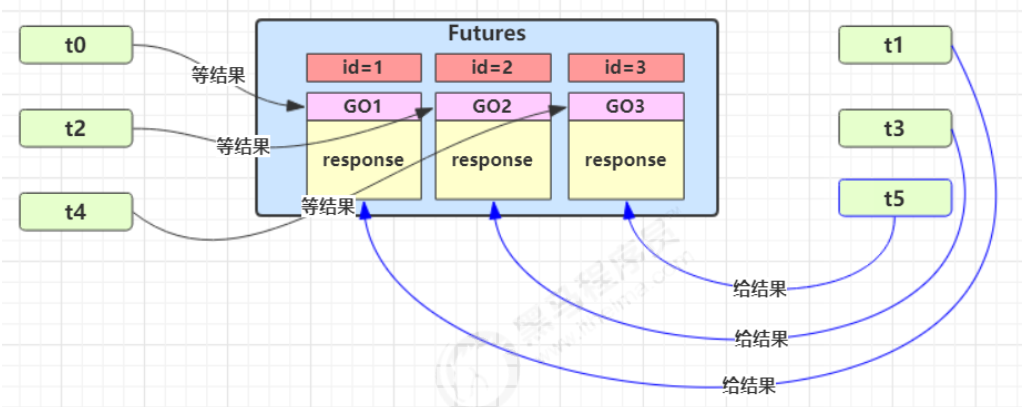
但是我们的实际项目中,我们会进行多任务的工作,我们下面来进行改造
我们先对项目进行介绍:
- 图中 Futures 就好比居民楼一层的信箱(每个信箱有房间编号)
- 左侧的 t0,t2,t4 就好比等待邮件的居民,右 侧的 t1,t3,t5 好比邮递员 。
我们在对耦合类进行介绍:
- 如果需要在多个类之间使用 GuardedObject 对象,作为参数传递不是很方便,因此设计一个用来解耦的中间类
- 这样不仅能够解耦【结果等待者】和【结果生产者】,还能够同时支持多个任务的管理。
我们给出项目的一张展示图:
我们来展示具体实现代码:
/*当然下面项目的逻辑并非很通顺,我们这里也只是对模式进行介绍而设计的*/

/*测试主函数*/

public static void main(String[] args) throws InterruptedException {
    for (int i = 0; i < 3; i++) {
        new People().start();
    }
    Sleeper.sleep(1);
    for (Integer id : Mailboxes.getIds()) {
        new Postman(id, "内容" + id).start();
    }
}

/*业务层实现*/

class People extends Thread{
    @Override
    public void run() {
        // 收信
        GuardedObject guardedObject = Mailboxes.createGuardedObject();
        log.debug("开始收信 id:{}", guardedObject.getId());
        Object mail = guardedObject.get(5000);
        log.debug("收到信 id:{}, 内容:{}", guardedObject.getId(), mail);
    }
}

class Postman extends Thread {
    private int id;
    private String mail;
    public Postman(int id, String mail) {
        this.id = id;
        this.mail = mail;
    }
    @Override
    public void run() {
        GuardedObject guardedObject = Mailboxes.getGuardedObject(id);
        log.debug("送信 id:{}, 内容:{}", id, mail);
        guardedObject.complete(mail);
    }
}

/*解耦类交互*/

class Mailboxes {

    private static Map<Integer, GuardedObject> boxes = new Hashtable<>();

    private static int id = 1;
    // 产生唯一 id,方法必须声明为synchronized
    private static synchronized int generateId() {
        return id++;
    }

    public static GuardedObject getGuardedObject(int id) {
        return boxes.remove(id);
    }

    public static GuardedObject createGuardedObject() {
        GuardedObject go = new GuardedObject(generateId());
        boxes.put(go.getId(), go);
        return go;
    }

    public static Set<Integer> getIds() {
        return boxes.keySet();
    }
}

/*底层实现*/

class GuardedObject {

    // 标识 Guarded Object
    private int id;

    public GuardedObject(int id) {
        this.id = id;
    }

    public int getId() {
        return id;
    }

    // 结果
    private Object response;

    // 获取结果
    // timeout 表示要等待多久 2000
    public Object get(long timeout) {
        synchronized (this) {
            // 开始时间 15:00:00
            long begin = System.currentTimeMillis();
            // 经历的时间
            long passedTime = 0;
            while (response == null) {
                // 这一轮循环应该等待的时间
                long waitTime = timeout - passedTime;
                // 经历的时间超过了最大等待时间时,退出循环
                if (timeout - passedTime <= 0) {
                    break;
                }
                try {
                    this.wait(waitTime); // 虚假唤醒 15:00:01
                } catch (InterruptedException e) {
                    e.printStackTrace();
                }
                // 求得经历时间
                passedTime = System.currentTimeMillis() - begin; // 15:00:02 1s
            }
            return response;
        }
    }

    // 产生结果
    public void complete(Object response) {
        synchronized (this) {
            // 给结果成员变量赋值
            this.response = response;
            this.notifyAll();
        }
    }

}

/*运行结果*/
10:35:05.689 c.People [Thread-1] - 开始收信 id:3
10:35:05.689 c.People [Thread-2] - 开始收信 id:1
10:35:05.689 c.People [Thread-0] - 开始收信 id:2
10:35:06.688 c.Postman [Thread-4] - 送信 id:2, 内容:内容2
10:35:06.688 c.Postman [Thread-5] - 送信 id:1, 内容:内容1
10:35:06.688 c.People [Thread-0] - 收到信 id:2, 内容:内容2
10:35:06.688 c.People [Thread-2] - 收到信 id:1, 内容:内容1
10:35:06.688 c.Postman [Thread-3] - 送信 id:3, 内容:内容3
10:35:06.689 c.People [Thread-1] - 收到信 id:3, 内容:内容3
模式之生产者消费者
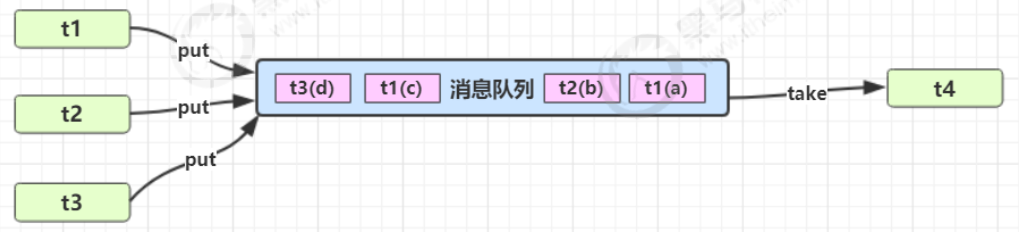
我们将介绍一种新的模式:生产者消费者
我们来介绍一种新的模型:
- 这里由一系列生产者只负责生产,一系列消费之只负责消费,不用负责对应关系
我们对其进行部分介绍:
- 与前面的保护性暂停中的 GuardObject 不同,不需要产生结果和消费结果的线程一一对应
- 消费队列可以用来平衡生产和消费的线程资源
- 生产者仅负责产生结果数据,不关心数据该如何处理,而消费者专心处理结果数据
- 消息队列是有容量限制的,满时不会再加入数据,空时不会再消耗数据
- JDK 中各种阻塞队列,采用的就是这种模式
我们给出该模式的展示图:
我们给出基本实现形式:
/*主函数*/

MessageQueue messageQueue = new MessageQueue(2);

// 4 个生产者线程, 下载任务
for (int i = 0; i < 4; i++) {
    int id = i;
    new Thread(() -> {
        try {
            log.debug("download...");
            List<String> response = Downloader.download();
            log.debug("try put message({})", id);
            messageQueue.put(new Message(id, response));
        } catch (IOException e) {
            e.printStackTrace();
        }
    }, "生产者" + i).start();
}

// 1 个消费者线程, 处理结果
new Thread(() -> {
    while (true) {
        Message message = messageQueue.take();
        List<String> response = (List<String>) message.getMessage();
        log.debug("take message({}): [{}] lines", message.getId(), response.size());
    }
}, "消费者").start();

/*模式底层代码*/

class Message {

    private int id;
    private Object message;

    public Message(int id, Object message) {
        this.id = id;
        this.message = message;
    }

    public int getId() {
        return id;
    }

    public Object getMessage() {
        return message;
    }
}

class MessageQueue {

    private LinkedList<Message> queue;
    private int capacity;

    public MessageQueue(int capacity) {
        this.capacity = capacity;
        queue = new LinkedList<>();
    }

    public Message take() {
        synchronized (queue) {
            while (queue.isEmpty()) {
                log.debug("没货了, wait");
                try {
                    queue.wait();
                } catch (InterruptedException e) {
                    e.printStackTrace();
                }
            }
            Message message = queue.removeFirst();
            queue.notifyAll();
            return message;
        }
    }

    public void put(Message message) {
        synchronized (queue) {
            while (queue.size() == capacity) {
                log.debug("库存已达上限, wait");
                try {
                    queue.wait();
                } catch (InterruptedException e) {
                    e.printStackTrace();
                }
            }
            queue.addLast(message);
            queue.notifyAll();
        }
    }
}

/*运行结果*/

10:48:38.070 [生产者3] c.TestProducerConsumer - download...
10:48:38.070 [生产者0] c.TestProducerConsumer - download...
10:48:38.070 [消费者] c.MessageQueue - 没货了, wait
10:48:38.070 [生产者1] c.TestProducerConsumer - download...
10:48:38.070 [生产者2] c.TestProducerConsumer - download...
10:48:41.236 [生产者1] c.TestProducerConsumer - try put message(1)
10:48:41.237 [生产者2] c.TestProducerConsumer - try put message(2)
10:48:41.236 [生产者0] c.TestProducerConsumer - try put message(0)
10:48:41.237 [生产者3] c.TestProducerConsumer - try put message(3)
10:48:41.239 [生产者2] c.MessageQueue - 库存已达上限, wait
10:48:41.240 [生产者1] c.MessageQueue - 库存已达上限, wait
10:48:41.240 [消费者] c.TestProducerConsumer - take message(0): [3] lines
10:48:41.240 [生产者2] c.MessageQueue - 库存已达上限, wait
10:48:41.240 [消费者] c.TestProducerConsumer - take message(3): [3] lines
10:48:41.240 [消费者] c.TestProducerConsumer - take message(1): [3] lines
10:48:41.240 [消费者] c.TestProducerConsumer - take message(2): [3] lines
10:48:41.240 [消费者] c.MessageQueue - 没货了, wait
这小节我们将会介绍park的使用
park基本使用
我们首先来介绍一下park和unpark:
- 它们是 LockSupport 类中的方法,用于控制线程的暂停
我们来介绍一下park的特点(与Wait和notify的区别):
- wait,notify 和 notifyAll 必须配合 Object Monitor 一起使用,而 park,unpark 不必
- park & unpark 是以线程为单位来【阻塞】和【唤醒】线程
- 而 notify 只能随机唤醒一个等待线程,notifyAll 是唤醒所有等待线程,就不那么【精确】
- park & unpark 可以先 unpark,而 wait & notify 不能先 notify
我们给出基本的使用格式:
// 暂停当前线程
LockSupport.park();

// 恢复某个线程的运行
LockSupport.unpark(暂停线程对象)
我们给出一个简单的案例:
/*先park后unpark*/

// 代码
Thread t1 = new Thread(() -> {
    log.debug("start...");
    sleep(1);
    log.debug("park...");
    LockSupport.park();
    log.debug("resume...");
},"t1");
t1.start();
sleep(2);
log.debug("unpark...");
LockSupport.unpark(t1);

// 结果
18:42:52.585 c.TestParkUnpark [t1] - start...
18:42:53.589 c.TestParkUnpark [t1] - park...
18:42:54.583 c.TestParkUnpark [main] - unpark...
18:42:54.583 c.TestParkUnpark [t1] - resume...

/*先unpark后park*/

// 代码
Thread t1 = new Thread(() -> {
    log.debug("start...");
    sleep(2);
    log.debug("park...");
    LockSupport.park();
    log.debug("resume...");
}, "t1");
t1.start();
sleep(1);
log.debug("unpark...");
LockSupport.unpark(t1);

// 结果
18:43:50.765 c.TestParkUnpark [t1] - start...
18:43:51.764 c.TestParkUnpark [main] - unpark...
18:43:52.769 c.TestParkUnpark [t1] - park...
18:43:52.769 c.TestParkUnpark [t1] - resume...

/*结论*/
不管是先park后unpark还是先unpark再park,unpark都起到了解锁的作用!
park底层讲解
我们来讲解一下park的底层思路,这样你就能明白unpark为什么位置随意摆放了!
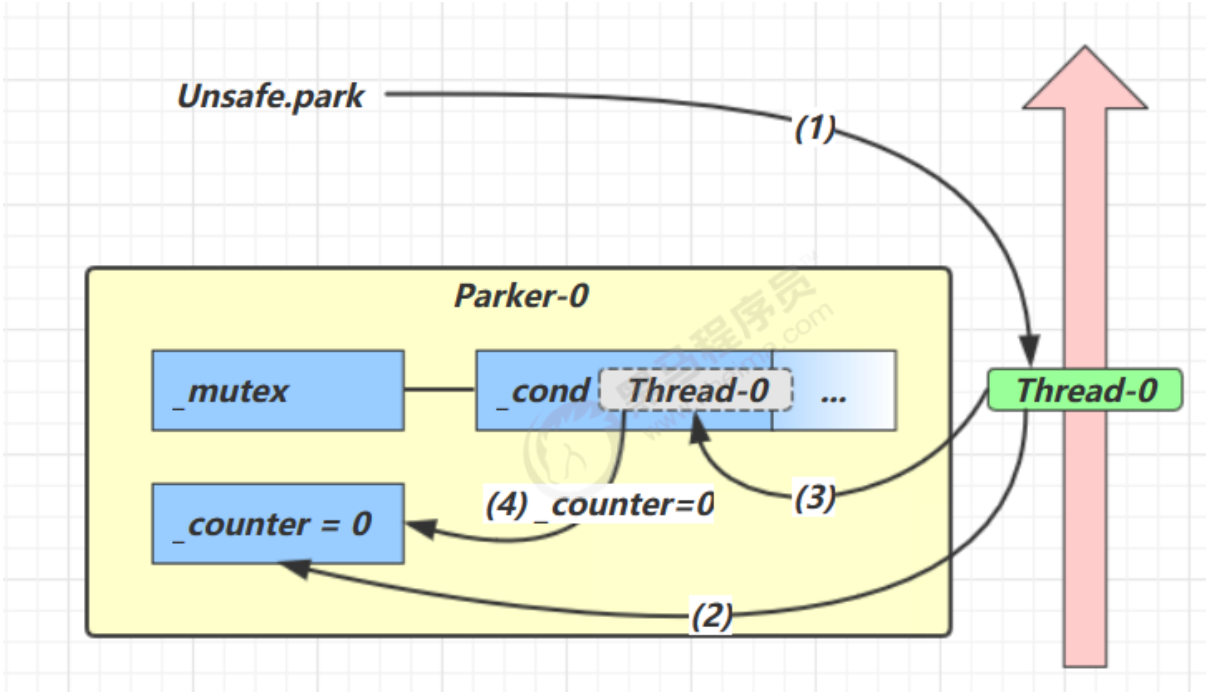
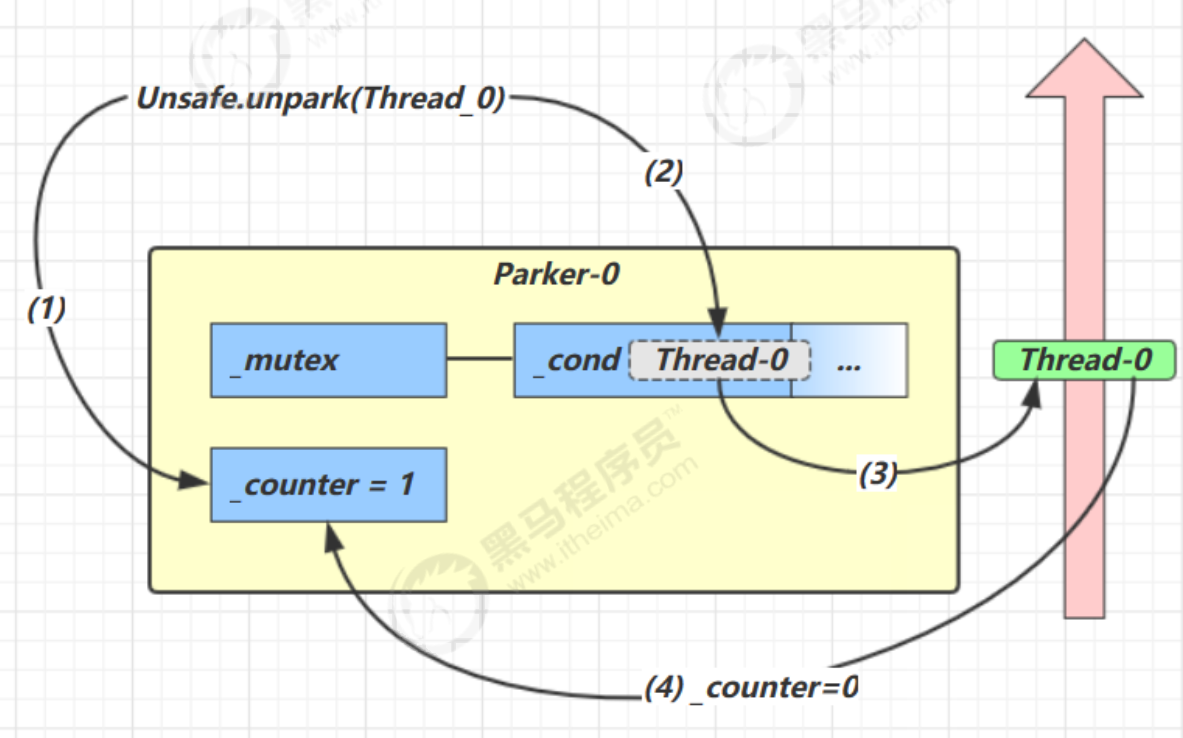
每个线程都有自己的一个 Parker 对象(由C++编写,java中不可见),由三部分组成 _counter , _cond 和 _mutex
我们只需要了解counter即可:
- counter:线程可执行次数,最小为0,最多为1;默认为0
那么我们再来解析park和unpark操作:
- park:检查当前的counter次数,如果为1,就继续执行,并将其--;如果为0,就停止线程操作
- unpark:将counter++;并且检查当前线程状态,若为暂停,则将counter--,同时启动线程;若为运行,直接counter++即可
我们采用一个简单的比喻:
- _counter 就好比背包中 的备用干粮(0 为耗尽,1 为充足)
- 调用 park 就是要看需不需要停下来歇息
- 如果备用干粮耗尽,那么钻进帐篷歇息
- 如果备用干粮充足,那么不需停留,继续前进
- 调用 unpark,就好比令干粮充足
- 如果这时线程还在休息,就唤醒让他继续前进
- 如果这时线程还在运行,那么下次他调用 park 时,仅是消耗掉备用干粮,不需停留继续前进
我们分别给出三种状态展示:
1. 当前线程调用 Unsafe.park() 方法
2. 检查 _counter ,本情况为 0,这时,获得 _mutex 互斥锁
3. 线程进入 _cond 条件变量阻塞
4. 设置 _counter = 0
1. 调用 Unsafe.unpark(Thread_0) 方法,设置 _counter 为 1
2. 唤醒 _cond 条件变量中的 Thread_0
3. Thread_0 恢复运行
4. 设置 _counter 为 0
1. 调用 Unsafe.unpark(Thread_0) 方法,设置 _counter 为 1
2. 当前线程调用 Unsafe.park() 方法
3. 检查 _counter ,本情况为 1,这时线程无需阻塞,继续运行
4. 设置 _counter 为 0

线程状态转换详解
这小节我们将会介绍线程状态转换的所有情况
线程状态转换示意图
我们首先给出总的展示图:
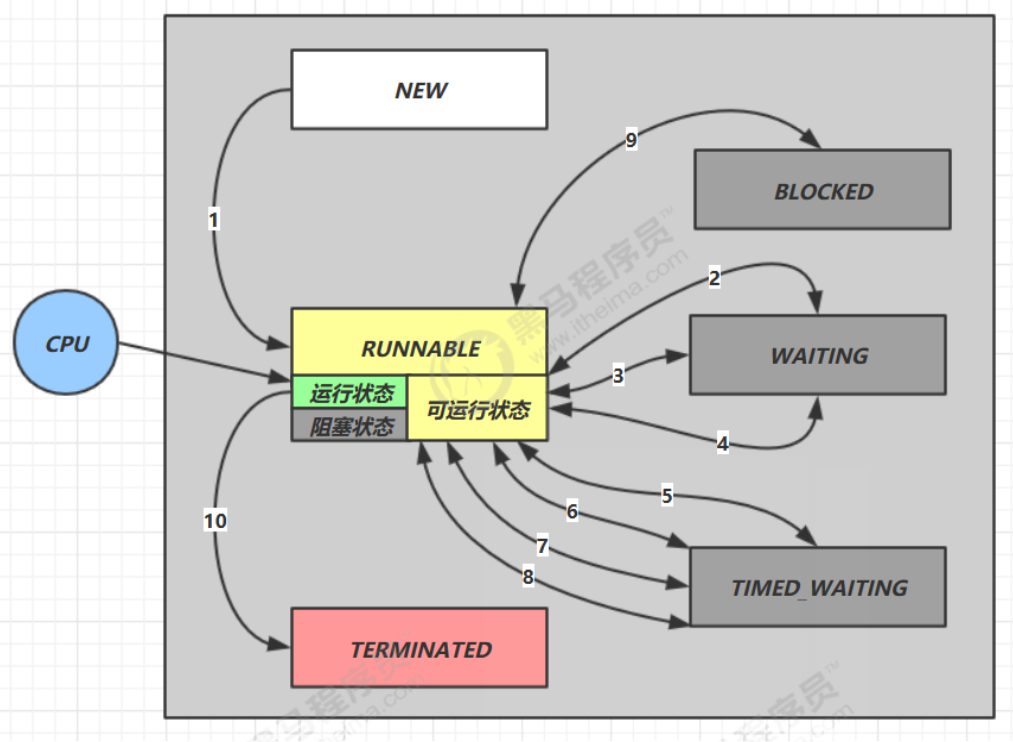
情况 1 NEW --> RUNNABLE
- 当调用
t.start()方法时,由 NEW --> RUNNABLE
情况 2 RUNNABLE <--> WAITING
t 线程用 synchronized(obj) 获取了对象锁后
- 调用
obj.wait()方法时,t 线程从RUNNABLE --> WAITING - 调用
obj.notify(),obj.notifyAll(),t.interrupt()时- 竞争锁成功,t 线程从
WAITING --> RUNNABLE - 竞争锁失败,t 线程从
WAITING --> BLOCKED
- 竞争锁成功,t 线程从
情况 3 RUNNABLE <--> WAITING
- 当前线程调用
t.join()方法时,当前线程从RUNNABLE --> WAITING注意是当前线程在t 线程对象的监视器上等待 - t 线程运行结束,或调用了当前线程的 interrupt() 时,当前线程从
WAITING --> RUNNABLE
情况 4 RUNNABLE <--> WAITING
- 当前线程调用
LockSupport.park()方法会让当前线程从RUNNABLE --> WAITING - 调用
LockSupport.unpark(目标线程) 或调用了线程 的interrupt(),会让目标线程从WAITING --> RUNNABLE
情况 5 RUNNABLE <--> TIMED_WAITING
t 线程用 synchronized(obj) 获取了对象锁后
- 调用
obj.wait(long n)方法时,t 线程从RUNNABLE --> TIMED_WAITING - t 线程等待时间超过了 n 毫秒,或调用
obj.notify(),obj.notifyAll(),t.interrupt()时- 竞争锁成功,t 线程从
TIMED_WAITING --> RUNNABLE - 竞争锁失败,t 线程从
TIMED_WAITING --> BLOCKED
- 竞争锁成功,t 线程从
情况 6 RUNNABLE <--> TIMED_WAITING
- 当前线程调用
t.join(long n)方法时,当前线程从RUNNABLE --> TIMED_WAITING注意是当前线程在t 线程对象的监视器上等待 - 当前线程等待时间超过了 n 毫秒,或t 线程运行结束,或调用了当前线程的
interrupt()时,当前线程从TIMED_WAITING --> RUNNABLE
情况 7 RUNNABLE <--> TIMED_WAITING
- 当前线程调用
Thread.sleep(long n),当前线程从RUNNABLE --> TIMED_WAITING - 当前线程等待时间超过了 n 毫秒,当前线程从
TIMED_WAITING --> RUNNABLE
情况 8 RUNNABLE <--> TIMED_WAITING
- 当前线程调用
LockSupport.parkNanos(long nanos)或LockSupport.parkUntil(long millis)时,当前线程从RUNNABLE --> TIMED_WAITING - 调用
LockSupport.unpark(目标线程) 或调用了线程 的interrupt(),或是等待超时,会让目标线程从TIMED_WAITING--> RUNNABLE
情况 9 RUNNABLE <--> BLOCKED
- t 线程用
synchronized(obj)获取了对象锁时如果竞争失败,从RUNNABLE --> BLOCKED - 持 obj 锁线程的同步代码块执行完毕,会唤醒该对象上所有
BLOCKED的线程重新竞争,如果其中 t 线程竞争 成功,从BLOCKED --> RUNNABLE,其它失败的线程仍然BLOCKED
情况 10 RUNNABLE <--> TERMINATED
- 当前线程所有代码运行完毕,进入
TERMINATED
这小节我们将会介绍多锁操作
多锁操作简述
首先我们来介绍一下多锁操作:
- 我们在实际开发中一把锁并不能解决所有问题,我们需要采用不同的锁来加快速率
我们给出多锁操作的优缺点:
- 好处,是可以增强并发度
- 坏处,如果一个线程需要同时获得多把锁,就容易发生死锁
- 前提:两把锁锁住的两段代码互不相关
我们给出一个简单的多锁操作案例:
/*问题*/
一间大屋子有两个功能:睡觉、学习,互不相干。

现在小南要学习,小女要睡觉,但如果只用一间屋子(一个对象锁)的话,那么并发度很低

解决方法是准备多个房间(多个对象锁)

/*代码*/

// 主代码
BigRoom bigRoom = new BigRoom();

new Thread(() -> {
    bigRoom.compute();
},"小南").start();

new Thread(() -> {
    bigRoom.sleep();
},"小女").start();

// 多锁操作
class BigRoom {

    private final Object studyRoom = new Object();

    private final Object bedRoom = new Object();

    public void sleep() {
        synchronized (bedRoom) {
            log.debug("sleeping 2 小时");
            Sleeper.sleep(2);
        }
    }

    public void study() {
        synchronized (studyRoom) {
            log.debug("study 1 小时");
            Sleeper.sleep(1);
        }
    }
}

/*结果*/
12:15:35.069 [小南] c.BigRoom - study 1 小时
12:15:35.069 [小女] c.BigRoom - sleeping 2 小时
这小节我们将会介绍活跃性
我们首先介绍一下死锁:
- 一个线程需要同时获取多把锁,这时就容易发生死锁
t1 线程获得A对象锁,接下来想获取B对象的锁t2 线程获得B对象锁,接下来想获取A对象的锁
我们给出一个实际案例:
/*代码展示*/

Object A = new Object();

Object B = new Object();

Thread t1 = new Thread(() -> {
    synchronized (A) {
        log.debug("lock A");
        sleep(1);
        synchronized (B) {
            log.debug("lock B");
            log.debug("操作...");
        }
    }
}, "t1");

Thread t2 = new Thread(() -> {
    synchronized (B) {
        log.debug("lock B");
        sleep(0.5);
        synchronized (A) {
            log.debug("lock A");
            log.debug("操作...");
        }
    }
}, "t2");

t1.start();
t2.start();

/*结果*/
12:22:06.962 [t2] c.TestDeadLock - lock B
12:22:06.962 [t1] c.TestDeadLock - lock A
我们再来介绍一下活锁:
- 活锁出现在两个线程互相改变对方的结束条件,最后谁也无法结束
我们给出一个简单案例:
public class TestLiveLock {

    static volatile int count = 10;

    static final Object lock = new Object();

    public static void main(String[] args) {
        new Thread(() -> {
            // 期望减到 0 退出循环
            while (count > 0) {
                sleep(0.2);
                count--;
                log.debug("count: {}", count);
            }
        }, "t1").start();

        new Thread(() -> {
            // 期望超过 20 退出循环
            while (count < 20) {
                sleep(0.2);
                count++;
                log.debug("count: {}", count);
            }
        }, "t2").start();

    }
}
活锁解决方法:
- 错开线程的运行时间,使得一方不能改变另一方的结束条件。
- 将睡眠时间调整为随机数。
我们来简单介绍一下饥饿:
- 一个线程由于优先级太低,始终得不到 CPU 调度执行,也不能够结束,饥饿的情况不易演示,讲读写锁时会涉及饥饿问题
我们这里给出一个简单案例:
- 我们在开始时创建一个优先级为1的操作
- 然后我们不断创建优先级大于1的操作,这些操作导致CPU没有空闲时间
- 最后所有进程都在不断执行,但是由于最开始的操作优先级过低无法调度,导致造成饥饿
ReentrantLock
这小节我们将会介绍ReentrantLock
ReentrantLock简述
我们首先介绍一下ReentrantLock:
- ReentrantLock也是一种锁,级别同synchronized锁相同,但是相比而言更加高级
我们来介绍ReentrantLock的优势:
- 可以设置超时时间
- 可以设置为公平锁
- 支持多个条件变量
- 与 synchronized 一样,都支持可重入
我们来介绍一下基本语法:
// 创造对象
private ReentrantLock reentrantLock;

// 获取锁(上锁)
reentrantLock.lock();

try {
 // 临界区
} finally {
 // 释放锁
 reentrantLock.unlock();
}
我们首先来介绍一下可重入性:
- 可重入是指同一个线程如果首次获得了这把锁,那么因为它是这把锁的拥有者,因此有权利再次获取这把锁
- 如果是不可重入锁,那么第二次获得锁时,自己也会被锁挡住。
我们给出一个简单案例:
/*代码展示*/

static ReentrantLock lock = new ReentrantLock();
public static void main(String[] args) {
    method1();
}
public static void method1() {
    lock.lock();
    try {
        log.debug("execute method1");
        method2();
    } finally {
        lock.unlock();
    }
}
public static void method2() {
    lock.lock();
    try {
        log.debug("execute method2");
        method3();
    } finally {
        lock.unlock();
    }
}
public static void method3() {
    lock.lock();
    try {
        log.debug("execute method3");
    } finally {
        lock.unlock();
    }
}

/*结果展示*/
17:59:11.862 [main] c.TestReentrant - execute method1
17:59:11.865 [main] c.TestReentrant - execute method2
17:59:11.865 [main] c.TestReentrant - execute method3

/*结果分析*/
上述的的调用均由main线程调用
方法中均采用了lock方法上锁,且main一直没有解锁
由于具有可重入性,main可以执行m1,m2,m3的方法,如果没有可重入性,则会导致线程卡死
我们来简单介绍一下可打断性:
- 可打断指的是处于阻塞状态等待锁的线程可以被打断等待。
- 注意
lock.lockInterruptibly()和lock.trylock()方法是可打断的,lock.lock()不是。 - 可打断的意义在于避免得不到锁的线程无限制地等待下去,防止死锁的一种方式。
我们给出一个简单的示例:
/*可打断性代码展示(lock.lockInterruptibly)*/

ReentrantLock lock = new ReentrantLock();

Thread t1 = new Thread(() -> {
    log.debug("启动...");
    try {
        lock.lockInterruptibly();
    } catch (InterruptedException e) {
        e.printStackTrace();
        log.debug("等锁的过程中被打断");
        return;
    }
    try {
        log.debug("获得了锁");
    } finally {
        lock.unlock();
    }
}, "t1");

lock.lock();
log.debug("获得了锁");
t1.start();

try {
    sleep(1);
    t1.interrupt();
    log.debug("执行打断");
} finally {
    lock.unlock();
}

/*可打断性结果展示(lock.lockInterruptibly)*/

18:02:40.520 [main] c.TestInterrupt - 获得了锁
18:02:40.524 [t1] c.TestInterrupt - 启动...
18:02:41.530 [main] c.TestInterrupt - 执行打断
java.lang.InterruptedException
 		at
java.util.concurrent.locks.AbstractQueuedSynchronizer.doAcquireInterruptibly(AbstractQueuedSynchr
onizer.java:898)
 		at
java.util.concurrent.locks.AbstractQueuedSynchronizer.acquireInterruptibly(AbstractQueuedSynchron
izer.java:1222)
 		at java.util.concurrent.locks.ReentrantLock.lockInterruptibly(ReentrantLock.java:335)
 		at cn.itcast.n4.reentrant.TestInterrupt.lambda$main$0(TestInterrupt.java:17)
 		at java.lang.Thread.run(Thread.java:748)
18:02:41.532 [t1] c.TestInterrupt - 等锁的过程中被打断

/*不可打断性代码展示(lock.lock())*/

ReentrantLock lock = new ReentrantLock();

Thread t1 = new Thread(() -> {
    log.debug("启动...");
    try {
        lock.lock();
    } catch (InterruptedException e) {
        e.printStackTrace();
        log.debug("等锁的过程中被打断");
        return;
    }
    try {
        log.debug("获得了锁");
    } finally {
        lock.unlock();
    }
}, "t1");

lock.lock();
log.debug("获得了锁");
t1.start();

try {
    sleep(1);
    t1.interrupt();
    log.debug("执行打断");
} finally {
    lock.unlock();
}

/*不可打断性结果展示(lock.lock)*/

18:06:56.261 [main] c.TestInterrupt - 获得了锁
18:06:56.265 [t1] c.TestInterrupt - 启动...
18:06:57.266 [main] c.TestInterrupt - 执行打断 // 这时 t1 并没有被真正打断, 而是仍继续等待锁
18:06:58.267 [main] c.TestInterrupt - 释放了锁
18:06:58.267 [t1] c.TestInterrupt - 获得了锁
我们的Reentrant Lock可以设置锁超时特性:
// 立刻检测
lock.tryLock()

// 时间内检测
lock.tryLock(1, TimeUnit.SECONDS)
我们给出简单示例:
/*立刻检测代码展示*/

ReentrantLock lock = new ReentrantLock();
Thread t1 = new Thread(() -> {
    log.debug("启动...");
    if (!lock.tryLock()) {
        log.debug("获取立刻失败,返回");
        return;
    }
    try {
        log.debug("获得了锁");
    } finally {
        lock.unlock();
    }
}, "t1");
lock.lock();
log.debug("获得了锁");
t1.start();
try {
    sleep(2);
} finally {
    lock.unlock();
}

/*立刻检测结果*/

18:15:02.918 [main] c.TestTimeout - 获得了锁
18:15:02.921 [t1] c.TestTimeout - 启动...
18:15:02.921 [t1] c.TestTimeout - 获取立刻失败,返回

/*延时检测代码展示*/

ReentrantLock lock = new ReentrantLock();
Thread t1 = new Thread(() -> {
    log.debug("启动...");
    try {
        if (!lock.tryLock(1, TimeUnit.SECONDS)) {
            log.debug("获取等待 1s 后失败,返回");
            return;
        }
    } catch (InterruptedException e) {
        e.printStackTrace();
    }
    try {
        log.debug("获得了锁");
    } finally {
        lock.unlock();
    }
}, "t1");
lock.lock();
log.debug("获得了锁");
t1.start();
try {
    sleep(2);
} finally {
    lock.unlock();
}

/*延时检测结果*/

18:19:40.537 [main] c.TestTimeout - 获得了锁
18:19:40.544 [t1] c.TestTimeout - 启动...
18:19:41.547 [t1] c.TestTimeout - 获取等待 1s 后失败,返回
同时我们会发现这个特性可以用来解决哲学家用餐问题:
/*主代码*/

class Philosopher extends Thread {

    Chopstick left;
    Chopstick right;

    public Philosopher(String name, Chopstick left, Chopstick right) {
        super(name);
        this.left = left;
        this.right = right;
    }

    @Override
    public void run() {
        while (true) {
            // 尝试获得左手筷子(当获取失败会释放当前资源,不会导致资源堵塞)
            if (left.tryLock()) {
                try {
                    // 尝试获得右手筷子(当获取失败会释放当前资源,不会导致资源堵塞)
                    if (right.tryLock()) {
                        try {
                            eat();
                        } finally {
                            right.unlock();
                        }
                    }
                } finally {
                    left.unlock();
                }
            }
        }
    }

    private void eat() {
        log.debug("eating...");
        Sleeper.sleep(1);
    }

}

/*筷子类*/

class Chopstick extends ReentrantLock {

    String name;

    public Chopstick(String name) {
        this.name = name;
    }

    @Override
    public String toString() {
        return "筷子{" + name + '}';
    }
}
我们来简单解释一下公平锁:
- 公平锁会有系统来做出判断,主动按照顺序来控制锁的归属权
默认情况下,公平锁是关闭的,我们如果开启需要手动设置:
// 开启公平锁
ReentrantLock lock = new ReentrantLock(true);
我们需要注意:
- 公平锁一般没有必要,会降低并发度
我们首先来介绍一下条件变量:
-
条件变量相比于休息室,当当前线程无法继续运行时,我们将其设置进条件变量进行暂停操作
-
synchronized 中也有条件变量,就是我们讲原理时那个 waitSet 休息室,当条件不满足时进入 waitSet 等待
我们需要注意的是ReentrantLock的条件变量是优秀的:
- synchronized 是那些不满足条件的线程都在一间休息室等消息
- 而 ReentrantLock 支持多间休息室,有专门等烟的休息室、专门等早餐的休息室、唤醒时也是按休息室来唤 醒
我们来讲一些使用要点:
- await 前需要获得锁
- await 执行后,会释放锁,进入 conditionObject 等待
- await 的线程被唤醒(或打断、或超时)取重新竞争 lock 锁
- 竞争 lock 锁成功后,从 await 后继续执行
我们给出一些简单的使用指南:
// 首先需要一个ReentrantLock对象
public ReentrantLock reentrantLock;

// 我们需要根据对象设置一些条件变量
static Condition waitCigaretteQueue = lock.newCondition();
static Condition waitbreakfastQueue = lock.newCondition();

// 表示这个线程将会在waitCigaretteQueue的条件变量中休息,相当于wait
waitCigaretteQueue.await();

// 这个就表示将waitCigaretteQueue的线程释放一个,相当于notify
waitCigaretteQueue.signal();

// 这个就表示将waitCigaretteQueue的线程释放全部,相当于notifyAll
waitCigaretteQueue.signalAll();
我们给出一个简单实例:
/*代码展示*/

static ReentrantLock lock = new ReentrantLock();
static Condition waitCigaretteQueue = lock.newCondition();
static Condition waitbreakfastQueue = lock.newCondition();
static volatile boolean hasCigrette = false;
static volatile boolean hasBreakfast = false;
public static void main(String[] args) {
    new Thread(() -> {
        try {
            lock.lock();
            while (!hasCigrette) {
                try {
                    waitCigaretteQueue.await();
                } catch (InterruptedException e) {
                    e.printStackTrace();
                }
            }
            log.debug("等到了它的烟");
        } finally {
            lock.unlock();
        }
    }).start();
    new Thread(() -> {
        try {
            lock.lock();
            while (!hasBreakfast) {
                try {
                    waitbreakfastQueue.await();
                } catch (InterruptedException e) {
                    e.printStackTrace();
                }
            }
            log.debug("等到了它的早餐");
        } finally {
            lock.unlock();
        }
    }).start();
    sleep(1);
    sendBreakfast();
    sleep(1);
    sendCigarette();
}
private static void sendCigarette() {
    lock.lock();
    try {
        log.debug("送烟来了");
        hasCigrette = true;
        waitCigaretteQueue.signal();
    } finally {
        lock.unlock();
    }
}
private static void sendBreakfast() {
    lock.lock();
    try {
        log.debug("送早餐来了");
        hasBreakfast = true;
        waitbreakfastQueue.signal();
    } finally {
        lock.unlock();
    }
}

/*结果展示*/

18:52:27.680 [main] c.TestCondition - 送早餐来了
18:52:27.682 [Thread-1] c.TestCondition - 等到了它的早餐
18:52:28.683 [main] c.TestCondition - 送烟来了
18:52:28.683 [Thread-0] c.TestCondition - 等到了它的烟
同步模式之顺序控制
我们在这里介绍一下同步模型下的顺序控制的几种方法
固定运行顺序
我们需要以固定的顺序来执行线程,例如先打印2在打印1
wait notify 版
我们直接给出相关代码:
// 用来同步的对象
static Object obj = new Object();

// t2 运行标记, 代表 t2 是否执行过
static boolean t2runed = false;

public static void main(String[] args) {

    Thread t1 = new Thread(() -> {
        synchronized (obj) {
            // 如果 t2 没有执行过
            while (!t2runed) {
                try {
                    // t1 先等一会
                    obj.wait();
                } catch (InterruptedException e) {
                    e.printStackTrace();
                }
            }
        }
        System.out.println(1);
    });

    Thread t2 = new Thread(() -> {
        System.out.println(2);
        synchronized (obj) {
            // 修改运行标记
            t2runed = true;
            // 通知 obj 上等待的线程(可能有多个,因此需要用 notifyAll)
            obj.notifyAll();
        }
    });

    t1.start();
    t2.start();
}
Park Unpark 版
我们之前的wait/notify相对而言比较麻烦:
- 首先,需要保证先 wait 再 notify,否则 wait 线程永远得不到唤醒。因此使用了『运行标记』来判断该不该 wait
- 第二,如果有些干扰线程错误地 notify 了 wait 线程,条件不满足时还要重新等待,使用了 while 循环来解决 此问题
- 最后,唤醒对象上的 wait 线程需要使用 notifyAll,因为『同步对象』上的等待线程可能不止一个
我们采用park和unpark来进行简化操作:
Thread t1 = new Thread(() -> {
    try { Thread.sleep(1000); } catch (InterruptedException e) { }
    // 当没有『许可』时,当前线程暂停运行;有『许可』时,用掉这个『许可』,当前线程恢复运行
    LockSupport.park();
    System.out.println("1");
});

Thread t2 = new Thread(() -> {
    System.out.println("2");
    // 给线程 t1 发放『许可』(多次连续调用 unpark 只会发放一个『许可』)
    LockSupport.unpark(t1);
});

t1.start();
t2.start();
交替输出顺序
我们需要以固定的交替顺序来执行线程,例如先t1后t2执行五次
wait notify 版
我们直接给出相关代码:
public class TestState {
        SyncWaitNotify syncWaitNotify = new SyncWaitNotify(1, 5);
        new Thread(() -> {
            syncWaitNotify.print(1, 2, "a");
        }).start();
        new Thread(() -> {
            syncWaitNotify.print(2, 3, "b");
        }).start();
        new Thread(() -> {
            syncWaitNotify.print(3, 1, "c");
        }).start();
}

class SyncWaitNotify {
    private int flag;
    private int loopNumber;
    public SyncWaitNotify(int flag, int loopNumber) {
        this.flag = flag;
        this.loopNumber = loopNumber;
    }
    public void print(int waitFlag, int nextFlag, String str) {
        for (int i = 0; i < loopNumber; i++) {
            synchronized (this) {
                while (this.flag != waitFlag) {
                    try {
                        this.wait();
                    } catch (InterruptedException e) {
                        e.printStackTrace();
                    }
                }
                System.out.print(str);
                flag = nextFlag;
                this.notifyAll();
            }
        }
    }
}
Lock 条件变量版
我们直接给出相关代码:
public class TestState {
    AwaitSignal as = new AwaitSignal(5);

    Condition aWaitSet = as.newCondition();
    Condition bWaitSet = as.newCondition();
    Condition cWaitSet = as.newCondition();

    new Thread(() -> {
        as.print("a", aWaitSet, bWaitSet);
    }).start();

    new Thread(() -> {
        as.print("b", bWaitSet, cWaitSet);
    }).start();

    new Thread(() -> {
        as.print("c", cWaitSet, aWaitSet);
    }).start();

    as.start(aWaitSet);
}

class AwaitSignal extends ReentrantLock {
    public void start(Condition first) {
        this.lock();
        try {
            log.debug("start");
            first.signal();
        } finally {
            this.unlock();
        }
    }
    public void print(String str, Condition current, Condition next) {
        for (int i = 0; i < loopNumber; i++) {
            this.lock();
            try {
                current.await();
                log.debug(str);
                next.signal();
            } catch (InterruptedException e) {
                e.printStackTrace();
            } finally {
                this.unlock();
            }
        }
    }
    // 循环次数
    private int loopNumber;
    public AwaitSignal(int loopNumber) {
        this.loopNumber = loopNumber;
    }
}
Park Unpark 版
我们直接给出相关代码:
public class TestState {
    SyncPark syncPark = new SyncPark(5);

    Thread t1 = new Thread(() -> {
        syncPark.print("a");
    });

    Thread t2 = new Thread(() -> {
        syncPark.print("b");
    });

    Thread t3 = new Thread(() -> {
        syncPark.print("c\n");
    });

    syncPark.setThreads(t1, t2, t3);

    syncPark.start();
}

class SyncPark {
    private int loopNumber;
    private Thread[] threads;
    public SyncPark(int loopNumber) {
        this.loopNumber = loopNumber;
    }
    public void setThreads(Thread... threads) {
        this.threads = threads;
    }
    public void print(String str) {
        for (int i = 0; i < loopNumber; i++) {
            LockSupport.park();
            System.out.print(str);
            LockSupport.unpark(nextThread());
        }
    }
    private Thread nextThread() {
        Thread current = Thread.currentThread();
        int index = 0;
        for (int i = 0; i < threads.length; i++) {
            if(threads[i] == current) {
                index = i;
                break;
            }
        }
        if(index < threads.length - 1) {
            return threads[index+1];
        } else {
            return threads[0];
        }
    }
    public void start() {
        for (Thread thread : threads) {
            thread.start();
        }
        LockSupport.unpark(threads[0]);
    }
}
本章我们需要重点掌握的是
- 分析多线程访问共享资源时,哪些代码片段属于临界区
- 使用 synchronized 互斥解决临界区的线程安全问题
- 掌握 synchronized 锁对象语法
- 掌握 synchronzied 加载成员方法和静态方法语法
- 掌握 wait/notify 同步方法
- 使用 lock 互斥解决临界区的线程安全问题
- 掌握 lock 的使用细节:可打断、锁超时、公平锁、条件变量
- 学会分析变量的线程安全性、掌握常见线程安全类的使用
- 线程安全类的方法是原子性的,但方法之间的组合要具体分析。
- 了解线程活跃性问题:死锁、活锁、饥饿。
- 解决死锁、饥饿的方式:ReentranLock
- 应用方面
- 互斥:使用 synchronized 或 Lock 达到共享资源互斥效果
- 同步:使用 wait/notify 或 Lock 的条件变量来达到线程间通信效果
- 原理方面
- monitor、synchronized 、wait/notify 原理
- synchronized 进阶原理
- park & unpark 原理
- 模式方面
- 同步模式之保护性暂停
- 异步模式之生产者消费者
- 同步模式之顺序控制
到这里我们JUC的共享模型之管程就结束了,希望能为你带来帮助~
该文章属于学习内容,具体参考B站黑马程序员满老师的JUC完整教程
这里附上视频链接:04.001-本章内容_哔哩哔哩_bilibili
Recommend
About Joyk
Aggregate valuable and interesting links.
Joyk means Joy of geeK