

云原生之旅 - 7)部署Terrform基础设施代码的自动化利器 Atlantis - WadeXu
source link: https://www.cnblogs.com/wade-xu/p/16839827.html
Go to the source link to view the article. You can view the picture content, updated content and better typesetting reading experience. If the link is broken, please click the button below to view the snapshot at that time.

云原生之旅 - 7)部署Terrform基础设施代码的自动化利器 Atlantis
前面有几篇文章讲述了如何使用Terraform创建资源 (基础设施即代码 Terraform 快速入门, 使用 Terraform 创建 Kubernetes) 以及 Kubernetes时代的包管理工具 Helm 里也讲述了如何用Terraform 安装 Helm Charts,但我们都是在local 执行Terrafrom的,那么有什么办法自动化整个流程呢?并且让这些基础设施的代码也需要走Pull Request Review 评审。
这时候推荐一款利器:开源工具 Atlantis,在代码提交时自动运行terraform plan命令,并将 plan命令的输出添加到pull request的注释中,经过团队伙伴Approve之后,才能执行terraform apply 变更资源,资源apply 成功之后,代码合并到master分支,整个流程遵循GitOps的最佳实践。换句话说就是我们使用了 Atlantis 为 Terraform 实现 GitOps。
Atlantis 在国内的文章很少,本篇文章就给大家详细的介绍下如何使用这款利器。
关键词:Terraform自动化,Atlantis入门,Atlantis示例,Terraform Pull Request Automation, Terraform基础设施自动化
* Kubernetes 我用的GKE 1.22
* 准备一个common github user, 也可以用自己的账号
* 随机生成一个 Webhook Secret
* kubectl 建一个 generic secret 供Atlantis使用
echo -n "xxx" > ghUser
echo -n "xxx" > ghToken
echo -n "xxx" > ghWebhookSecret

kubectl create secret generic atlantis --from-file=ghUser --from-file=ghToken --from-file=ghWebhookSecret
有多种方式,这里使用Kustomize 作为例子,k8s manifests 参考 my repo
修改 statefulset-patch.yaml 环境变量为自己的。
kustomize build sre-mgmt-dev > deploy.yaml

kubectl apply -f deploy.yaml
需要一个Gateway,配置一个 URL 指向 atlantis ClusterIP svc ,我的 Ingress-nginx 配置参考。(Optional) Ingress-Nginx入门参考我下一篇文章 云原生之旅 - 8)云原生时代的网关 Ingress Nginx
也可以把atlantis 置成 LB类型或者NodePort本地测试。
配置Github webhook
很简单,参考文档 https://www.runatlantis.io/docs/configuring-webhooks.html#github-github-enterprise
确保Running 在 Kubernetes 的 Atlantis service account 对所操作的资源有权限,能Terraform init/plan/apply 云端资源。
我这里是GCP Project作为例子。
配置 Atlantis.yaml
简单例子如下
假设Terraform 代码结构如下
Terraform
├── quick_demo1
│   ├── xxx.tf
│   └── xxx.tf
├── quick_demo2
    ├── xxx.tf
    └── xxx.tf
Atlantis yaml 配置
---
version: 3
automerge: true
delete_source_branch_on_merge: true

projects:
- name: project-1
  dir: Terraform/quick_demo1
  terraform_version: 1.2.9
  autoplan:
    when_modified:
    - '**/*.tf'

- name: project-2
  dir: Terraform/quick_demo2
  terraform_version: 1.2.9
  autoplan:
    when_modified:
    - '**/*.tf'
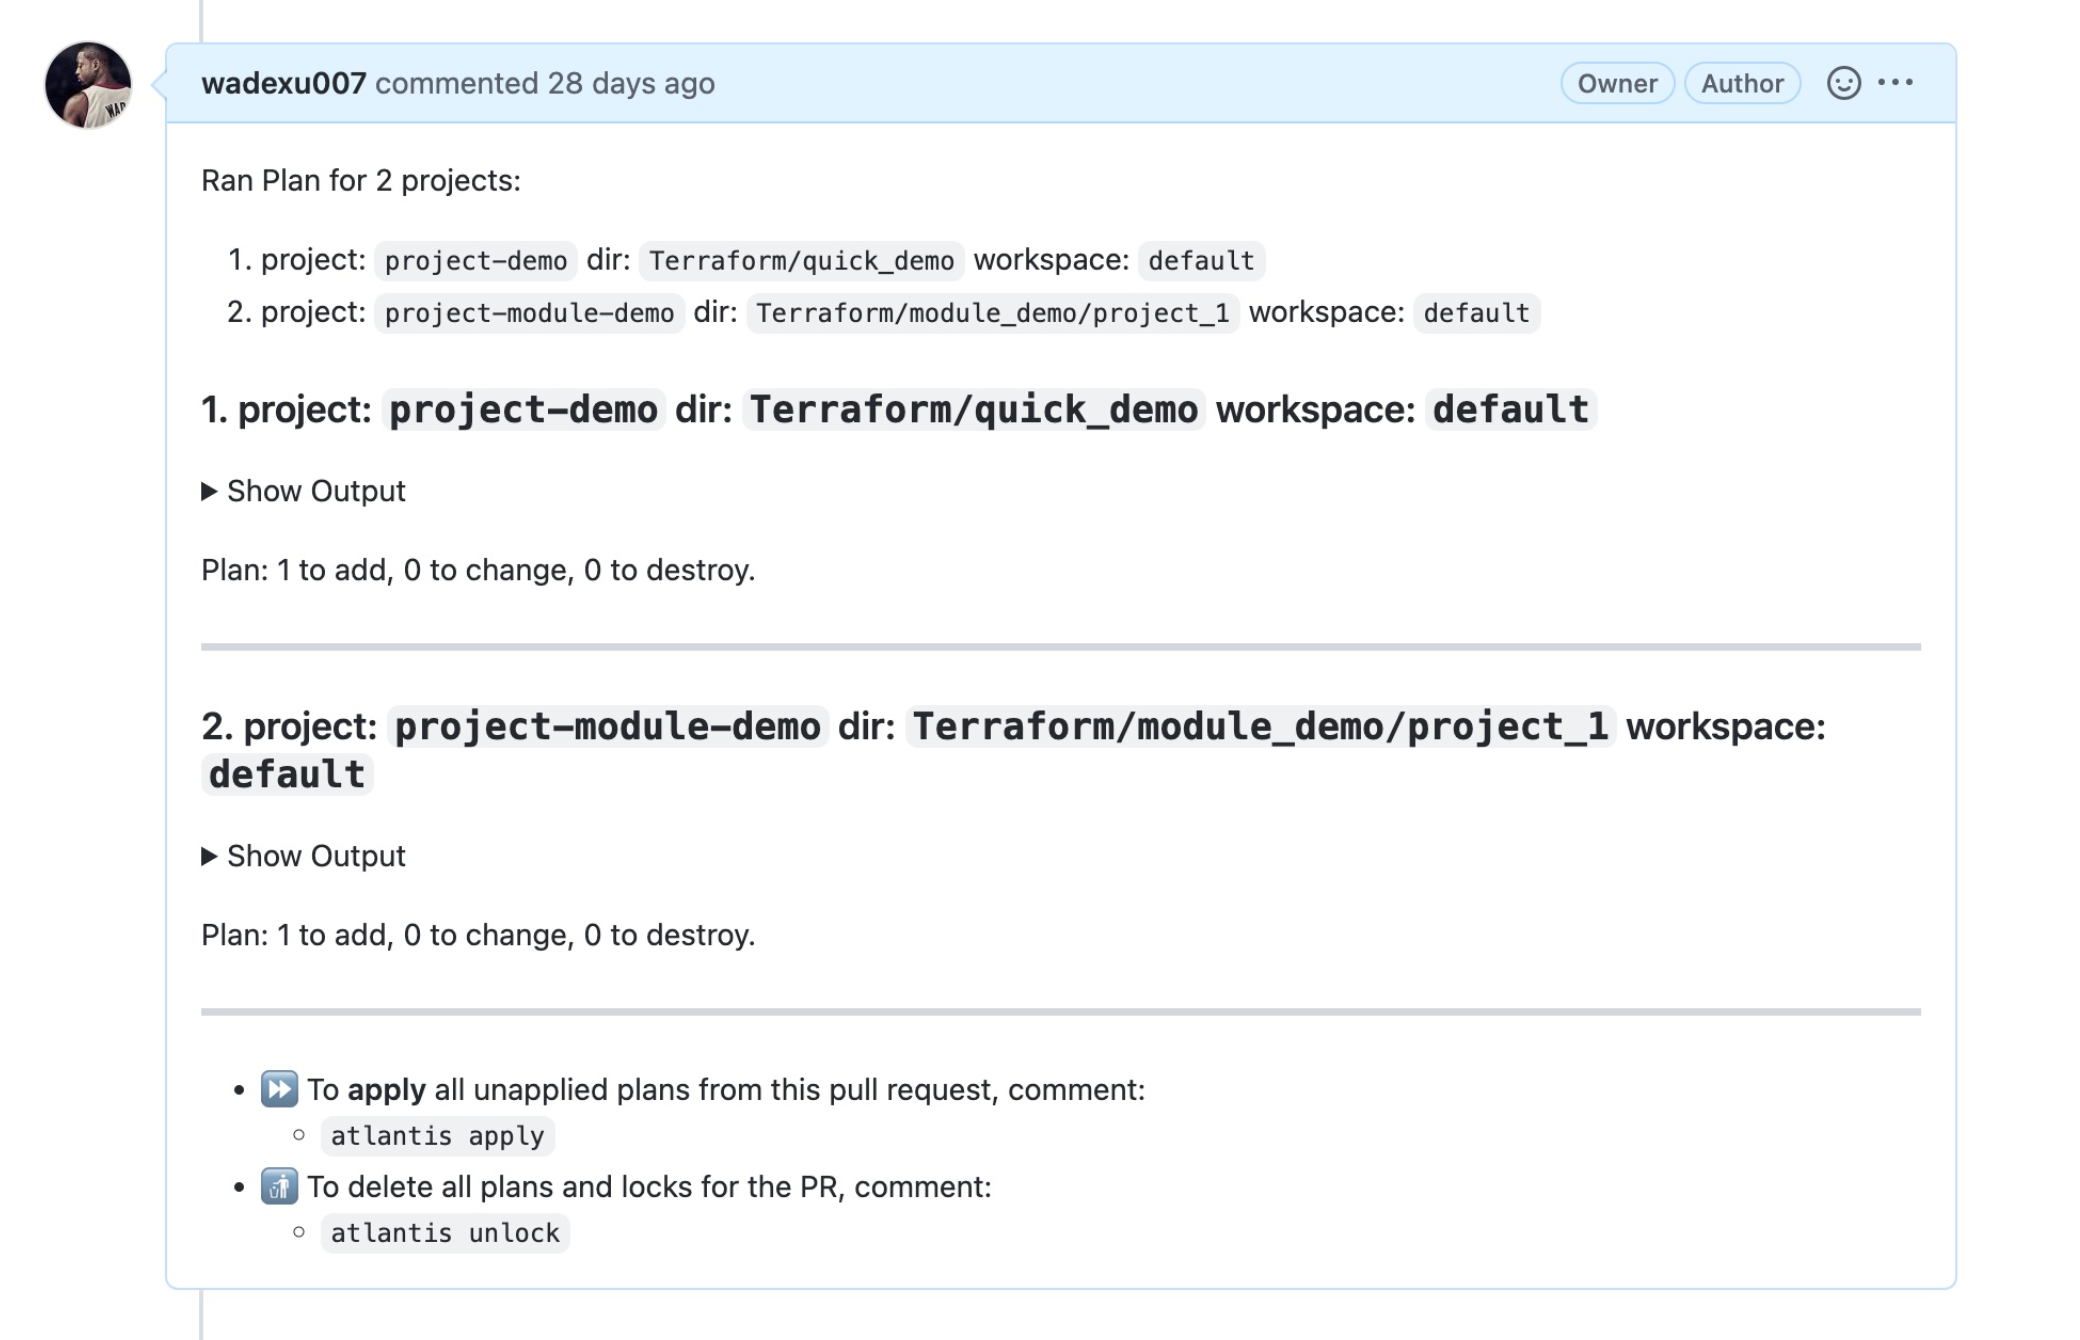
当你修改TF文件 提交PR的时候,Atlantis 会自动使用default workflow 执行 Terraform Plan, plan result 会 comment到 PR里面。
注意: 需要配置 Github -> Settings -> Branches-> Branch protection rule -> Protect matching branches 需要Approve才能merge。
然后有队友Approve了PR, 你才可以执行 Atlantis Apply, 最终资源会被Terraform apply,PR 自动 merged to master。
Workflow breakdown
- Step 1: Open a Pull Request
- Step 2: Atlantis automatically run `terraform plan` and comments back on PR
- Step 3: Someone reviews and approves PR
- Step 4: Comment `atlantis apply`
- Step 5: Atlantis run `terraform apply` and comments back on PR about result
- Step 6: PR merged automatically.
自定义 Workflow
加个Terraform format check, 代码如下:
workflows:
  test:
    plan:
      steps:
      - env:
          name: ENV_NAME
          command: 'echo "dynamic-value-$(date)"'
      - run: terraform${ATLANTIS_TERRAFORM_VERSION} fmt -check=true -write=false -diff=true
      - init
      - plan
    apply:
      steps:
      - apply
需显示申明使用此workflow 如 "workflow: test", 完整 Atlantis yaml 参考


atlantis.yaml
我们的Terraform 代码结构是按环境分成不同的folder,这样做的好处是可以通过github CODEOWNERS文件来针对不同的文件夹(环境)给不同的组权限。比如以下例子给予group-dev权限审批这个folder project-xx/dev下面的Terraform代码变化。
* @sre
Terraform/project-xx/dev/** @group-dev
Terraform/project-xx/prod/** @sre
我们也试过同一套代码利用Terraform的工作区workspace 来区分环境,实践下来不如上面的结构灵活,维护性差。
感谢阅读,如果您觉得本文的内容对您的学习有所帮助,您可以打赏和推荐,您的鼓励是我创作的动力。
Recommend
About Joyk
Aggregate valuable and interesting links.
Joyk means Joy of geeK