

Sharing Data Between Web Components Using Custom Events
source link: https://blog.bitsrc.io/sharing-data-between-web-components-using-custom-events-7eff301625d2
Go to the source link to view the article. You can view the picture content, updated content and better typesetting reading experience. If the link is broken, please click the button below to view the snapshot at that time.

Sharing Data Between Web Components Using Custom Events
Give your Web Components superpowers and let them talk to each other

As a native solution to bundling presentational logic into an “entity”, Web Components work great. They let you create complex HTML elements that can have rich behaviors thanks to the included JavaScript, and that you, as a user, don’t have to worry about.
However, they’re straightforward if you’re thinking about them as isolated elements. A <Button> here, a <Link> there, they work great and do what you want them to do.
But what happens if you want to use these components together, as you would with your React or Vue components (or any framework really)?
What happens when you want your components to interact with each other and share some data between them?
The answer is simple, yet it’s not directly found inside Web Components. And that’s because as a native part of our browser’s JavaScript ecosystem, we can use the rest of that ecosystem to answer the question.
Let’s take a look at what we can implement to solve our need for component interaction.
Enter events
The solution doesn’t have to be complex really. As web developers, we’re already used to dealing with events, so we understand the concept and we can even design our logic around them.
But instead of having a “click” or a “key down” event, here we’ll have our own custom ones that we’ll define from within our components.
But first, let’s take a look at the app I’m going to be building to show you how to use events:
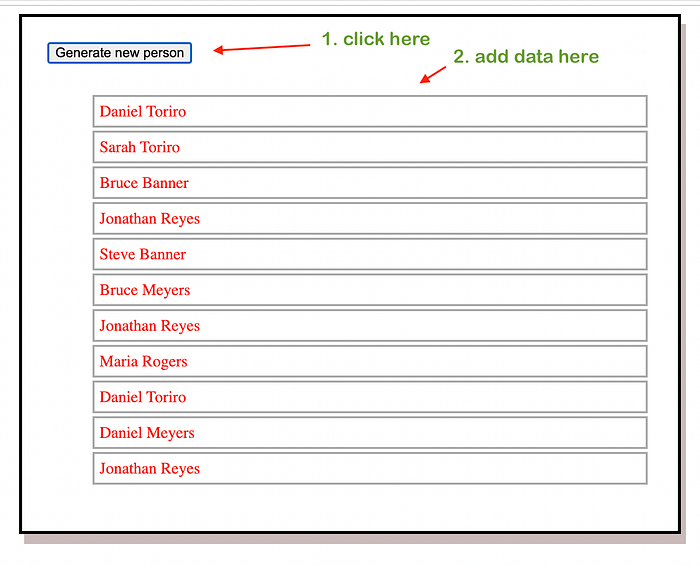
The logic is simple, every time you click on that button, a new random name will be generated, and it will be added to an existing list. The kicker here, is that this is all a single component:
See the <hm-list-random-people> component. It’s part of my “Homemade Web Components” library that I use for these articles.
This component is going to render the button you see on the screenshot above, and the list is going to be contained inside a secondary component. The key here will be connecting the parent component (the hm-list-random-people ) with the child component, and making sure that when a new person is generated, the list gets updated.
Implementing custom events
I’m sure there are many complex ways in which you can implement this, but for our purposes, all we need is a way for components to register themselves as “interested” in a type of event, and a way for them to be notified about them. That’s all.
And for that, a simple class such as this will do the trick:
A simple static class. This class will publish 2 different methods:
subscribeToEvent: which will let components subscribe to whatever event they want to listen for. Theeventparameter is just a string with the name of the event. Andelemis going to be a reference to the component.triggerEvent: which notifies all interested components that their event was fired. Not only that, but it will also pass along the extra data for the event. All interested components will have to have ahandleEventmethod, so they can implement their specific event-handling logic there.
And with that, we have the perfect interface to share data between our components. If you need more complex behavior, you can probably centralize it here as well, but as of now, this will do.
Creating our components
If you’ve never implemented Web Components before, I highly encourage you to play around with them first and then get back here. You can quickly get something working following the MDN documentation.
For this example, I’m going to be using a proto-library I created for a past article about Web Components. I call it “Homemade Web Components” and they’re just VanillaJS Web Components organized in a way that makes it easy to create new ones. Check out the repo and look at their code for more details.
The main thing to understand about this code, is that there is a central CustomComponent class that centralizes all major WC-related logic. Any new WC will extend it and implement their own render method, and their own handleEvent method if they need to.
So for me to be able to generate random people, all I have to do, is write the following code:
As you can see, the render method is nothing too fancy. The code there creates a new button that every time it gets clicked, I call the generateRandomPerson method of the component.
I’m also creating another Web Component inside this one, I’m adding the hm-list-people component that will list my data.
Notice how the generateRandomPerson method doesn’t return anything, instead, it generates the data and triggers the event. That’s all. Is there anyone on the other side listening for that event? What will they do with that data? This component doesn’t need to care about that, so it doesn’t.
Working on the list of people
The second custom Web Component is not that different really. But instead of triggering an event, it will subscribe to it when it’s first instantiated:
Notice the last line on the constructor method, that’s where I’m linking this class (actually, the instance of the class) with the EventHandler static class. After this, whenever some other component triggers the person-added event, the handleEvent method of this class will be called.
And that method will add the new name to an internal list (which is used inside the render method). And it will also call the display method, which is inherited from the CustomComponent class. The true that I’m passing to that method is to force a re-render, otherwise the method will recognize this component was already rendered, and it will ignore the request.
The re-render needs to happen for the component to update itself on screen.
Congrats, you managed to connect two Web Components together through custom events using VanillaJS!
Did you like what you read? Consider subscribe to my FREE newsletter where I share my 2 decades worth of wisdom in the IT industry with everyone. Join “The Rambling of an old developer” !
Why go with events?
I started this article saying that you might find other ways to implement this, and they’re perfectly fine.
Why did I go with events? Because I like them.
They provide a way to break coupling that I really find clean and useful.
Thanks to this implementation, my logic is much easier to extend. Imagine that tomorrow I want to add a second component that uses this same data, I don’t have to change the component that generates it, at all, I can simply add a new component that listens for the same event, and knows how to deal with it.
Could an events-based implementation be more complex? Absolutely! Right now this is the most naive way to implement events that I’ve found, but you can get creative! You can take advantage of the Custom Events API, or even try to manually implement something that can let you stop the propagation of events at a certain point.
The sky’s the limit!
Web Components have been under development for more than a decade, and are just starting to become a standard across all major browsers. If you tried WC in the past and deemed them unworthy of your time, consider giving them another chance, they’ve evolved quite a lot in recent years, and can now do pretty much anything you need.
I hope this article shows you a bit of what you can do with them and convinces you that there is a place for WC in the near future of the web!
Have you tried WC recently? Are you using them for a project? Leave your comments and let’s connect!
Go composable: Build apps faster like Lego
Bit is an open-source tool for building apps in a modular and collaborative way. Go composable to ship faster, more consistently, and easily scale.
Build apps, pages, user-experiences and UIs as standalone components. Use them to compose new apps and experiences faster. Bring any framework and tool into your workflow. Share, reuse, and collaborate to build together.
Help your team with:
Recommend
About Joyk
Aggregate valuable and interesting links.
Joyk means Joy of geeK