
9

Docker实战:使用Dockerfile部署第一个Netcore程序
source link: https://www.51cto.com/article/721704.html
Go to the source link to view the article. You can view the picture content, updated content and better typesetting reading experience. If the link is broken, please click the button below to view the snapshot at that time.

Docker实战:使用Dockerfile部署第一个Netcore程序
作者:郝光明 2022-11-01 07:23:55
因为我是从事了五年C#工作的开发,虽然最近不怎么用C#了,为了后续能用得上,简单整理了一下使用dockerfile来部署一个非常微软最基本的netcore api项目,亲测成功,感兴趣的朋友也可以学习一下。
1、创建一个NetCore API项目
首先创建一个netcore的api项目因为比较简单就不介绍。
2、云服务部署
2.1 首先登录云服务器创建一个测试目录
mkdir /home/netCoreDemo/webapp使用Linux的ftp工具将Visualstudio发布好的部署包上传到云服务器的/home/netCoreDemo/webapp目录中去,
2.2 新建dockerfile文件用来构建镜像。
内容如下:
# 添加基础镜像:docker会从网络下载这个镜像
FROM mcr.microsoft.com/dotnet/aspnet:3.1 AS base
FROM mcr.microsoft.com/dotnet/sdk:3.1 AS build
ENV ASPNETCORE_URLS=http://+:28080  #解决下面报错的问题
#容器中系统的工作空间
WORKDIR /webapp
#拷贝当前文件夹下的文件到容器中系统的工作空间(注意:“.”后面有空格)
COPY . /webapp
#设置Docker容器对外暴露的端口
EXPOSE 28080
#容器中使用 ["dotnet","系统启动的dll"] 来运行应用程序
#使用ENTRYPOINT ["dotnet","系统启动的dll"]
#也可以使用 CMD ["dotnet","系统启动的dll"]推荐使用ENTRYPOINT
ENTRYPOINT ["dotnet", "test.dll"]
2.3 构建镜像
当前dockerfile目录执行构建镜像命令
build -f dockerfile -t xm/netcoredemo:1.0 .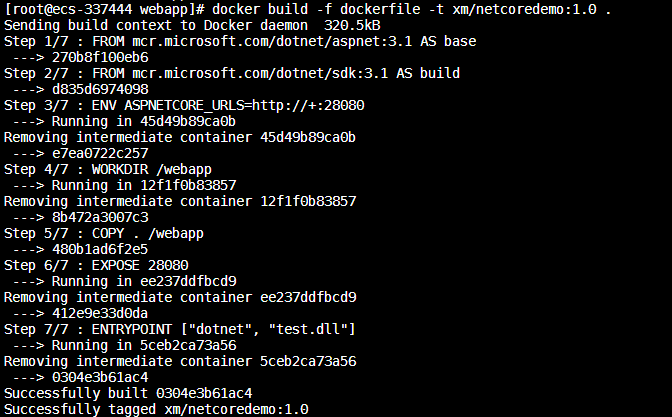
2.4 运行镜像
启动运行镜像,推荐增加 -d参数 后台启动
docker run --name netcoredemo -p 28080:28080 xm/netcoredemo:1.0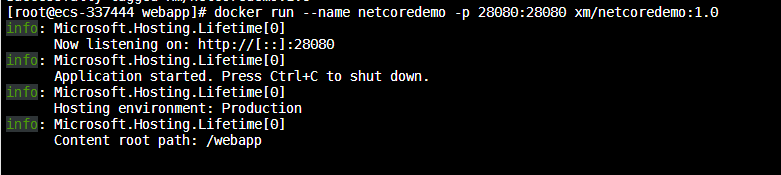
后台启动命令
docker run -d --name netcoredemo -p 28080:28080 xm/netcoredemo:1.0服务器直接测试接口是否正常
curl http://127.0.0.1:28080/weatherforecast
外网访问测试准备条件
确保你的云服务器外网端口开放
防火墙也要注意开放28080端口或者关闭防火墙
浏览器访问:
http://你的公网IP:28080/weatherforecast

删除容器,需要先停止容器,然后再删除
docker stop  netcoredemo #先停止
docker rm netcoredemo #删除容器
docker rmi xm/netcoredemo:1.0部署可能遇到的问题 on the IPv6 loopback interface: 'Cannot assign requested address'
解决方案:
dockerfile增加这一行配置,因为这边只是单纯测试目的,不考虑使用nginx做代理。
ENV ASPNETCORE_URLS=http://+:28080责任编辑:武晓燕
来源:
IT技术分享社区
Recommend
About Joyk
Aggregate valuable and interesting links.
Joyk means Joy of geeK