

Building an advanced backend API from scratch using Node.js; CRUD, authenticatio...
source link: https://medium.com/@nafiu.dev/building-an-advanced-backend-api-from-scratch-using-node-js-f26ed5c7092c
Go to the source link to view the article. You can view the picture content, updated content and better typesetting reading experience. If the link is broken, please click the button below to view the snapshot at that time.

Building an advanced backend API from scratch using Node.js; CRUD, authentication and implementing awesome feathers — part 1
Hi all, welcome to the end to end full stack (backend, frontend) project with artificial intelligence and machine learning and ethical hacking series. In this post we are going to build the backend of the project.
To build the backend API I will be using Express.js which is a Node.js framework specified for building RESTFUL APIs. To make this easier let’s break down the project into parts and write down the steps in point form.
I have already explained the project in the main series post. Check it out.
About the project — (backend)
Our goal is to create a RESTFUL API which has an awesome amount of feathers that a modern application would have. This API is based on blogging. Where users will be able to register and login to their account and create a post, edit a post if they want to improve their post and also delete it if they don’t like it. Also will be able to view and read posts from other users and like the post if you like it and also follow the user if you want to keep it up to date.
What will you learn?
- Structure files and folder
- Configure environment variables
- Connect and create database schemas
- Populate database Schemas using mongoose virtuals
- Create express server
- Create different types of routes
- Handle authentication
- Logic and to implement awesome feathers
- Test an API
Feathers we going to implement:
- authentication — user can login and register
- User will be able to register and then login
- View any user profile — No authentication required
- Verify users login — authentication required - CRUD — users will able to Create, Read, Update and Delete posts
- Users can view all the posts — No authentication required
- Users can filter posts by followers — authentication required
- User can create a new post — authentication required
- User can edit own post — authentication required
- User can delete own post — authentication required - Follow and unfollow targeted user — authentication required
- Link and unlike a post — authentication required
Note: I will improve this API as we go along, More feathers will be added and we will make the whole API more secure by adding more security perimeters and fixing existing bugs once we rich the hacking part of the series. For now the basic goal is to create version 1 of the backend API
Steps we gonna follow:
Install Prerequisites and setup the environment
Before we start we must install the required programs and set up the environment. In this step we need to make sure of 3 things which are: if our runtime environment is installed, an available database and a way to test the API.
As a runtime environment we are going to use Node.js so make sure its installed, you can get it here: https://nodejs.org.
To test the API we will use postmen which you can get from here: https://www.postman.com. also you must have a code editor I'm using vscode which I prefer to use, you can get it from here: https://code.visualstudio.com
And as a database we will use MongoDB atlas so we don’t have to install anything but you need to create an account and get the connection URI
Steps to setup the database:
- Visit ‘https://www.mongodb.com/cloud/atlas/register’ and create a free account. And complete the registration process by selecting the free shared subscription model.
- Step 1 will direct you to Create a Shared Cluster page, here select the AWS > select any region > leave both Cluster Tire and Addition Settings and move to Cluster name which in default is ‘Cluster0’ and I am gonna leave it as it is and create cluster.
- Step 2 will take you to the Quickstart page. Here you must give a username and a password and click create user.
- Next is to set up an IP Access List. here you must leave the ip address of your current device or the IP address of the server that you gonna deploy this api. But for the development purposes I’m gonna keep it all open for me by adding 0.0.0.0 as an Ip address and ‘for all’ as a description, and click finish and close. You must change it when you deploy the API else others will have access to your database
- Step 4 will take you to Database Deployments page, here you can see Cluster0 click connect > connect new application, This will show you an URI which we will use to connect the database with the API. now replace the password and username with the password and username you created in step 3. Example of URI:
mongodb+srv://<username>:<password>@cluster0.h8milvy.mongodb.net/?retryWrites=true&w=majority
Well, for now let’s keep it somewhere safe, we will get back to it when we start building the API
Create a node project and Install required packages
Let’s open our terminal and create a folder named ‘backend’ and create a new node project inside that folder which will initialize the package.json file.
mkdir backend
cd backend
npm init -y
Before we explore and add additional scripts in the package.json file lets install all the required packages and understand which role it plays in our API
npm i express mongoose dotenv cors bcryptjs morgan jsonwebtoken
express — To manage the server and routes.
mongoose — To connect with MongoDB
dotenv — To load environment variables from the .env file
cors — To allow api access from different domains
bcryptjs — To hash passwords
morgan — To log HTTP requests and errors
jsonwebtoken — for authentication

screenshot — package.json
Here we can see all the packages we installed under dependencies and also you can see I have added two scripts and one of them is using nodemon but here you can’t see nodemon installed this is because I have installed it globally so you either install it globally or as a dev-dependency.
npm i nodemon -D
//Or
npm install -g nodemon
Nodemon — by using nodemon we don’t have to restart our server every time it fails it will run automatically.
Create and Structure folder and files
Well explaining each file at this point is going to be useless so at this point let me just show you the folder and file structure and please create the files as it is and I’m sure at this point you already have package.json, package-lock.json and the folder node_modules.
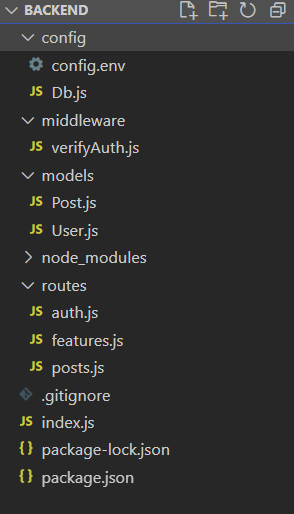
screenshot — files structure
Create all the folders and files accordingly.
Well, till now we have installed all the required packages and created the files we need to get started.
Let’s create and run the server and connect to the database
Hope you have already created the index.js file in the root directory if not
please create it now. Inside this file we will import express, dotenv, cors and morgan and set up the middlewares, routes and also will make the connection with the database. To make things easy to understand we will make the database connection in another file (Db.js) and will import the file to the server. This file is located in the config folder. Also before we proceed we must set up the environment variables which are also located in the config folder.
config/config.env
MONGO_URI=mongodb+srv://<username>:<password>@cluster0.h8milvy.mongodb.net/?retryWrites=true&w=majorityJWT_SECTET=sdfsnisdnjsnfjsdnfjsdnfjk
PORT=5000
Make sure you use your database connection URI as the MONG_URI
config/Db.js
const mongoose = require('mongoose')
mongoose.connect(process.env.MONGO_URI)
 .then(() => console.log('DATABASE CONNECTED'))
 .catch(err => {
  console.log('DATABASE CONNECTION ERROR', err)
  process.exit(1)
})
Will use this file to connect the database.
Open index.js file
This is how your index.js file will look like, imported packages and created the express server as an app, configured all the middleware's and connected to the database.
Note: remember this is the completed version (v1) of index.js file therefore if you try to run the server as this is you will get an error. Because of the routes, remember we haven’t created any routes yet. So if you want to run the server now, you can comment the 3 routes lines and you can run the server and keep uncommenting the appropriate route as we go along
index.js
const express = require('express')
const app = express()
const dotenv = require('dotenv')
const cors = require('cors')
const morgan = require('morgan')// MIDDLEWEARES
dotenv.config({ path: './config/config.env' })
require('./config/Db')
app.use(cors())
app.use(express.json())
app.use(morgan('dev')) // for logging// ROUTES
app.use('/api/v1', require('./routes/posts'))
app.use('/api/v1', require('./routes/auth'))
app.use('/api/v1', require('./routes/features'))
PORT  = process.env.PORT || 5000
app.listen(PORT, console.log(`SERVER RUNNING ON PORT: ${PORT}`))
Use the scripts to run the server.
npm run dev
The server will run on port 5000, make sure you don’t have anything running on port 5000.
Note: In the routes you can see /api/v1 which means that is the first two directories before whatever route directory we give in the routes in the routes folder. Example: the login route will be: http://127.0.0.1:5000/api/v1/loginsince we are using port number 5000.
Authentication
Open the User.js file in the models folder. Here we are going to create a mongoose Schema for our User models and also we will define some other function to format the current date as we want and also to populate posts which will allow us to get all posts posted by the user while we get the user profile which will make things easy in the long run.
models/User.js
const mongoose = require('mongoose')let UserSchema = new mongoose.Schema({
 name:{
  type: String,
  required: true,
  index:true
 },
 email: {
  type: String,
  required: true,
  unique: true,
  match: [/^\w+([\.-]?\w+)*@\w+([\.-]?\w+)*(\.\w{2,3})+$/]
 },
 password:{
  type: String,
  required: true,
  select: false
 },
 following: {
  type: Array
 },
 followers: {
  type: Array
 },
 created_at:{
  type: String,
 }
}, {
 toJSON: { virtuals: true },
 toObject: { virtuals: true }
})
UserSchema.pre('save', async function (next) {
 let date_info = new Date
 let date_into = date_info.getDate() + '/' + (date_info.getMonth()+1) + '/' +  date_info.getFullYear()
 this.created_at = await date_into
})UserSchema.virtual('posts', {
 ref: 'post',
 localField: '_id',
 foreignField: 'UserId',
 justOne: false
})
module.exports = mongoose.model('user', UserSchema)
Now open the auth.js file if you don’t have it create the auth.js file in the routes folder. Here we are going to create three routes. Register, Login and user routes. We all know what both register and login routes does, so let me tell you about the user route. User route is used to verify the logged in user.
Also we need to protect some routes to make sure only logged in users can use the route, to make this happen we will create a middleware to check the request headers for the access token. Now create verifyAuth.js in the middleware folder, we will get back to this after creating the register and login route.
Note: remember to uncomment the auth route from index.js file if you had it commented
Let’s get to code, first import the required libraries such as jsonwebtoken, bcryptjs, express and configure the router using express and export it. Here you will see I have imported the User model as User and also the verifyAuth.js file as verifyAuth. If you run the server now you will get an error that is because right now there is nothing in the verifyAuth.js file so to avoid the error lets code that file and get back to Auth.js
middleware/verifyAuth.js
Here we are looking for the value ‘x-token’ in the header. Which will hold the access token generated by JWT and verify the token using jwt.verify().
const jwt = require('jsonwebtoken')module.exports = (req, res,next) => {
 const token = req.header('x-token')
 if(!token){
  return res.status(401).json({
   msg: 'no Token, access denied',
   success: false
  })
 }
try {
  const decoded  = jwt.verify(token, process.env.JWT_SECTET)
  req.user = decoded
  next()
 } catch (err) {
  res.status(400).json({
   msg: 'no Token, access denied',
   success: false
  })
 }
}
routes/auth.js
Here we have to create 3 routes. Let me explain what each route does
/register: This a POST request which will have 3 input fields: name, email, password and these 3 fields are required. Then we will check if the user already exists or not by using the input email. How? if the email already exists in the database then the user already exists and if not then we will consider as a new user and create the new user and before saving the user in the user in the database we will encrypt the password using bcrypt and then we will save the user and return the jWT token which is required for authentication.
/login: is also a POST request which will expect 2 input fields: email and password. Next will check if the user exists or not and if not we will return a message saying invalid credentials and if does we will compare the password using bcrypt and if successful it will return the jWT token which is required for authentication.
/user: this is a GET request which is protected by using the middleware we created earlier. This request will find the current logged in user by using the access token and return the user’s information/profile.
const router = require('express').Router()
const bcrypt = require('bcryptjs')
const jwt = require('jsonwebtoken')const User = require('../models/User')
const verifyAuth = require('../middleware/verifyAuth')// POST | /api/v1/register | public | register user
router.post('/register', async (req, res) => {
    try {
        const {name, email, password} = req.body


        if(!name || !email || !password) {
            res.status(400).json({
                msg: 'please fill the required fields',
                success: false
            })
        }

let user = await User.findOne({email})
        if(user){
            return res.status(400).json({
                msg: 'user already exists',
                success: false
            })
        }


        user = new User({
            name,
            email,
            password
        })

const slat = await bcrypt.genSalt(10)
        user.password = await bcrypt.hash(password, slat)
        await user.save()


        // paylaod || {id: user._id}
        jwt.sign({id: user._id}, process.env.JWT_SECTET, {
            expiresIn: 36000
        }, (err, token) => {
            if(err) throw err
            res.status(200).json({
                token
            })
        })} catch (err) {
        console.log(err)
        res.status(400).json({success: false})
    }
})// POST api/v1/login | public | login exixting user
router.post('/login', async (req, res) => {
    try {
        const {email, password} = req.body
        if( !email || !password){
            return res.status(400).json({
                msg: 'invalid credentials',
                success: false
            })
        }let user = await User.findOne({email}).select('+password')
        if(!user ) return res.status(400).json({
            msg: 'invalid credentials',
            success: false
        })const isMatch = await bcrypt.compare(password, user.password)
        if(!isMatch ) return res.status(400).json({
            msg: 'invalid credentials',
            success: false
        })jwt.sign({id: user._id}, process.env.JWT_SECTET, {
            expiresIn: 36000
        }, (err, token) => {
            if(err) throw err
            res.status(200).json({
                token
            })
        })} catch (err) {
        console.log(err)
        res.status(400).json({success: false})
    }
})// GET api/v1/user | private | get logged in user for the process of auth
router.get('/user', verifyAuth,  async (req, res) => {
    try {
        const user = await User.findById(req.user.id).populate('posts')
        res.status(200).json({
            user,
            success: true
        })
    } catch (err) {
        console.error(err.message)
        res.status(500).json({ msg:'SERVER ERROR'})
    }
})module.exports = router
Now that we have successfully created the authentication. It’s time to create posts.
Posts
We will start by creating the data Schema for posts. Open the Post.js in the models folder and code the schema here also we will create function to format date and to populate the user that created the post
models/Post.js
const mongoose = require('mongoose')let PostSchema = new mongoose.Schema({
    UserId: {
        type: mongoose.Schema.Types.ObjectId,
        ref: 'user',
        required: true
    },
    post_image: {
        type: String,
    },
    description: {
        type: String,
    },
    title: {
        type: String,
    },
    likes: {
        type: Array
    },
    post_emotion: {
        // this will be filled by AI/ML later
        type: String,
        default: null
    },
    created_at:{
        type: String,
    }
}, {
    toJSON: { virtuals: true },
    toObject: { virtuals: true }
})PostSchema.pre('save', async function (next) {
    let date_info = new Date
    let date_into = date_info.getDate() + '/' + (date_info.getMonth()+1) + '/' +  date_info.getFullYear()
    this.created_at = await date_into
})PostSchema.virtual('posted_by', {
    ref: 'user',
    localField: 'UserId',
    foreignField: '_id',
    justOne: true
})module.exports = mongoose.model('post', PostSchema)
Now open the posts.js file if you don’t have it, create the posts.js file in the routes folder. Here we are going to create six routes. Before I start listing and explaining the routes, let’s import the required libraries and files, import express and create the router and export it. We also have to import two models Post and User. The User model will be used to filter posts by the following users and let’s not forget the verifyAuth since we need to protect some routes here.
Note: uncomment the post route from index.js if you have it commented
/posts: this is a GET request in order to get all the posts from the database
/followers-posts: GET request to get posts from the only the users that you follow you must be logged in to make the request
/post/:id: GET request will get a single post by id
/add-new: POST request which will allow the logged in user to create a new post. Input fields are the title of the post the post (description) and an image url to show the image (image_url) in the database the image will be saved as post_image
/edit-post/:id: PUT request will allow logged in user to edit users own posted post. Function will ensure that users can only edit their own posts and the input fields are the same as creating a new post
/delete-post/:id: DELETE request which will allow logged in users to delete their own post by id. The function will ensure the post owner by checking if the post belongs to the logged in user or not.
routes/posts.js
const router = require('express').Router()// Models
const Post = require('../models/Post')
const User = require('../models/User')// MIDDLEWARE
const verifyAuth = require('../middleware/verifyAuth')// GET | /api/v1/posts | public | get all posts
router.get('/posts', async (req, res) => {
    try {
        const posts = await Post.find()
        return res.status(200).json({
            data: posts,
            success: true
        })
    } catch (error) {
        console.log(err)
        res.status(400).json({success: false})
    }
})// GET | /api/v1/followers-posts | private | get all posts from the users that logged in user follow
router.get('/followers-posts', verifyAuth, async (req, res) => {try {
        const get_user = await User.findById(req.user.id)const posts  = await Post.find({UserId: get_user.following}).populate('posted_by')

res.status(200).json({
            data: posts,
            success: true
        })
    } catch (err) {
        console.log(err)
        res.status(400).json({success: false})
    }
})// GET | /api/v1/post/:id | public | get a single post by id
router.get('/post/:id', async (req, res) => {
    try {
        const post  = await Post.findById(req.params.id)if(!post){
            res.status(400).json({success: false})
        }

res.status(200).json({
            data: post,
            success: true
        })} catch (err) {
        console.log(err)
        res.status(400).json({success: false})
    }
})// POST | /api/v1/add-new| private | add a new post
router.post('/add-new', verifyAuth, async (req, res) => {
    try {const newPost = await Post.create({
            UserId: req.user.id,
            title: req.body.title,
            description: req.body.description,
            post_image: req.body.image_url,
        })res.status(200).json({
            data: newPost,
            success: true
        })
    } catch (err) {
        console.log(err)
        res.status(400).json({success: false})
    }
})// PUT | /api/v1/post/edit-post/:id| Private | Edit a post
router.put('/edit-post/:id', verifyAuth, async (req, res) =>{
    try {
        const post = await Post.findById(req.params.id)
        if (!post) {
            return res.status(400).json({
                success: false
            })
        }if(!post.UserId == req.user.id){
            return res.status(400).json({
                success: false
            })
        }else{
            await post.update({
                UserId: req.user.id,
                title: req.body.title,
                description: req.body.description,
                post_image: req.body.image_url,
            })
        }res.status(200).json({
            success: true,
            data: {}
        })
    } catch (err) {
        console.log(err)
        res.status(400).json({success: false})
    }
})// DELETE | /api/v1/post/delete-post/:id | Private | delete a post
router.delete('/delete-post/:id',verifyAuth, async (req, res) =>{
    try {
        const post = await Post.findById(req.params.id)
        if (!post) {
            return res.status(400).json({
                success: false
            })
        }

if(!post.UserId == req.user.id){
            return res.status(400).json({
                success: false
            })
        }else{
            await post.delete()
        }

res.status(200).json({
            success: true,
            data: {}
        })
    } catch (err) {
        console.log(err)
        res.status(400).json({success: false})
    }
})module.exports = router
Now that we have created both posts and the authentication, let’s add some additional feathers to the API.
Feathers
Note: uncomment the post route from index.js if you have it commented
well, think about this.. Lets allow users to follow each other and keep them up to date also lets allow them to like a post. This is going to be great for data analysis in the last stages of this series when we start implementing data models to improve the API. Without further ado let’s get into it.
Open the features.js file in the routes folder and import the required resources as before. Here we are going to create 5 routes which are to get the user profile by id, to like and unlike a post and also to follow and unfollow a user. Allow me to explain how each one of his works.
/like/:id: GET request which will add a like to a post by Id. how this works is by pushing the id of the user that sent the request to the likes array of that post, we created that while creating the post data model.
/unlike/:id: GET request which unlike a post by id. This route will remove the users id in the likes array of that post
/follow/:id: GET request. This route will allow the current logged in user to follow another user. How this works is by adding the current users id to the followers array of the targeted user and targeted users id to the following array of the logged in user.
/unfollow/:id: GET request used to unfollow a followed user. This works the opposite way of the follow request
/profile/:id: GET request which will get a user by id. No authentication is required for this route
Security alert: both liking and following feathers has a bug where you can add as much as likes you want and also can follow 1 user more then once. We can fix this by an easy if else statement but I’m going to leave it that way, because I’m planning big on the series, might end up introducing a level of hacking as well
routes/feathers.js
const router = require('express').Router()const Post = require('../models/Post')
const User = require('../models/User')
const verifyAuth = require('../middleware/verifyAuth')// GET | /api/v1/post/like/:id| Private | Like a post
router.get('/like/:id', verifyAuth, async (req, res) => {
    try {
        const liked = await Post.updateOne(
            {
                _id: req.params.id
            },
            {
                $push: {
                    likes:  req.user.id
                }
            }
            )


            if(!liked){
                return res.status(401).json({success: false})
            }

res.status(200).json({success: true})

} catch (err) {
            console.log(err)
            res.status(400).json({success: false})
        }
    })

// GET | /api/v1/post/unlike/:id| Private | unlike a post
router.get('/unlike/:id', verifyAuth, async (req, res) => {
    try {
        const liked = await Post.updateOne(
            {
                _id: req.params.id
            },
            {
                $pull: {
                    likes:  req.user.id
                }
            }
            )

if(!liked){
                return res.status(401).json({success: false})
            }


            res.status(200).json({success: true})

} catch (err) {
            console.log(err)
            res.status(400).json({success: false})
        }
    })

// GET | /api/v1/post/follow/:id| Private | follow a User
router.get('/follow/:id', verifyAuth, async (req, res) => {
    try {
        const followed = await User.updateOne(
            {
                _id: req.user.id
            },
            {
                $push: {
                    following:  req.params.id
                }
            }
        )

const followersAdded = await User.updateOne(
            {
                _id: req.params.id
            },
            {
                $push: {
                    followers:  req.user.id
                }
            }

)

if(!followed || !followersAdded){
            return res.status(401).json({success: false})
        }

res.status(200).json({success: true})
    } catch (err) {
        console.log(err)
        res.status(400).json({success: false})
    }
})


// GET | /api/v1/post/unfollow/:id| Private | unfollow a User
router.get('/unfollow/:id', verifyAuth, async (req, res) => {
    try {
        const followFixed = await User.updateOne(
            {
                _id: req.user.id
            },
            {
                $pull: {
                    following:  req.params.id
                }
            }
        )

const followersFixed = await User.updateOne(
            {
                _id: req.params.id
            },
            {
                $pull: {
                    followers:  req.user.id
                }
            })if(!followFixed || !followersFixed){
            return res.status(401).json({success: false})
        }res.status(200).json({success: true})
    } catch (err) {
        console.log(err)
        res.status(400).json({success: false})
    }
})// GET | /api/v1/post/profile/:id| public | get a users profile by iD
router.get('/profile/:id', async (req, res) => {
    try {
        const user = await User.findById(req.params.id).populate('posts')

if(!user){
            return res.status(401).json({success: false})
        }
        res.status(200).json({
            data: user,
            success: true
        })
    } catch (err) {
        console.log(err)
        res.status(400).json({success: false})
    }
})module.exports = router
Let’s test the API
To test the API we will use a program called postmen if you don’t have it make sure to install it and also we won’t be testing for checking if all the routes works or not since it’s gonna only make this post longer and longer.
Make sure to run the server, cd into the backend folder and use the command ‘npm run dev’ this will run the development server and also open the postmen app
Here we are only going to test 4 routes if you want to try all feel free to do it We will try /register, /user, /add-new and /posts.
/register
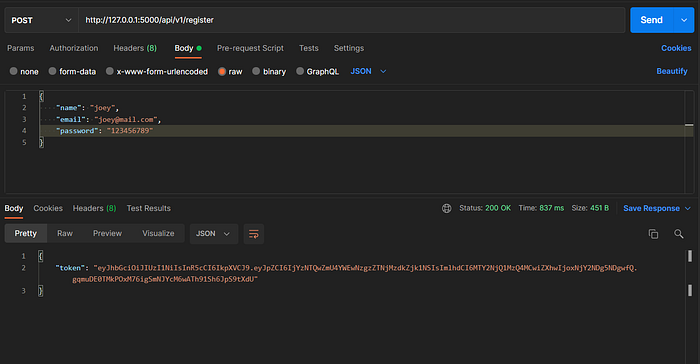
screenshot — test register route
We successfully got the access token, now let’s verify the user
/user

screenshot — test user
We verified the user as well by using the access token. Lets create a post
/add-new

screenshot — added new post
New we have successfully created a post let see if we can get the post by the /posts route.
/posts

screenshot — get all posts
Yes, we got the posts as well
Try testing all the routes
Conclusion
Well this is the end of building this version of the backend API hope you enjoyed it. Next hopefully we will be building the front end of the application. But before that I would like to know if you guys want to add more feathers which will help the project series.
Trying to make things simple here but I personally think adding more feathers will be great.
example :
- Add comments (will be great for ML/AI)
- Allow image upload from local (post, image and user profile)
And more, let me know and don’t forget to follow
link to the github repo: https://github.com/nafiu-dev/full_stack_app_with_AI-ML_models
You can connect with me here:
https://www.instagram.com/nafiu.dev
Linkedin: https://www.linkedin.com/in/nafiu-nizar-93a16720b
Posts related to series:
My other posts
Recommend
About Joyk
Aggregate valuable and interesting links.
Joyk means Joy of geeK