

optee学习篇(1) 环境&调试
source link: https://o0xmuhe.github.io/2022/08/24/optee%E5%AD%A6%E4%B9%A0/
Go to the source link to view the article. You can view the picture content, updated content and better typesetting reading experience. If the link is broken, please click the button below to view the snapshot at that time.

optee学习篇(1) 环境&调试
本篇主要是环境配置、调试、流程梳理
qemu_v8环境搭建
https://optee.readthedocs.io/en/latest/building/prerequisites.html
$ repo init -u https://github.com/OP-TEE/manifest.git -m qemu_v8.xml
$ repo sync -c -j8
$ cd build
$ make toolchains
$ make run
同步下来的仓库如下

运行一下试试看:
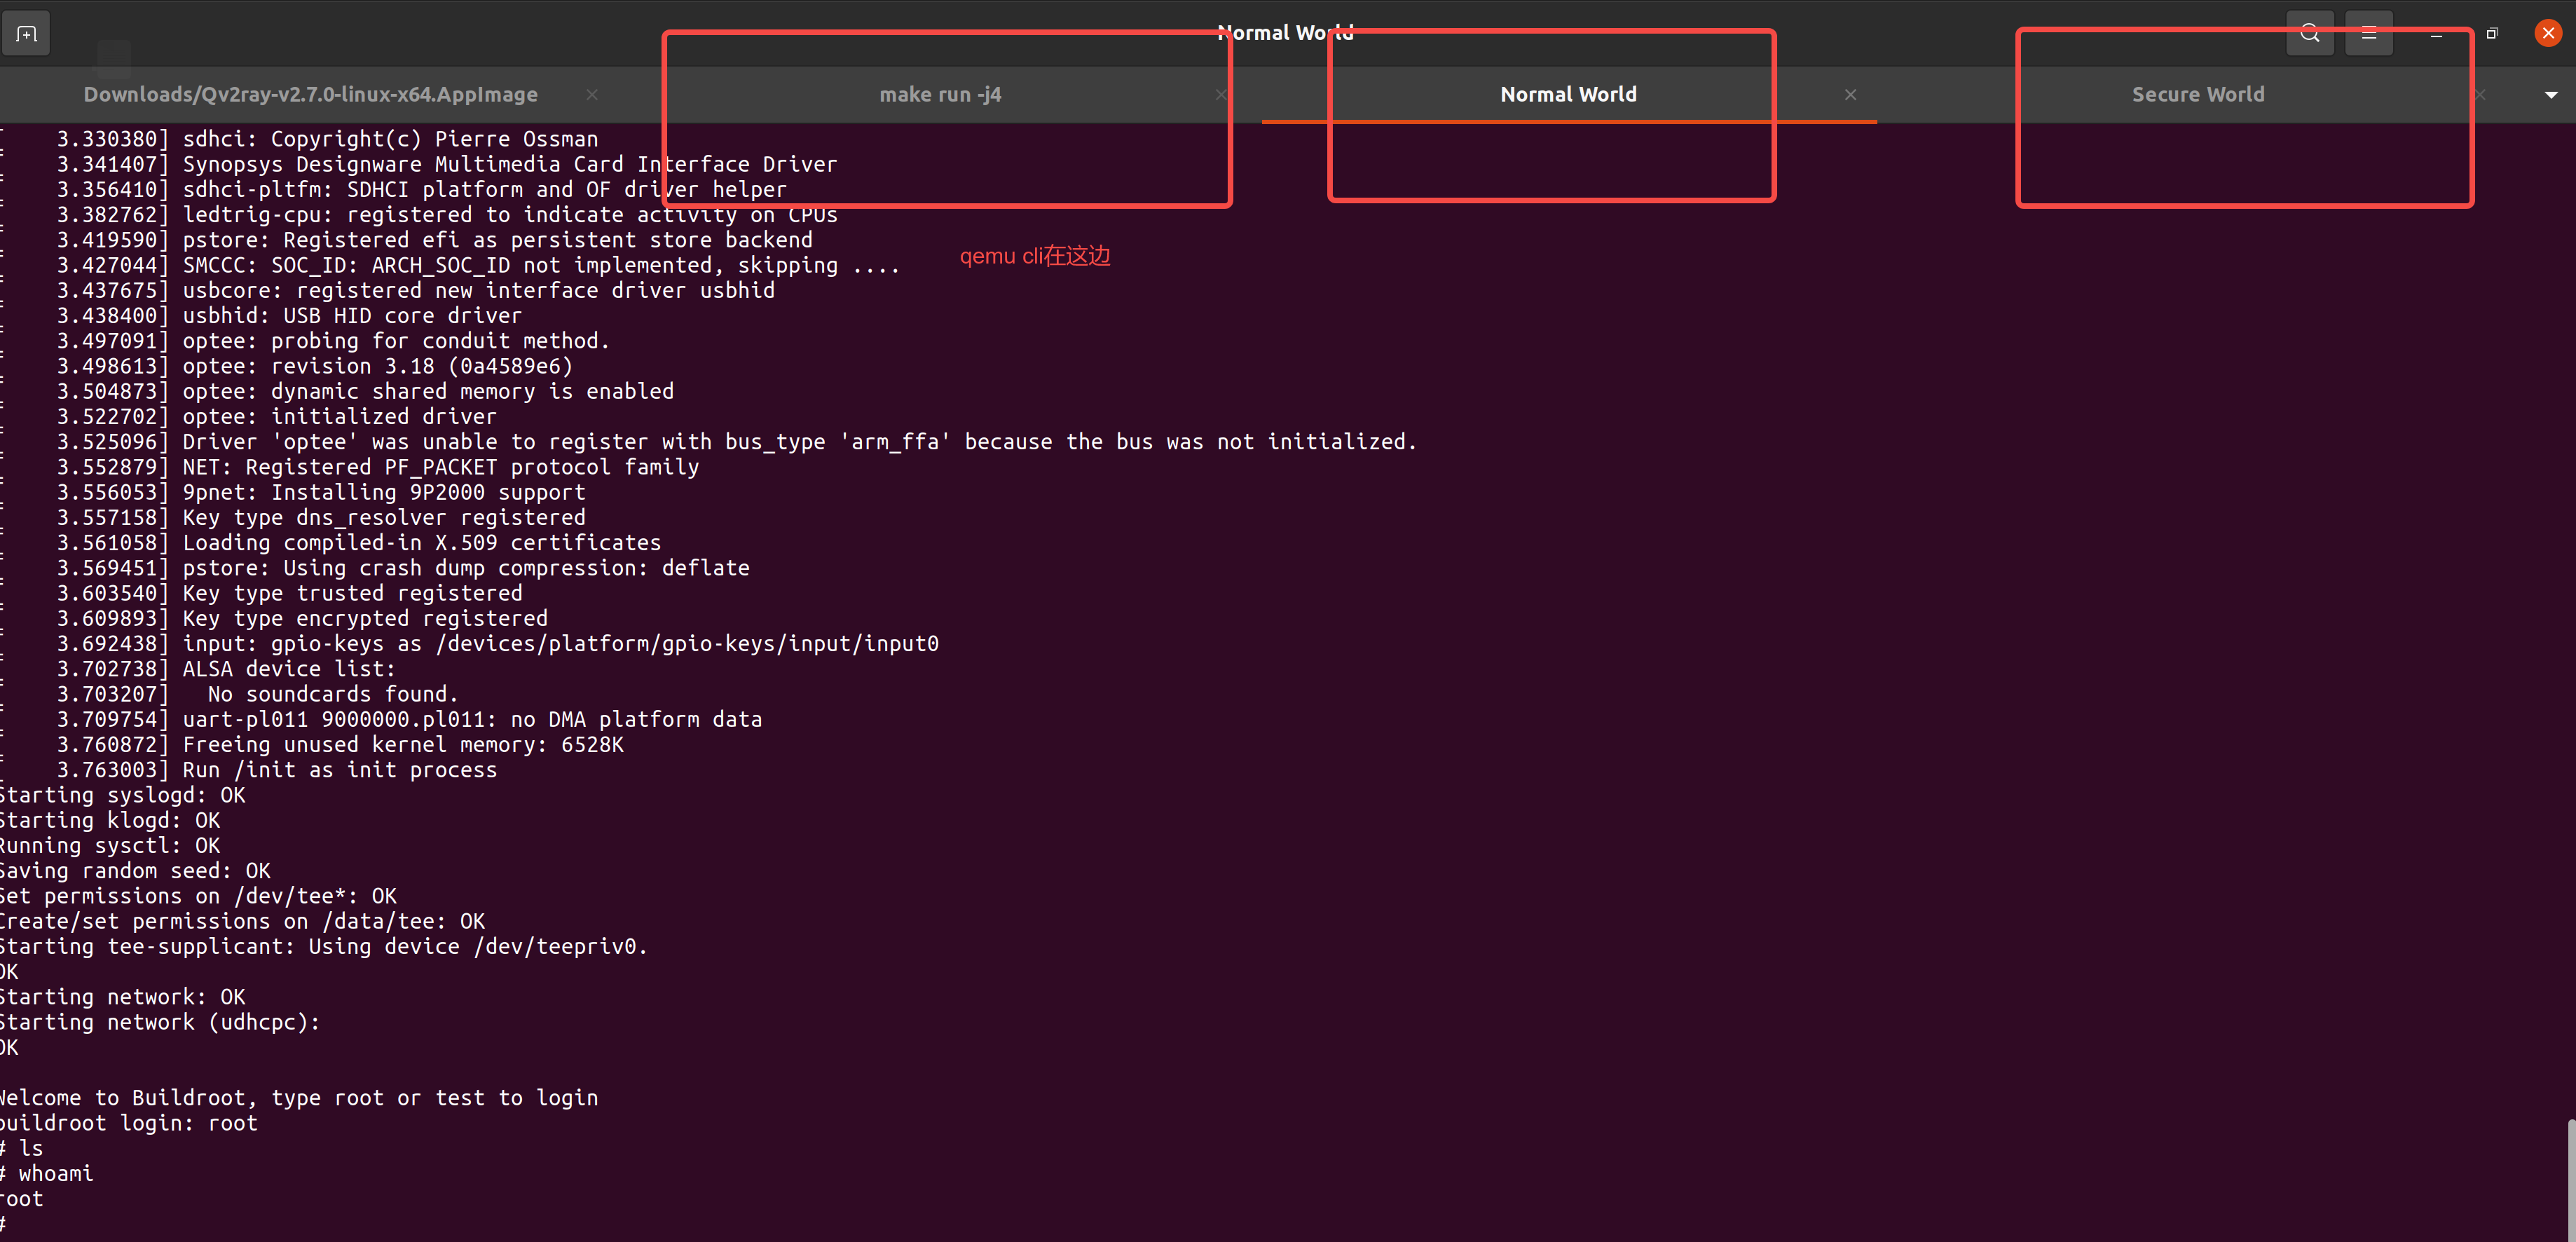
需要指定版本跑的话 : make -f qemu_v8.mk run-only
这里以qemu-v8为例
cd build
make  DEBUG=1  -f qemu_v8.mk all
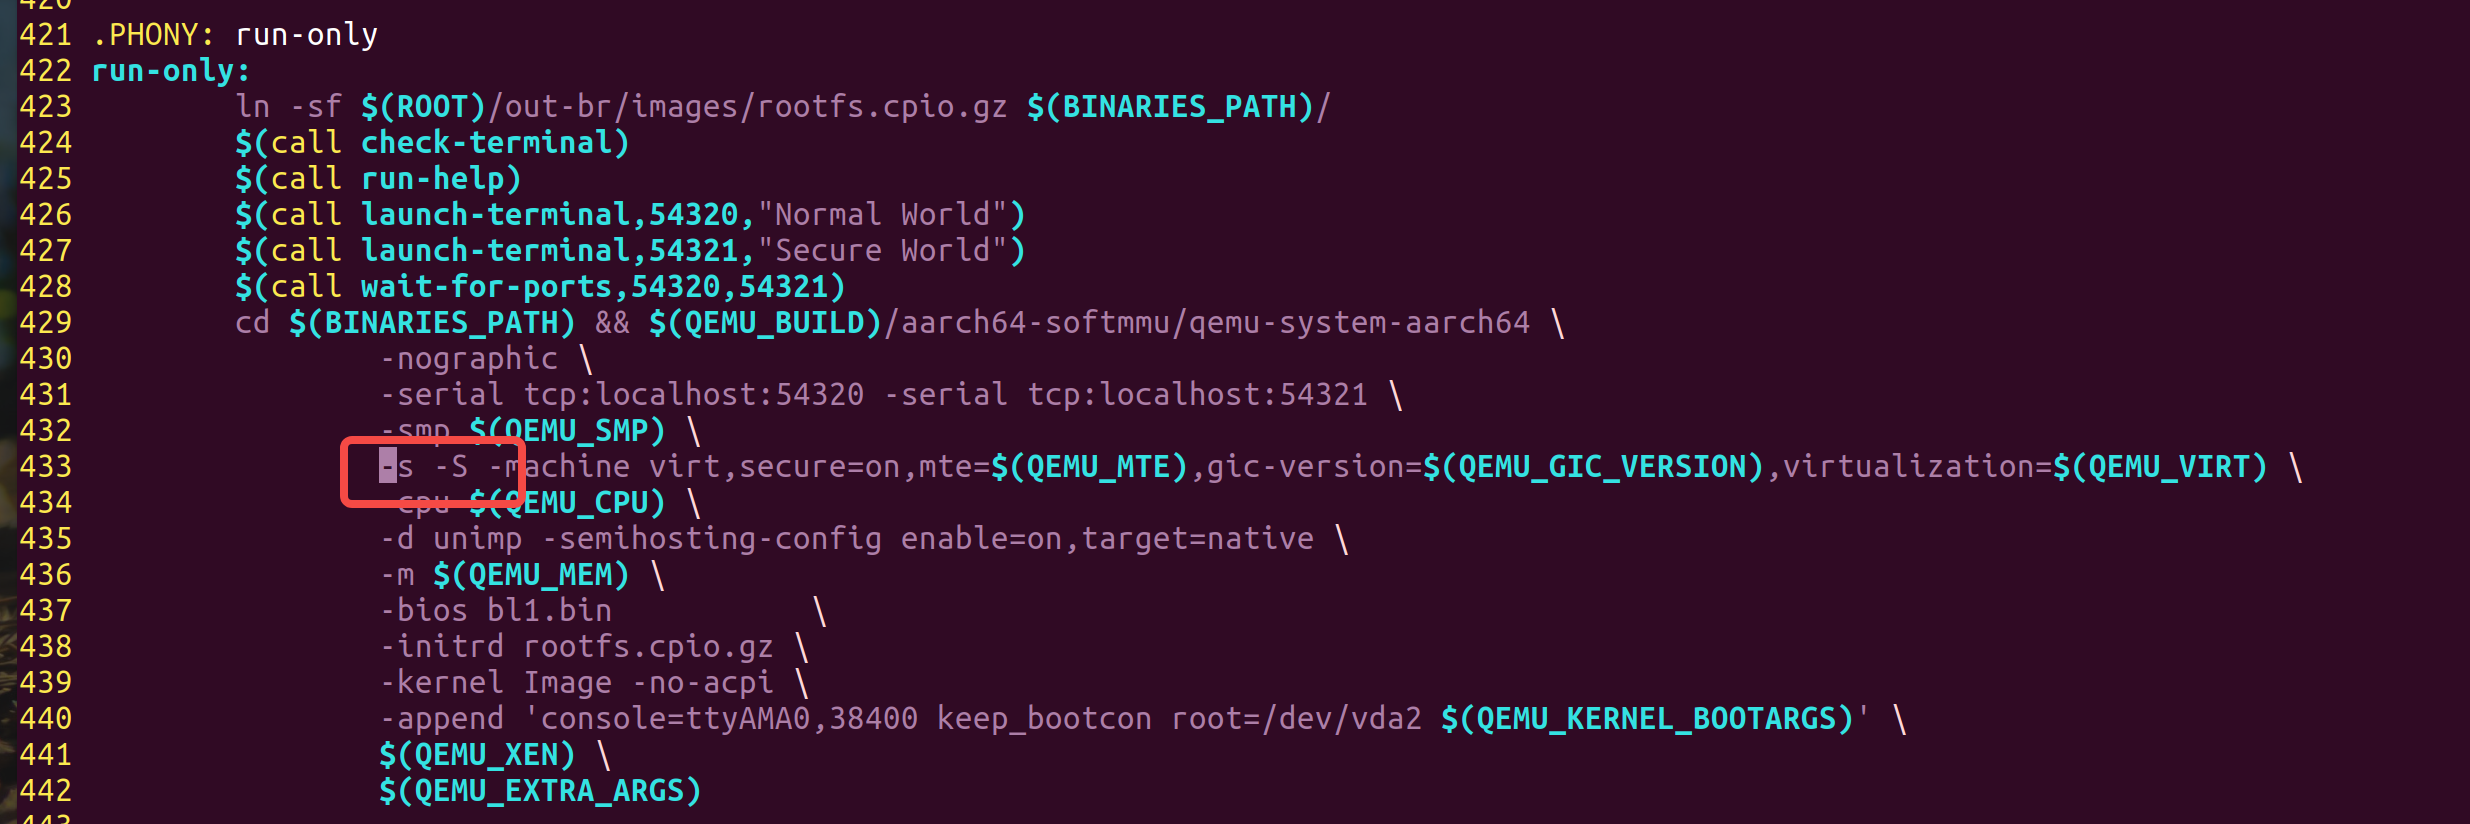
make DEBUG=1 -f qemu_v8.mk run-only
因为Makefile中启动的时候已经写了设置了 -s -S了 ,所以可以直接连接

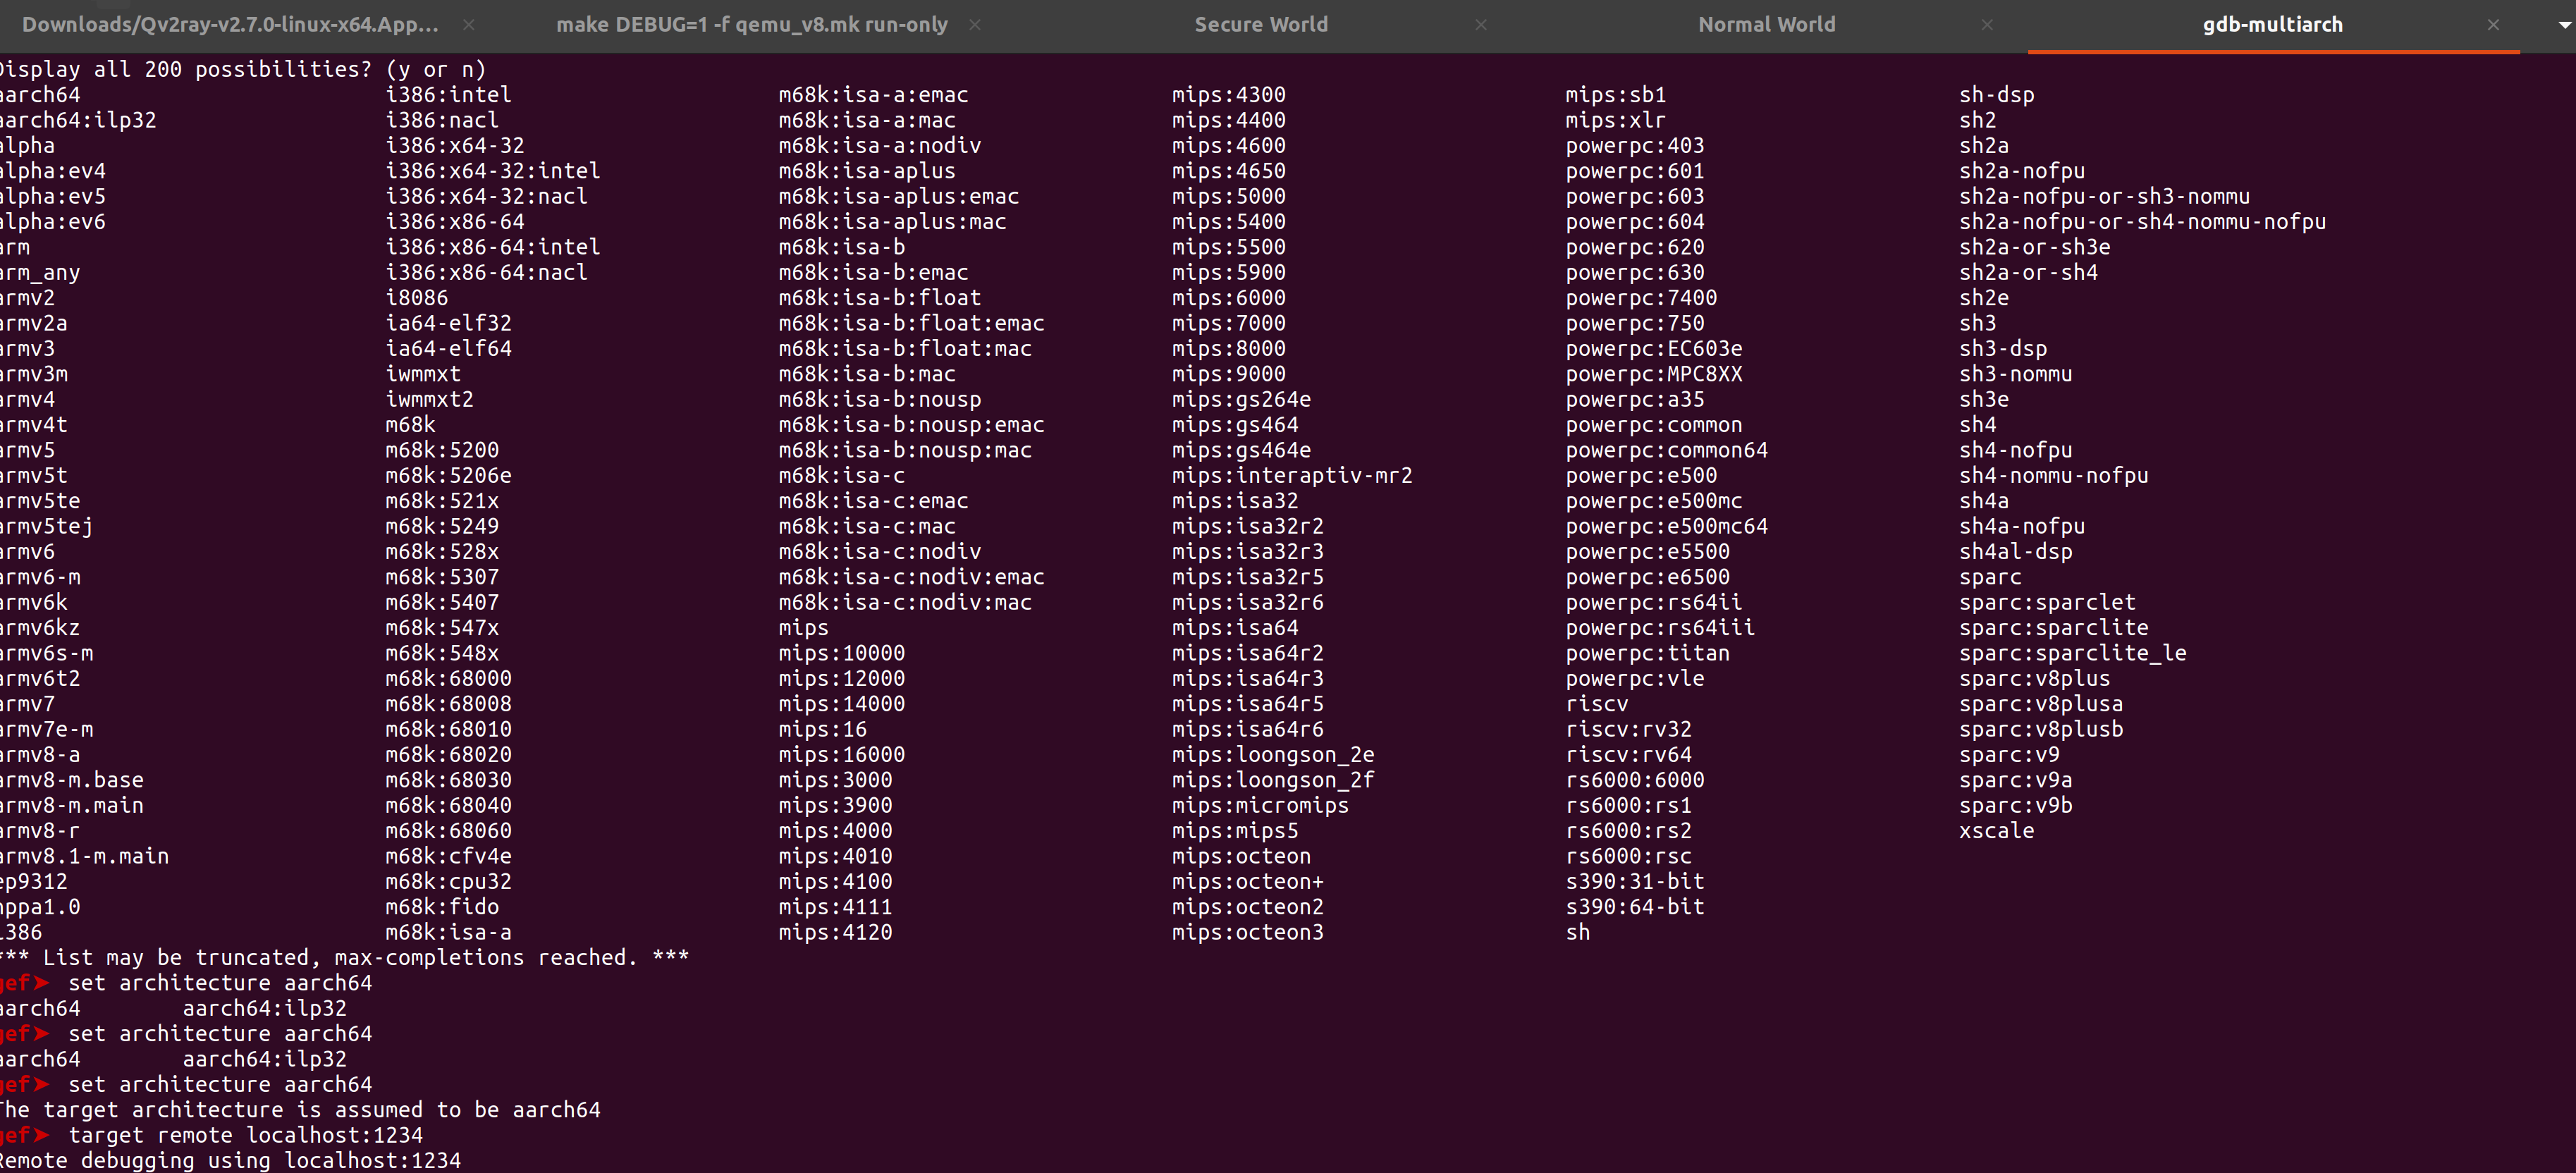
可以从这里下载对应的gdb来用
装了libncurses5-dev还是找不到so的话,可以参考 https://www.cnblogs.com/wanglouxiaozi/p/14987053.html
gdb-multiarch 也可以,更好用

bl1 --- /home/work/optee/trusted-firmware-a/build/qemu/debug/bl1/bl1.elf
bl2 ---  /home/work/optee/trusted-firmware-a/build/qemu/debug/bl2/bl2.elf
bl31 ---  /home/work/optee/trusted-firmware-a/build/qemu/debug/bl31/bl31.elf
bl32(teeOS)  ----  /home/work/optee/optee_os/out/arm/core/tee.elf
bl33(UEFI)  ---  /home/work/optee/edk2/Build/
fvp可视化调试环境搭建
$ repo init -u https://github.com/OP-TEE/manifest.git -m fvp.xml
$ repo sync -j4 -c
Updating depot_tools...
需要下载 FVP_Base_RevC-2xAEMvA_11.18_16_Linux64.tgz并解压到optee-fvp目录下
$ tar -zxvf ../FVP_Base_RevC-2xAEMvA_11.18_16_Linux64.tgz -C .
# work @ work-virtual-machine in ~/optee-fvp [23:34:36]
$ ls -al
total 72
drwxrwxr-x 18 work work 4096 Sep 22 23:32 .
drwx------ 70 work work 4096 Sep 22 23:34 ..
drwxrwxr-x 10 work work 4096 Sep 22 23:32 Base_RevC_AEMvA_pkg
drwxrwxr-x 12 work work 4096 Sep 22 23:26 build
drwxrwxr-x 14 work work 4096 Sep 22 23:26 buildroot
drwxrwxr-x 50 work work 4096 Sep 22 23:26 edk2
drwxrwxr-x  4 work work 4096 Sep 22 23:26 edk2-platforms
drwxrwxr-x 14 work work 4096 Sep 22 23:26 grub
drwxr-xr-x  3 work work 4096 Jun 16 10:34 license_terms
drwxrwxr-x 24 work work 4096 Sep 22 23:26 linux
drwxrwxr-x 14 work work 4096 Sep 22 23:26 mbedtls
drwxrwxr-x  5 work work 4096 Sep 22 23:26 ms-tpm-20-ref
drwxrwxr-x  9 work work 4096 Sep 22 23:26 optee_client
drwxrwxr-x 10 work work 4096 Sep 22 23:26 optee_examples
drwxrwxr-x 10 work work 4096 Sep 22 23:26 optee_os
drwxrwxr-x  7 work work 4096 Sep 22 23:26 optee_test
drwxrwxr-x  7 work work 4096 Sep 22 23:26 .repo
drwxrwxr-x 19 work work 4096 Sep 22 23:26 trusted-firmware-a
编译流程参考上面qemu_v8部分
# work @ work-virtual-machine in ~/optee-fvp [23:35:06]
$ cp -rf Base_RevC_AEMvA_pkg Foundation_Platformpkg # build toolchains的时候文件夹名需要改一下
$ cd build
$ make toolchains
$ make DEBUG=1 FVP_USE_BASE_PLAT=y  -f fvp.mk all
修改build/fvp.mk ,以便启动时进入调试模式
-I \
--iris-allow-remote\
################################################################################
# Run targets
################################################################################
# This target enforces updating root fs etc
run: all
        $(MAKE) run-only

ifeq ($(FVP_USE_BASE_PLAT),y)
FVP_ARGS ?= \
        -I \
        --iris-allow-remote\
        -C bp.ve_sysregs.exit_on_shutdown=1 \
        -C cache_state_modelled=0 \
        -C pctl.startup=0.0.0.0 \
        -C cluster0.NUM_CORES=4 \
cd build
make DEBUG=1 FVP_USE_BASE_PLAT=y  -f fvp.mk run-only
ARM Developer Studio连接
启动的时候需要license,注册个账号就行,先试用。
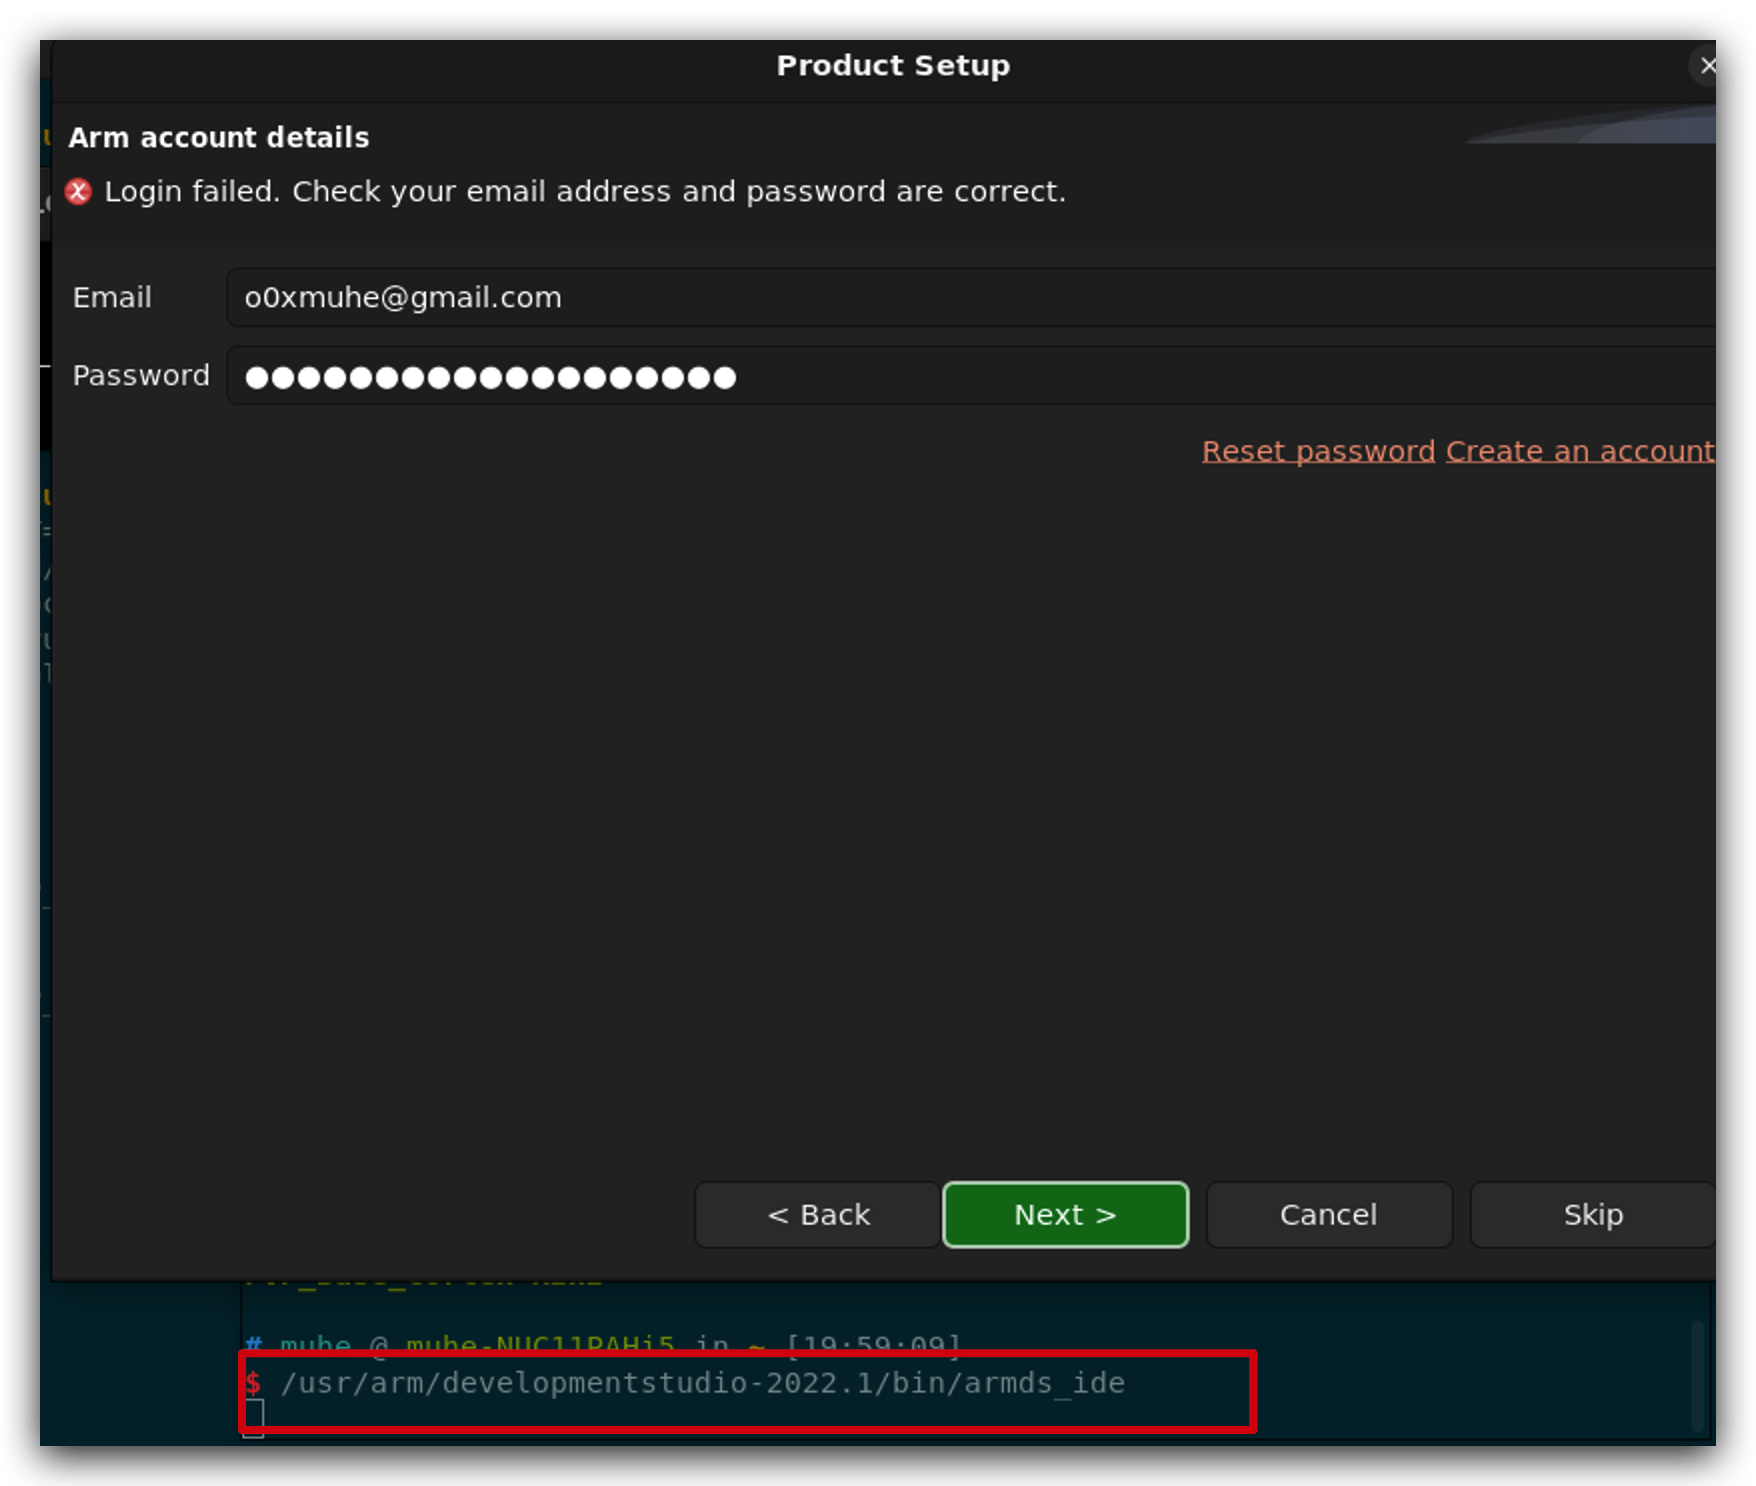
启动之后,选择 : File->New->Model Connection
模型选择 : Base_RevC_AEMvA 和 Base_RevC_AEMvA 都没法直接调试,好像是模型没装好 :(
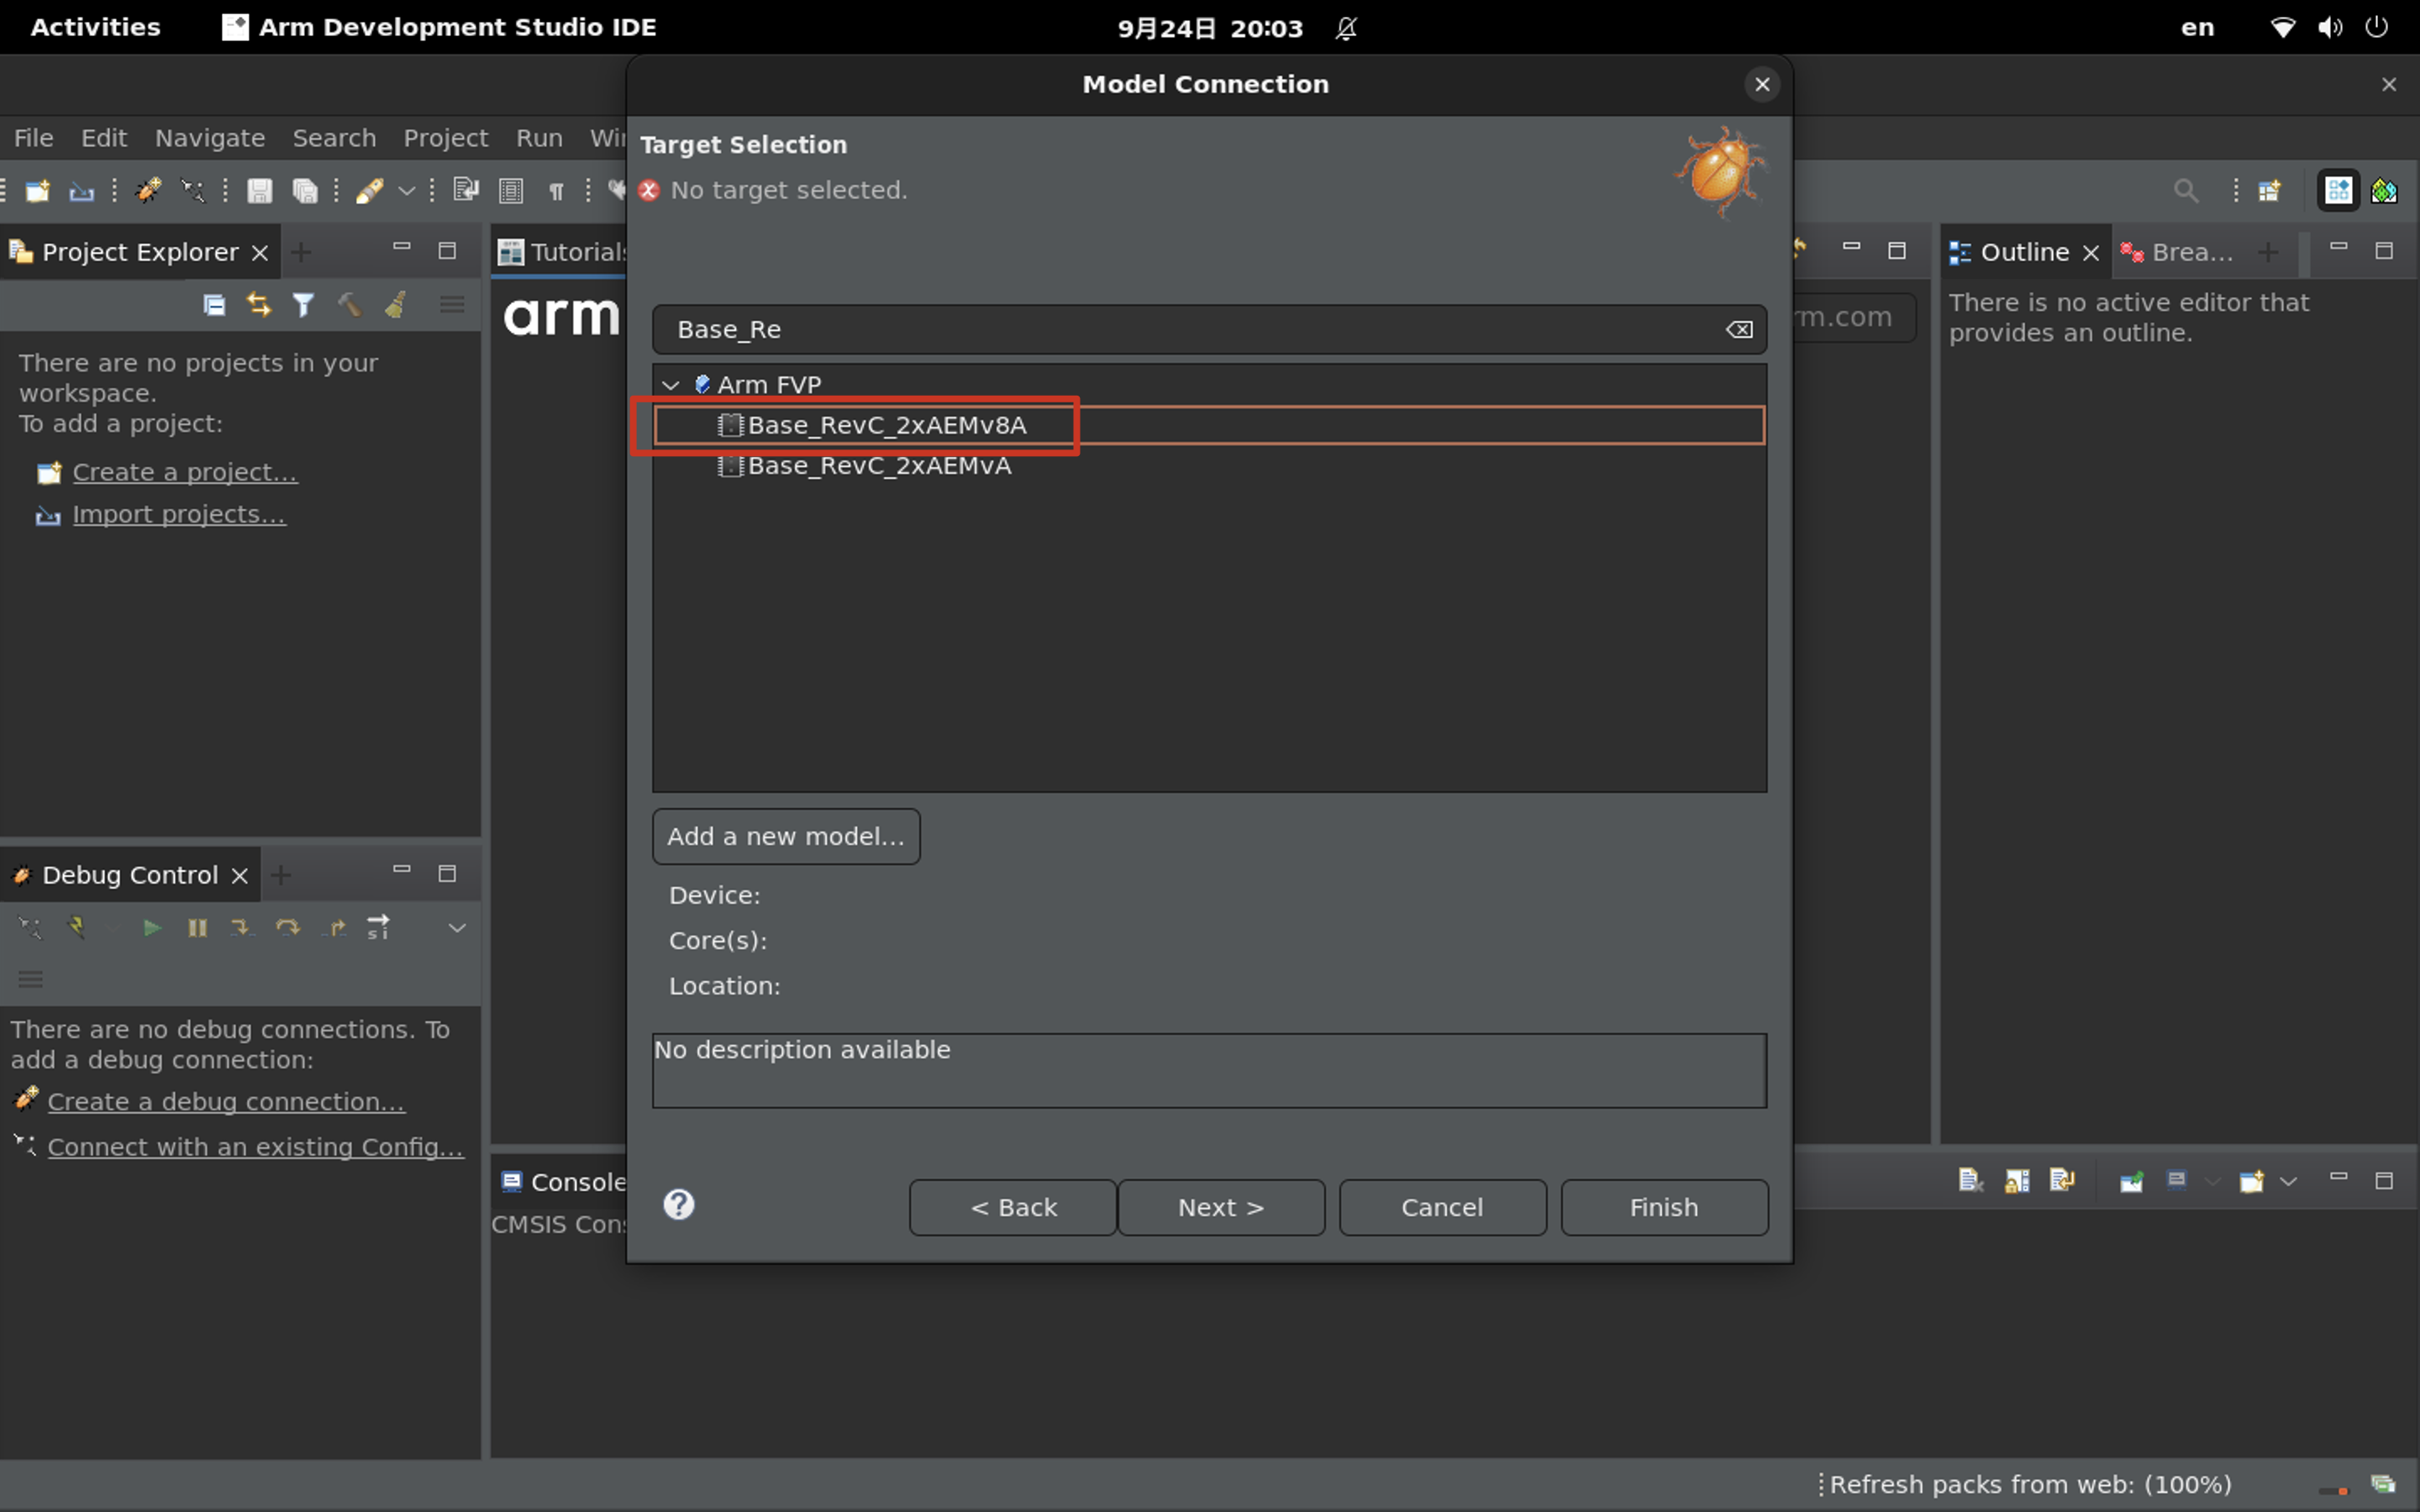
点Finish之后,需要手动选择,连接本地的模型 localhost 7100
加载了bl31的符号,然后对入口下断:
b *EL3:0x0000000004003000

add-symbol-file /home/muhe/Study/optee-fvp/trusted-firmware-a/build/fvp/debug/bl31/bl31.elf
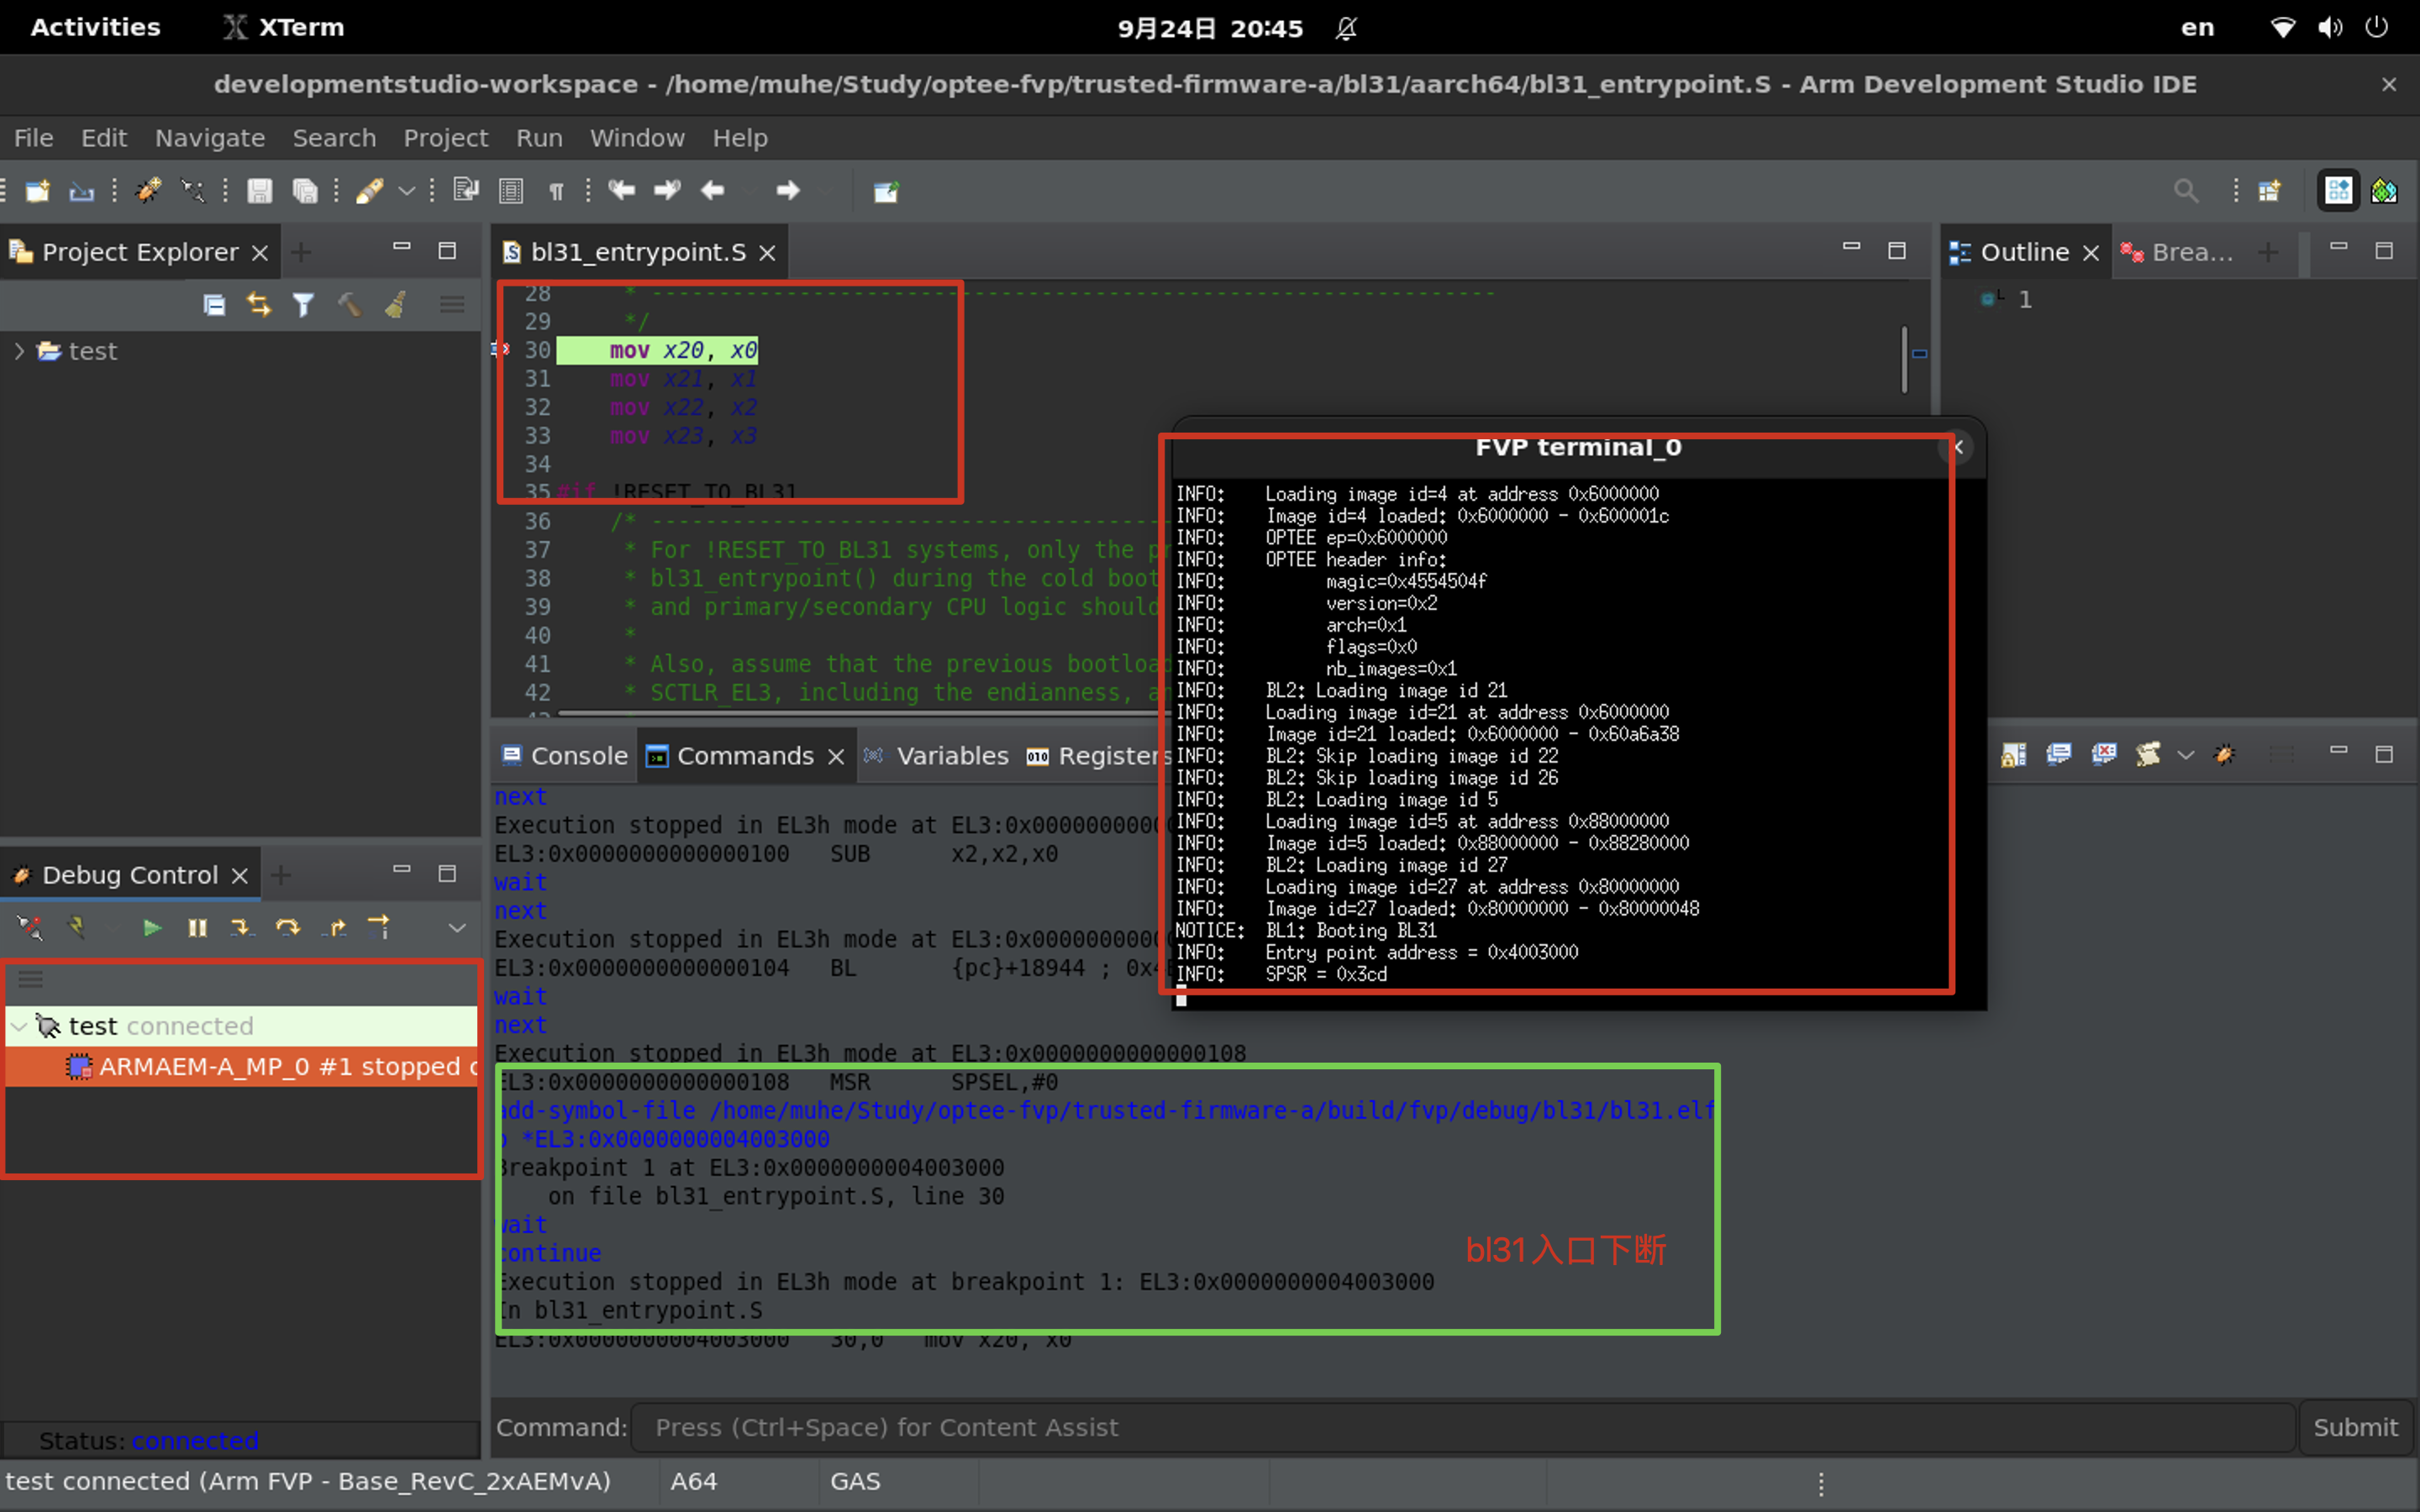
芜湖 🛫️
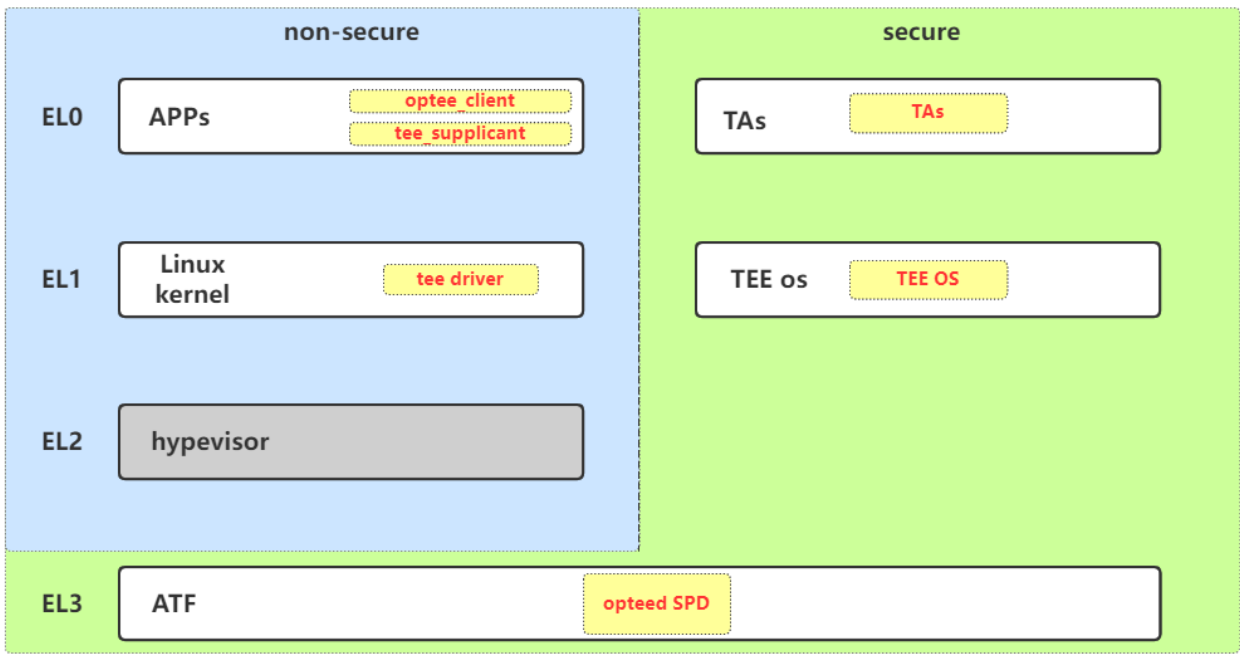
ARM 安全架构
ARM v8 的文档
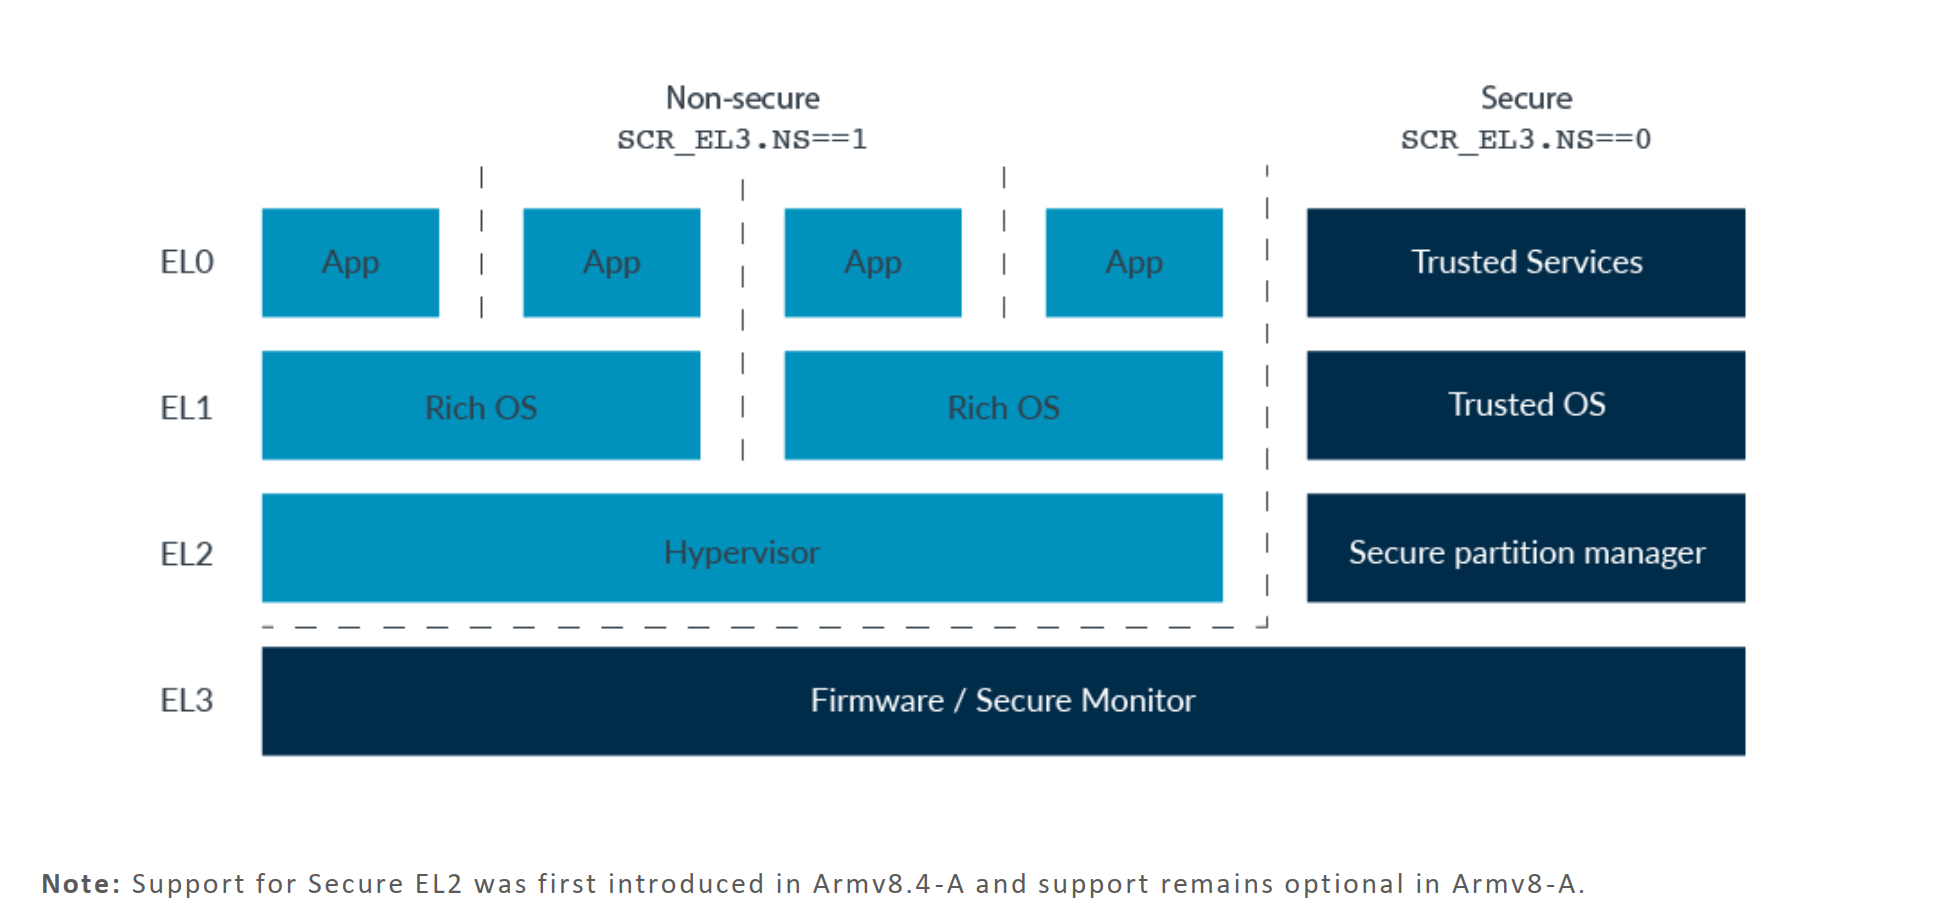
- 分三个异常等级
- 两个“世界”,non-secure 和 secure
opteeos跑在 secure world,ta在secure world的上层(el0); linux在non-secure world,ca在el0
optee项目中还有个``atf,这个跑在el3`。
该图来自周贺贺老师的OPTEE系列课程中
OPTEE 启动流程
这里我直接用了周贺贺老师OPTEE系列课程中的图,我在对着代码分析的时候结合这个图感觉十分的清晰,有助于理解 :)
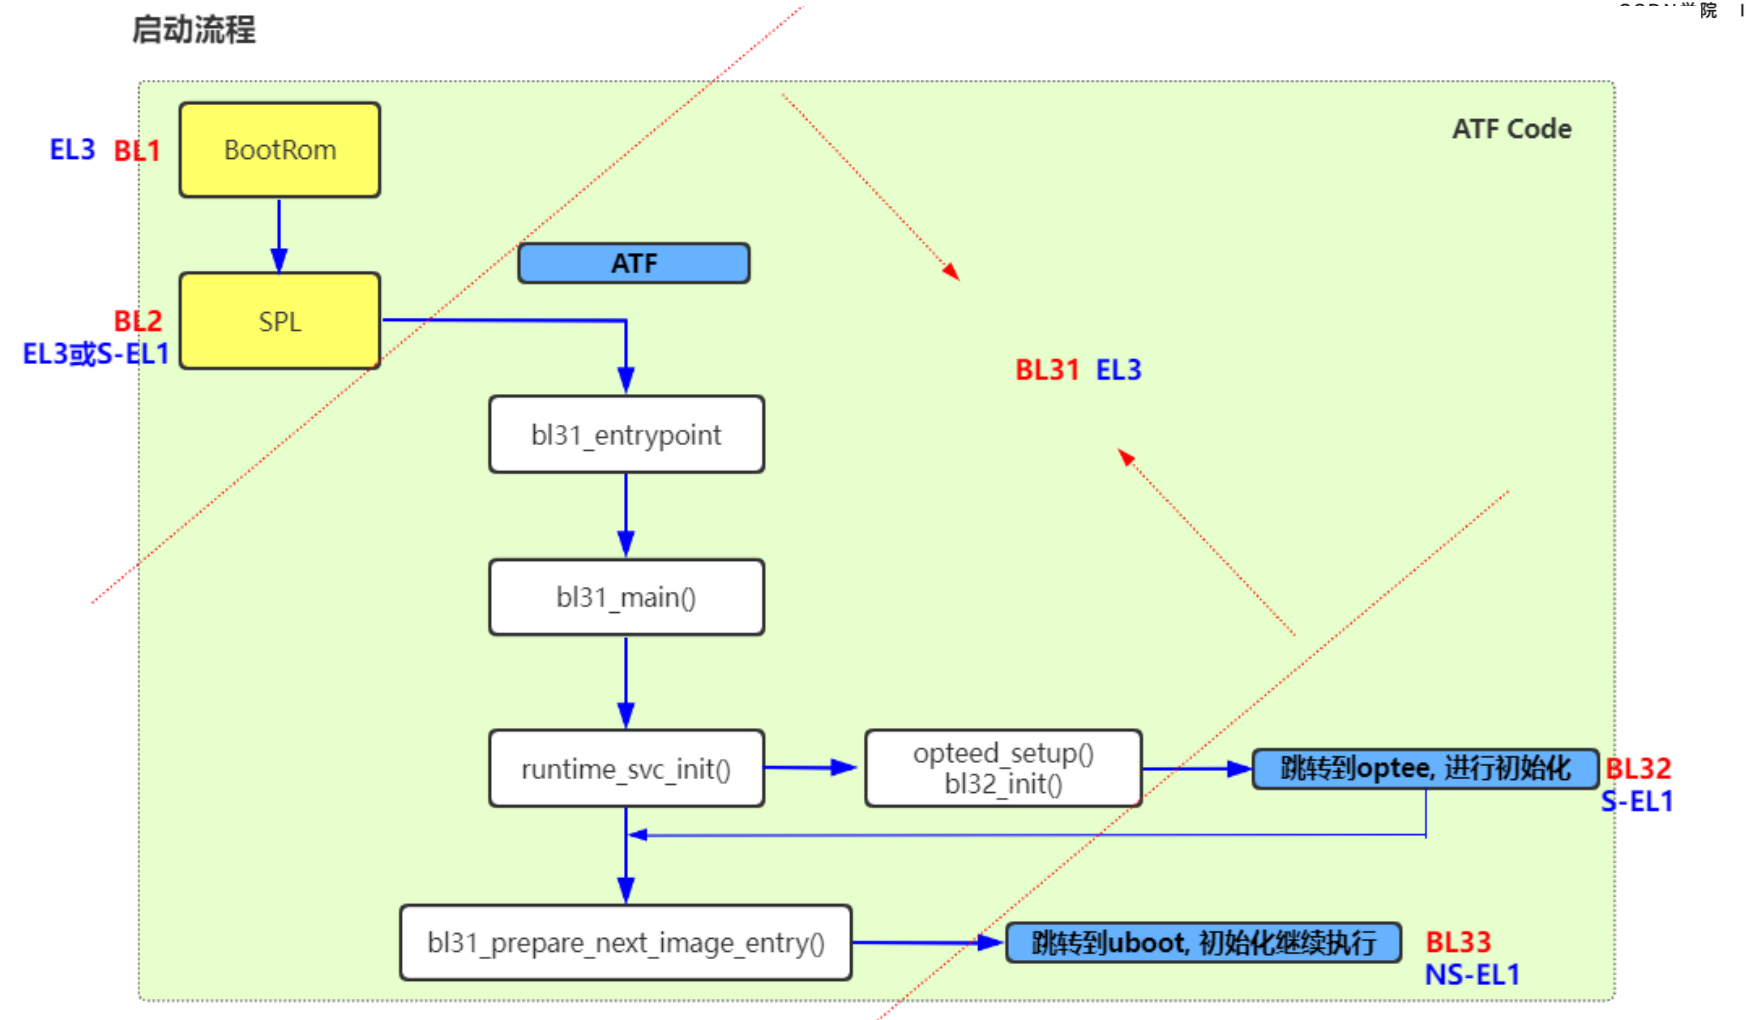
先来看大概的启动流程
bl31_entrypoint (trusted-firmware-a/bl31/aarch64/bl31_entrypoint.S)
    bl31_main (trusted-firmware-a/bl31/bl31_main.c)
        runtime_svc_init (trusted-firmware-a/common/runtime_svc.c)
            opteed_setup (trusted-firmware-a/services/spd/opteed/opteed_main.c DECLARE_RT_SVC里定义)
                bl31_plat_get_next_image_ep_info(SECURE)
                opteed_init_optee_ep_state
                bl31_register_bl32_init(&opteed_init);

bl32_init // 这个函数就是opteed_init,在上面注册的
            // 进入tee
            opteed_synchronous_sp_entry(optee_ctx);
                opteed_enter_sp(&optee_ctx->c_rt_ctx);
            // 出tee
    bl31_prepare_next_image_entry (进入uboot)
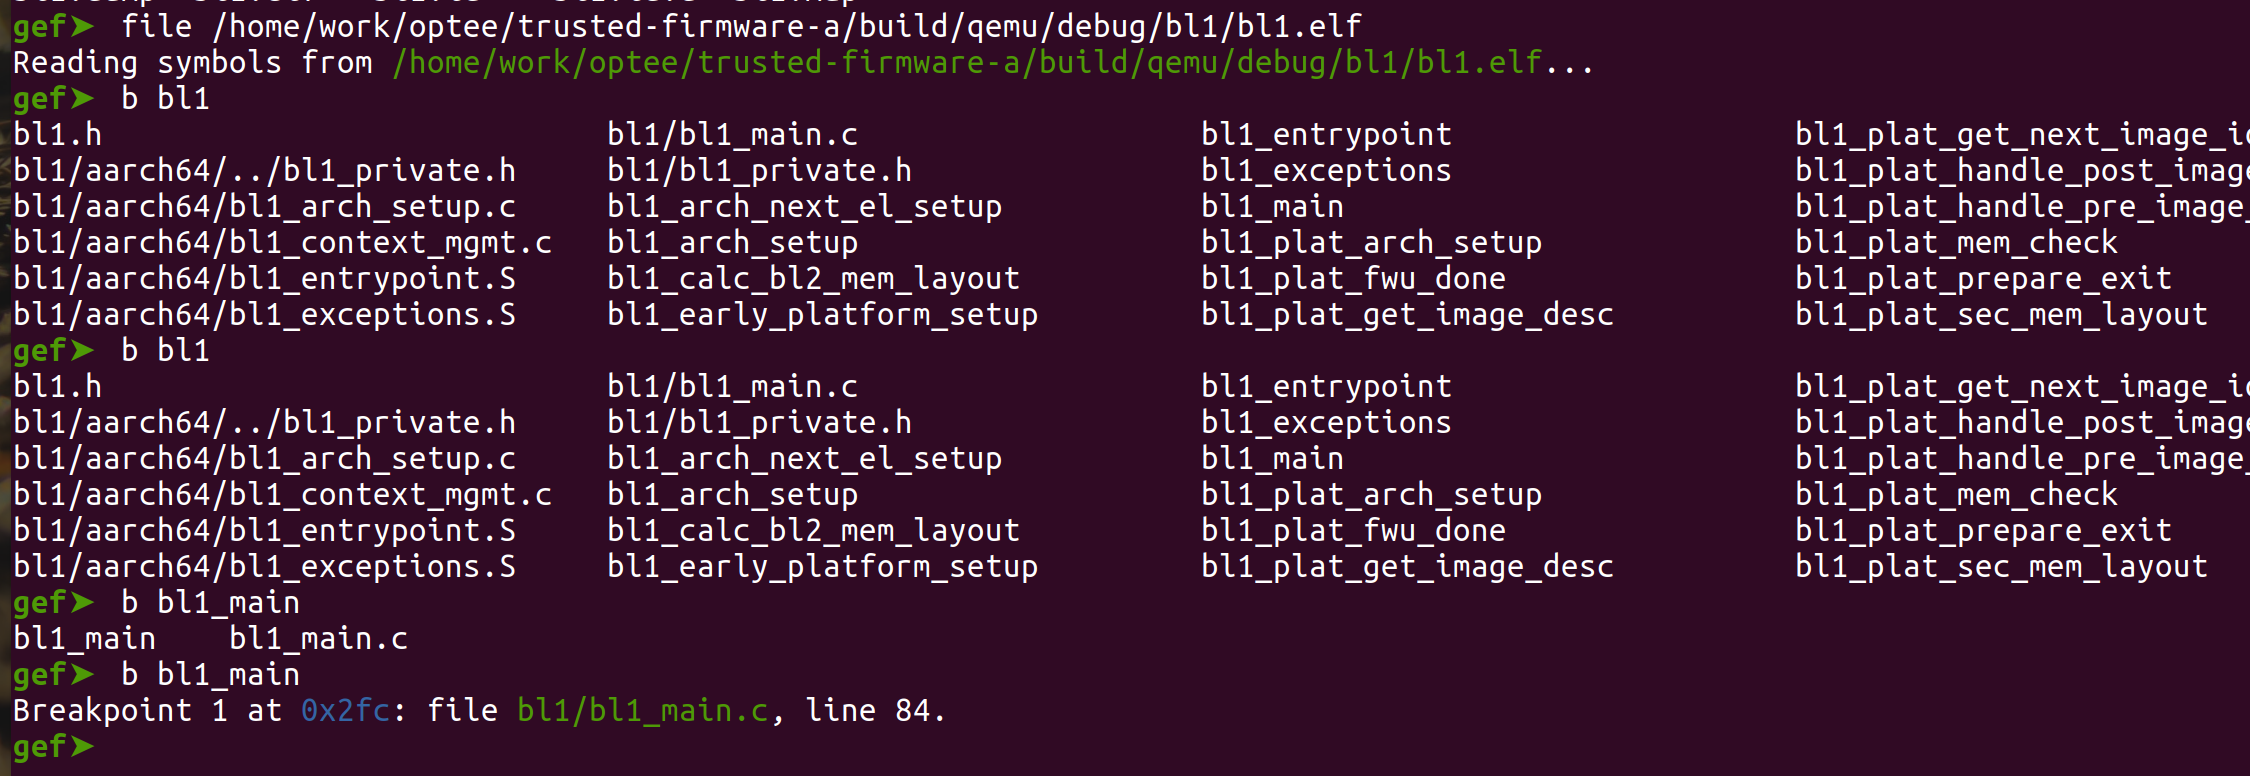
下断点的時候注意,切换到对应的阶段之后再去 file xxx 加载符号
file /home/work/optee/trusted-firmware-a/build/qemu/debug/bl1/bl1.elf
file /home/work/optee/trusted-firmware-a/build/qemu/debug/bl2/bl2.elf
file /home/work/optee/trusted-firmware-a/build/qemu/debug/bl31/bl31.elf
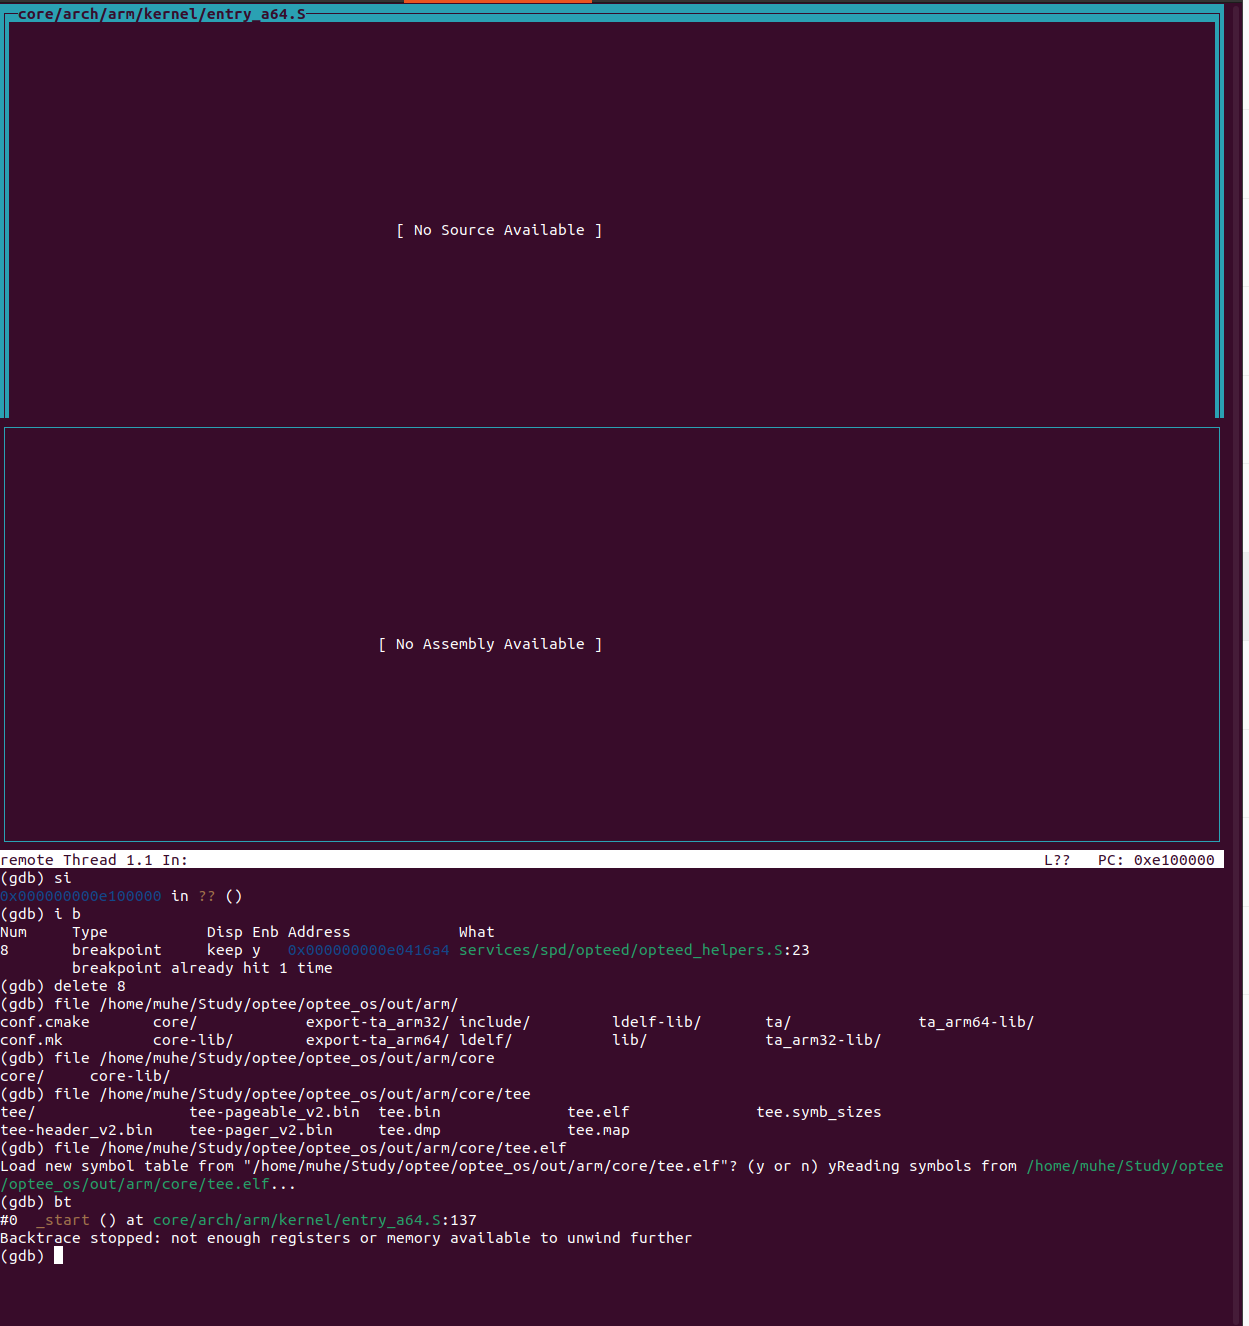
file /home/work/optee/optee_os/out/arm/core/tee.elf
比如下面要进入tee的时候
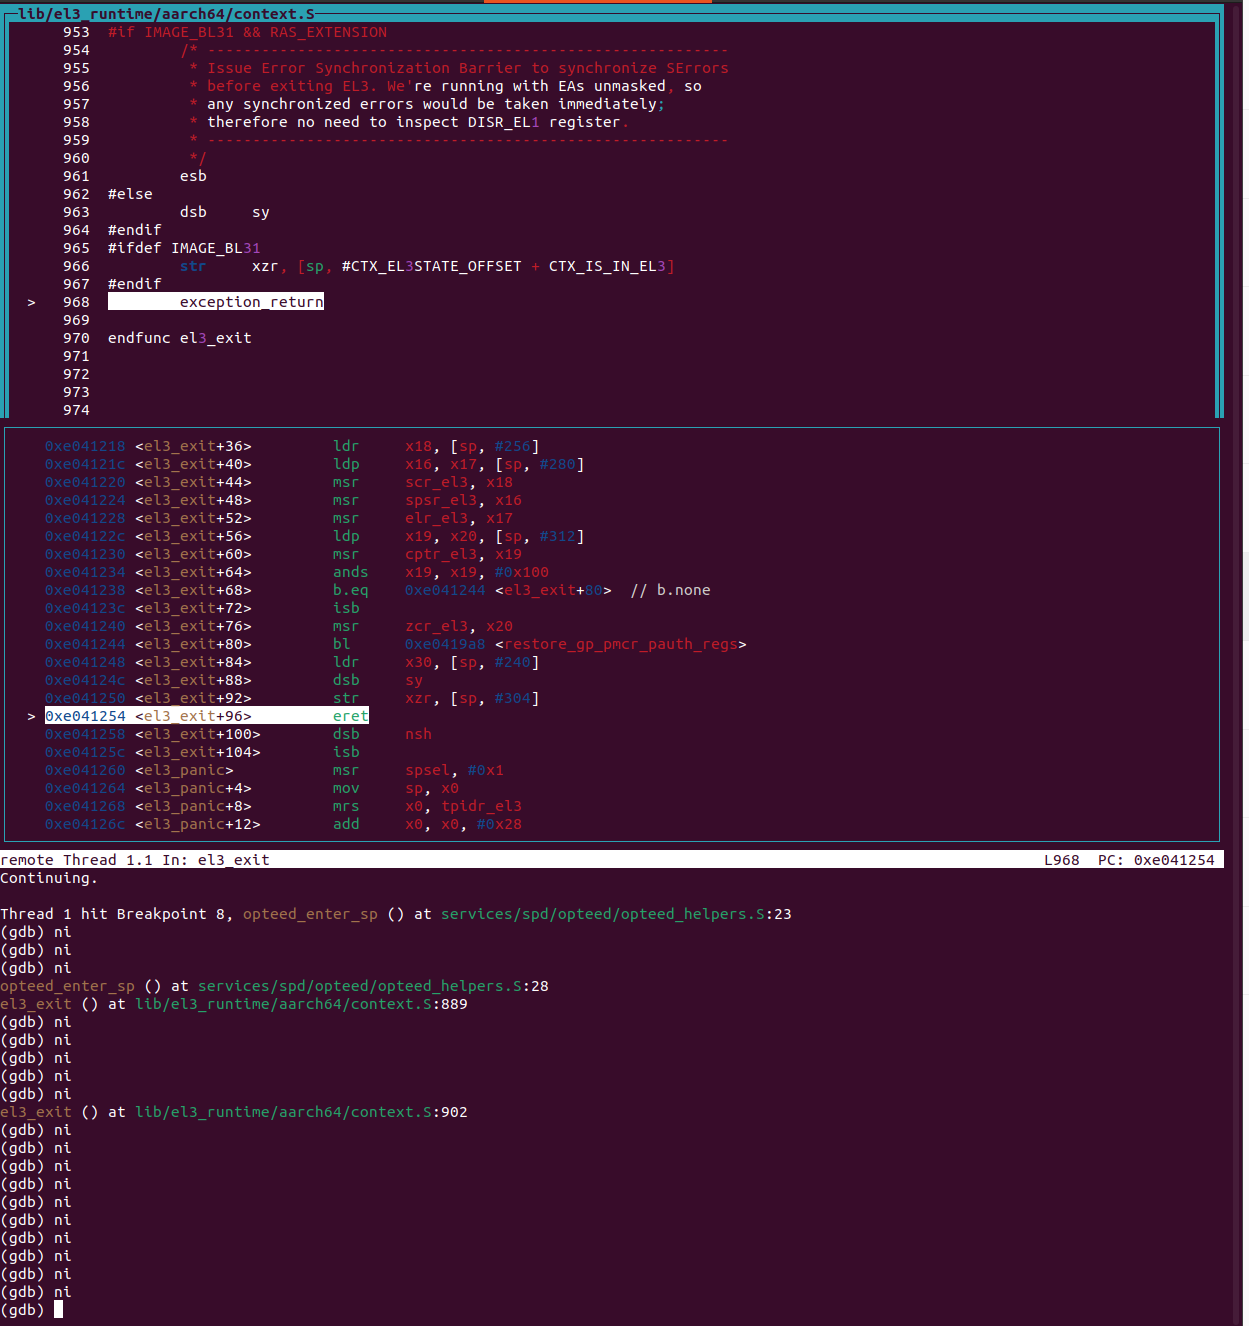
加载符号之后:
ads可视化流程梳理
ads可视化调试记录
add-symbol-file /home/muhe/Study/optee-fvp/trusted-firmware-a/build/fvp/debug/bl1/bl1.elf
b *EL1S:0x0000000004022000
add-symbol-file /home/muhe/Study/optee-fvp/trusted-firmware-a/build/fvp/debug/bl2/bl2.elf
b *EL3:0x0000000004003000
add-symbol-file /home/muhe/Study/optee-fvp/trusted-firmware-a/build/fvp/debug/bl31/bl31.elf
b *EL1S:0x6000000
add-symbol-file /home/muhe/Study/optee-fvp/optee_os/out/arm/core/tee.elf
UEFI 的符号加载比较特殊, 这个部分是相对地址, 并且很多模块是动态加载的, 断点下到加载UEFI的地址, 也就是BL31 跳转到BL33时的地址。 断下后,
commands下通过 cmd_load_symbols 加载, 执行前先要弄清楚几个参数
/home/muhe/Study/optee-fvp/edk2/ArmPlatformPkg/Scripts/Ds5/cmd_load_symbols.py
def usage():
    print "-v,--verbose"
    print "-a,--all: Load all symbols"
    print "-l,--report=: Filename for the EDK2 report log"
    print "-m,--sysmem=(base,size): System Memory region"
    print "-f,--fv=(base,size): Firmware region"
    print "-r,--rom=(base,size): ROM region"
-m 参数在
/home/muhe/Study/optee-fvp/edk2-platforms/Platform/ARM/VExpressPkg/ArmVExpress-FVP-AArch64.dsc
# System Memory (2GB - 16MB of Trusted DRAM at the top of the 32bit address space)

gArmTokenSpaceGuid.PcdSystemMemoryBase|0x80000000

gArmTokenSpaceGuid.PcdSystemMemorySize|0x7F000000
-f 参数在
/home/muhe/Study/optee-fvp/edk2-platforms/Platform/ARM/VExpressPkg/ArmVExpress-FVP-AArch64.fdf
[FD.FVP_AARCH64_EFI]

!ifdef ARM_FVP_RUN_NORFLASH

BaseAddress   = 0x08000000|gArmTokenSpaceGuid.PcdFdBaseAddress  # The base address of the Firmware in Flash0.

!else

BaseAddress   = 0x88000000|gArmTokenSpaceGuid.PcdFdBaseAddress  # UEFI in DRAM + 128MB.

!endif

Size          = 0x04000000|gArmTokenSpaceGuid.PcdFdSize         # The size in bytes of the device (64MiB).

ErasePolarity = 1
b *EL2N:0x88000000
断点触发后, 执行下面的命令加载符号。
source /home/muhe/Study/optee-fvp/edk2/ArmPlatformPkg/Scripts/Ds5/cmd_load_symbols.py -a -m (0x80000000, 0x7F000000) -f (0x88000000, 0x04000000)
info files
Symbols from "/home/muhe/Study/optee-fvp/edk2-platforms/Build/ArmVExpress-FVP-AArch64/DEBUG_GCC49/AARCH64/ArmPlatformPkg/PrePi/PeiUniCore/DEBUG/ArmPlatformPrePiUniCore.dll".
Local exec file:
        "/home/muhe/Study/optee-fvp/edk2-platforms/Build/ArmVExpress-FVP-AArch64/DEBUG_GCC49/AARCH64/ArmPlatformPkg/PrePi/PeiUniCore/DEBUG/ArmPlatformPrePiUniCore.dll", file type ELF64.
        Entry point: EL2N:0x0000000088000800.
        EL2N:0x0000000088000800 - EL2N:0x0000000088018AD7 is .text
        EL2N:0x0000000088019000 - EL2N:0x000000008801916F is .data
DxeCore的加载这个脚本处理不了,还是要自己加载
add-symbol-file /home/muhe/Study/optee-fvp/edk2-platforms/Build/ArmVExpress-FVP-AArch64/DEBUG_GCC49/AARCH64/MdeModulePkg/Core/Dxe/DxeMain/DEBUG/DxeCore.dll 0x00fe3d3000
现在就正常了:
Symbols from "/home/muhe/Study/optee-fvp/edk2-platforms/Build/ArmVExpress-FVP-AArch64/DEBUG_GCC49/AARCH64/ArmPlatformPkg/PrePi/PeiUniCore/DEBUG/ArmPlatformPrePiUniCore.dll".
Local exec file:
        "/home/muhe/Study/optee-fvp/edk2-platforms/Build/ArmVExpress-FVP-AArch64/DEBUG_GCC49/AARCH64/ArmPlatformPkg/PrePi/PeiUniCore/DEBUG/ArmPlatformPrePiUniCore.dll", file type ELF64.
        Entry point: EL2N:0x0000000088000800.
        EL2N:0x0000000088000800 - EL2N:0x0000000088018AD7 is .text
        EL2N:0x0000000088019000 - EL2N:0x000000008801916F is .data
Symbols from "/home/muhe/Study/optee-fvp/edk2-platforms/Build/ArmVExpress-FVP-AArch64/DEBUG_GCC49/AARCH64/MdeModulePkg/Core/Dxe/DxeMain/DEBUG/DxeCore.dll".
Local exec file:
        "/home/muhe/Study/optee-fvp/edk2-platforms/Build/ArmVExpress-FVP-AArch64/DEBUG_GCC49/AARCH64/MdeModulePkg/Core/Dxe/DxeMain/DEBUG/DxeCore.dll", file type ELF64.
        Entry point: EL2N:0x00000000FE3D4000.
        EL2N:0x00000000FE3D4000 - EL2N:0x00000000FE41AEBF is .text
        EL2N:0x00000000FE41B000 - EL2N:0x00000000FE435860 is .data
TODO,这部分一直没时间搞,先挂起了
Linux Kernel
BL33是UEFl,其实UEFI 还会引导grub2, 这里grub2作为一个UEFl的driver(or 应用)被UEFl加载, grub执行完毕,引导linux时,其实linux 内核也打包作为一个UEFl的应用了,所以BL33的执行过程是, UEFI-> grub->linux内核的efi stub -> linux内核
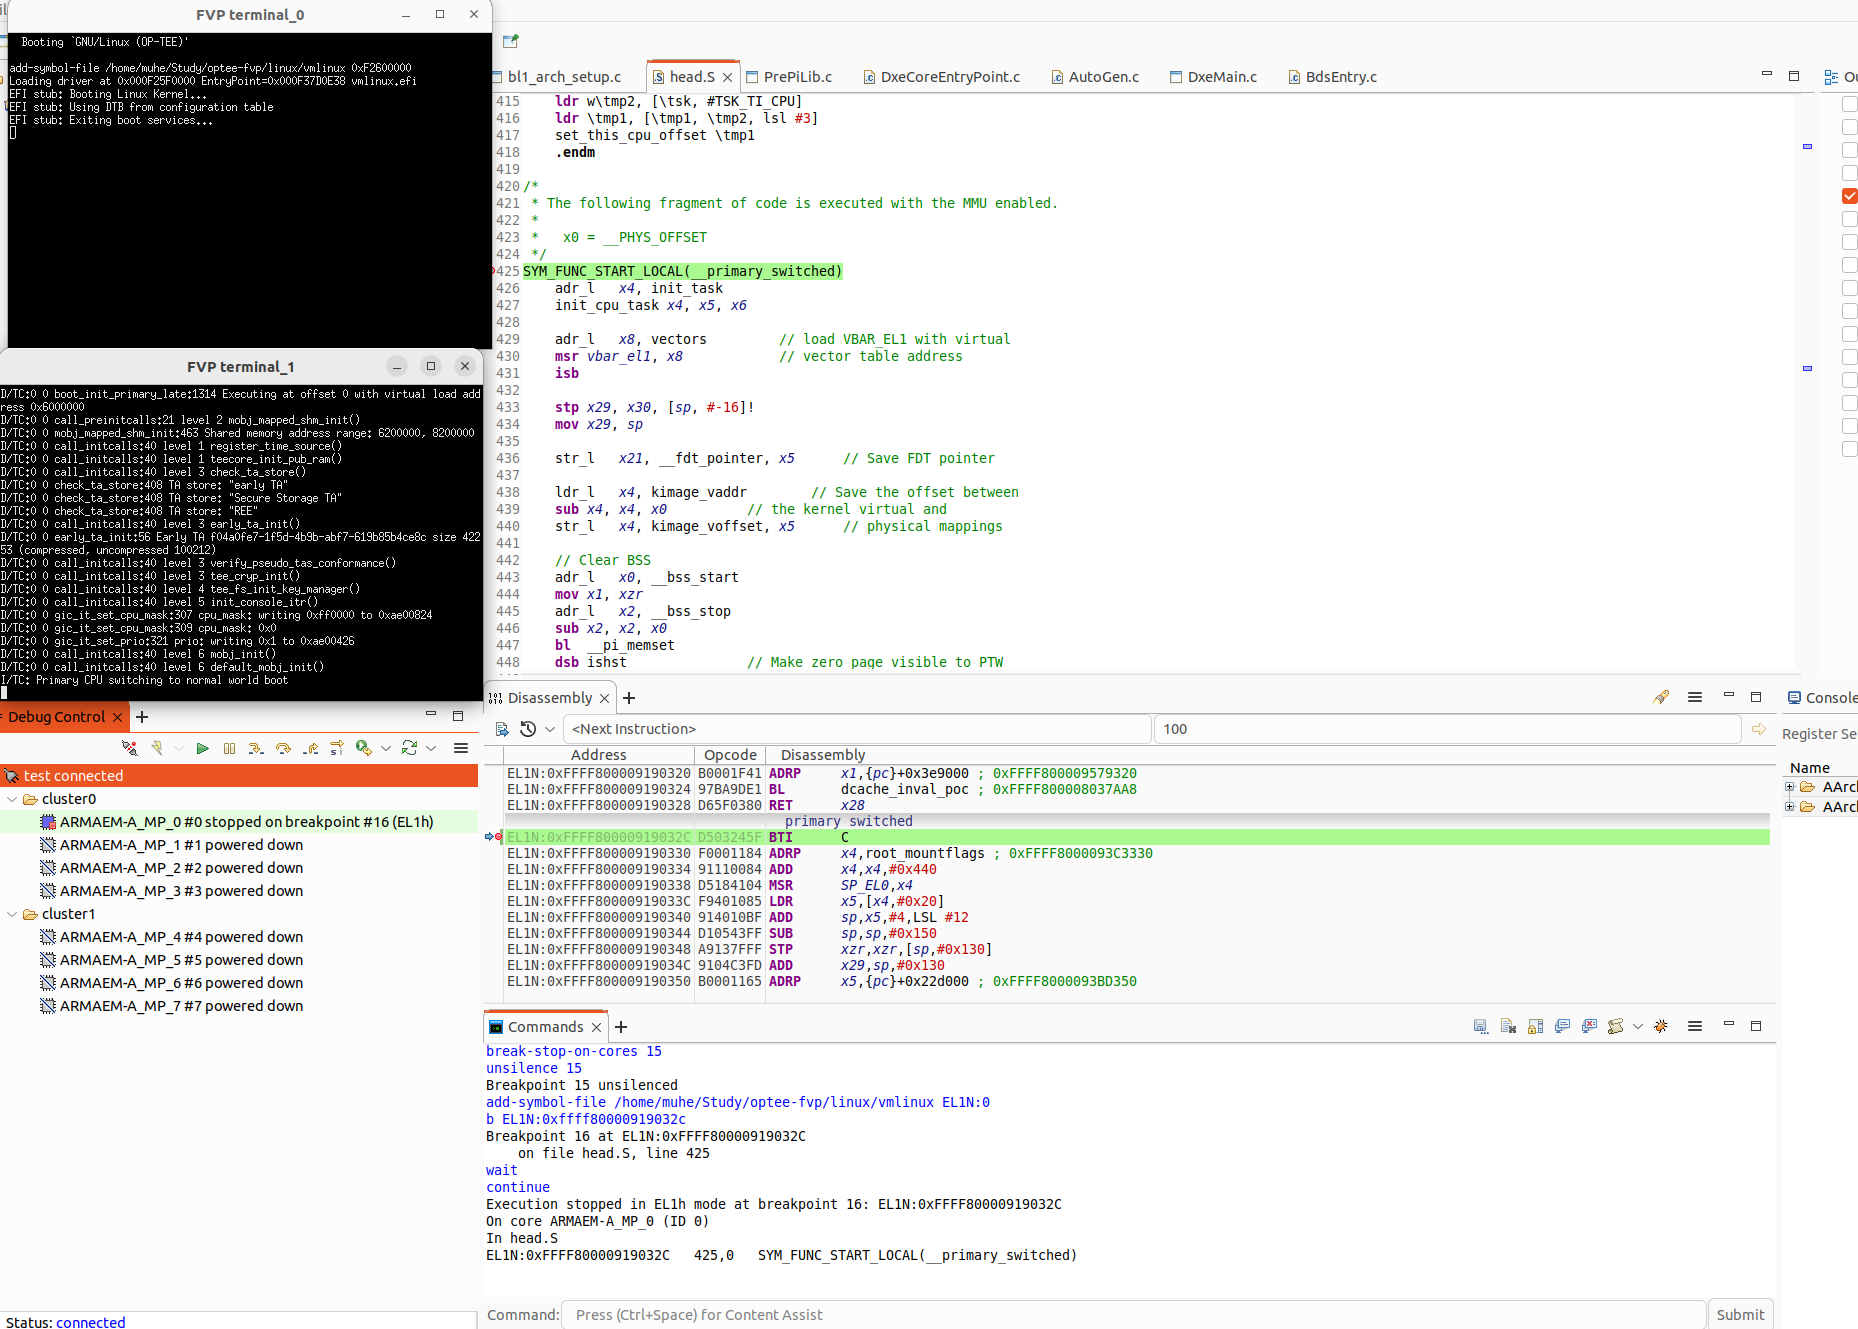
加载符号,注意EL1N:0,因为内核主要运行在EL1N
add-symbol-file /home/muhe/Study/optee-fvp/linux/vmlinux EL1N:0
根据启动流程 :
__HEAD
        primary_entry
                __primary_switch
                        __enable_mmu
                        __primary_switched
                                设置异常向量表 // `adr_l       x8, vectors`
                                start_kernel()
我们可以对__primary_switch 下断,如果符号对不上,可以根据地址下断
# muhe @ muhe-NUC11PAHi5 in ~/Study/optee-fvp/linux on git:29aee39cf x [23:24:42]
$ cat System.map | grep "primary_switched"
ffff80000919032c t __primary_switched
JVM设置
修改ads的jvm,否则调试的时候容易oom影响体验
# muhe @ muhe-NUC11PAHi5 in /usr/arm/developmentstudio-2022.1/sw/ide [20:20:40]
$ cat armds_ide.ini
-startup
plugins/org.eclipse.equinox.launcher_1.6.400.v20210924-0641.jar
--launcher.library
plugins/org.eclipse.equinox.launcher.gtk.linux.x86_64_1.2.400.v20211117-0650
-vm
../java/lib/server/libjvm.so
-vmargs
--add-opens=java.base/java.io=ALL-UNNAMED
--add-opens=java.base/sun.nio.ch=ALL-UNNAMED
--add-opens=java.base/java.lang=ALL-UNNAMED
--add-opens=java.base/java.util=ALL-UNNAMED
--add-opens=java.base/java.nio.charset=ALL-UNNAMED
--add-opens=java.base/java.nio=ALL-UNNAMED
--add-opens=java.base/java.lang.reflect=ALL-UNNAMED
-Dnashorn.args=--no-deprecation-warning
-Xms4096m
-Xmx4096m
-Xmn256m
https://download.csdn.net/course/detail/37655
https://optee.readthedocs.io/en/latest/
Recommend
About Joyk
Aggregate valuable and interesting links.
Joyk means Joy of geeK