

#打卡不停更# HarmonyOS 基于ArkUI(ETS) 实现雷达扫描-开源基础软件社区-51CTO.COM
source link: https://ost.51cto.com/posts/18634
Go to the source link to view the article. You can view the picture content, updated content and better typesetting reading experience. If the link is broken, please click the button below to view the snapshot at that time.

#打卡不停更# HarmonyOS 基于ArkUI(ETS) 实现雷达扫描 原创 精华
作者:杨尚晓
雷达扫描是一个比较有科技感的东西,对于科幻迷来说,科幻电影里基本都能看到的画面,一个大大的屏幕上,可以看到雷达扫描的绿幕效果。
下面我们使用三种方式来实现这样的雷达效果。
- 工具版本:DevEco Studio 3.0 Release
- SDK版本:3.1.1.2(API Version 8 Release)
- 主要组件:canvas, Row, Image
-
使用Image图片组件方式实现
-
使用canvas组件实现
-
使用Row组件的渐变属性实现
需要注意,一个页面里只能有一个@Entry修饰符,所以,下面三种方法在预览的时候,需要注意注释只保留一个@Entry
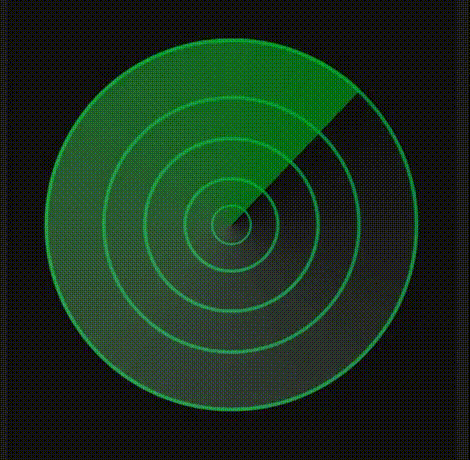
1. 使用Image方法实现
使用Image组件的方法是最简单的,直接制作两张图片,一张底图,一张扫描的图

将两张图片通过叠加,将扫描的图片通过圆心宣旋转即可,下面使用代码来实现
@Entry
@Component
struct RadarImg {
  @State angle:number = 0;
  aboutToAppear(){
    setTimeout(()=>{
      this.angle = 360
    },200)
  }
  build(){
    Row(){
      Stack(){
        Image($r("app.media.radar_grid"))
          .width(300)
          .height(300)
        Image($r('app.media.radar_sector'))
          .width(300)
          .height(300)
          .rotate({
            z: 1,
            angle: this.angle
          })
          .animation({
            duration: 2000,
            curve:Curve.Linear,
            iterations: -1,
          })
      }
    }
    .justifyContent(FlexAlign.Center)
    .backgroundColor(0x111111)
    .width('100%')
    .height('100%')
  }
}
整体比较简单,旋转主要用到了animation属性,这些在官网API文档可以查看。虽然使用Image组件实现比较简单,但是却是可以实现一些复杂的雷达UI。
2. 使用canvas实现
使用canvas实现的需要用到两个组件,第一个是Canvas组件,用来绘制底图网格,第二个是Row组件,使用角渐变属性实现旋转的扇形。
这里为什么不都使用canvas实现呢,找了一圈,canvas只有线性渐变和径向渐变,切没有角度渐变属性,所以,为了方便就用了row来实现吧。
下面直接上代码。
Row的渐变方式在下一个方法讲解,最终都还是使用animation属性动画实现扇形的旋转效果
@Entry
@Component
struct RadarCanvas {
  private settings: RenderingContextSettings = new RenderingContextSettings(true);
  private ctx: CanvasRenderingContext2D = new CanvasRenderingContext2D(this.settings)
  @State angle:number = 0
  // 绘制网格
  drawGrid = (): void => {
    let ctx = this.ctx;
    ctx.lineWidth = 1
    ctx.strokeStyle = 'green'

    // arr数组是需要绘制的底图圈圈
    let arr:Array<number> = [150, 100, 50]
    for(let i = 0; i < arr.length; i++){
      ctx.beginPath()
      ctx.arc(150, 150, arr[i] - 0.5, 0, 2 * Math.PI)
      ctx.stroke()
    }

    // 绘制十字架
    ctx.beginPath()
    ctx.moveTo(0,150)
    ctx.lineTo(300,150)
    ctx.stroke()

    ctx.beginPath()
    ctx.moveTo(150,0)
    ctx.lineTo(150,300)
    ctx.stroke()
  }

  aboutToAppear(){
    setTimeout(()=>{
      this.angle = 360
    },200)
  }
  build(){
    Row(){
      Stack(){
        Canvas(this.ctx)
          .onReady(()=>{
            this.drawGrid()
          })
          .width(300)
          .height(300)
        Row()
          .width(300)
          .height(300)
          .borderRadius(150)
          .sweepGradient({
            center: [150,150],
            start: 0,
            end: 359,
            colors: [
              ['rgba(0,0,0,0)',0],
              ['rgba(0,0,0,0)',0.4],
              ['rgba(0,255,0,0.5)',1],
            ]
          })
          .rotate({
            z: 1,
            angle: this.angle
          })
          .animation({
            duration: 2000,
            iterations: -1,
            curve: Curve.Linear
          })
      }
    }
      .justifyContent(FlexAlign.Center)
      .backgroundColor(0x111111)
      .width('100%')
      .height('100%')
  }
}
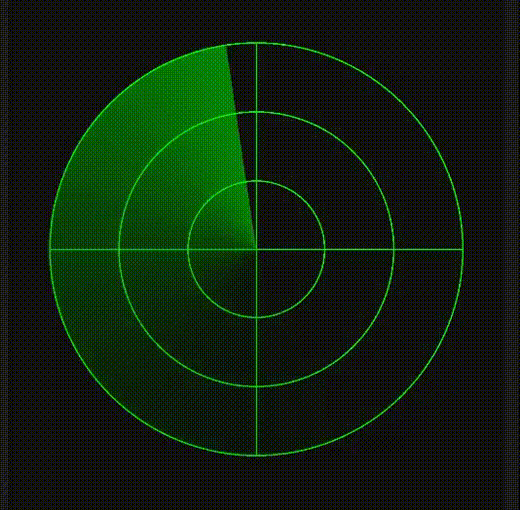
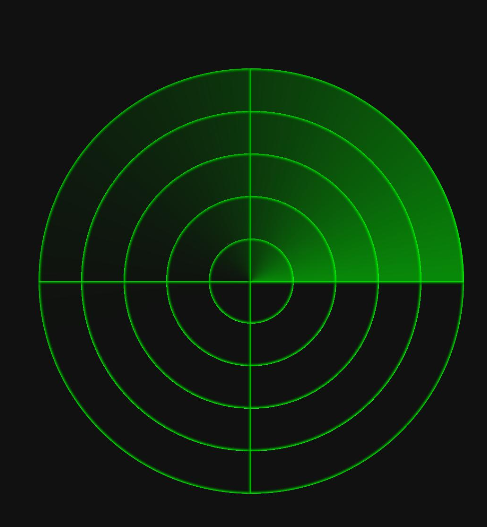
3. 使用Row组件实现
使用Row组件实现的方法稍微复杂一些,这里用到了4个Row组件,其实对于前端童鞋来说,这里可能会比较好里一些,其实就是类似通过div和css来实现的,row组件是div,其属性是css样式。
废话不多说,直接上代码开搞
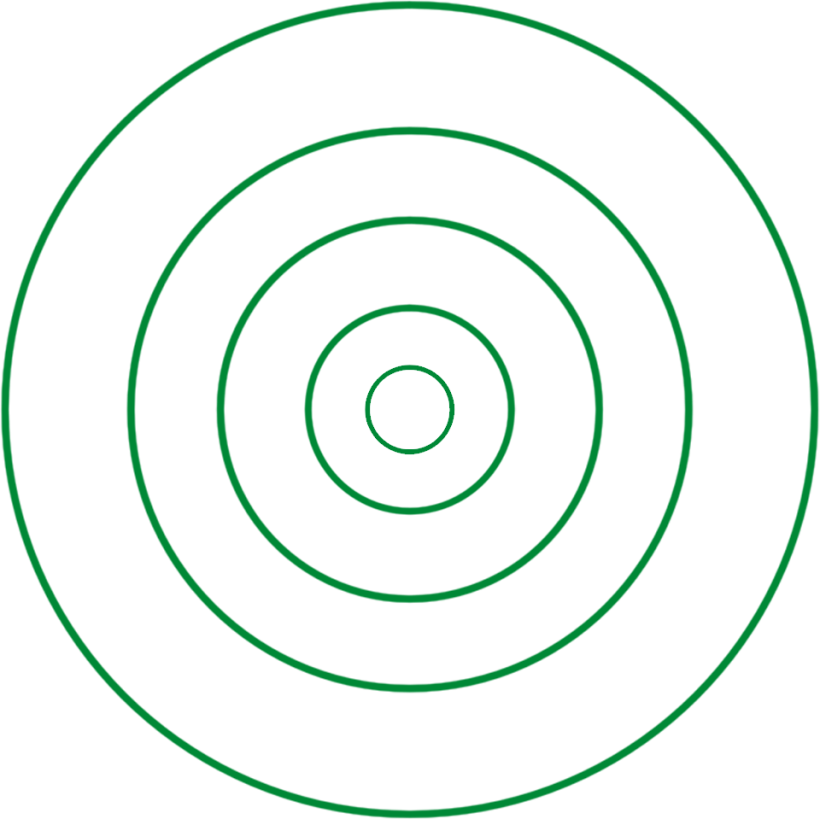
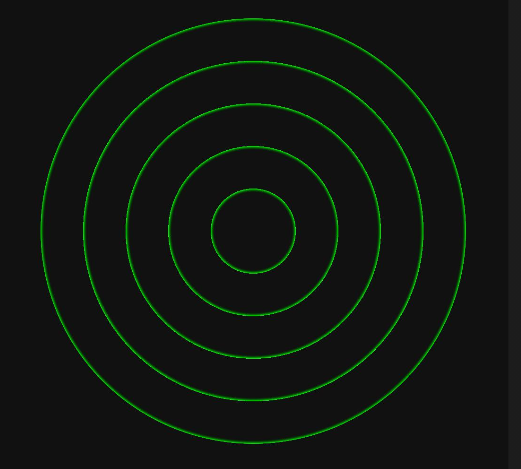
3.1 实现圆圈圈
首先使用径向渐变属性(radialGradient)来实现底部圈圈的效果
radialGradient属性有几个需要注意的值,radius是渐变的半径,这里使用30。
渐变颜色colors组用了三个数据,可以看出,前两个其实是透明度为0的。
可以理解为
- 第一个渐变颜色到第二个渐变颜色用了90%
- 第二个渐变颜色到第三个渐变颜色,用了10%(100%-90%)
- 也就是说在渐变半径为30的情况下,有90%是透明的,只有10%是透明到green颜色的,这样得到了一个圈圈
- 然后又设置了repeating属性(重复着色)为true
- 所以在半径为150的圆内,可以设置 150 / 3 = 5个圆圈圈
Row()
.width(300)
.height(300)
.borderRadius(150)
.radialGradient({
    center: [150,150],
    radius: 30,
    colors: [
      ['rgba(0,0,0,0)', 0],
      ['rgba(0,0,0,0)', 0.9],
      ['green', 1],
    ],
    repeating: true,
})
我们看看效果
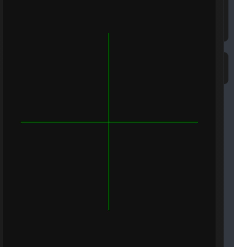
3.2 实现十字架
实现十字架使用了两个Row组件,使用线性渐变属性(linearGradient)分别绘制了一横一竖的效果。
可以看到颜色组colors使用了5个颜色来实现,1,2,4,5的颜色都是透明的
- 第一个颜色到第二个颜色都是透明的,渐变范围是0到49%,
- 第二个颜色到第三个颜色渐变范围是50% - 49% = 1%,也就是在其50%(中间)的地方绘制了一个1%的green线条
- 第三个颜色到第四个颜色不变
- 第三个到第五个颜色也是透明,渐变范围也是50%
上面绘制好之后,我们通过angle属性将线条旋转90度得到一个十字架
Row()
  .width(300)
  .height(300)
  .borderRadius(150)
  .linearGradient({
    angle: 0,
    colors: [
      ['rgba(0,0,0,0)', 0],
      ['rgba(0,0,0,0)',0.49],
      ['green',0.5],
      ['rgba(0,0,0,0)',0.5],
      ['rgba(0,0,0,0)',1]
    ]
  })
Row()
  .width(300)
  .height(300)
  .borderRadius(150)
  .linearGradient({
    angle: 90,
    colors: [
      ['rgba(0,0,0,0)', 0],
      ['rgba(0,0,0,0)',0.49],
      ['green',0.5],
      ['rgba(0,0,0,0)',0.5],
      ['rgba(0,0,0,0)',1]
    ]
  })
来看看效果
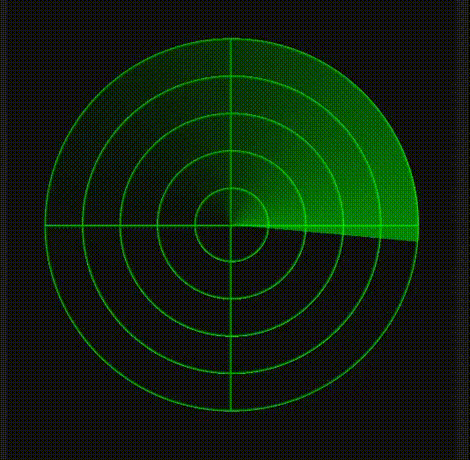
3.3 实现旋转扇形
扇形也是用到Row组件,其角度渐变属性(sweepGradient)来实现的。
Row()
  .width(300)
  .height(300)
  .borderRadius(150)
  .sweepGradient({
    center: [150,150],
    start: 0,
    end: 359,
    colors: [
      ['rgba(0,0,0,0)',0],
      ['rgba(0,0,0,0)',this.flag],
      ['rgba(0,255,0,0.5)',1],
    ]
  })
来看看效果
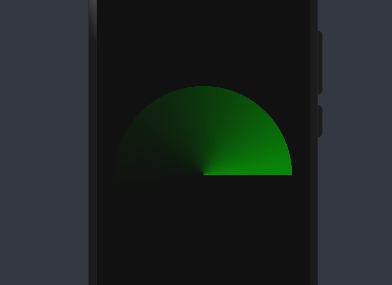
最后设置rotate旋转属性,设置旋转轴为z轴,角度angle为动态更新,这样animation动画属性才会更新。
最终代码
扇形的代码
Row()
  .width(300)
  .height(300)
  .borderRadius(150)
  .sweepGradient({
    center: [150,150],
    start: 0,
    end: 359,
    colors: [
      ['rgba(0,0,0,0)',0],
      ['rgba(0,0,0,0)',this.flag],
      ['rgba(0,255,0,0.5)',1],
    ]
  })
  .rotate({
    z: 1,
    angle: this.angle
  })
  .animation({
    duration: 2000,
    iterations: -1,
    curve: Curve.Linear
  })
这里添加一个扫描周边设备的效果,动态设置了一个数据源,通过ForEach来动态渲染
ForEach(this.scanData,(item: any) => {
  Column(){
    Image($r('app.media.icon'))
      .width(28)
      .height(28)
      .backgroundColor('#fff')
      .borderRadius(19)
    Text(item.name)
      .fontColor('#fff')
      .margin({top: 5})
      .fontSize(10)
  }
  .alignItems(HorizontalAlign.Center)
  .position({x: item.x, y: item.y})
  .scale({x: this.w, y: this.h})
  .animation({
    duration: 1000,
    iterations: 1,
    curve: Curve.Friction
  })
  .opacity(this.opt)
})
最终的代码
// 雷达扫描组件
@Entry
@Component
struct Radar {
  @State angle:number = 0;
  @State scanData: any = []
  @State w:number = 0;
  @State h:number = 0;
  @State opt:number = 1
  @State flag:number = 0.4
  aboutToAppear(){
    setTimeout(()=>{
      this.angle = 360
    },200)
    setTimeout(()=>{
      animateTo({
        duration: 1000, // 动画时长
        curve: Curve.Linear, // 动画曲线
        iterations: -1, // 播放次数
        playMode: PlayMode.AlternateReverse, // 动画模式
        onFinish: () => {
          console.info('play end')
        }
      }, () => {
        this.opt = 0.3
      })
    },2000)
    setTimeout(()=>{
      this.scanData = [
        {
          id: 1,
          x: 190,
          y: 200,
          name: '空调'
        },
        {
          id: 1,
          x: 80,
          y: 240,
          name: '插座'
        },
      ]
      setTimeout(()=>{
        this.w = 1;
        this.h = 1;
      },200)
    },1000)

  }
  build(){
    Row(){
      Stack(){
        Row()
          .width(300)
          .height(300)
          .borderRadius(150)
          .radialGradient({
            center: [150,150],
            radius: 30,
            colors: [
              ['rgba(0,0,0,0)', 0],
              ['rgba(0,0,0,0)', 0.9],
              ['green', 1],
            ],
            repeating: true,
          })
        Row()
          .width(300)
          .height(300)
          .borderRadius(150)
          .linearGradient({
            angle: 0,
            colors: [
              ['rgba(0,0,0,0)', 0],
              ['rgba(0,0,0,0)',0.49],
              ['green',0.5],
              ['rgba(0,0,0,0)',0.5],
              ['rgba(0,0,0,0)',1]
            ]
          })
        Row()
          .width(300)
          .height(300)
          .borderRadius(150)
          .linearGradient({
            angle: 90,
            colors: [
              ['rgba(0,0,0,0)', 0],
              ['rgba(0,0,0,0)',0.49],
              ['green',0.5],
              ['rgba(0,0,0,0)',0.5],
              ['rgba(0,0,0,0)',1]
            ]
          })
        Row()
          .width(300)
          .height(300)
          .borderRadius(150)
          .sweepGradient({
            center: [150,150],
            start: 0,
            end: 359,
            colors: [
              ['rgba(0,0,0,0)',0],
              ['rgba(0,0,0,0)',this.flag],
              ['rgba(0,255,0,0.5)',1],
            ]
          })
          .rotate({
            z: 1,
            angle: this.angle
          })
          .animation({
            duration: 2000,
            iterations: -1,
            curve: Curve.Linear
          })
        ForEach(this.scanData,(item: any) => {
          Column(){
            Image($r('app.media.icon'))
              .width(28)
              .height(28)
              .backgroundColor('#fff')
              .borderRadius(19)
            Text(item.name)
              .fontColor('#fff')
              .margin({top: 5})
              .fontSize(10)
          }
          .alignItems(HorizontalAlign.Center)
          .position({x: item.x, y: item.y})
          .scale({x: this.w, y: this.h})
          .animation({
            duration: 1000,
            iterations: 1,
            curve: Curve.Friction
          })
          .opacity(this.opt)
        })
      }
      .width(300)
      .height(300)
    }
    .justifyContent(FlexAlign.Center)
    .width('100%')
    .height('100%')
    .backgroundColor(0x111111)
  }
}
来看看最终完整的效果
git地址
https://gitee.com/yango520/yg-radar
通过这个雷达demo,特别是第三种方法,可以学到了颜色渐变属性中的三种渐变,线性渐变,径向渐变,和角度渐变。也可以学习属性动画的实现。
更多原创内容请关注:中软国际 HarmonyOS 技术团队
入门到精通、技巧到案例,系统化分享HarmonyOS开发技术,欢迎投稿和订阅,让我们一起携手前行共建鸿蒙生态。
Recommend
About Joyk
Aggregate valuable and interesting links.
Joyk means Joy of geeK