
5

AgileBoot - 如何集成内置数据库H2和内置Redis - CoderV的进阶笔记
source link: https://www.cnblogs.com/valarchie/p/16829864.html
Go to the source link to view the article. You can view the picture content, updated content and better typesetting reading experience. If the link is broken, please click the button below to view the snapshot at that time.

本项目地址:
本项目说明:AgileBoot - 基于SpringBoot + Vue3的前后端快速开发脚手架
为什么我们需要内置的数据库和Redis呢?
- 内置的数据库H2,可以让我们在无依赖数据库的情况下,做集成测试。比如我们想测试添加一个学生到数据库,就需要启动一台数据库来验证结果。然而使用H2内置数据库的话,就可以在无依赖数据库的情况下,进行验证。
- 数据库H2是内存级的,如果有大量集成测试(IT:Integration Test)的话,可以缩短测试时间。
- Embedded Redis同上,使我们在无依赖Redis的情况下,做测试。
- 还有一个小优点,就是对于新手或者不熟悉后端的前端小伙伴来说,他们在可以不配置Mysql和Redis就直接把整个项目run起来~
- H2并不能兼容所有数据库的功能,比如函数,或者一些特殊索引之类的。使用H2的话,Mysql的表结构不能直接导入,需要做一些调整。
- Embeded Redis同样不能完全兼容真正的Redis, 一些特殊用法可能会出错。
引入H2数据库代码实现
1.引入内置的H2数据库
因为我想做到使用H2直接启动项目,所以scope设置为runtime,如果仅用H2做测试用的话,请设置成test
<dependency>
    <groupId>com.h2database</groupId>
    <artifactId>h2</artifactId>
    <scope>runtime</scope>
</dependency>
2.yml文件内数据库的配置,改成H2
# 数据源配置
spring:
    datasource:
        #  驱动
        driver-class-name: org.h2.Driver
        # h2 内存数据库 内存模式连接配置 库名: agileboot
        url: jdbc:h2:mem:agileboot;DB_CLOSE_DELAY=-1
        h2:
            # 开启console 访问 默认false
            console:
                enabled: true
                settings:
                    #      开启h2 console 跟踪 方便调试  默认 false
                    trace: true
                    #      允许console 远程访问 默认false
                    web-allow-others: true
                #  h2 访问路径上下文
                path: /h2-console

    sql:
        init:
            platform: mysql
            # 初始化数据
            schema-locations: classpath:h2sql/agileboot_schema.sql
            data-locations: classpath:h2sql/agileboot_data.sql
最后两行是H2数据库需要的数据库结构和数据脚本文件,放置在resources文件夹下的h2sql目录里(你也可以放在其他目录)
以下是样本:
schema.sql
create table sys_config
(
    config_id       int auto_increment,
    config_name     varchar(128)  default '' not null comment '配置名称',
    config_key      varchar(128)  default '' not null comment '配置键名',
    config_options  varchar(1024) default '' not null comment '可选的选项',
    config_value    varchar(256)  default '' not null comment '配置值',
    is_allow_change int              not null comment '是否允许修改',
    creator_id      int                   null comment '创建者ID',
    creator_name    varchar(64)   default '' null comment '创建者',
    updater_id      int                   null comment '更新者ID',
    updater_name    varchar(64)   default '' null comment '更新者',
    update_time     datetime                 null comment '更新时间',
    create_time     datetime                 null comment '创建时间',
    remark          varchar(128)             null comment '备注',
    deleted         int    default 0  not null comment '逻辑删除'
);
data.sql
-- ----------------------------
-- Records of sys_config
-- ----------------------------
INSERT INTO `sys_config` VALUES ('1', '主框架页-默认皮肤样式名称', 'sys.index.skinName', '["skin-blue","skin-green","skin-purple","skin-red","skin-yellow"]', 'skin-blue', '1', null, 'admin', null, '', '2022-08-28 22:12:19', '2022-05-21 08:30:55', '蓝色 skin-blue、绿色 skin-green、紫色 skin-purple、红色 skin-red、黄色 skin-yellow', '0');
INSERT INTO `sys_config` VALUES ('2', '用户管理-账号初始密码', 'sys.user.initPassword', '', '1234567', '1', null, 'admin', null, '', '2022-08-28 21:54:19', '2022-05-21 08:30:55', '初始化密码 123456', '0');
INSERT INTO `sys_config` VALUES ('3', '主框架页-侧边栏主题', 'sys.index.sideTheme', '["theme-dark","theme-light"]', 'theme-dark', '1', null, 'admin', null, '', '2022-08-28 22:12:15', '2022-08-20 08:30:55', '深色主题theme-dark,浅色主题theme-light', '0');
INSERT INTO `sys_config` VALUES ('4', '账号自助-验证码开关', 'sys.account.captchaOnOff', '["true","false"]', 'false', '0', null, 'admin', null, '', '2022-08-28 22:03:37', '2022-05-21 08:30:55', '是否开启验证码功能(true开启,false关闭)', '0');
INSERT INTO `sys_config` VALUES ('5', '账号自助-是否开启用户注册功能', 'sys.account.registerUser', '["true","false"]', 'true', '0', null, 'admin', '1', 'admin', '2022-10-05 22:18:57', '2022-05-21 08:30:55', '是否开启注册用户功能(true开启,false关闭)', '0');
这边需要注意一点,H2只支持最简单的建表语句。
比如索引、engine、charset、排序之类的都无法执行。以下是我Mysql的建表语句供你参考
CREATE TABLE `sys_config` (
  `config_id` int NOT NULL AUTO_INCREMENT COMMENT '参数主键',
  `config_name` varchar(128) CHARACTER SET utf8mb4 COLLATE utf8mb4_general_ci NOT NULL DEFAULT '' COMMENT '配置名称',
  `config_key` varchar(128) CHARACTER SET utf8mb4 COLLATE utf8mb4_general_ci NOT NULL DEFAULT '' COMMENT '配置键名',
  `config_options` varchar(1024) NOT NULL DEFAULT '' COMMENT '可选的选项',
  `config_value` varchar(256) CHARACTER SET utf8mb4 COLLATE utf8mb4_general_ci NOT NULL DEFAULT '' COMMENT '配置值',
  `is_allow_change` tinyint(1) NOT NULL COMMENT '是否允许修改',
  `creator_id` bigint DEFAULT NULL COMMENT '创建者ID',
  `creator_name` varchar(64) CHARACTER SET utf8mb4 COLLATE utf8mb4_general_ci DEFAULT '' COMMENT '创建者',
  `updater_id` bigint DEFAULT NULL COMMENT '更新者ID',
  `updater_name` varchar(64) CHARACTER SET utf8mb4 COLLATE utf8mb4_general_ci DEFAULT '' COMMENT '更新者',
  `update_time` datetime DEFAULT NULL COMMENT '更新时间',
  `create_time` datetime DEFAULT NULL COMMENT '创建时间',
  `remark` varchar(128) CHARACTER SET utf8mb4 COLLATE utf8mb4_general_ci DEFAULT NULL COMMENT '备注',
  `deleted` tinyint(1) NOT NULL DEFAULT '0' COMMENT '逻辑删除',
  PRIMARY KEY (`config_id`),
  UNIQUE KEY `config_key_uniq_idx` (`config_key`) USING BTREE
) ENGINE=InnoDB AUTO_INCREMENT=100 DEFAULT CHARSET=utf8mb4 COLLATE=utf8mb4_general_ci COMMENT='参数配置表';
可以发现Mysql的建表语句需要删除一部分特殊用法,才能在H2执行。H2的建表语句显得很简单。
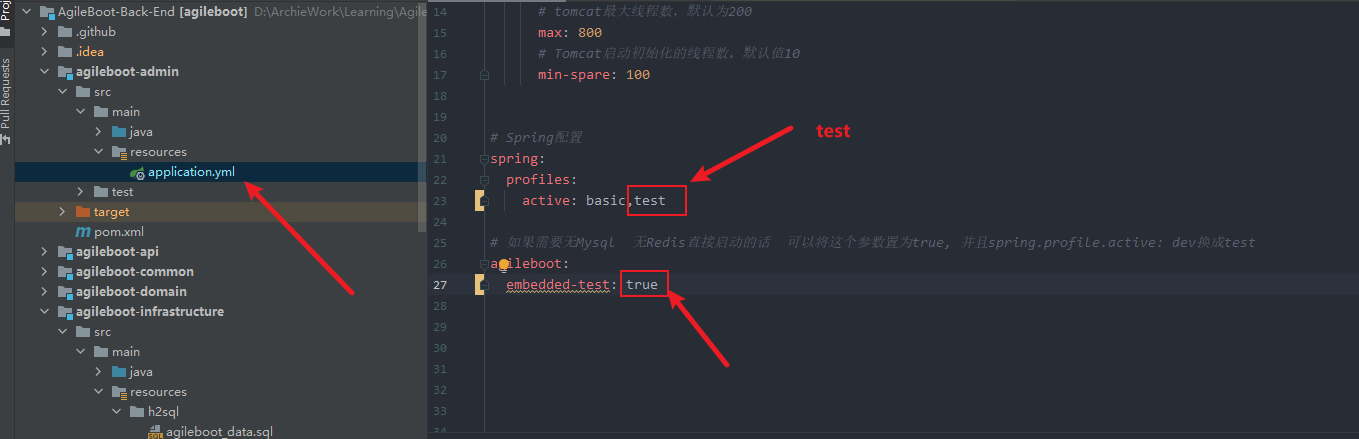
3.yml中引入变量控制是否启用H2数据库
# 如果需要无Mysql  无Redis直接启动的话  可以将这个参数置为true, 并且spring.profile.active: dev换成test
agileboot:
  embedded-test: false
因为项目可以选择使用Mysql启动也可以使用H2启动,Spring的配置会有冲突。所以使用agileboot.embedded-test的值来决定启动Mysql相关的Bean还是H2相关的Bean.
Spring提供了@ConditionalOnExpression注解基于条件来初始化bean
    @Bean
    @ConfigurationProperties("spring.datasource.druid.master")
    @ConditionalOnExpression("'${agileboot.embedded-test}' != 'true'")
    public DataSource masterDataSource(DruidProperties druidProperties) {
        DruidDataSource dataSource = DruidDataSourceBuilder.create().build();
        return druidProperties.dataSource(dataSource);
    }
引入内置Redis代码实现
1.引入依赖
<dependency>
   <groupId>it.ozimov</groupId>
    <artifactId>embedded-redis</artifactId>
    <version>0.7.3</version>
    <!-- 不排除掉slf4j的话 会冲突-->
    <exclusions>
        <exclusion>
            <groupId>org.slf4j</groupId>
            <artifactId>slf4j-simple</artifactId>
        </exclusion>
    </exclusions>
</dependency>
2.引入Embedded Redis进行启动
@Configuration
@ConditionalOnExpression("'${agileboot.embedded-test}' == 'true'")
public class EmbeddedRedisConfig {

    @Value("${spring.redis.port}")
    private Integer port;

    private RedisServer redisServer;


    @PostConstruct
    public void postConstruct() {
        RedisServer redisServer = RedisServer.builder().port(port)
            .setting("maxheap 32M")
            .setting("daemonize no")
            .setting("appendonly no").build();
        this.redisServer = redisServer;
        redisServer.start();
    }

    @PreDestroy
    public void preDestroy() {
        redisServer.stop();
    }

}
同理,我们使用agileboot.embedded-test的值来决定启动内置的Redis.
该设计实现在AgileBoot项目内,有兴趣的小伙伴可以项目down下来看下~
几行指令即可run起前后端项目。
后端项目仅需把yml的这两个配置改一下即可。
前后端全栈技术交流群:1398880
欢迎前后端萌新大佬加群讨论~~
Recommend
About Joyk
Aggregate valuable and interesting links.
Joyk means Joy of geeK