

Creating an FHIR API
source link: https://keyholesoftware.com/2022/10/25/part-3-creating-an-fhir-api-implementation-part-b/
Go to the source link to view the article. You can view the picture content, updated content and better typesetting reading experience. If the link is broken, please click the button below to view the snapshot at that time.

Part 3: Creating an FHIR API – Implementation Part B
Zach Gardner October 25, 2022 Cloud, Creating an FHIR API, Tutorial Leave a Comment
This is Part 3 of our series on creating an FHIR API using Google Cloud’s offering. In the last installment, we began implementing an FHIR using GCP. We covered creating both the BigQuery resources and your FHIR repository resources. if you missed Part 1 and Part 2, be sure you go back to read those – they’re critical to understanding!
This time, we’re continuing the implementation. I’ll explain the authentication methods, and we’ll also tackle populating data in our FHIR repository.
Alright, let’s get started!
An Explanation of Authentication Methods
In the last part, we created our FHIR dataset. Now that we have that done, it’s time to start loading it with some sample data.
A prerequisite is to have a service account that your application leverages to authenticate with the FHIR repository. There are some potential downsides to service accounts, namely credential rotation as well as how and where to store the credentials.
In a perfect world, a Managed Identity is the preferred approach as it follows the IAM/RBAC model as a first-class citizen and does not rely on obscurity for its security. It also does not need to have an expiration date configured, which can increase the burden for the operational team. That said, proceed with caution when setting up a service account for a production application, and ensure it is in compliance with the policies and procedures of your organization.
Caveats now disclosed, let’s move forward. Search for “service account,” click on the IAM page, and then click +Create Service Account.
![]()
The name of the service account should begin with “sa” for “Service Account”, then a dash, then it should be followed by the ID of the data store.

Then, click on Create and Continue. For demo purposes, assign the Owner role for the current project to the service account. Ideally, in a production scenario, the role used would correspond to the principle of least permission, so be sure to note this when working on a deployment for a real environment.

Then click on Continue. The next prompt will be to add specific users to the service account. This should be done to ensure that even if the current user goes on PTO and access to the service account is needed, administrative action can still be taken by other users on call for support.
Ideally, the other users would be part of a group-specific to this application, rather than a list of specific users. For the purposes of this demo, no other users or roles will be provisioned with access to this Service Account.

After creation, the new Service Account will show up in the listing.

Click on the newly created Service Account, then go to Keys, Add Key, and Create new key.

Select JSON as the key type, then click Create.

The file then gets downloaded to your browser and is not accessible within GCP. Make sure to take all the necessary precautions with the file that gets downloaded since it contains in clear text the private key for the service account.
Also note that the expiration date for the key is December 31st, 9999.
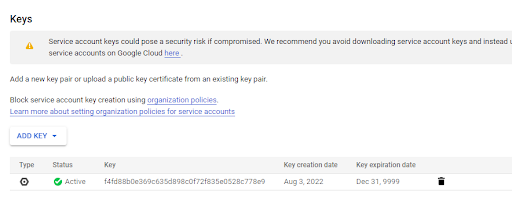
This could be problematic if your organization has a policy around keys needing to expire 12 months from creation. Additionally, the administrator of the organization tied to the current project has the ability to block key creation for service accounts. If that is configured, then keys need to be requested from the appropriate IT team that has permission to create them, or only an OAuth-style access to the FHIR repository will be possible. This has the downside of requiring a running user to run the synchronization process to hydrate the FHIR repository, which usually runs headless and synchronizes data as a background process.
For these reasons and more, it is recommended to use Workload identity federation when integrating with GCP resources like the FHIR repository. The Service Account key is used as part of this blog purely as a demonstration and not as a recommendation of how to set up a production workflow.
Following the Google documentation, after the Service Account is created, install the gcloud CLI. (The Windows installer does SSL validation, so you might have to disconnect from a corporate VPN if it proxies HTTPS traffic.) Log in, select the project to use, set the desired compute region, authenticate using the service account, then print the bearer token.
Populating Data in the FHIR Repository
With the FHIR data store and bearer token method in hand, it is now time to populate the data inside of the repository. To show that from scratch, I’ll create a new .NET Core project/solution and leverage some NuGet libraries to help facilitate the API interaction.

Search for a Console app, select the .NET Core version, then create the project/solution.

For this demo, I’m selecting .NET Core 3.1 LTS.

The application gets created with the Hello World printed out.

Then, right-click on the Dependencies and Manage NuGet Packages.
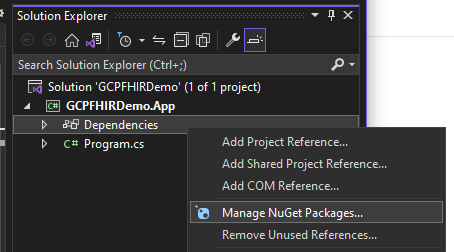
This demo will use the Fhirly library, so go to Browse, search for “FHIR,” then select the Hl7.Fhir.R4 package. Install it on the project.

Back in the console application, bring in the library, and create a sample patient.

Note that the ID was specified as part of the definition of the patient before it was sent to the FHIR repository. There are pros and cons to this approach, which require consideration no matter which direction is chosen.
If the decision is made to provide an ID on creation, consider what to use for it. An MRN from an acute or ambulatory EMR might make sense, or potentially an MPI as an aggregate patient identifier. Merges and splits are possible if not likely depending upon the registration team’s workflow, which could require the application populating the FHIR repository to listen to these events and deprecate the non-surviving record and merge data into the surviving record. An upside to using an MRN or MPI as the ID for the FHIR patient is that lookups are extremely fast if the calling system already knows an MRN or the MPI for the patient.
The alternative is to use a GUID automatically generated by the FHIR repository, and simply have the calling systems look the patient up by querying the identifiers with that MRN or MPI.
With the Patient instance created, the next step is to configure the FHIR Rest client to the data store. Go to the data store’s details, and copy the Path.

The URL is then “https://healthcare.googleapis.com/v1/” plus what was copied from the data store path, then suffixed with “/fhir/”. For example:
The FHIR Rest client setup also includes some of the default settings recommended by the Fhirly documentation. Most of them work with the GCP FHIR repository, except the VerifyFhirVersion. That issues a call to /fhir/metadata?_summary=true, which returns a grpc.BadRquest invalid argument exception. The settings that work well with both GCP FHIR as well as Fhirly are:

Note that the example in the documentation uses a Timeout value of 0, but that will cause an opaque ArgumentOutOfRange exception.

Authorization is the next piece of the configuration. A class that extends the HttpMessageHandler needs to be created so that, prior to any outbound HTTP requests to the FHIR Repository, a filter can inject the bearer token into the headers of the request.
The implementation for this on the Fhirly side may vary depending upon the version of .NET being used in the application. For the .NET Core 3.1 use case, the class looked like this:

The recommendation for a production scenario is to instead have the instance of this class come through Dependency Injection, and for the class to be given the bearer token as an appSetting configuration.
Now with all three pieces together, it’s time to create the FHIR Repository client.

Note that some of the variables used are defined outside of this screenshot and come from the appSettings. In a production scenario, these would be loaded in at the run time from a secure secret storage location.
Now, it’s time to create the patient. For the purposes of this blog post, the chosen direction is to use the patient’s MPI as the FHIR resource’s ID. If the fhirClient.CreateAsync() method was used, this would trigger the GCP FHIR repository to essentially ignore the ID that was passed in the payload and instead, generate its own ID for the patient. The API will still give a HTTP 201 Created response, but it will also include a Location header with a URL to the newly created Patient resource with the GCP-generated GUID as the identifier. That is why the fhirClient.UpdateAsync() method is used.
![]()
The response from the GCP FHIR Repository is still a HTTP 201 Created, but the Location header includes the ID (MPI) provided on the payload. That allows us to then read the Patient resource after it’s been created.
![]()
The response from the API looks like this.
HTTP/1.1 200 OK{"birthDate": "2022-01-01","gender": "female","id": "1000001","meta": {"lastUpdated": "2022-08-04T12:51:08.259792+00:00","versionId": "MTY1OTYxNzQ2ODI1OTc5MjAwMA"},"name": [{"family": "Smith","given": ["Jenny"],"use": "official"}],"resourceType": "Patient"} |
If you get that on your end, you’re set.
Wrapping Up
With that, we conclude Part 3. Just a recap, today, we talked through authentication considerations and populating data. I hope you’ll keep your eye out for our fourth and final installment, Part 4! We’ll wrap up our implementation, and I’ll share a few closing thoughts before sending you off to do things on your own.
Recommend
-
7
HL7® FHIR® and Touchstone Virtual Training Feb. 3-4, 2021 Recently updated!“Touchstone’s training program unlocked the power of this testing environment for us. Like any specialized tool, we needed to learn how to use it....
-
11
Normalizing FHIR Queries using FluentQuery
-
20
Automating FHIR IG Builds From Structured Data
-
9
FHIR enabling an immunization registry March 26, 2021 5 Comments ...
-
6
FHIR enabling an Immunization registry – part 4 April 6, 2021 1 Comment...
-
6
Making FHIR work for everybody FHIR is the HL7’s modern approach to connecting components in the health computing space. Unlike t...
-
7
Accessing lab data via FHIR – part 2 May 25, 2021 4 Comments
-
8
Accessing lab data via FHIR – part 1 May 23, 2021 2 Comments
-
5
FHIR API: Should I Use Azure or Google?
-
5
Part 2: Creating an FHIR API – Implementation Part A Zach Gardner October 20, 2022
About Joyk
Aggregate valuable and interesting links.
Joyk means Joy of geeK