
6

使用pve-exporter监控proxmox
source link: https://www.bboy.app/2022/10/24/%E4%BD%BF%E7%94%A8pve-exporter%E7%9B%91%E6%8E%A7proxmox/
Go to the source link to view the article. You can view the picture content, updated content and better typesetting reading experience. If the link is broken, please click the button below to view the snapshot at that time.

使用pve-exporter监控proxmox
2022-10-24 21:47:00 kubernetes
周末终于鼓起勇气花了一个多小时,把家里nuc里面的esxi换成了pve,然后就想着在树莓派的k3s里面去启动一个pve-exporter去监控,下面记录下过程
https://github.com/prometheus-pve/prometheus-pve-exporter
创建一个deployment
apiVersion: apps/v1
kind: Deployment
metadata:
  name: pve-exporter
  namespace: app
spec:
  selector:
    matchLabels:
      app: pve-exporter
  template:
    metadata:
      labels:
        app: pve-exporter
    spec:
      containers:
      - name: pve-exporter
        image: git.bboysoul.cn/container/prometheus-pve-exporter:2.2.4
        env:
          - name: PVE_USER
            value: root@pam
          - name: PVE_PASSWORD
            value: pass
          - name: PVE_VERIFY_SSL
            value: "false"
        resources:
          limits:
            memory: "128Mi"
            cpu: "500m"
        ports:
        - containerPort: 9221
关键的地方就是这个环境变量
        env:
          - name: PVE_USER
            value: root@pam
          - name: PVE_PASSWORD
            value: pass
          - name: PVE_VERIFY_SSL
            value: "false"
其他的没什么好说的,当然根据官方的文档,你还可以挂载一个configmap上去,但是我感觉比较麻烦,所以直接注入环境变量了
创建一个svc
apiVersion: v1
kind: Service
metadata:
  name: pve-exporter
  namespace: app
spec:
  selector:
    app: pve-exporter
  ports:
  - port: 80
    targetPort: 9221
这个没什么好说的,之后prometheus直接去请求这个svc
prometheus的配置
      - job_name: 'pve'
        static_configs:
          - targets:
            - 10.10.100.200  # Proxmox VE node.
        metrics_path: /pve
        params:
          module: [default]
        relabel_configs:
          - source_labels: [__address__]
            target_label: __param_target
          - source_labels: [__param_target]
            target_label: instance
          - target_label: __address__
            replacement: pve-exporter # PVE exporter.
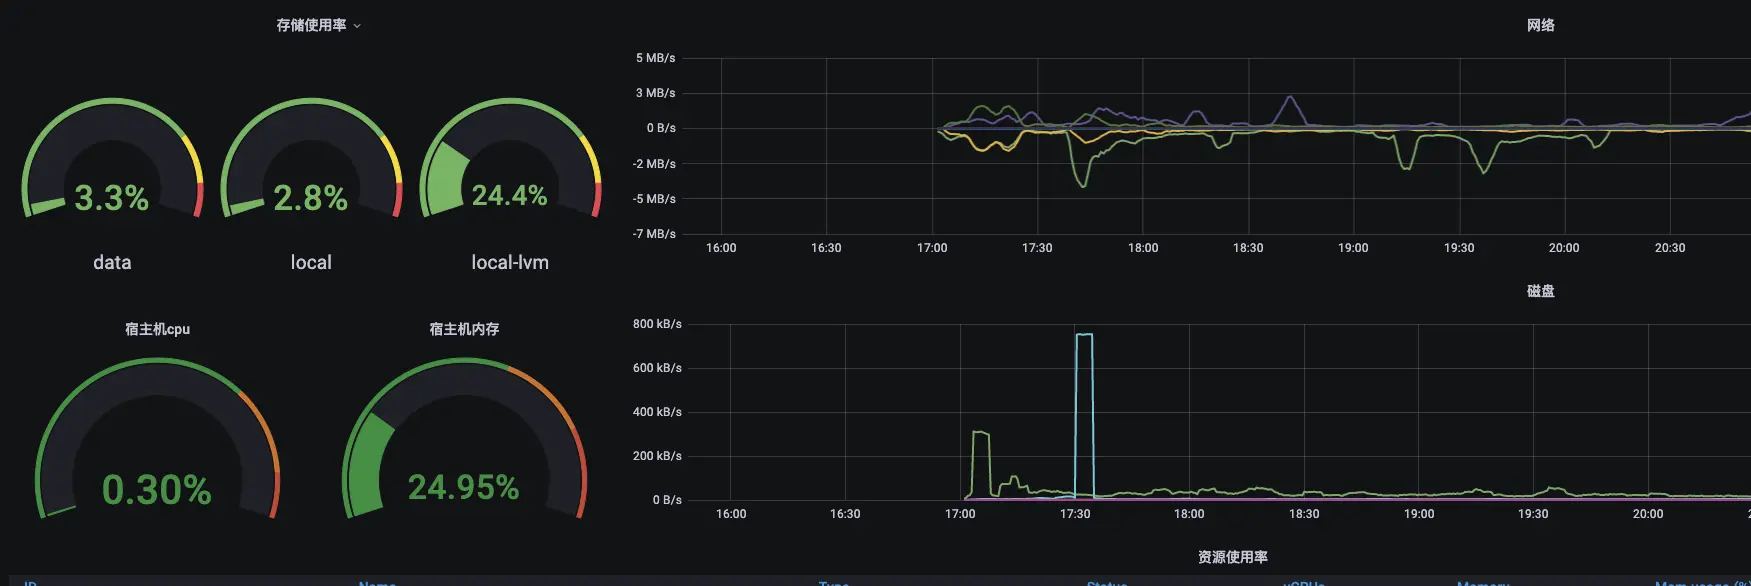
貌似默认就会去请求pve的8006端口,所以你的target直接写ip就好了,下面是dashboard的地址
https://grafana.bboysoul.cn/d/Xd6FvKE7z/jian-kong-da-ping?orgId=1&refresh=5s
欢迎关注我的博客 www.bboy.app
Have Fun
Recommend
About Joyk
Aggregate valuable and interesting links.
Joyk means Joy of geeK