
2

Unable to remove heatsink from Mac Pro 5,1 | MacRumors Forums
source link: https://forums.macrumors.com/threads/unable-to-remove-heatsink-from-mac-pro-5-1.2232768/
Go to the source link to view the article. You can view the picture content, updated content and better typesetting reading experience. If the link is broken, please click the button below to view the snapshot at that time.

MP 1,1-5,1 Unable to remove heatsink from Mac Pro 5,1
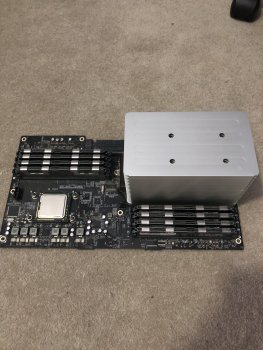
I'm currently in the process of cleaning up the Northbridge due to it overheating. I've removed one of the heatsinks but the other one won't come off.
3 of the screws unscrew, but seems like one of screws is either missing or trapped as I can't get any traction on anything.
3 of the screws unscrew, but seems like one of screws is either missing or trapped as I can't get any traction on anything.
Attachments
-
 IMG_9699.jpg546.3 KB · Views: 739
Macschrauber
macrumors 68000
Dec 27, 2015
1,923
Germany
Inspect it with a strong flashlight.
It has to be mounted like the other one.
Btw: its a 4.1
It has to be mounted like the other one.
Btw: its a 4.1
minifridge1138
macrumors 65816
Jun 26, 2010
1,175
I see the CPU in that photo has the IHS on it, so it's not the original. Did you do the upgrade yourself?
Reactions:
h9826790
I've tried using one, but there's a smaller hole at the bottom of the one on the heatsink....Inspect it with a strong flashlight.
It has to be mounted like the other one.
Btw: its a 4.1
[automerge]1587910211[/automerge]
The previous owner must have done that.I see the CPU in that photo has the IHS on it, so it's not the original. Did you do the upgrade yourself?
I've been looking for similar problems and seems like apple sometimes put a torx screw in one of them? Anyone else heard of that before
tommy chen
macrumors 6502a
Oct 1, 2018
Macschrauber
macrumors 68000
Dec 27, 2015
1,923
Germany
Neither,
One can see the screw head if looking in the hole and use a flash light from the side.
One can see the screw head if looking in the hole and use a flash light from the side.
Macschrauber
macrumors 68000
Dec 27, 2015
1,923
Germany
I know this will not make it easier but:
Be gentle removing the heat sink.
The processors are not mounted the (imo) proper way. They have the heat spreader on.
Were there spacers / washers between the 4 stands and the heat sink screws?
If not avoid any side movement of the heat sink, it will apply pressure to the cpu socket and could damage it.
See https://forums.macrumors.com/threads/4-1-dual-cpu-delid-or-leave-the-lid-down.1959772/
minifridge1138
macrumors 65816
Jun 26, 2010
1,175
My guess if that screw isn’t coming out, then it’s possible that whoever did the upgrade stripped the head on the screw.
Look inside the hole with a flashlight and try really hard to get a look at the head of the screw.
Also, that’s a 4,1 model. Reinstalling the heat sinks correctly is VERY challenging and you could easily destroy the board. Be very careful and patient.
Look inside the hole with a flashlight and try really hard to get a look at the head of the screw.
Also, that’s a 4,1 model. Reinstalling the heat sinks correctly is VERY challenging and you could easily destroy the board. Be very careful and patient.
Reactions:
h9826790
Yeah there were spacers and washers.I know this will not make it easier but:
Be gentle removing the heat sink.
The processors are not mounted the (imo) proper way. They have the heat spreader on.
Were there spacers / washers between the 4 stands and the heat sink screws?
If not avoid any side movement of the heat sink, it will apply pressure to the cpu socket and could damage it.
See https://forums.macrumors.com/threads/4-1-dual-cpu-delid-or-leave-the-lid-down.1959772/
It looks like it's the same fit to be honest, but maybe even a bit bigger.My guess if that screw isn’t coming out, then it’s possible that whoever did the upgrade stripped the head on the screw.
Look inside the hole with a flashlight and try really hard to get a look at the head of the screw.
Also, that’s a 4,1 model. Reinstalling the heat sinks correctly is VERY challenging and you could easily destroy the board. Be very careful and patient.
Snow Tiger
macrumors 6502a
Dec 18, 2019
You're placing a PCB on a carpeted surface ... that's not very wise from an ESD standpoint .
How did you remove the bottom aluminum part of the CPU Tray without removing both CPU heatsinks ? Or did it come from the seller that way ?
For releasing the captive CPU Heatsink fasteners from the Tray , you should use a 3mm T-handle hex driver with a long blade . I use a Bondhus model 15356 . It has a nine inch blade . You can manage a lot of torque with one of these , so that's probably what you need with that stuck fastener .
A small tight beam flashlight will assist in verifying the tip of the driver has locked in place onto the top of the fastener if things have gotten a little worn over the years - you simply point the beam down into the hole while aiming with the driver .
It's very rare to strip one of these fasteners ...
 [automerge]1587948601[/automerge]
How did you remove the bottom aluminum part of the CPU Tray without removing both CPU heatsinks ? Or did it come from the seller that way ?
For releasing the captive CPU Heatsink fasteners from the Tray , you should use a 3mm T-handle hex driver with a long blade . I use a Bondhus model 15356 . It has a nine inch blade . You can manage a lot of torque with one of these , so that's probably what you need with that stuck fastener .
A small tight beam flashlight will assist in verifying the tip of the driver has locked in place onto the top of the fastener if things have gotten a little worn over the years - you simply point the beam down into the hole while aiming with the driver .
It's very rare to strip one of these fasteners ...
Nope . The MP4,1 and 5,1 CPU HS definitely uses only a 3mm hex . Not a torx fastener .I've been looking for similar problems and seems like apple sometimes put a torx screw in one of them? Anyone else heard of that before
Last edited: Apr 26, 2020
Macsonic
macrumors 68000
Sep 6, 2009
1,672
The Bondhus model 15356 3mm Hex screwdriver is a good choice and I'm also using this screwdriver. The red grip design fits nicely in the hands and the height is just right in relation to the heatsink's height.You're placing a PCB on a carpeted surface ... that's not very wise from an ESD standpoint .
How did you remove the bottom aluminum part of the CPU Tray without removing both CPU heatsinks ? Or did it come from the seller that way ?
For releasing the captive CPU Heatsink fasteners from the Tray , you should use a 3mm T-handle hex driver with a long blade . I use a Bondhus model 15356 . It has a nine inch blade . You can manage a lot of torque with one of these , so that's probably what you need with that stuck fastener .
A small tight beam flashlight will assist in verifying the tip of the driver has locked in place onto the top of the fastener if things have gotten a little worn over the years - you simply point the beam down into the hole while aiming with the driver .
It's very rare to strip one of these fasteners ...
View attachment 909668
[automerge]1587948601[/automerge]
Snow Tiger
macrumors 6502a
Dec 18, 2019
I'm still using this same driver after ten years of heavy use . It has not broken . I have three identical drivers in reserve still factory fresh , never used . The steel in these drivers is unbelievably durable . All my shop hand tools are made in the USA , Germany , Taiwan , Japan , and the Czech Republic .The Bondhus model 15356 3mm Hex screwdriver is a good choice and I'm also using this screwdriver. The red grip design fits nicely in the hands and the height is just right in relation to the heatsink's height.
Macsonic
macrumors 68000
Sep 6, 2009
1,672
You’re probably strict and “quality conscious” with computer tools which is very good practice. I’ve used other 3mm hex screwdrivers, the Bondhus screwdriver seems to be the most durable.I'm still using this same driver after ten years of heavy use . It has not broken . I have three identical drivers in reserve still factory fresh , never used . The steel in these drivers is unbelievably durable . All my shop hand tools are made in the USA , Germany , Taiwan , Japan , and the Czech Republic .
Snow Tiger
macrumors 6502a
Dec 18, 2019
Hmmm ... you must be bored in self quarantine ( you changed your Avatar ) ! Is he based on Link from Zelda ? Wait ... he never wore a mask . He usually had a shield , too . The avatar is handsome ! The colors look "earthy" .You’re probably strict and “quality conscious” with computer tools which is very good practice. I’ve used other 3mm hex screwdrivers, the Bondhus screwdriver seems to be the most durable.
When I took over my dad's manufacturing plant thirty years ago ( 1990 ) , we still had in use USA made tools and equipment from the 1930s , 1940s and 1950s . Now , that's build quality .
Big Delta bench-top drill presses from the 1950's , a compressor from the 1940s with a huge tank , A big electric hand drill made by Sears in the 1960s , hundreds of hand tools decades old . Everything still worked and had that solid look to it .
The greatest prize I still miss when the factory shut down was a complete 1970s Japanese made set of metric and SAE wrenches ( 1/8" to 2" ). It had a proprietary highly mirror polished chrome-molybdenum plating and these were the toughest tools I have ever used . I couldn't even scratch the mirrored surface very much . They were less tools than usable works of art .
I was born and raised in an industrial family and was exposed to this worldview from day one , so its normal for me . Everything just has to last as long as possible . Many of our products had lifetime warranties .
Reactions:
Noiselab
Macsonic
macrumors 68000
Sep 6, 2009
1,672
As far as I know the older tools are built of very good quality and material. Example, the older Mac computers seemed heavier compared to the new ones. Yep, the quarantine lockdown is dragging. I designed the new warrior avatar to keep myself busy. I hope the original poster was able to remove the heatsink and found a fix.Hmmm ... you must be bored in self quarantine ( you changed your Avatar ) ! Is he based on Link from Zelda ? Wait ... he never wore a mask . He usually had a shield , too . The avatar is handsome ! The colors look "earthy" .
When I took over my dad's manufacturing plant thirty years ago ( 1990 ) , we still had in use USA made tools and equipment from the 1930s , 1940s and 1950s . Now , that's build quality .
Big Delta bench-top drill presses from the 1950's , a compressor from the 1940s with a huge tank , A big electric hand drill made by Sears in the 1960s , hundreds of hand tools decades old . Everything still worked and had that solid look to it .
The greatest prize I still miss when the factory shut down was a complete 1970s Japanese made set of metric and SAE wrenches ( 1/8" to 2" ). It had a proprietary highly mirror polished chrome-molybdenum plating and these were the toughest tools I have ever used . I couldn't even scratch the mirrored surface very much . They were less tools than usable works of art .
I was born and raised in an industrial family and was exposed to this worldview from day one , so its normal for me . Everything just has to last as long as possible . Many of our products had lifetime warranties .
flowrider
macrumors 604
Nov 23, 2012
6,967
2,740
^^^^Have you hoisted the NcMP 7,1❓
Lou
Lou
Macsonic
macrumors 68000
Sep 6, 2009
1,672
A couple of months back I was in an Apple Authorized Dealer with a demo 2019 nMac Pro. I tried to lift it out of curiosity. It’s quite heavy. This is an exception as this computer is made of premium quality.^^^^Have you hoisted the NcMP 7,1❓
Lou
Thanks for your help guys, managed to remove it. Turns out the screw was just really worn and damaged, an elastic band and some elbow grease did the job.
Reactions:
tommy chen
Snow Tiger
macrumors 6502a
Dec 18, 2019
Glad to hear this . I would replace the heatsink , though , to avoid another scare in the future . Your cMP should last a long , long time with proper maintenance .Thanks for your help guys, managed to remove it. Turns out the screw was just really worn and damaged, an elastic band and some elbow grease did the job.
flowrider
macrumors 604
Nov 23, 2012
6,967
2,740
^^^^Replacing just that long bolt is probably enough.
Lou
Lou
Snow Tiger
macrumors 6502a
Dec 18, 2019
Knowing Apple , the fastener is probably proprietary and impossible to find on the open market . A mismatch would be a serious mistake .^^^^Replacing just that long bolt is probably enough.
Lou
flowrider
macrumors 604
Nov 23, 2012
6,967
2,740
^^^^Don't think so. As long as it's long enough and you have the proper removal tool, I see no issue.
Lou
Lou
angrymacguy
macrumors newbie
Feb 4, 2022
For anyone coming back to this thread, I had a similar issue. I was able to remove the 3mm stripped hex bolt with a 1/8" hex. 3.5mm was too big but 1/8" works out about 3.2mm and was just able to do the trick.
Recommend
About Joyk
Aggregate valuable and interesting links.
Joyk means Joy of geeK