

Object Detection with an IP camera using Python and CodeProject.AI Server
source link: https://www.codeproject.com/Articles/5344693/Object-Detection-with-an-IP-camera-using-Python-an
Go to the source link to view the article. You can view the picture content, updated content and better typesetting reading experience. If the link is broken, please click the button below to view the snapshot at that time.

Introduction
Many of us use IP cameras for monitoring. There are hundreds cameras available, ranging from the cheap (and not so great) to amazingly full featured and, of course, expensive. I'm cheap so I use Wyze cams. They are $US30, waterproof, and wireless.
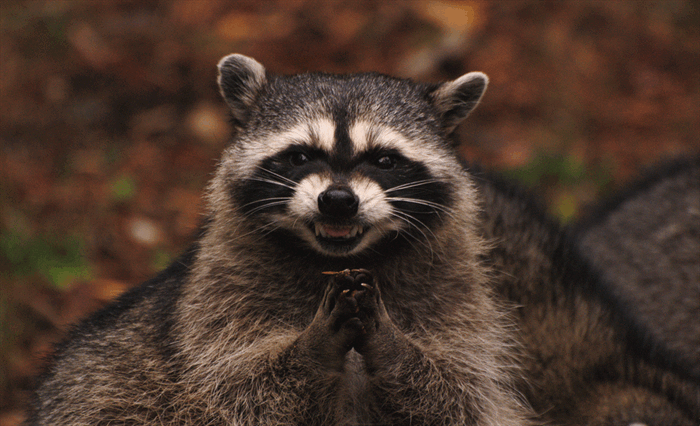
My goal - my need, really - is to have a system that will detect when a racoon is on my balcony so I can rain down fire and brimestone upon the little furry bringer-of-destruction-and-ruin.
I've had a showdown with one of those hunched-back demons. He, staring at me, hissing while backed into a corner; me staring at him, holding a large piece of wood and not knowing exactly what I was going to do with it. We don't have racoons in Australia. I knew this thing was trouble, but I just wasn't sure how much.
The breeze stirred gently. A wasp flew past. And then flew back and landed on the strangely child-like hands of the creature. Oh this will be interesting, I thought. It never blinked. Instead it flicked its whiskered snout down and plucked the wasp off its hand with yellowed teeth and started chewing. All the while never taking his eyes off me. Do you feel lucky, punk? Well do ya?
This article will provide the basics for us to use CodeProject.AI Server for detecting racoons. We'll setup a Wyze cam with beta firmware to expose a RTSP stream, suck in that stream using a small bit of Python, and then send frames from the stream to CodeProject.AI Server to perform object detection. The second part will deal with training a model specifically to detect racoons.
What you do after is left to the brave reader.
Setting up a Wyze cam to provide a RTSP video stream
Wyze does not provide access to the video stream from their cameras out of the box, but they do, kind of, provide beta firmware that enables RTSP (real-time streaming protocol). RTSP is a protocol for streaming media, and the implementation for Wyze cams was initially released as beta, but then removed due to stability issues, then re-released, updated, released for v3, then removed. It's now in an odd limbo state but the firmware can still be downloaded from Wyze using the links below.
To update your camera, download the appropriate firmware and follow the instructions. Just remember to rename the bin file to demo.bin (V2) or demo_wcv3.bin (V3) and place the files in the root directory of your SD card.
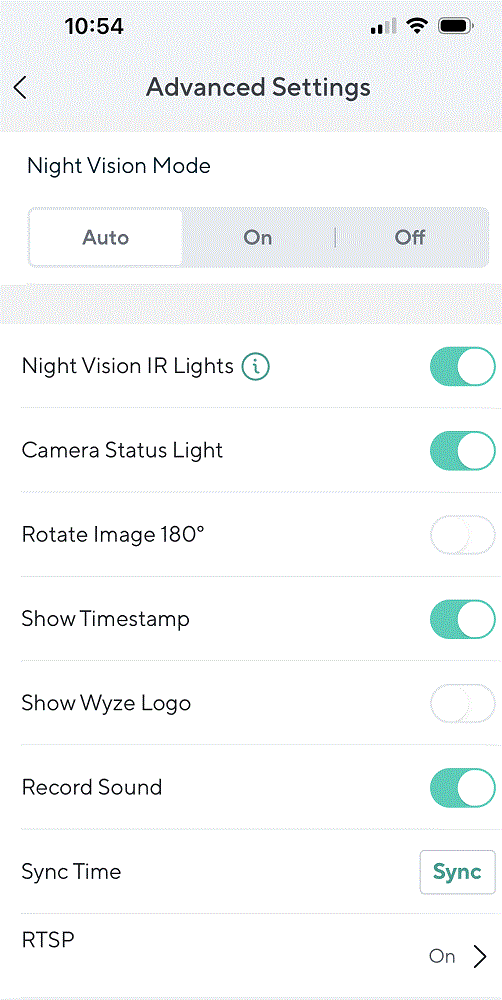
Once you've flashed the updating firmware and rebooted the camera, you will see the RTSP option in your Wyze app. Just select the camera, go to Settings → Advanced Settings and the RTSP setting is at the bottom.
Processing a RTSP video stream using Python
The location of the stream
The location of an RTSP stream is specified using a URL of the form
rtsp://<username>:<password>@<ip address>:<port>/<endpoint>
Select 'RTSP' in the Advanced Settings of your camera settings in the Wyze app and you will be prompted to generate a URL. Choose a username and password and your URL will be displayed similar to
rtsp://user:[email protected]/live
Here I chose 'user' and 'pass' as my ultra-secure credentials. The cam is on IP address 192.160.0.189, and it will use the default port.
Viewing the stream
We use imutils.video to grab the stream and OpenCV to display each frame. It's embarrasingly simple code:
import cv2
import imutils
from imutils.video import VideoStream

rtsp_url = "rtsp://user:[email protected]/live"

def main():

    vs = VideoStream(rtsp_url).start()    # Open the RTSP stream

    while True:

        # Grab a frame at a time
        frame = vs.read()
        if frame is None:
            continue

        # Resize and display the frame on the screen
        frame = imutils.resize(frame, width = 1200)
        cv2.imshow('WyzeCam', frame)

        # Wait for the user to hit 'q' for quit
        key = cv2.waitKey(1) & 0xFF
        if key == ord('q'):
            break

    # Clean up and we're outta here.
    cv2.destroyAllWindows()
    vs.stop()

if __name__ == "__main__":
    main()
Processing the stream
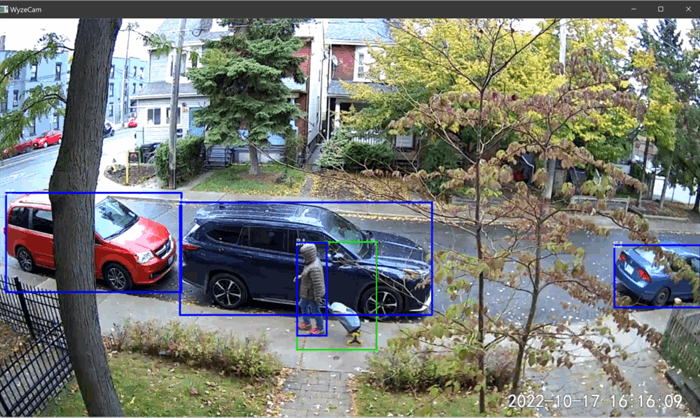
Viewing is one thing, but let's make it do something useful: Add Object Detection.
- Step 1. Install CodeProject.AI Server.
- Step 2. Send each frame from our video to CodeProject.AI Server for processing.
- Step 3. Display the results
First, add a `do_detection` method in the code. This method will take a frame, convert it to a form suitable for sending to CodeProject.AI Server, do the detection, then annotate the frame with labels and bounding boxes for the items detected.
import io
import requests
import numpy as np
from PIL import Image, ImageDraw

def do_detection(image):

    # Convert to format suitable for a POST
    buf = io.BytesIO()
    image.save(buf, format='PNG')
    buf.seek(0)

    # Send the image to CodeProject.AI Server and do some object detection.
    # Better to have a session object created once at the start and closed at
    # the end, but we keep the code simpler here for demo purposes
    with requests.Session() as session:
        response = session.post(opts.endpoint("vision/detection"),
                                files={"image": ('image.png', buf, 'image/png') },
                                data={"min_confidence": 0.5}).json()

    # Get the predictions (but be careful of a null return)
    predictions = response["predictions"]
    if (predictions is None):
        predictions = []

    # Draw each bounding box that was returned by the AI engine
    draw = ImageDraw.Draw(image)
    for object in predictions:
        label = object["label"]
        conf  = object["confidence"]
        y_max = int(object["y_max"])
        y_min = int(object["y_min"])
        x_max = int(object["x_max"])
        x_min = int(object["x_min"])

        draw.rectangle([(x_min, y_min), (x_max, y_max)], outline="red", width=5)
        draw.text((x_min, y_min), f"{label}")
        draw.text((x_min, y_min - 10), f"{round(conf*100.0,0)}")

    # ...and we're done
    return image
Next we'll take each image we retrieve from the RTSP stream, convert it to a format we can POST to the CodeProject.AI Server detection API, then convert the result back to the format we originally received the frame.
Our main becomes:
def main():

   # Open the RTSP stream
   vs = VideoStream(opts.rtsp_url).start()

   while True:

       # Grab a frame at a time
       frame = vs.read()
       if frame is None:
           continue

       # Convert the frame to an image, pass to the detector, then convert back
       # to the original format so we can draw it
       image = Image.fromarray(frame)
       image = do_detection(image)
       frame = np.asarray(image)

       # Resize and display the frame on the screen
       frame = imutils.resize(frame, width = 1200)
       cv2.imshow('WyzeCam', frame)

       # Wait for the user to hit 'q' for quit
       key = cv2.waitKey(1) & 0xFF
       if key == ord('q'):
           break

   # Clean up and we're outta here.
   cv2.destroyAllWindows()
   vs.stop()
And voila.
Conclusion
By taking a stock Wyze cam and updating its firmware we're able to access the RTSP stream for processing. A little Python code to extract the frames from this stream allows us to to send the frames to CodeProject.AI Server for object detection.
The code is included in the CodeProject.AI Server source code (under Demos/Python/ObjectDetect). The entire file is under 100 lines long.
We wrote CodeProject.AI Server to take away the pain of setting up AI systems and projects. We deal with the runtimes, packages and getting all the pieces in place so we can skiip straight to the fun parts like detecting trash pandas.
Please download CodeProject.AI and give it a go. Add your own modules, integrate it with your apps, train some custom models and use it learn a little about Artificial Intelligence.
Recommend
About Joyk
Aggregate valuable and interesting links.
Joyk means Joy of geeK